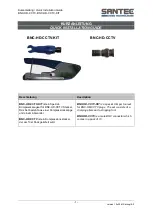
background image

Danfoss


FT1330 Crimp Machine Operator’s Manual

8 | © Danfoss FT1330 Crimp Machine Operator’s Manual | 2023.02. 


AQ439269212774en-000101

Basic Machine Operation & Operating Instructions

With the machine installed as outlined in this manual and with the power cord plugged into a suitable receptacle, switch the toggle switch 
on the front of the cabinet to the “ON” position. The pump will start running.

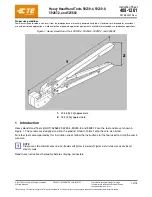
The crimp die cage is pushed into the crimp ring by a hydraulic cylinder. Depressing the footswitch will extend the cylinder moving the 
crimp die cage forward. Pressing the jog reverse button (next to the on/off switch) will move the crimp die cage back to its retracted 
position.

The forward crimp limit is preset and requires no adjustment. If the footswitch is depressed and held until the forward crimp limit is 
reached, the crimp die cage will stop its forward movement and return automatically to the retracted position when the footswitch is 
released. If the footswitch is released before the forward crimp limit is tripped, the crimp die cage will stop and remain in that position. 
Depressing the footswitch again will move the crimp die cage further forward or pressing the jog reverse button will move the crimp die 
cage back toward the retracted position.

You will find that being able to jog the crimp die cage in either direction will be very helpful when positioning the fitting within the crimp 
dies during the crimping cycle or when setting up the fitting locator.

The Danfoss FT1330 crimp machine is especially designed to provide a low cost, quick, easy to use machine to hydraulically crimp 
Aeroquip standard field crimp fittings in hose sizes -4 through -20 and most four spiral hose through -20. Check the PowerSource Crimp 
Spec Tool at danfoss.com/crimp for exceptions. This machine features color coded quick change dies (field crimp fittings) for greater 
operating simplicity.

It is designed to crimp straight and elbow assemblies with standard fittings.

1.  Check oil level. Fill to within one inch of opening with the cylinder fully retracted. Replace reservoir plug with breather cap supplied.

2.  Plug into electrical outlet (dedicated circuit).

3.  Select proper hose and fitting and preassemble (See Hose Preparation).

4.  Insert proper die cage in place. 

CAUTION: MAKE SURE DIES ARE COMPLETELY IN PLACE, FLAT AGAINST PRESSURE PLATE OR 

DAMAGE TO THE DIES OR MACHINE MAY RESULT.

5.  Position assembly against locator and adjust locator. 

6.  Set digital diameter control selector to the proper setting. Reference crimp diameter chart for field crimp and pages 45 - 52 for skive 

type fittings.

7.  Turn switch to “ON” position.

8.  Depress foot switch, cylinder will stop automatically when crimp diameter is reached.

9.  Release foot switch, cylinder will automatically retract.

10.  Remove crimped assembly.

11.  Check the crimp diameter of first crimped assembly of each run (it is best to adjust machine for nominal diameters).

12.  When machine is not in use turn switch to “OFF” position.

Note: 


The crimp diameter can be changed by adding or subtracting numbers on the digital indicator. The ratio is 2 to 1.  


If the setting is .500 and it is changed to .502 the crimp diameter will be reduced by .001.  


If the setting is changed to .498 the crimp diameter will be increased by .001. 

Summary of Contents for FT1330

Page 1: ...Operator s Manual Danfoss FT1330 Crimp Machine...

Page 2: ...4 WIRE SPIRAL THRU 16 EXCEPT FC254 FC273 DIE SIZE DIES FOR NEW FT1330 275 NOS CAGES ARE 3 4 WIDE WITH A CRIMP LENGTH OF 1 600 DIES FOR OBSOLETE FT1330 200 NOS CAGES ARE 9 16 WIDE WITH A CRIMP LENGTH...

Page 3: ...THRU 16 FLAT CRIMP BRAIDED THRU 20 FLAT CRIMP 4 WIRE SPIRAL THRU 16 FLAT CRIMP FC254 AND FC273 WITH PRECRIMP FITTINGS DIE SIZE DIES FOR NEW FT1330 275 NOS CAGES ARE 3 4 WIDE WITH A CRIMP LENGTH OF 1 6...

Page 4: ...ning The Return Stroke 9 Hose Preparation 9 Setting The Encoder 10 Machine Calibration 11 Crimping Hose Styles That Require A Positive Backstop 12 Crimping Barrel Field Crimp Style Hose Assemblies 13...

Page 5: ...are hardened tool steel affording the best combination of strength and wear resistance for long life Hardened dies are generally brittle and care should be taken to avoid any sharp impact Never strik...

Page 6: ...de 29 Deep 16 High Weight 255 lbs Crimp Die One Cage Per Setup Eight dies included in one cage assembly Refer to the PowerSource Crimp Spec Tool at danfoss com crimp for crimp spec details including t...

Page 7: ...are provided in the machine base for this purpose 3 Position the toggle switch on the front of the cabinet in the OFF position 4 Plug the power cord into a standard 115 or 230 volt single phase recept...

Page 8: ...igned to provide a low cost quick easy to use machine to hydraulically crimp Aeroquip standard field crimp fittings in hose sizes 4 through 20 and most four spiral hose through 20 Check the PowerSourc...

Page 9: ...hose to length assemble and crimp Skiving is required for flat factory crimp Refer to the PowerSource Crimp Spec tool for crimp spec information 2 Crimp Machine Setup Determine the correct crimp die...

Page 10: ...we wish to crimp a fitting onto FC211 16 hose Following the steps just described the cylinder stopped when the encoder was set to 300 After crimping the first fitting the socket diameter measured 1 66...

Page 11: ...n the adjusting nut on the transducer rod counterclockwise Note 1 turn 015 in in crimp diameter 7 If the crimp diameter measures under 485 916 loosen the lock nut and turn the adjusting nut on the tra...

Page 12: ...tory Crimp Style Only The locator has a built in spring which allows it to retract as a fitting grows or is elongated during the crimping operation A positive backstop does not allow this movement The...

Page 13: ...semlies Skiving is not required with field crimp fittings The socket is pre crimped to the nipple so the fitting can simply be pushed onto the hose and crimped When crimping field crimp style hose ass...

Page 14: ...his illustration shows the special locator used for flat field crimp location Determine hose size rotate the corresponding locating tab to its fully extended position Place fitting inside cage and pul...

Page 15: ...Factory Flat Crimp This illustration shows the locator being used for flat crimp location To position the fitting loosen the hand knob and slide the locator assembly forward or back until the fitting...

Page 16: ...E INTO THE BORE OF THE HOSE UNTIL THE HOSE BOTTOMS OUT AGAINST THE NIPPLE STEP 2 SKIVE THE HOSE TO PROPER LENGTH USE THE CORRECT SIZE DANFOSS FT1230 HOSE COVER SKIVING TOOL MOUNT THE TOOL IN A VISE PU...

Page 17: ...ING TO THE PRESET DIMENSION ONCE THE FOOTSWITCH IS RELEASED AFTER THE FULL CRIMPING STROKE THE DIES WILL RETURN IF THE FOOTSWITCH IS RELEASED BEFORE THE FULL CRIMP STROKE IS COMPLETED THE DIES WILL ST...

Page 18: ...INSTALLED WITHIN THE THREE ALIGNMENT SLOTS FOR PROPER CRIMP INFORMATION REFER TO THE POWERSOURCE CRIMP SPEC TOOL STEP 2 PREASSEMBLE SELECT THE HOSE AND FITTINGS TO BE USED USING THE BOTTOM EDGE OF TH...

Page 19: ...THE FITTING TO THE PRESET DIMENSION ONCE THE FOOTSWITCH IS RELEASED AFTER THE FULL CRIMPING STROKE THE DIES WILL RETURN IF THE FOOTSWITCH IS RELEASED BEFORE THE FULL CRIMP STROKE IS COMPLETED THE DIES...

Page 20: ...E BORE STEP 3 INSERT PROPER CRIMP DIE CAGE WITH THE PISTON RETRACTED THE CORRECT CRIMP DIE CAGE IS INSTALLED WITHIN THE THREE ALIGNMENT SLOTS FOR PROPER CRIMP DIE NUMBER REFER TO THE POWERSOURCE CRIMP...

Page 21: ...INST THE LOCATOR TABS IF TABS ARE USED STEP 6 CRIMP THE ASSEMBLY TURN THE MACHINE ON AND DEPRESS THE FOOTSWITCH THE DIES WILL AUTOMATICALLY CRIMP THE FITTING TO THE PRESET DIMENSION ONCE THE FOOTSWITC...

Page 22: ...part number T 400 G at the beginning of each production run or as required during production minimum of once per 25 crimps and more often with larger hose 3 All exposed black metal surfaces should be...

Page 23: ...Danfoss FT1330 Crimp Machine Operator s Manual AQ439269212774en 000101 Danfoss FT1330 Crimp Machine Operator s Manual 2023 02 23 FT1330 Crimp Machine Model A...

Page 24: ...Danfoss FT1330 Crimp Machine Operator s Manual 24 Danfoss FT1330 Crimp Machine Operator s Manual 2023 02 AQ439269212774en 000101 FT1330 Crimp Machine Model A...

Page 25: ...Danfoss FT1330 Crimp Machine Operator s Manual AQ439269212774en 000101 Danfoss FT1330 Crimp Machine Operator s Manual 2023 02 25 FT1330 Crimp Machine Model A...

Page 26: ...Danfoss FT1330 Crimp Machine Operator s Manual 26 Danfoss FT1330 Crimp Machine Operator s Manual 2023 02 AQ439269212774en 000101 FT1330 Crimp Machine Model A...

Page 27: ...30 3 16 Pressure Plate 1 19 FT1330 3 17 Push Bar 3 20 FT1330 3 18 Shaft Collar 1 21 FT1330 3 19 Spanner Nut 1 22 FT1330 3 20 Push Plate 1 23 FT1330 2 10 1 4 x 375 Shoulder Bolt 2 24 FT1330 3 21 Transd...

Page 28: ...late 1 57 FT1330 3 41 4 Drive Screw 4 58 FT1092 Never Seeze Lube 1 59 FT1330 2 5 Electronic Subassembly 1 60 FT1330 3 60 Locator Collar 1 61 FT1330 3 61 Spring Plunger RCID XNK1A N 2 62 FT1330 3 62 Al...

Page 29: ...Danfoss FT1330 Crimp Machine Operator s Manual AQ439269212774en 000101 Danfoss FT1330 Crimp Machine Operator s Manual 2023 02 29 FT1330 Crimp Machine Model B...

Page 30: ...Danfoss FT1330 Crimp Machine Operator s Manual 30 Danfoss FT1330 Crimp Machine Operator s Manual 2023 02 AQ439269212774en 000101 FT1330 Crimp Machine Model B...

Page 31: ...Danfoss FT1330 Crimp Machine Operator s Manual AQ439269212774en 000101 Danfoss FT1330 Crimp Machine Operator s Manual 2023 02 31 FT1330 Crimp Machine Model B...

Page 32: ...Danfoss FT1330 Crimp Machine Operator s Manual 32 Danfoss FT1330 Crimp Machine Operator s Manual 2023 02 AQ439269212774en 000101 FT1330 Crimp Machine Model B...

Page 33: ...1 19 FT1330 3 17 Push Bar 3 20 FT1330 3 18 Shaft Collar 1 21 FT1330 3 19 Spanner Nut 1 22 FT1330 3 20 Push Plate 1 23 FT1330 2 10 1 4 x 375 Shoulder Bolt 2 24 FT1330 3 21 Transducer Bracket 1 25 FT133...

Page 34: ...SC2307 Name Plate 1 57 FT1330 3 41 4 Drive Screw 4 58 FT1092 Never Seeze Lube 1 59 FT1330 2 5 Electronic Subassembly 1 60 FT1330 3 60 Locator Collar 1 61 FT1330 3 61 Spring Plunger RCID XNK1A N 2 62 F...

Page 35: ...Danfoss FT1330 Crimp Machine Operator s Manual AQ439269212774en 000101 Danfoss FT1330 Crimp Machine Operator s Manual 2023 02 35 115 Volt Electrical Schematic...

Page 36: ...D 1 FT1330 2 5 1 Manual Motor Starter 1 2 FT1330 2 5 2 Fuse 1 3 FT1330 2 5 3 Transformer 1 4 FT1330 2 5 4 Foot Switch 1 5 FT1330 2 5 5 Push Button Contact Block Legend Plate 1 6 FT1330 2 5 6 Linear Tr...

Page 37: ...Danfoss FT1330 Crimp Machine Operator s Manual AQ439269212774en 000101 Danfoss FT1330 Crimp Machine Operator s Manual 2023 02 37 230V Electrical Schematic...

Page 38: ...FT1330 2 5 1 Manual Motor Starter 1 2 FT1330 2 5 2 Fuse 1 3 FT1330 2 5 3 Transformer 1 4 FT1330 2 5 4 Foot Switch 1 5 FT1330 2 5 5 Push Button Contact Block Legend Plate 1 6 FT1330 2 5 6 Linear Trans...

Page 39: ...Danfoss FT1330 Crimp Machine Operator s Manual AQ439269212774en 000101 Danfoss FT1330 Crimp Machine Operator s Manual 2023 02 39 Cylinder Subassembly Model A...

Page 40: ...1 4 FT1330 2 3 4 Crimp Ring 1 5 FT1330 2 3 5 Crimp Insert 1 6 FT1330 2 3 6 Piston Rod 1 7 FT1330 2 3 7 O Ring 2 8 FT1330 2 3 8 Rod Wiper 1 9 FT1330 2 3 9 O Ring 1 10 FT1330 2 3 10 Backup Ring 1 11 FT1...

Page 41: ...Danfoss FT1330 Crimp Machine Operator s Manual AQ439269212774en 000101 Danfoss FT1330 Crimp Machine Operator s Manual 2023 02 41 Cylinder Subassembly Model B...

Page 42: ...rt TJ TX86HG3384A 1 6 FT1330 2 8 6 Piston Rod TJ TG82UAB072 1 7 FT1330 2 8 7 Hex Nut TJ 5063 18 2 8 FT1330 2 3 8 Rod Wiper TJ 5026 3 1 9 FT1330 2 8 9 Rod Seal TJ 7623 011 1 10 FT1330 2 8 10 O Ring Sea...

Page 43: ...to overhang the outside diameter of the spring plate 6 Install all eight roll pins into the backside of the dies Allow 20 of roll pin to protrude 7 Install all eight crimp dies within the slots of th...

Page 44: ...4en 000101 Assembly Instructions for Global Crimp Die Cage FRONT PLATE SPRING PLATE BACK PLATE INSTALLING THE CRIMP DIE LUBRICATE AREAS WHERE CRIMP DIES CONTACT WITH high efficiency PTFE grease T 400...

Page 45: ...3 02 45 Global Crimp Die Cage DETAIL NUMBER PART NUMBER DESCRIPTION NUMBER REQUIRED 1 FT1330 2 9 9 1 4 20 X 2 5 Screw 1 2 FT1330 2 9 21 Spring 16 3 FT1330 2 9 13 Spring Plate 1 4 FT1330 2 9 14 Front P...

Page 46: ...4en 000101 Assembly Instructions for Factory Crimp Die Cage FRONT PLATE SPRING PLATE BACK PLATE INSTALLING THE CRIMP DIE LUBRICATE AREAS WHERE CRIMP DIES CONTACT WITH high efficiency PTFE grease T 400...

Page 47: ...l 2023 02 47 Crimp Die Cage DETAIL NUMBER PART NUMBER DESCRIPTION NUMBER REQUIRED 1 FT1330 2 9 9 1 4 20 X 2 50 Screw 1 2 FT1330 2 9 2 Spring 8 3 FT1330 2 9 3 Spring Plate 1 4 FT1330 2 9 4 1 1 Front Pl...

Page 48: ...en 000101 Assembly Instructions for Flat Field Crimp Die Cage FRONT PLATE SPRING PLATE BACK PLATE INSTALLING THE CRIMP DIE LUBRICATE AREAS WHERE CRIMP DIES CONTACT WITH high efficiency PTFE grease T 4...

Page 49: ...2 9 8 Back Plate 1 9 FT1330 2 9 9 Button Head Cap Screw 1 11 FT1330 2 9 10 Button Head Cap Screw 1 12 FT1330 2 9 11 Lock Nut 1 13 FT1330 250 0004 Locator Tab 1 14 FT1330 2 9 12 Bumper Grommet 1 DETAIL...

Page 50: ...1 9 FT1330 2 9 9 Button Head Cap Screw 1 11 FT1330 2 9 10 Button Head Cap Screw 1 12 FT1330 2 9 11 Lock Nut 1 13 FT1330 250 0016 Locator Tab 1 14 FT1330 2 9 12 Bumper Grommet 1 DETAIL NUMBER PART NUMB...

Page 51: ...ng 8 3 FT1330 2 9 3 Spring Plate 1 4 FT1330 2 9 4 2 Front Plate 1 5 FT1330 2 9 5 Button Head Cap Screw 3 6 FT1330 2 9 6 Spacer 4 7 FT1330 2 9 7 Nut 1 8 FT1330 2 9 8 Back Plate 1 9 FT1330 2 9 9 Button...

Page 52: ...1 4 FT1330 2 9 4 1 Front Plate 1 5 FT1330 2 9 5 Button Head Cap Screw 3 6 FT1330 2 9 6 Spacer 4 7 FT1330 2 9 7 Nut 1 8 FT1330 2 9 8 Back Plate 1 9 FT1330 2 9 9 Button Head Cap Screw 1 11 FT1330 2 9 10...

Page 53: ...ng 8 3 FT1330 2 9 3 Spring Plate 1 4 FT1330 2 9 4 4 Front Plate 1 5 FT1330 2 9 5 Button Head Cap Screw 3 6 FT1330 2 9 6 Spacer 4 7 FT1330 2 9 7 Nut 1 8 FT1330 2 9 8 Back Plate 1 9 FT1330 2 9 9 Button...

Page 54: ...d 18 and 17 open With switch depressed 5 and 18 should show an open and 18 and 17 a short 4 If 3 is okay with power removed jumper wire 21 to wire 1 23 to 1 if 230V machine Plug machine in and turn ma...

Page 55: ...rimp the problem assembly Upon stall record pressure If not 4500 psi remove hex cap on back of crimper at the center of the power unit Adjust pressure C W increases pressure C C W decreases 3 If no su...

Page 56: ...ss hoses fittings and tooling provide the ultimate fluid conveyance solutions for a variety of equipment and applications around the world We proudly engineer to support a sustainable future for tomor...

Reviews: