background image

11

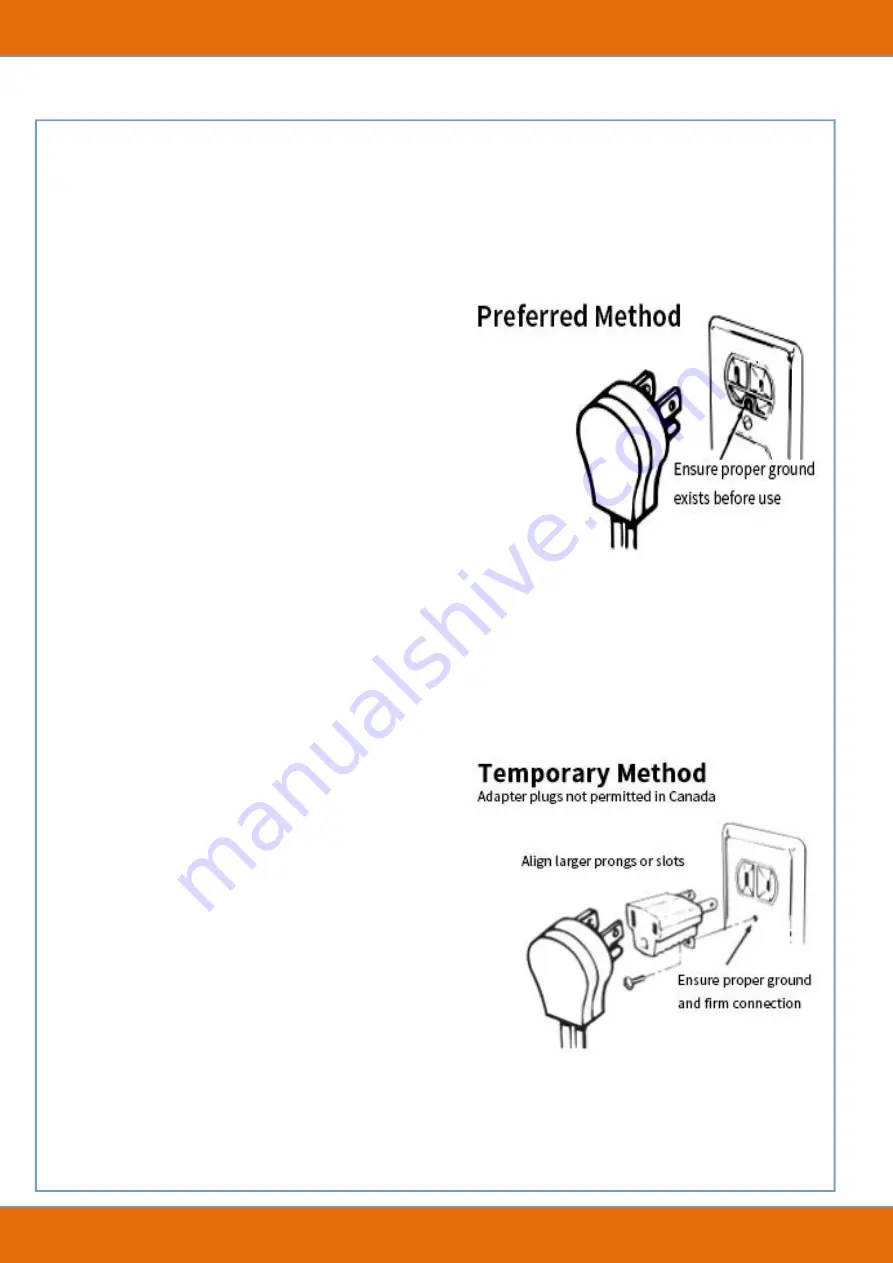
For personal safety, this equipment must be properly grounded, please read the

following carefully.

Do not cut or remove the third (ground) prong from this power cord under any

circumstances. Temporary Method :Adapter plugs not permitted Canada

The power cord for this equipment is

equipped with a three-prong grounded plug

for use with a standard three-prong

grounded wall outlet to minimize the

potential for electric shock hazard.

If you encounter a standard two-prong wall

outlet, please contact us or replace it with a

properly grounded three-prong wall outlet.

CAUTION

: Attaching the adapter ground

terminal to the wall receptacle cover screw

does not ground the appliance unless the

cover screw is metal but not insulated and

the wall receptacle is grounded through the

house wiring. You should ask a qualified

electrician check circuit to make sure the

receptacle is properly grounded.

Summary of Contents for GHS705IV-PCI

Page 1: ...1 Dalxo Gas Cooktop Model GHS705IV PCI User Manual Please read the instruction carefully before usage If you have any problems please do not hesitate to contact our service team support dalxo com...

Page 2: ...Table of Contents Introduction 1 Important Safety Tips 2 Machine Diagram Parts List 4 Installation Gas Cooktop 5 Using the Gas Cooktop 12 Cleaning Maintenance 14 Troubleshooting 16 Warranty 17...

Page 3: ...the blue flame to your need Moreover the flame out failure device system ensures your safety at any time Easy to install and convert from NG to LPG by providing the kit Perfect for your indoor or outd...

Page 4: ...r death Do not store or use gasoline flammable vapors and liquids near this device What to do if you smell gas Do not attempt to ignite any electrical appliances Do not touch any electrical switches D...

Page 5: ...Disconnect the power before maintaining the cooktop Improper use of the cooktop may cause injury such as stepping on tilting or sitting on the countertop Maintenance Keep the cooktop area clean and aw...

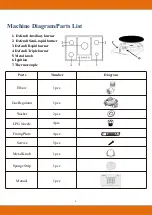
Page 6: ...as Regulator 1pcs Washer 2pcs LPG Nozzle 4pcs Fixing Plate 4pcs Screws 5pcs Metal Knob 1pcs Sponge Strip 1pcs Manual 1pcs 1 Defendi Auxiliary burner 2 Defendi Semi rapid burner 3 Defendi Rapid burner...

Page 7: ...evice If there are appliances under the unit it is necessary to install a thermal baffle between them The top of the cooktop must be at least 4 102 mm away from the side walls the cooktop must be inst...

Page 8: ...itchen furniture are particularly prone to heat damage or discoloration at temperatures below 185 85 Discharging Products of Combustion There should be a range hood or exhaust fan directly connected t...

Page 9: ...the cooktop in the recess and secure the 4 corners with the brackets for a worktop thickness of 1 18 1 57 3 4 cm as shown in Figure 6 Built in Gas Cooktop Dimension Cut Out 30 L 20 1W 3 54 H 26 97 Wx...

Page 10: ...een 5 3 water column But LPG is between 10 and 13 Inlet pressure must be at least 1 greater than the above operating pressure when checking for proper operation of the regulator Flexible metal fitting...

Page 11: ...NG nozzles on the gas stove B Adjust the Level of the Burner Flame When switching from one gas to another the min flow rate must be adjusted so that the flame does not go out The adjustment steps are...

Page 12: ...de make sure all cooktop controls are in the off position and turn on the main gas supply valve Use a liquid leak detector at all joints and connections to check for leaks in the system WARNING Do not...

Page 13: ...d three prong grounded wall outlet to minimize the potential for electric shock hazard If you encounter a standard two prong wall outlet please contact us or replace it with a properly grounded three...

Page 14: ...s based on the diameter of the burner Avoid flames sticking out of the bottom of the pan Refer the table below Put a smaller diameter pot or pan on a larger burner does not mean that boiling condition...

Page 15: ...etal knobs to OFF positions and also close the shut off valve placed on the main gas supply line Light the Burner Any film or stickers on the cooktop surface should be removed before use All operation...

Page 16: ...igh calcium water or aggressive cleaning agents containing phosphorus It is recommended to wash these parts with water and dry them thoroughly Properly Replace the Burner All burner covers and bases s...

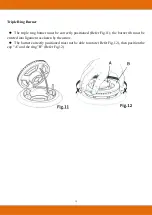
Page 17: ...urner must be correctly positioned Refer Fig 11 the burner rib must be entered into ligament as shown by the arrow The burner correctly positioned must not be able to rotate Refer Fig 12 then position...

Page 18: ...ly No airflow around the cooking surface The flame does not stay lighted on the model with the safety device Press the knob all the way Long press the knob to activate the safety device The gas holes...

Page 19: ...d will start from the date of ownership This warranty does not cover and excludes damage or defects caused by Consumer misuse Abuse Neglect includes not cleaning and regular maintenance as described i...

Page 20: ...warranty gives you specific legal rights You may have other legal rights that vary depending on where you live Some states do not allow limitations on implied warranties or special incidental or cons...

Reviews: