background image

Dakota Micro, Inc.


DMAC

-

1DVR


User


Manual


Rev:


10/27/15


Page


5


of


20


Author:


CNR


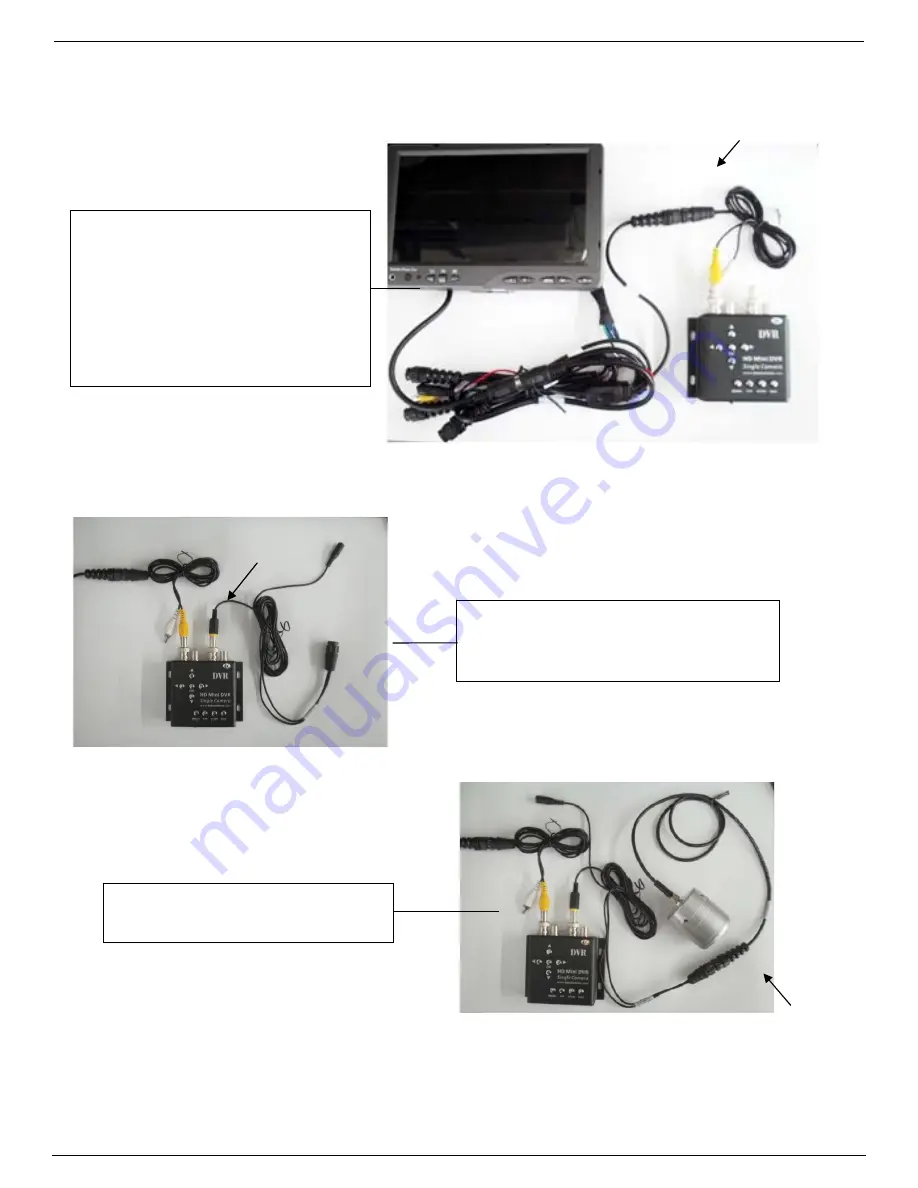
STEP


4


*If


using


Dakota


Micro


equipment


insert


DMAC

AV


adaptor


into


camera


connector


on


the


monitor


wire


harness.


*If


not


using


DM


equipment,


use


RCA


cables.


STEP


5


Insert


the


yellow


connector


of


the


DMAC

TVA


adaptor


to


your


DVR


yellow


video


In


port.

STEP


6


Connect


the


Dakota


Micro


camera


to


the


DMAC

TVA


adaptor.


Summary of Contents for DMAC-1DVR

Page 1: ...e Dakota Micro Inc website for installation training videos at www dakotamicro com Table of Contents I Included DVR Kit Components 2 II Standard Features 2 III DVR Operation 3 IV DVR Installation 4 7...

Page 2: ...Adaptor PN DMAC AV F Dakota Micro Single Channel DVR IMPORTANT NOTE Each DVR kit may only record from one camera Wall Plug Power Adaptor PN DMAC PA Thank you for purchasing the AgCam The AgCam is a du...

Page 3: ...Author CNR III DVR OPERATION 1 2 3 4 5 6 7 8 9 1 DC Power Plug 2 On Off Switch 3 SD Card Slot 4 Red Power Indicator Light 5 Green Record Indicator Light 6 Audio Input Not used 7 Video Input Plug TVA i...

Page 4: ...Rev 10 27 15 Page 4 of 20 Author CNR IV DVR INSTALLATION STEP 1 Insert SD Card with label down until it clicks STEP 2 Attach RCA to BNC connectors into the video ports STEP 3 Insert yellow connector...

Page 5: ...Dakota Micro equipment insert DMAC AV adaptor into camera connector on the monitor wire harness If not using DM equipment use RCA cables STEP 5 Insert the yellow connector of the DMAC TVA adaptor to y...

Page 6: ...r Manual Rev 10 27 15 Page 6 of 20 Author CNR OR STEP 7 Connect the provided power adaptor to the DMAC TVA power cord STEP 8 Decide which power adaptor to use either 12v or wall adaptor Then plug into...

Page 7: ...monitor and camera Use only the provided power supply or damage could occur V SET UP A Main Menu Press Menu on the top of DVR to enter the Setup screen Use the Up and Down arrows to navigate to the I...

Page 8: ...ty tab then press OK Use the Up and Down arrows to navigate High Medium Low then press OK NOTE The higher the quality the more memory used Use the Up and Down arrows to navigate to the Frame Rate tab...

Page 9: ...VGA is better than QVGA Then press OK Press ESC to get back to the Setup Main Menu C Record Settings Use the Up and Down arrows to navigate to REC Settings Then press OK Here you choose Scheduled Tim...

Page 10: ...press OK NOTE Only set time if you want it to REC at that time If you want to use Manual or Motion do not set schedule Use the Up and Down arrows to navigate to the Overwrite tab Then press OK Use th...

Page 11: ...re a new file is automatically created Use the Up and Down arrows to navigate to the Motion Detection Then press OK Use the Up and Down arrows to navigate to Mask Area tab then press OK Use the Up and...

Page 12: ...e High Medium Low sensitivity Then press OK NOTE Setting may vary depending on application Use the Up and Down arrows to navigate to the Speed tab then press OK Use the Up and Down arrows to navigate...

Page 13: ...our preset time Use the Up and Down arrows to navigate Motion detection recording Trigger to record by the motion detect When using motion detection the system will record for 2 minutes after first mo...

Page 14: ...file you would like to play back Then press OK Press P P to play file Press P P again to pause the file or press STOP to stop the file Then press ESC Use the Up and Down arrows to navigate to file yo...

Page 15: ...Use the Up and Down arrows to navigate to the System Settings Then press OK Use the Up and Down arrows to navigate to the Language tab Then press OK Use the Up and Down arrows to navigate to Language...

Page 16: ...the Up and Down arrows to navigate to the Format tab Then press OK Use the Up and Down arrows to navigate Yes or No Then press OK NOTE By selecting Yes you will delete all files on memory card Use th...

Page 17: ...se the Up and Down arrows to navigate to the EXIT tab Then press OK Now you are ready to both start recording and to view your recordings Depending what you have selected in the REC Mode tab use the f...

Page 18: ...ameters We always request that customers keep in mind that our less expensive OverView product line is cheaper because it does not feature the reliability and durability of our AgCam and EnduraCam lin...

Page 19: ...ed information RA Number provided by Dakota Micro Technical Support Shipping and associated costs to ship product to DM factory to be borne by the customer unless otherwise specified 5 Customer should...

Page 20: ...In order to enforce the rights under this limited warranty the purchaser should follow the steps set forth in the complete Dakota Micro Warranty Repair Policy listed on page 11 section XVI and provide...

Reviews: