
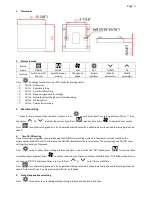


Page 4
5)
Sleep: Press
five times, sleep icon blinks then press
to set sleep mode.
Press
to confirm settings and exit. If no operation within 6 seconds, it will automatically exit and the setting will not
be saved.
13.
Global control setting
Press
five times to set global control and “NETWORK” icon blinks.
1)
Press
, timer on/off icon blinks and all slave units’ timer on/off function setting are cancelled.
2)
Press
, all slave units time are set to the same as master units.
Press
, master unit sends commands to all online slave units. “NETWORK” icon is off. If timer on/off function is set on
mater unit, “NETWORK” icon blinks until Timer on/off disappears.
14.
Parameter checking
Press
six times to enter parameter checking interface. Local unit parameter is shown in temperature display area. Unit
number is shown in real time hour area and parameter number is shown in real time minute area. For example, 2:03 stands
for No.2 unit and No.3 parameter. Press
and
to select the specific parameter. Press
and
to select
unit number. Press
to exit parameter checking interface.
Parameters shown below:
Temp. area
Time area
C0
Return air temperature
C1
Indoor coil 1 temperature
C2
Unit address
C3
Indoor coil 2 temperature
15.
Error codes
When unit error is detected, unit number blinks on real time hour area and Error code blinks on real time minute area. The
Error codes display alternately if more than one error is detected.
If there is no slave unit online, only error code is shown in real time minute area.
Error code table:
Error reason
Error code
Electric heater faulty
E1
Indoor coil sensor 2 faulty
E2
Return air sensor faulty
E3
Indoor coil sensor 1 faulty
E4
Indoor coil low temperature protection
E5
Indoor coil over heat protection
E6
Water pump faulty
E7
Local communication error
E8
EC motor failure
E9
16.
EC motor RPM setting (Not available in AC motor unit)
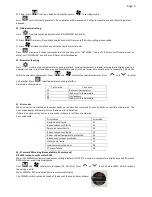
DIP SW3 is used to set EC motor RPM.
When DIP SW3=ON, wired wall pad enters setting interface. D1/D2/D3 is shown in temperature display area and EC motor
RPM is shown in real time display area.
Press
and
to select motor speed (D1, D2 or D3). Press
or
to set EC motor RPM. After 3 seconds,
the setting is valid.
When DIP SW3=OFF, wired wall pad resumes normal display.
The DIP SW3 switch set can be found at the back of the controller as shown:


