


• Outdoor Units • HEAT PUMP • RWEYQ-MY1
1
10
• VRV Systems • Outdoor Units
102
10
Installation of outdoor units
10 - 9 Refrigerant piping
10 - 9 - 2
Protection against contamination when installing pipes
•
Take measures to prevent foreign materials like moisture and contamination from mixing into the system.
•
Great caution is needed when passing copper tubes through walls.
10 - 9 - 3
Pipe connection
•
Only use the flare nuts included with the unit.
Using different flare nuts may cause the refrigerant to leak.
•
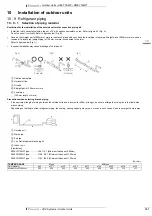
Be sure to perform a nitrogen blow when brazing.
(Brazing without performing nitrogen replacement or releasing nitrogen into the piping will create large quantities of oxidized film on the inside of
the pipes, adversely affecting valves and compressors in the refrigerating system and preventing normal operation.)
C
AUTION
Do not use anti-oxidants when brazing the pipe joints. Residue can clog pipes and break equipment.
N
OTES
1
For nitrogen replacement method, see the “Installation Manual” (contact your dealer).
2
The pressure regulator for the nitrogen released when doing the brazing should be set to 0.02 MPa(0.2kg/cm2) or less.
햲
Refrigerant pipe
햳
Location to be brazed
햴
Nitrogen
햵
Taping
햶
Manual valve
햷
Regulator
Precautions when connecting pipes
•
See the following table for flare part machining dimensions.
•
When connecting the flare nuts, apply refrigerant oil to the inside and outside of the flares and screw them in by hand three or four times at first.
(Use ester oil or ether oil.)
•
See the following table for tightening torque.
(Applying too much torque may cause the flares to crack.)
•
After all the piping has been connected, check the gas leak with nitrogen.
Not recommendable but in case of emergency
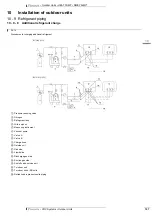
You must use a torque wrench but if you are obliged to install the unit without a torque wrench, you may follow the installation method mentioned below.
After the work is finished, make sure to check that there is no gas leak.
When you keep on tightening the flare nut with a spanner, there is a point where the tightening torque suddenly increases. From that position, further
tighten the flare nut the angle shown below:
Place
Installation period
Protection method
Outdoor
More than a month
Pinch the pipe
Less than a month
Pinch or tape the pipe
Indoor
Regardless of the period
Pipe size
Tightening torque (N·m)
A (mm)
Flare shape
ø9.5
32.7 - 39.9
12.8 - 13.2
ø12.7
49.5 - 60.3
16.2 - 16.6
ø15.9
61.8 - 75.4
19.3 - 19.7
Pipe size
Further tightening angle
Recommended arm length of tool
ø9.5
60 to 90 degrees
Approx. 200 mm
ø12.7
30 to 60 degrees
Approx. 250 mm
ø15.9
30 to 60 degrees
Approx. 300 mm
R=0.4~0.8
45 ±2
90 ±2
A


