


5 Configuration
Installation manual
11
EWAQ+005BAVP
Packaged air-cooled water chillers and packaged air to water heat
pumps
4P469106-1 – 2017.01
4C From the top
a
b
PCB
b
1×
4D From the top centre
a
PCB
b
b
1×
a
Notch this part for the wiring to pass through with nippers
etc.
b
Secure the wiring to the front part of the casing using the
wiring retainer and clamp.
4.4.4
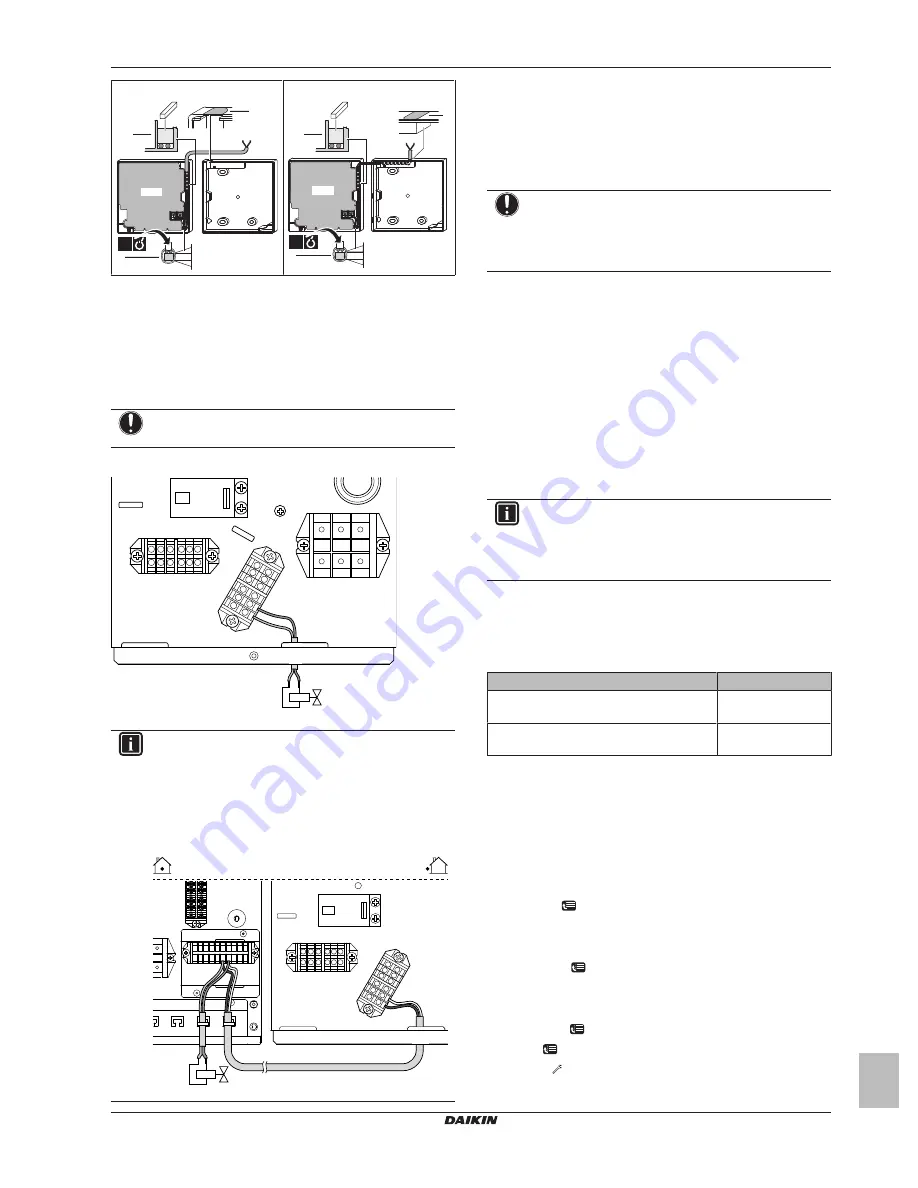
To connect the shut-off valve
1
Connect the valve control cable to the appropriate terminals as
shown in the illustration below.
NOTICE
Only connect NO (normal open) valves.
NO
X5M
X4M
X3M
M2S
2
1
INFORMATION
By default, the shut‑off valve is to be connected to the
outdoor unit. However, if control box EKCB07CAV3 is
present in the system, you can also connect it to the
control box. To do this, connect outdoor unit terminals
X3M/1+2 to control box terminals X8M/6+7, and then
connect the shut‑off valve to control box terminals
X8M/6+7.
X2M
X8M
6 7
X5M
X3M
M2S
1
2
5
Configuration
5.1
Overview: Configuration
This chapter describes what you have to do and know to configure
the system after it is installed.
NOTICE
The explanation about the configuration in this chapter
gives you ONLY basic explanations. For more detailed
explanation and background information, see the installer
reference guide.
Why
If you do NOT configure the system correctly, it might NOT work as
expected. The configuration influences the following:
▪ The calculations of the software
▪ What you can see on and do with the user interface
How
You can configure the system via the user interface.
▪
First time – Quick wizard.
When you turn ON the user interface
for the first time (via the indoor unit), a quick wizard starts to help
you configure the system.
▪
Afterwards.
If necessary, you can make changes to the
configuration afterwards.
INFORMATION
When the installer settings are changed, the user interface
will request to confirm. When confirmed, the screen will
shortly turn OFF and "busy" will be displayed for several
seconds.
Accessing settings – Legend for tables
You can access the installer settings using two different methods.
However, NOT all settings are accessible via both methods. If so,
the corresponding table columns in this chapter are set to N/A (not
applicable).
Method
Column in tables
Accessing settings via the breadcrumb in the
menu structure
.
#
Accessing settings via the code in the
overview settings
.
Code
See also:
▪
"To access the installer settings" on page 11
▪
"5.3 Menu structure: Overview installer settings" on page 15
5.1.1
To access the most used commands
To access the installer settings
1
Set the user permission level to Installer.
2
Go to [A]:
> Installer settings.
To access the overview settings
1
Set the user permission level to Installer.
2
Go to [A.8]:
> Installer settings > Overview settings.
To set the user permission level to Installer
1
Set the user permission level to Adv. end user.
2
Go to [6.4]:
> Information > User permission level.
3
Press
for more than 4 seconds.
Result:
is displayed on the home pages.
Summary of Contents for EWAQ004BAVP
Page 23: ......


