background image

16

Troubleshooting

Restoring factory settings

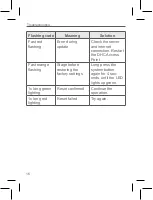
Flashing code

Meaning

Solution

Fast red 

flashing

Error during 

update

Check the server 

and internet 

connection. Restart 

the DHC Access 

Point.

Fast orange 

flashing

Stage before 

restoring the

factory settings

Long press the 

system button 

again for 4 sec-

onds, until the LED 

lights up green.

1x long green 

lighting

Reset confirmed

Continue the 

operation.

1x long red 

lighting

Reset failed

Try again.

Restoring factory settings

The factory settings of your DHC Access Point as well as of 

your entire installation can be restored. 

• 

Resetting the DHC Access Point:

 Only the fac-

tory settings of the DHC Access Point will be re-

stored. The entire installation will not be deleted. 

• 

Resetting and deleting the entire installation:


The entire installation is removed. The factory set-

tings of your individual DHC accessories have to 

be restored so they can be connected again. For 

further information on how to do so, see the manu-

al of the respective DHC accessory. 

7.1 

Resetting the DHC Access Point

To restore the factory settings of the DHC Access Point,  

proceed as follows:

1.  Disconnect the DHC Access Point from the power 

supply by unplugging the mains adapter.

2.  Press the system button and plug in the mains ad-

apter again at the same time, until the LED starts 

flashing orange.

3.  Release the system button.

4.  Press the system button again, until the LED lights 

up green. If the LED lights up red,  try again.

5. 

Release the system button to finish the procedure.


» The accessory will perform a restart and the DHC 

Access Point is being reset.

Summary of Contents for EKRACPUR1PA

Page 1: ...Installer and user reference guide Daikin Home Controls Access Point EKRACPUR1PA...

Page 2: ...t the written consent of the publisher Typographical and printing errors cannot be excluded However the information contained in this manual is reviewed on a regular basis and any necessary correction...

Page 3: ...Setting up the DHC Access Point 11 5 3 Connecting further DHC accessories 12 5 4 Operation and configuration 13 6 Troubleshooting 13 6 1 Duty cycle 13 6 2 Error codes and flashing sequences 15 7 Rest...

Page 4: ...e accessory to other persons for use hand over this manual as well Symbols used Attention This indicates a hazard Please note This section contains important additional informa tion 2 Hazard informati...

Page 5: ...an error have the accessory checked by an expert For safety and licensing reasons CE unautho rized change and or modification of the accessory is not permitted The accessory may only be operated indo...

Page 6: ...ople and domestic animals The accessory may only be operated within resi dential buildings Using the accessory for any purpose other than that described in this operating manual does not fall within t...

Page 7: ...h a dedicated wireless connection All accessories of the system can be configured comfort ably and individually via the ONECTA app The available functions provided by the DHC ecosystem in combina tion...

Page 8: ...smartphone via the ONECTA cloud with all DHC accessories It transmits con figuration and operating commands from the app to the DHC accessories You can simply adjust your DHC eco system to your person...

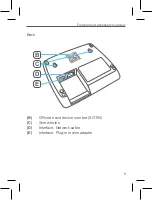
Page 9: ...9 Function and accessory overview ew via the ts con to the C eco e Back B D C E B QR code and device number SGTIN C Screw holes D Interface Network cable E Interface Plug in mains adapter...

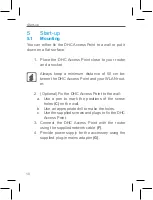
Page 10: ...DHC Access Point and your WLAN rout er 2 Optional Fix the DHC Access Point to the wall a Use a pen to mark the positions of the screw holes C on the wall b Use an appropriate drill to make the holes...

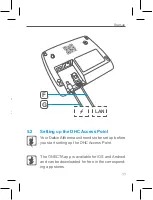
Page 11: ...outer ing the LAN F G 5 2 Setting up the DHC Access Point Your Daikin Altherma unit needs to be set up before you start setting up the DHC Access Point The ONECTA app is available for iOS and Android...

Page 12: ...her DHC accessories As soon as your DHC Access Point and the ONECTA app are ready for use you can connect additional DHC acces sories and allocate them to different rooms 1 Open the ONECTA app 2 Click...

Page 13: ...6 Troubleshooting 6 1 Duty cycle The wireless DHC accessories operate in the following fre quency bands 868 000 868 600 MHz 869 400 869 650 MHz In order to safeguard operation of all devices working...

Page 14: ...and 10 During normal operation of the DHC accessories this limit is not usually reached However it is possible that the limit is reached during start up or during a fresh installation of a system In...

Page 15: ...r is being established Wait until the con nection is estab lished and the LED lights permanently blue Permanent blue lighting Normal operation connection to server is estab lished Continue the operati...

Page 16: ...Restart the DHC Access Point Fast orange flashing Stage before restoring the factory settings Long press the system button again for 4 sec onds until the LED lights up green 1x long green lighting Re...

Page 17: ...ored so they can be connected again For further information on how to do so see the manu al of the respective DHC accessory 7 1 Resetting the DHC Access Point To restore the factory settings of the DH...

Page 18: ...1 Reset the DHC Access Point as previously de scribed 2 Wait at least 10 seconds until the LED permanently lights up blue 3 Immediately afterwards perform the reset for the second time by disconnecti...

Page 19: ...pp 8 Maintenance and cleaning The accessory does not require you to carry out any maintenance Enlist the help of an expert to carry out any repairs Clean the accessory using a soft lint free cloth tha...

Page 20: ...n air Be sides the transmitting power and the reception characteristics of the receiver environmental fac tors such as humidity in the vicinity have an import ant role to play as do on site structural...

Page 21: ...in mains adapter 2 5 W max Supply voltage 5 VDC Current consumption 500 mA max Standby power consumption 1 1 W Degree of protection IP20 Ambient temperature 5 to 35 C Dimensions W x H x D 118 x 104 x...

Page 22: ...of at local collection points for waste electronic equip ment in compliance with the Waste Electrical and Electronic Equipment Directive Information about conformity The CE sign is a free trading sign...

Page 23: ...omestic osed of equip cal and d exclu de any st deal...

Page 24: ...Free download of the ONECTA app 4P687361 1 2022 04...

Reviews: