background image


83


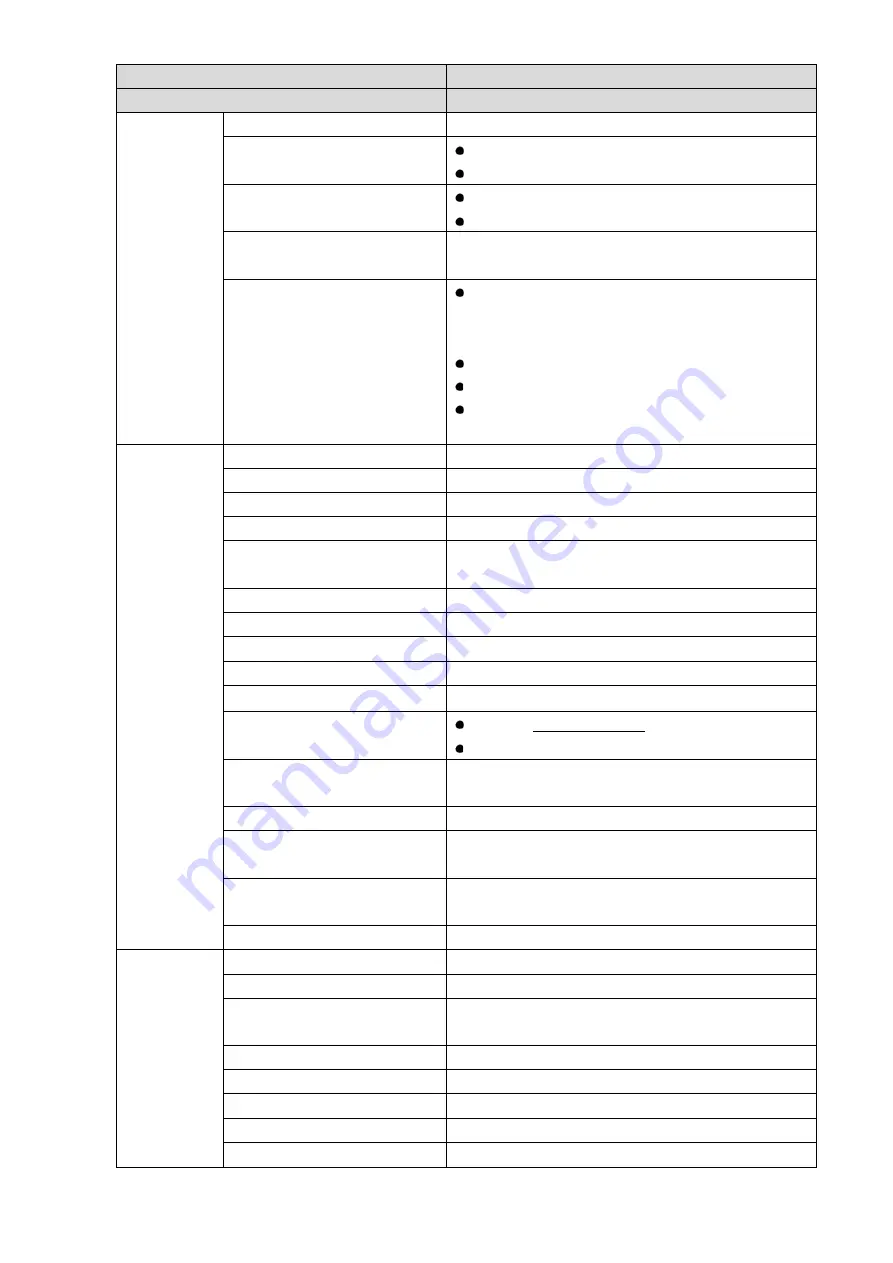
Parameter Item 

Parameter Value 

Model 

Navigator X1100 

Angle control accuracy 

±0.01° 

Max. controllable rotation 

speed 


Course: ±130°/s 


Pitch: ±130°/s 

Controllable rotation range 


Course: ±168° 


Pitch: -90° to +45° 

Installation mechanical 

feature 

Quick mount and demount 

Built-in function 


Two working modes: 


Course follow mode 


Attitude lock mode 


Built-in independent IMU module 


X1100 exclusive servo drive module 


Ethernet video transmission and camera PTZ 

control 

Visible Light 

Camera (2 

MP, 

30X 

optical 

zoom) 

Sensor 

1/1.8” 3Mp CMOS 

Max resolution 

1920

H

×1080

V


View angle 

67.8°

2.77° 

WDR 

≥100

dB 

Video compression 

standard 

H.264/H.265/MJPEG 

Frame rate 

30fps@5M/3M

60fps@1080p 

Iris 

F1.6

F4.4 

Focal length 

4.5mm

135mm (30x optical zoom) 

Digital NR 

3D 

SNR 

≥55

dB (AGC Off, Weight ON) 

Min illuminance 


Color: [email protected] 


Black and white: [email protected] 

Backlight compensation 

mode 

BLC/HLC 

Day/night switch 

Auto/Manual 

WB 

Auto/Manual/Tracking/Outdoors/Indoors/Outdoors 

Auto/Sodium Lamp Auto/Sodium Lamp 

Electronic shutter 

Support auto electronic shutter (1/3

1/30,000s), 

manual electronic shutter (1/3

1/30,000s). 

Storage 

128GB Micro SD 

Thermal 

camera 

(temperature 

measuring 

type) 

Detector type 

Uncooled vanadium oxide focal plane detector 

Detector pixel 

640×512 

Video coding 

H.264M/H.264H/M-JPEG, support 720P image 

output 

Pixel size 

17μ

Spectral range 

7.5μ

m

13.5μ

Thermal sensitivity 

≤40

mK 

Lens focal length 

19mm 

Distance (human: 

640m, 160m, 80m   

Summary of Contents for NAVIGATOR X1100

Page 1: ...NAVIGATOR X1100 User s Manual V1 0 0 ZHEJIANG DAHUA VISION TECHNOLOGY CO LTD...

Page 2: ...de reverse engineering rent transfer or sublicense the software Trademark and are the trademarks or registered trademarks of Dahua and its branch companies in various jurisdictions Other trademarks or...

Page 3: ...gging before first use If it is not the first time to use the device you can select the installation content according to the dismounting situation last time However confirm that all the components un...

Page 4: ...ndix 1 It is to introduce the technical parameters 8 Appendix 2 It is to introduce the indicator definition of the aircraft 9 Appendix 3 It is to introduce the matching method among the components 10...

Page 5: ...l information which is the emphasis and supplement of the main body Document Material The product includes the following document materials Please search according to your requirements Quick Start Gui...

Page 6: ...Please do not dismantle other components privately Please do not touch the lens of PTZ camera directly Use hair drier to remove the dust or dirt from the lens surface Please operate the device by stri...

Page 7: ...pply is correct Please use power supply that meets SELV safety extra low voltage requirements and supply power with rated voltage that conforms to Limited Power Source in IEC60950 1 For specific power...

Page 8: ...ery is 300 in normal application situation During charging of power battery charging is completed when the charger displays FULL and beeps continuously Don t take down batteries before charging is com...

Page 9: ...r announcement The user shall undertake any losses resulting from violation of guidance in the document The document may include technically inaccurate contents inconsistencies with product functions...

Page 10: ...2 3 4 Operation Interface 18 3 Flight Preparation 27 3 1 Unpack 27 3 2 Check Remaining Power 27 3 2 1 Aircraft 28 3 2 2 Remote Control 29 3 3 Charging 30 3 3 1 Aircraft Battery Charging 30 3 3 2 Remo...

Page 11: ...4 4 1 Low Battery 62 4 4 2 Out of Control 62 4 5 Remote Control Setting 62 4 5 1 Remote Button User defined 62 4 5 2 Flight Control Settings 63 4 5 3 Preview Settings 66 4 5 4 Camera Settings 67 4 5 5...

Page 12: ...XI Appendix 4 4 FAQ and Solutions of Charger 89...

Page 13: ...raft adopts integrated design and neat appearance Only the propeller shall be dismantled and installed The remote control integrates the remote control and touch screen together It is easy to operate...

Page 14: ...ining electric quantity Battery has built in power indicator light Balanced charging protection function Automatically balance the battery cell voltage to protect battery Overcharge protection functio...

Page 15: ...3 Support customized e fence settings...

Page 16: ...dimensions listed here for reference only The figure and the dimensions may be slightly different from the user data due to measurement position measurement accuracy and position indication Please ref...

Page 17: ...5 Figure 2 2...

Page 18: ...structures Please install propellers according to the actual situation 2 Arm Fold and unfold 3 Protective cover of propeller Fix the horizontally unfolded arm 4 Battery buckle Dismantle and install th...

Page 19: ...ation performance 11 Landing gear Control the landing gear to open or fold with remote control buttons 12 Aircraft state indicator There are two modes normally on and flashing It displays five colors...

Page 20: ...8 2 2 1 The 2 MP Visible Light PTZ Camera Unit is mm Figure 2 4...

Page 21: ...9 Figure 2 5...

Page 22: ...clearer video 2 Shock absorber board 3 Installation screw Secure the PTZ camera on the aircraft 4 Course motor Control horizontal direction of the camera 5 Course rotation arm 6 Roll motor Control ho...

Page 23: ...11 2 3 Remote Control 2 3 1 Dimensions Unit is mm Figure 2 7...

Page 24: ...12 Figure 2 8 2 3 2 Structural Component Front panel side panel and rear panel of the remote control are shown in Figure 2 9 Figure 2 10 and Figure 2 11...

Page 25: ...e 4 Touch screen Set parameters and preview the video 5 Landing gear button Control the landing gear 6 Battery indicator Each bar represents 25 battery power 7 Charging indicator Indicator light is on...

Page 26: ...ghts automatically according to the specified course Middle level flight at the specified height When the throttle lever is at the central mode the aircraft flights at the same height automatically Lo...

Page 27: ...le changes with aircraft flight direction Lower level Course locking mode No matter what the aircraft flight angles are the PTZ camera always faces the same degree to shoot 21 Record button Press this...

Page 28: ...ote control control PTZ PZT Center and PTZ 90 through State Bar Quick Operation PTZ Please refer to 3 6 5 2 PTZ for details PTZ course scroll wheel control horizontal shooting angle of camera lens as...

Page 29: ...e of PTZ camera changes with aircraft flight direction Lower level Course locking mode No matter what the aircraft flight angles are the PTZ camera always faces the same degree to shoot Lever returns...

Page 30: ...ition on the main interface to view them again No Name Function 1 Function setting and state bar Set the menu and aircraft course display PTZ mode flight state list flight mode remote control signal i...

Page 31: ...celerometer gyro remote mode GPS signal drone battery and camera SD card remaining total capacity info Flight mode display Display present flight mode of the aircraft including intelligent flight loit...

Page 32: ...gain Please refer to Appendix 3 System Pairing for details Remote button user defined Indicate A1 button and function of the remote control Please refer to 4 5 1 Remote Button User defined for details...

Page 33: ...e refer to 3 8 2 Accelerometer Calibration for details Offline map Add or delete offline map Please refer to 6 2 2 Download and Update Offline Map of Remote Control for details Brightness Adjust brigh...

Page 34: ...Flight State List Click the icon to display drone state list as shown in Figure 2 19 Figure 2 19 View drone state info in a real time way 2 3 4 1 4 Quick Operation Realize quick setting of dashboard P...

Page 35: ...gle it indicates the aircraft direction on the geographic position Battery time Display remaining flight time of the aircraft It displays N A when the aircraft is not connected This estimated value is...

Page 36: ...istance between the aircraft and Home This value is planar projection distance Table 2 9 2 3 4 3 Preview Click the window at the top left corner to switch between video preview mode and map preview mo...

Page 37: ...ction locking button When it is unlocked press the map interface with two fingers to rotate the map when it is locked map direction cannot be changed Map display mode switching button Switch to displa...

Page 38: ...26 2 3 4 4 2 Locking Mode Click the icon to select locking mode of the aircraft on the popped up dialog box as shown in Figure 2 25 Figure 2 25...

Page 39: ...quence can t be reversed Flight Preparation Phase Unpack Check remaining power Please charge in case of low battery Prepare airborne device Prepare aircraft Prepare remote control Enable aircraft powe...

Page 40: ...hts represent remaining power of the battery At normal temperature the remaining power shall be 2 The aircraft shall take off with full power when temperature is lower than 10 3 2 1 2 Aircraft Remaini...

Page 41: ...ining power shall be 3 when the temperature is lower than 10 3 2 2 2 Remaining Power of Remote Control There are two statuses for each indicator light of remote control which are normally on and off T...

Page 42: ...r port and connect AC power Connect DC insert charging adapter cable into battery and charger port Select charging mode open charger switch turn the black button select BLC and short press the black b...

Page 43: ...AC connect power adapter with AC power AC 100V AC 240V Check charging state it means the remote control is charging when the indicator light is red and normally on It means charging is done when the i...

Page 44: ...ly without PTZ camera 3 4 1 Demount PTZ Camera Loosen 4 mounting screws as shown in Figure 3 9 Figure 3 9 Take down PTZ camera 3 4 2 Install PTZ Camera Insert the upper port on the vibration damper pl...

Page 45: ...igure 3 11 The subsequent steps can be implemented only when the arm is fixed horizontally Please contact our company if the arm is loose Figure 3 11 3 5 2 Open Antenna It is recommended to unfold the...

Page 46: ...all off Open the battery buckle as shown in Figure 3 13 Figure 3 13 Put the battery into battery compartment horizontally as shown in Figure 3 14 Figure 3 14 Close the battery buckle and aircraft batt...

Page 47: ...rd face downward and insert it into the micro SD card slot of the remote control side panel horizontally 3 6 2 Open Antenna Open the antenna of remote control to proper location as shown in Figure 3 1...

Page 48: ...rol for remote control mode and its corresponding relations 3 6 5 Set Quick Operation Click at the upper right corner of main interface set quick operation items of remote control interface view dashb...

Page 49: ...37 Figure 3 19 3 6 5 2 PTZ Set the PTZ such as PTZ position and throwing Click PTZ and the system enters PTZ interface as shown in Figure 3 20...

Page 50: ...s the camera is vertically downward PTZ center the camera lens faces the front Throwing Set throwing including throwing device A and throwing device B Table 3 3 Click key A on the remote control to ca...

Page 51: ...ng to actual needs 3 6 5 4 Other Set the flight task flight path and stop beep here 3 6 5 4 1 Fly Task Set the flight task of remote control according to actual needs including flight path and flight...

Page 52: ...click this icon to download present saved flight path automatically Modify waypoint according to actual needs and save the task at remote control Select click this icon to select one task or multiple...

Page 53: ...dit Select the flight path which shall be deleted and saved according to actual needs as shown in Figure 3 24 Figure 3 24 Click Complete to complete flight data setting Click Select All to operate all...

Page 54: ...in Figure 3 25 Figure 3 25 3 8 Check and Debugging The subsequent steps can be implemented only after checking and debugging all the items listed in the chapter below Besides the remote control promp...

Page 55: ...direction for several times Slide the rolling wheels on both sides slide to the maximum value end of two directions for several times Click Complete Calibration after turning the rolling wheels and j...

Page 56: ...cularity during calibration Non standard posture during calibration will lead to abnormal flight and even explosion 3 8 3 Initialization Failure Abnormity Prompt Remote control prompts Initialization...

Page 57: ...n where the aircraft is used causing big change to geomagnetic field There is another intensive magnetic field or abrupt change in the environment affecting geomagnetic field Solutions Select Settings...

Page 58: ...46 Figure 3 29 Keep the aircraft vertical and rotate it for 360 vertically as shown in Figure 3 30 Figure 3 30...

Page 59: ...control is less than 1 bar or there is no signal Possible Reasons The flying environment is not wide open enough which is severely blocked There is some other interference around the surroundings Solu...

Page 60: ...48 Figure 3 32...

Page 61: ...at each spare part is in good condition Please do not fly the aircraft if some parts are aged or damaged Flight environment meets the requirements listed in important safeguards and warnings Please do...

Page 62: ...hen all sticks are located in the middle 4 2 Manual Mode 4 2 1 Introduction to Manual Flight Flow Manual Flight Mode Manual Unlock Manual Takeoff One Key Takeoff Manual Flight Control Manual RTH and L...

Page 63: ...ystick to lower right and meanwhile move the right joystick to lower left and then keep the status till the propellers stop rotating Turn off the aircraft and contact our company The aircraft will be...

Page 64: ...emote control modes It is mode 2 by default Please modify in Settings Remote Control Settings Joystick Mode to switch to mode 1 Mode 1 Vertical direction of left joystick is pitching joystick which co...

Page 65: ...craft s ascending and descending Moving the left joystick left and right course joystick to control aircraft s left and right turn horizontally Moving the right joystick up and down pitching joystick...

Page 66: ...nual Locking Move the left joystick to lower left and move the right joystick to lower right at the same time or move the left joystick to lower right and move the right joystick to lower left at the...

Page 67: ...ontrol to intelligent mode after the aircraft takes off select proper flight mission and click Start Mission When the flight mode joystick of remote control is moved to any mode point elevation or int...

Page 68: ...om of the interface Figure 4 12 Click the map and the position can be set as a waypoint several waypoints can be connected together and form a route Check total route length estimated flight time and...

Page 69: ...tion will skip to manual setting point after setting is done Waypoint action No action it is not to set waypoint action Shutter it will take photos after the aircraft arrives at the waypoint Action cy...

Page 70: ...odify the waypoint according to actual requirement and save it into the remote control Select mission Click the icon select one or more missions on the interface and delete the mission s 4 3 1 2 Circl...

Page 71: ...ht radius of aircraft flying around interest point Cycle mode Select the flight direction of aircraft flying around interest point clockwise optional Table 4 2 Click Save to make configuration valid S...

Page 72: ...ght line direction far away from HOME point as forward direction and the straight line direction close to HOME point as backward direction If both modes are canceled the aircraft head direction is for...

Page 73: ...e landing modes in other situations Short press RTH button on the front panel of the remote control and the aircraft will return to Home Figure 4 18 4 3 3 3 One key Landing Under the present condition...

Page 74: ...w voltage landing along with alarm sound Meanwhile the aircraft triggers landing mode After suspending low voltage home level three low battery alarm will be triggered if it continues to fly or fly in...

Page 75: ...Figure 4 20 4 5 2 Flight Control Settings 4 5 2 1 Fence Settings Select Settings Flight Control Settings Fence Settings The system displays Fence Settings interface as shown in Figure 4 21 Figure 4 2...

Page 76: ...rcraft but there is no limit in horizontal direction of the aircraft Circle Take HOME point as circle center and the set value as radius The aircraft is restricted to fly within the circle and there i...

Page 77: ...Settings Fence Action as shown in Figure 4 24 Figure 4 24 Notify The aircraft hovers in the air when electronic fence is triggered Preview interface of remote control gives a prompt along with buzzing...

Page 78: ...m the HOME point horizontally or flight altitude exceeds B C meters the aircraft will implement the action of RTH or landing 4 5 2 2 Enable Electronic Fence Enable electronic fence after setting fence...

Page 79: ...selected line becomes green and checked which makes it valid immediately 4 5 4 Camera Settings 4 5 4 1 Photo Settings Set resolution frame rate and max bandwidth of photos taken by PTZ camera accordin...

Page 80: ...nable Camera Auto take Video When Unlock or not select the resolution frame rate stream and coding format of PTZ camera Please ensure that the aircraft is unlocked during video setting Video setting c...

Page 81: ...selected parameter line becomes green and checked which makes it valid immediately Select Stream Format as shown in Figure 4 30 Figure 4 30 Click a line and icon at the end of selected parameter line...

Page 82: ...ess of the image adjust the value when the overall brightness of image is too bright or too dark Contrast Adjust the image contrast Adjust the value when overall brightness is proper but the image con...

Page 83: ...etwork and thus transmit data through wireless network Mobile hotspot Enable Mobile WLAN Hotspot so the user s mobile phone or other devices are connected with the network through mobile hotspot 4G Se...

Page 84: ...een Select Settings General Settings Other Settings Brightness The system displays Brightness interface as shown in Figure 4 34 Figure 4 34 Drag the adjustment bar to set overall brightness of remote...

Page 85: ...ameters according to actual needs Please refer to Table 4 3 for more details Parameter Note Date Click it to set date of remote control Time Click it to set time of remote control Time Zone Click it t...

Page 86: ...36 According to actual needs select English or Chinese 4 5 5 2 About View hardware device model and version info Select Settings General Settings About to enter About interface as shown in Figure 4 37...

Page 87: ...g to the actual situation End Flight Turn off power Take out batter Dismantle airborne device Fold aircraft Dismantle image transmission antenna Take out other components Figure 5 1 5 1 Turn off Power...

Page 88: ...e It means that remote control power has been turned off when the indicator light of remote control front panel is off Figure 5 3 5 2 Remove Aircraft Battery Open the battery buckle of the aircraft as...

Page 89: ...Airborne Device Loosen 4 mounting screws as shown in Figure 5 6 Figure 5 6 Dismantle PTZ camera 5 4 Fold Aircraft Press the spring fastener on both sides of the propeller center and remove the propel...

Page 90: ...7 Restore the antenna and keep it close to the arm as shown in Figure 5 8 Figure 5 8 Hold the arm with left hand loosen helical casing with right hand and lay down the arm gently as shown in Figure 5...

Page 91: ...micro SD card into the card reader and connect the card reader to computer Copy the micro SD card video into the computer via card reader and save it 5 6 Remove Other Components Remove SIM card open...

Page 92: ...e update package into the micro SD card slot of the remote control Select Remote Control Settings General Settings The system displays Firmware Update interface as shown in Figure 6 1 Figure 6 1 Selec...

Page 93: ...in the above figure will be the same as update software 6 2 2 Download and Update Offline Map of Remote Control Insert 4G SIM card or connect Wi Fi so the remote control accesses the network Select Se...

Page 94: ...h 2 megapixel PTZ camera Intelligent obstacle avoidance Support Power System Propeller wing material Carbon fiber Propeller wing dimension 19 5 inches 7 inches Mechanical features of propeller wing Qu...

Page 95: ...264 H 265 MJPEG Frame rate 30fps 5M 3M 60fps 1080p Iris F1 6 F4 4 Focal length 4 5mm 135mm 30x optical zoom Digital NR 3D SNR 55dB AGC Off Weight ON Min illuminance Color 0 005Lux F1 6 Black and white...

Page 96: ...measuring temperature alarm temperature correction temperature measuring unit setting temperature real time analysis historical temperature information query and so on Storage 128GB Micro SD Integrate...

Page 97: ...elf check report error Aircraft in no fly zone Move the aircraft out of no fly zone Please refer to 3 8 Check and Debugging for the flight area Compass calibration Normally on Horizontal calibration o...

Page 98: ...nected from remote control for more than 3s Level 1 low battery warning Level 2 low battery warning Disconnected from remote control for more than 3s Level 1 low battery warning Level 2 low battery wa...

Page 99: ...aircraft loses effect Specific Operations Open silicone cover of USB port of the aircraft Appendix Figure 3 1 USB2 0 port at the other end of data cable shall be inserted into USB port of the aircraf...

Page 100: ...rface of Remote Pair as shown in Appendix Figure 3 3 Appendix Figure 3 3 Click Start Pair on the remote control and the system starts pairing automatically It means pairing is successful when the remo...

Page 101: ...ith power switch at the back of remote control Please timely contact the supplier if it is not improved Appendix 4 3 FAQ and Solutions of Airborne Device Question Recorded video loss including failure...

Page 102: ...and battery is abnormal or not Please contact the manufacturer if it fails to be solved ZHEJIANG DAHUA VISION TECHNOLOGY CO LTD Address No 1199 Bin an Road Binjiang District Hangzhou P R China Postcod...

Reviews: