background image


11 

4  Device Installation  

This section details installing the camera to a wall or to a ceiling. Note that the wall or ceiling must be 

capable of supporting a minimum of three times the weight of the camera and a bracket (if used).  

Warning

: DO NOT connect the camera to the power supply during installation. 

Warning

: For units intended to be installed outdoors: All wiring connecting to the unit must be routed 

separately inside a different permanently earthed metal conduits (not supplied). 

Warning

: Install external interconnecting cables in accordance to NEC, ANSI/NFPA70 (for US 

application) and Canadian Electrical Code, Part I, CSA C22.1 (for CAN application) and in 

accordance to local country codes for all other countries. Branch circuit protection incorporating a 20 

A, 2-pole Listed Circuit Breaker or Branch Rated Fuses are required as part of the building installation. 

A readily accessible 2-pole disconnect device with a contact separation of at least 3 mm must be 

incorporated. 

Warning: 

DO NOT remove the protective film from the dome until the installation is complete to 

protect the dome from distortions from fingerprints, oil, grease or other contaminants.  

Note

: Dahua recommends attaching a “drip loop” (flex or hard conduit) during installation to ensure 

condensation does not form in the mount or the conduit. 
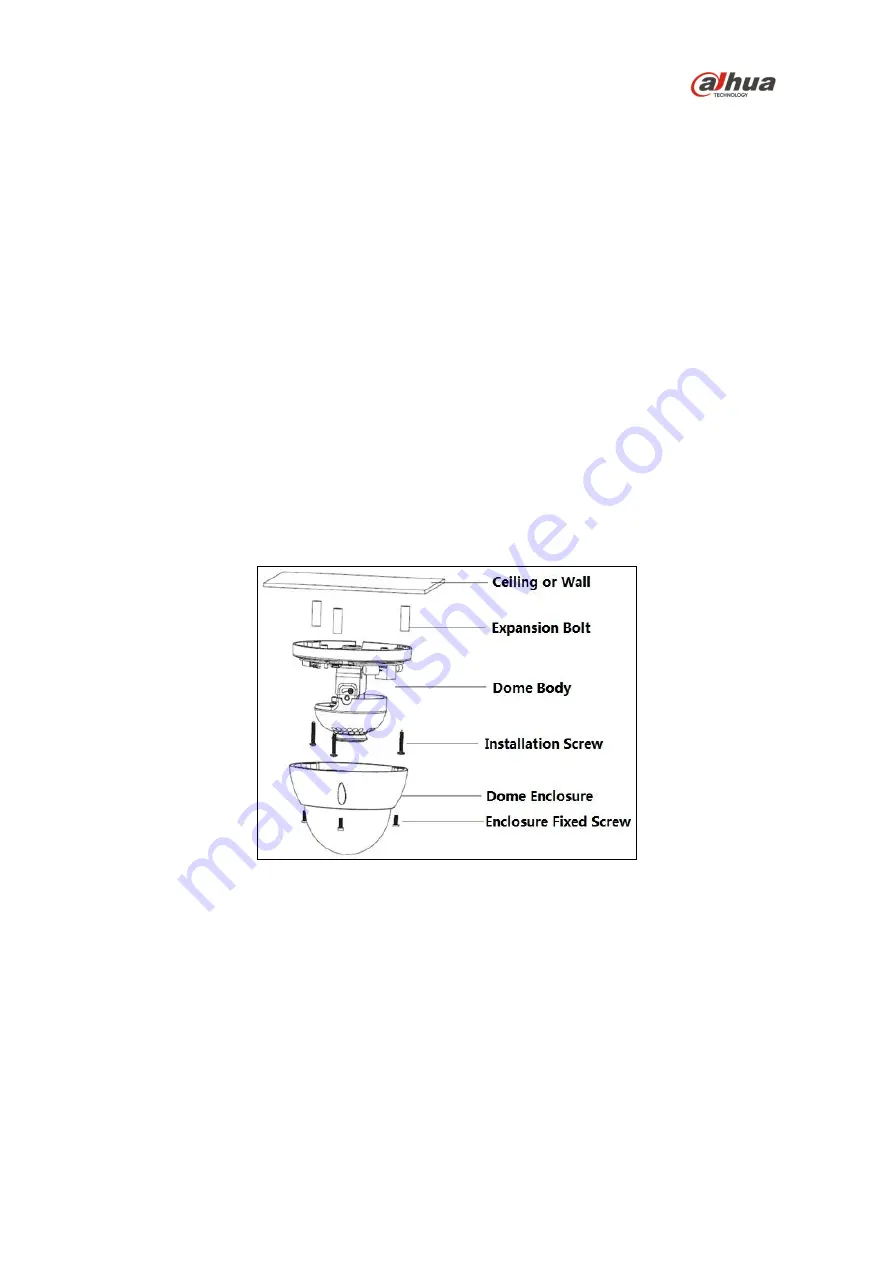
 

Figure 4-1 

Summary of Contents for N64CL52

Page 1: ...6 MP Fixed Dome ePoE Network Camera N64CL52 N64CL53 Quick Start Guide Version 1 0 1 Dahua Technology USA Inc ...

Page 2: ...ation and Cables 7 Cable Connections 7 3 2 Alarm I O Connections 8 3 3 Framework and Dimensions 8 3 4 Locally Storing Data 8 3 5 Bi directional Talk 9 3 6 Alarm Setup 9 Alarm Input 9 Alarm Output 9 Alarm Connections 10 4 Device Installation 11 4 1 Installing the Camera 12 4 2 Inserting the Micro SD Card optional 12 4 3 Mounting the Camera 12 5 Network Configuration 14 5 1 Network Protocols 14 5 2 ...

Page 3: ...o protect the unit from damage especially in damp environments Protect the plug and power cord from foot traffic being pinched and its exit from the unit Units with or without an ON OFF switch have power supplied to the unit whenever the power cord is inserted into the power source however the unit is operational only when the ON OFF switch is in the ON position The power cord is the main power di...

Page 4: ...ing or installation Environmental Precautions Do not aim the unit at a strong light source or into direct sunlight to focus A strong light source may cause overexposure and may affect the longevity of the CCD or the CMOS sensor Transport use and store the unit within the specified temperature and humidity range Do not place the unit in a wet dusty extremely hot or an extremely cold environment and...

Page 5: ...le solvent like alcohol benzene or thinner or use a strong detergent with abrasives which may damage the surface coating or reduce the working performance of the unit Do not touch or wipe a dome cover during installation this cover is an optical device Refer to the following methods clean the dome cover Stained with dirt Use an oil free soft brush or blower to gently remove the dirt Stained with g...

Page 6: ...tee that interference will not occur in a particular installation If this equipment does cause harmful interference to radio or television reception which can be determined by turning the equipment off and on the user is encouraged to try to correct the interference by one or more of the following measures Reorient or relocate the receiving antenna Increase the separation between the equipment and...

Page 7: ...ry information Dahua accepts no liability for damage resulting directly or indirectly from faults incompleteness or discrepancies between this guide and the product described Dahua is not liable for any loss caused by installation operation or maintenance inconsistent with the information in this guide Video loss is inherent to all digital surveillance and recording devices therefore Dahua cannot ...

Page 8: ...original packing carton is the safest container to transport the unit in the event the unit must be returned for service Retain the carton and all shipping material for future use Please refer to the enclosed CD for more details to view the detailed User s Manual and for configuration software Package Item Quantity Network Camera 1 Mounting Template 1 Installation Hardware Pack 1 Expansion Bolts 3...

Page 9: ...r Function 3 Power Input Port Power port input 12 VDC Use in accordance with device label instructions 4 I O Port Input output for alarm signals 5 Network Port RJ45 Connect to standard Ethernet cable Note Certain devices support Power over Ethernet Check the specific device to determine if the device accepts PoE and use an appropriate Ethernet cable and network to supply power 6 Audio Input RCA In...

Page 10: ...card slot for onboard storage that support a 128 GB Micro SD card Dahua recommends using a SanDisk Extreme Micro SD card or an equivalent substitute as these cards have been fully tested without issue and the SanDisk Extreme line is better suited for constant recording Lower grade SD cards meant for multimedia applications will at times have questionable quality and reliability Recording to the SD...

Page 11: ...he bi directional talk is enabled Click the Talk button a second time to disable the bi directional talk 3 6 Alarm Setup Certain devices support alarm inputs and outputs check your specific device for alarm capability Alarm Input Refer to Figure 3 3 for alarm input configuration The device collects that status of the alarm input port when the input signal is idle or grounded If the input signal is...

Page 12: ...address bar Internet Explorer opens the Login page 4 Type the Username and Password for the camera The default Username and Password is admin Then click Login 5 Navigate to the Alarm page under the Event menu item Figure 3 5 6 Set the alarm input and output parameters Set the Sensor Type to NO or NC for each alarm input The alarm input set corresponds to the device I O port cable When an alarm is ...

Page 13: ...NFPA70 for US application and Canadian Electrical Code Part I CSA C22 1 for CAN application and in accordance to local country codes for all other countries Branch circuit protection incorporating a 20 A 2 pole Listed Circuit Breaker or Branch Rated Fuses are required as part of the building installation A readily accessible 2 pole disconnect device with a contact separation of at least 3 mm must ...

Page 14: ...oles for the expansion bolts using a drill bit that is no wider than the expansion bolt 3 If routing wires through the installation medium drill the center hole to route the cables from the camera through the installation medium 4 Insert an expansion bolt into each pre drilled perimeter hole 5 Attach the waterproof network connector if the camera is used outdoors Figure 4 3 a Place the wide side o...

Page 15: ...om the top of the camera through the installation medium or through the side wiring exit on the pedestal 9 Connect the external cables from the camera to the appropriate cables for Ethernet and power 10 Adjust the camera and the lens according to the application requirements of the location a Loosen but do not remove the set screws on either side of the bracket that holds the camera b Tilt the cam...

Page 16: ... and automate the assignment of IP addresses DHCP should only be enabled if using dynamic IP address notification or if the DHCP can update a DNS server TFTP The Trivial File Transfer Protocol is a simple lock step File Transfer Protocol which allows a client to get from or put a file onto a remote host TFTP lacks security and most of the advanced features offered by more robust file transfer prot...

Page 17: ... the CD included with the camera or on Dahuasecurity com for complete information Notes Ensure that the network parameters of each camera is available before starting configuration The ConfigTool supports those cameras that are part of the same network that as the computer running the ConfigTool 5 3 Using the ConfigTool 1 Install the ConfigTools exe on a computer 2 Adjust the computer s network se...

Page 18: ...y have different Web interfaces the figures below are for reference only and may not represent the Web Interface for your camera Refer to the Web Operation Manual included on the CD shipped with the camera for more details 1 Launch Internet Explorer and type the modified camera IP address in the address bar Internet Explorer opens the Login page 2 Type the Username and Password for the camera The ...

Page 19: ...ge 1 Access the Web Interface for the device and click the Setup tab Expand the Storage menu then choose the Destination page Figure 5 4 2 Select the recording medium for each event Recorded and Snapshot event Scheduled Motion Detect and Alarm Select the Local check box to record an event to the Micro SD card 3 Click the Local tab to view the used capacity and the total capacity of the Micro SD ca...

Page 20: ...es writing data or retrieving data from the Micro SD card Figure 5 6 5 Select the event from the Event Type pull down menu No SD Card Capacity Warning and SD Card Error 6 Check the Enable box to activate the alarm for this event 7 Check the Relay out box to enable a relay alarm Then specify the time in seconds to delay the alarm relay output 10 s to 300 s 8 Check the Send Email box to send an emai...

Page 21: ...ology USA Inc 23 Hubble Irvine CA 92618 Tel 949 679 7777 Fax 949 679 5760 Email sales usa global dahuatech com Rev 001 001 2017 Dahua All rights reserved Design and specifications are subject to change without notice ...

Reviews: