Dahua EZ-IPC-D2B20P-ZS Quick Start Manual Download Page 11

Network  Configuration    4


After clicking 

Search setting

,


please enter the

 username 

and

 password

, and


please 

make sure they are the same as what you set during initialization, otherwise there will 
be "wrong password" notice. 


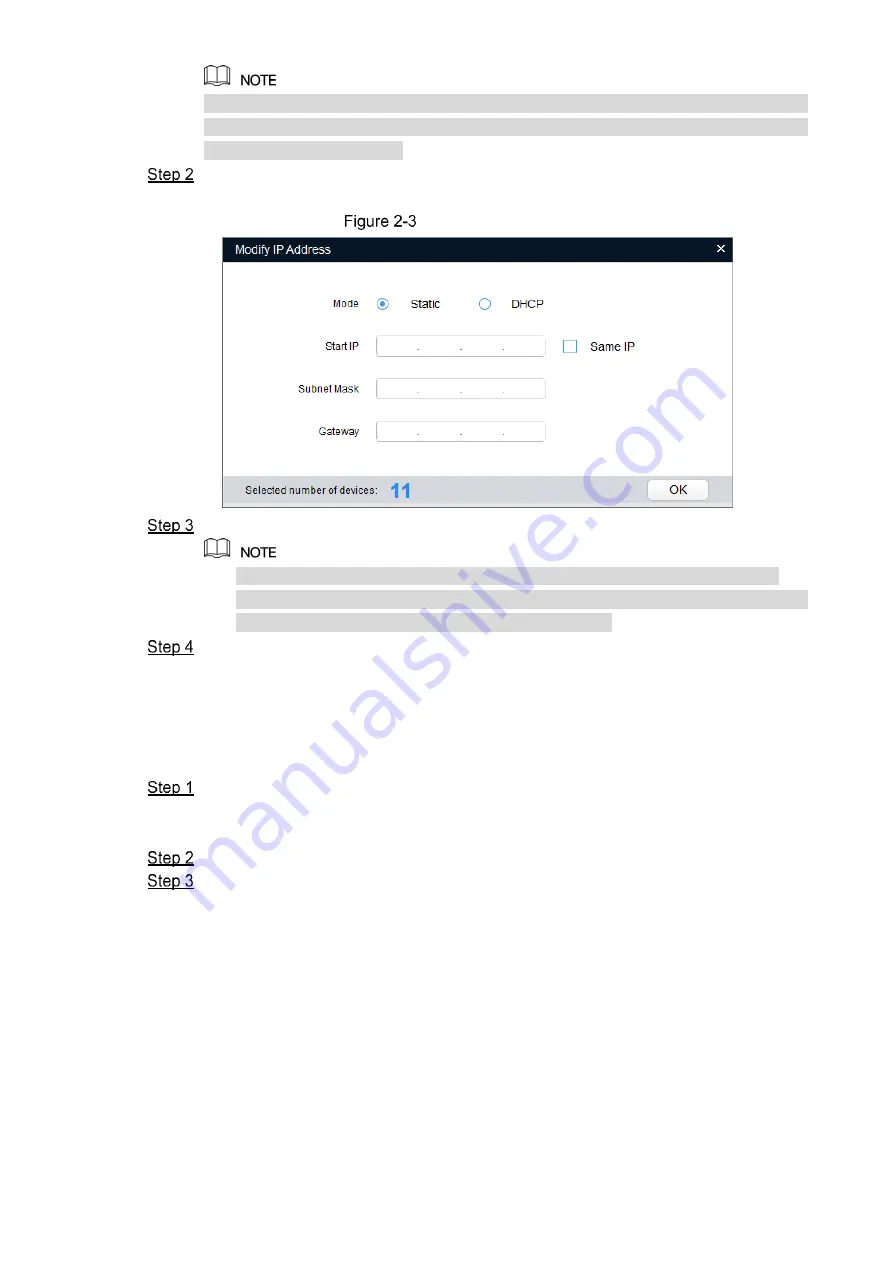
Select the devices which IP addresses need to be modified, and then click

 Modify IP

The 

Modify IP


Address

 interface is displayed. See Figure 2-3.   


Modify IP Address interface 


Select 

Static

 mode and enter start IP, subnet mask and gateway.   


IP addresses of multiple devices will be set to the same if you select 

Same IP


If  DHCP  server  is  available  in  the  network,  devices  will  automatically  obtain  IP 
addresses from DHCP server when you select 

DHCP


Click 

OK

2.3 

Logging in Web Interface 


Open  IE  browser,  enter  the  IP  address  of  the  device  in  the  address  bar  and  press 
Enter. 
If the setup wizard is displayed, follow the instructions to finish the settings. 


Enter user name and password in the log in box, and then click 

Login


For  first  time  login,  click 

Click  Here  to  Download  Plugin 

and  install  the  plugin  as 

instructed. 
The main interface is displayed when the installation is finished. See Figure 2-4. 

Summary of Contents for EZ-IPC-D2B20P-ZS

Page 1: ...EZ IP Outdoor Dome Network Camera Quick Start Guide V1 0 0...

Page 2: ...nal data of others such as face fingerprints car plate number Email address phone number GPS and so on You need to be in compliance with the local privacy protection laws and regulations to protect th...

Page 3: ...ations description or errors in print If there is any doubt or dispute please refer to our final explanation Upgrade the reader software or try other mainstream reader software if the Guide in PDF for...

Page 4: ...the device away from any liquid to avoid damage to the internal components Keep the indoor device away from rain or damp to avoid fire or lightning Keep sound ventilation to avoid heat accumulation Tr...

Page 5: ...with moisten oil free cotton with diethyl or moisten soft cloth You can also air blower to remove dust Please strengthen the protection of network device data and personal information by adopting meas...

Page 6: ...imits are designed to provide reasonable protection against harmful interference in a commercial environment Operation of this equipment in a residential area is likely to cause harmful interference i...

Page 7: ...guration 2 2 1 Initializing Device 2 2 2 Modifying Device IP Address 3 2 3 Logging in Web Interface 4 3 Installation 6 3 1 Packing List 6 3 2 Dimension 6 3 3 Installing Device 6 3 3 1 Installation Typ...

Page 8: ...led operation see the FAQ manual Cable list For more information about cable ports see Table 1 1 Table 1 1 Cable Information No Port Name Function 1 Ethernet Port Connects to network with network cabl...

Page 9: ...vailable only when the IP addresses of the device 192 168 1 108 by default and the PC stays in the same network segment Planning useable network segment properly to connect the device to the network T...

Page 10: ...rface is displayed Password can be modified or reset in System Settings Select the options according to your needs and then click OK The Initialization interface is displayed after initializing is com...

Page 11: ...addresses of multiple devices will be set to the same if you select Same IP If DHCP server is available in the network devices will automatically obtain IP addresses from DHCP server when you select...

Page 12: ...Network Configuration 5 Main interface...

Page 13: ...installation such as electric drill is not provided in the packing 3 2 Dimension Following figures are for reference only and the actual product shall prevail Device dimension mm in 3 3 Installing De...

Page 14: ...Pole mounted Wall mounted 3 3 2 Installing SD Card Optional...

Page 15: ...3 3 3 Attaching Device Make sure the mounting surface is strong enough to hold at least three times of the device weight...

Page 16: ...Cable going through the mounting surface...

Page 17: ...Cable going through the side cable tray 3 3 4 Installing Waterproof Connector Optional This part is needed only when there is waterproof connector come with the device and the device is used outdoor...

Page 18: ...3 3 5 Adjusting Lens Angle You can adjust the lens angle without loosening the screws...

Reviews: