background image


Operation    22 

3.8.5 Language 

There is only one language: English. 

 System 

3.9

Select 

6 System

, and then you can do admin level management, view registration information 

and device information. 

Admin Level Management 

Select 

6 SysInfo > Admin Level Management

, the administrator information is displayed. You 

can modify the administrator level. After you have modified the user level to 

user

, the user used 

to be the administrator will not be displayed in the Admin Level Management. 


You can also modify user level by selecting 

1 User > Query & Edit User

, and then selecting a 

user to modify the user level. 

Management 

Select 

6 SysInfo > Management

, and then you can view administrators

’ operational records 

(for example user information modification and system setting modification records). 

Registration Info 

Select 

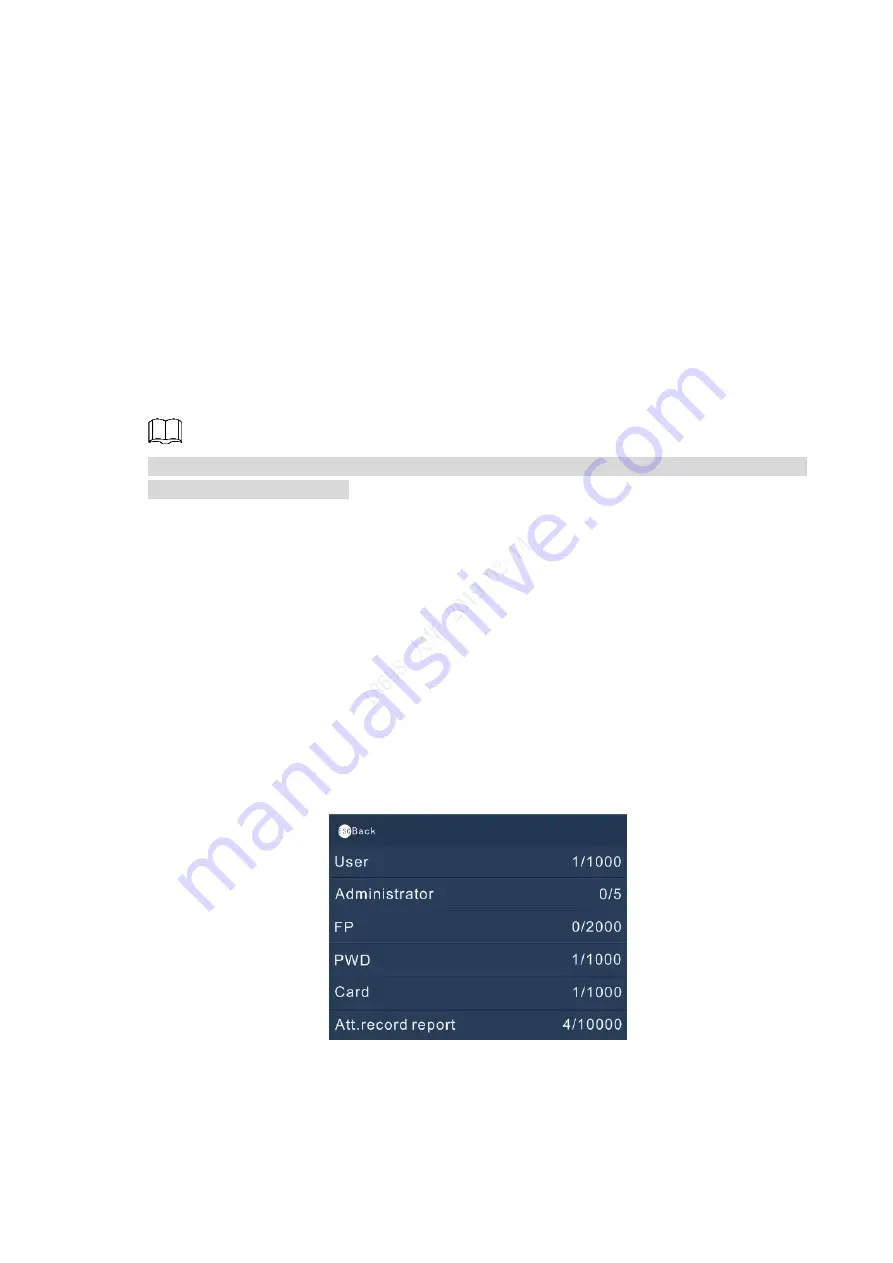
6 SysInfo > Registration Info

, and then you can


view registration information (users 

that can be registered, administrator number, fingerprint number, password number, card 

number, attendance record report number, and management records the terminal can restore). 

See Figure 3-23. 

 Registration info 

Figure 3-23


Device Info 

Select 

6 SysInfo > Registration Info

, and then you can view terminal version number and 

device ID. 

Summary of Contents for ASA1222G

Page 1: ...Time Attendance Terminal User s Manual V1 0 0 ...

Page 2: ...nd do not block the ventilation of the Time Attendance Terminal Operate the Time Attendance Terminal within the rated range of power input and output Do not dissemble the Time Attendance Terminal Transport use and store the Time Attendance Terminal under the allowed humidity and temperature conditions Electrical Safety Improper battery use might result in fire explosion or inflammation When replac...

Page 3: ...en the Manual and the actual product the actual product shall prevail We are not liable for any loss caused by the operations that do not comply with the Manual The Manual would be updated according to the latest laws and regulations of related regions For detailed information see the paper manual CD ROM QR code or our official website If there is inconsistency between paper manual and the electro...

Page 4: ...Foreword IV occurred when using the device If there is any uncertainty or controversy please refer to our final explanation ...

Page 5: ... Cards in Batch 11 Data 12 3 5 3 5 1 Query User ATT Log 12 3 5 2 Export Monthly User ATT Log Export Monthly ATT Report 13 Shift 13 3 6 3 6 1 Shift Setting 13 3 6 2 Schedule Setup 14 3 6 3 Late in Early out Allowed 16 USB 16 3 7 3 7 1 Import Export User Info 16 3 7 2 Import Export User FP 16 3 7 3 Import Export Bell Info 17 3 7 4 Import Export Auto Switch Time 17 Feature 17 3 8 3 8 1 Date Time 17 3...

Page 6: ...5 4 2 2 Attendance Shift 28 4 2 3 Holiday 29 4 2 4 Attendance Event 30 Shift Schedule 31 4 3 Viewing Real Time Attendance Check Detail 33 4 4 Attendance Report 35 4 5 Fingerprint Record Description 36 Appendix 1 Text Input 38 Appendix 2 FAQ 39 Appendix 3 Cybersecurity Recommendations 40 Appendix 4 ...

Page 7: ...00 user information ID name fingerprint password card number can be recorded on terminal Stores up to 100 000 attendance record reports and 10 000 management records All users can query their own attendance records Only administrators can add new users edit user information query import or export attendance logs and attendance reports USB disk update firmware T9 text input 24 groups of shift 20 de...

Page 8: ...rface press the key to check out Delete key or shortcut key for reviewing records When the terminal is off on press the key to turn the terminal on off press the key for over three seconds to turn the terminal off On the standby mode press the key and then administrators can go to the main menu by fingerprints passwords or cards When you need to enter text press the key and then you can switch tex...

Page 9: ...Overview 3 Port Description NO Makes the relay normally on Dimensions 1 4 Dimensions mm Figure 1 3 ...

Page 10: ...lation 4 2 Installation Installation Methods 2 1 Installed through the 86 electrical box Installed through 86 electrical box Figure 2 1 Directly installed on the wall Directly installed on the wall Figure 2 2 ...

Page 11: ...allation 5 Installed through the bracket Installed through bracket Figure 2 3 Cable Connection 2 2 The terminal can be connected to exit button to control the door See Figure 2 4 Cable connection Figure 2 4 ...

Page 12: ...lect a user ID Select User Level press OK F4 and then F2 or F3 to select Administrator When you need to connect the terminal to SmartPSS the management platform the default ID is admin and the default password is also admin Settings about shifts schedules and departments in the terminal are independent of those on SmartPSS For standalone system framework see Figure 3 1 System framework Figure 3 1 ...

Page 13: ...e Figure 3 3 Main menu Figure 3 3 After you have created administrators you need to press first and then you can go to the main menu by the following methods Press your finger tip at the fingerprint sensor Enter the administrator s user ID and password Swipe your card at the card reader You can select icon by the following two methods Press F2 or F3 Press number keys Attendance Check Methods 3 3 O...

Page 14: ...print sensor to get your attendance checked Your user ID name card swiping time attendance events will all be displayed on the screen See Figure 3 4 Swipe card Figure 3 4 Press F2 or F3 continuously BREAK OUT CHECK IN OT OUT OT IN CHECK OUT BREAK IN will be displayed in turn There are shortcut keys for check in check out break in and break out Esc F1 Press Esc F1 CHECK IN will be displayed on the ...

Page 15: ...ery and edit user edit department and add cards in batches 3 4 1 Add New Users You can add users one by one or you can add users in batches 3 4 1 1 Add One by One On the main menu select 1 User Add New User and then the adding new user Step 1 interface is displayed See Figure 3 5 and Figure 3 6 Adding new user 1 Figure 3 5 Adding new user 2 Figure 3 6 Do the following operations Step 2 1 Enter use...

Page 16: ...dd fingerprints and passwords separately See Figure 3 7 Swipe cards to add users Figure 3 7 Add users through USB Excel charts with special format are stored in the USB flash drive You need to export the excel chart first and then enter user information including user ID user name password card number department user level and schedule mode into the charts and then import the charts to the termina...

Page 17: ... Edit Department On the main menu select 1 User Edit Dept Step 1 Press OK F4 Step 2 Department ID and Department name will be displayed See Figure 3 9 Edit department Figure 3 9 Press F2 or F3 to select a user Step 3 Press OK F4 Step 4 And then you can press letter keys to create department names Press OK F4 to save names you entered Step 5 There are 20 departments in total and departments cannot ...

Page 18: ...alfunction will occur You can query and export attendance record 3 5 1 Query User ATT Log On the main menu select 2 Data Query User ATT Log Step 1 See Figure 3 10 Query user ATT Log Figure 3 10 Press OK F4 Step 2 Enter the User ID Name will be displayed automatically See Figure 3 11 Step 3 Enter user ID Figure 3 11 Press OK F4 Step 4 Attendance record of the user will be displayed See Figure 3 12 ...

Page 19: ... Monthly ATT Step 1 Report Press OK F4 Step 2 Select a date Step 3 See Figure 3 13 Export logs reports Figure 3 13 Press OK F4 Step 4 Press Step 5 The logs and reports will be exported Shift 3 6 You can set shift periods There are 24 shifts in total 3 6 1 Shift Setting On the main menu select 3 Shift Shift Setting Shift You can set 24 shifts at most See Figure 3 14 ...

Page 20: ...t for more than once the system only takes the latest sign out records as effective In Overtime Session there is no late early leave time setup Import Export shift Once you have done shift settings on a terminal you can export the settings through flash drives and then import them to other terminals thus you do not need to do settings repeatedly 3 6 2 Schedule Setup On the main menu select 3 Shift...

Page 21: ...p 26 means leave Department Schedule On the main menu select Shift Schedule Setup Department Step 1 Select a department Step 2 Press OK F4 Step 3 See Figure 3 16 Department schedule Figure 3 16 Import Export Schedule Before you export or import schedules make sure the USB is inserted During exporting or importing do not remove the USB or operate the terminal otherwise exporting or importing will f...

Page 22: ...er 17 25 he she is not considered to have left early During Duty 1 and Duty 2 period you have only one chance to get your attendance checked late and one chance to leave early If you arrive late or leave early within the time period permitted overtime will still be counted USB 3 7 Select 4 USB and then you can import export user Information fingerprints bell information and auto switch time See Fi...

Page 23: ...to test attendance event mode fixed mode setup and open door keep time 3 8 1 Date Time On the main menu select 5 Features Date Time and then you can do settings about date time time zone DST setting and network time protocol NTP Date Format There are three options YY_MM_DD DD_MM_YY and MM_DD_YY Y stands for year M stands for month D stands for day Date Setting Set a date for the terminal The date ...

Page 24: ...It is 255 255 255 0 by default Gateway It is 192 168 1 1 by default MAC MAC address of the terminal and it cannot be modified Port Port number used to login the terminal on the SmartPSS 3 8 3 Features Select 5 Feature Features and then you can set state switch time bell time recheck interval verification method system auto test attendance event mode fixed mode setup and open door keep time 3 8 3 1...

Page 25: ...ecked only once in every three minutes There are ten options 0 1 2 3 4 5 6 7 8 and 9 3 8 3 4 Verification Method There are four options FP or PWD or Card FP PWD and Card If you select FP or PWD or Card your attendance will be checked by fingerprint password or card If you select FP your attendance can only be checked by fingerprint If you select PWD your attendance can only be checked by password ...

Page 26: ... can select a fixed attendance event for a terminal and then users can sign in at one terminal and sign out at another terminal On the standby interface select 5 Feature Features Att Event Mode Step 1 Press OK F4 Step 2 The white text box appears Press F2 or F3 to select Fixed Step 3 Press OK F4 Step 4 Press F3 Step 5 Press OK F4 Step 6 The white text box appears Press F2 or F3 to select among Che...

Page 27: ...witch and broadcast volume switch adjust volume restore the terminal to the factory settings restore the terminal to the factory settings with user information and logs saved reboot the terminal do firmware update set device ID and set screen sleep time min See Figure 3 21 and Figure 3 22 System 1 Figure 3 21 System 2 Figure 3 22 Factory Restore you can restore the terminal to the factory settings...

Page 28: ...el by selecting 1 User Query Edit User and then selecting a user to modify the user level Management Select 6 SysInfo Management and then you can view administrators operational records for example user information modification and system setting modification records Registration Info Select 6 SysInfo Registration Info and then you can view registration information users that can be registered adm...

Page 29: ...rtments and Adding Users 4 1 You need to create departments and add users and then you can do attendance settings for departments and users 4 1 1 Creating Departments Click on the New interface Step 1 The Attendance interface is displayed Click on the Attendance interface Step 2 And the User interface is displayed See Figure 4 1 User Figure 4 1 Click the right mouse button on the Default Departmen...

Page 30: ...partment Figure 4 2 Enter department name and click Save Step 4 A department is created See Figure 4 3 A department is created Figure 4 3 4 1 2 Adding Users Click on the Attendance interface Step 1 The Add User interface is displayed See Figure 4 4 ...

Page 31: ...S to the Time Attendance Terminal by clicking on the bottom left corner of the User interface You can import and export users by clicking or Attendance Setting 4 2 4 2 1 Attendance Time Zone By setting attendance time zone you can configure in which periods users need to get their attendance checked according to company regulations Click on the Attendance interface Step 1 Figure 4 5 is displayed ...

Page 32: ...imezone interface is displayed See Figure 4 6 Attendance timezone Figure 4 6 Click Add on the top left corner of the interface Step 3 The New Timezone interface is displayed See Figure 4 7 New Timezone Figure 4 7 Enter timezone name and click Save Step 4 The timezone setting interface is displayed See Figure 4 8 Step 5 ...

Page 33: ...out to be valid for normal attendance Record as X Workday One week time is recorded as how many weekdays Start Sign In Time Sign in only within set period on attendance device End Sign In Time Start Sign Out Time Sign out only within set period on attendance device End Sign Out Time Late sign in within X minutes is permitted Define late early leave and absence You can set different time ranges the...

Page 34: ...vertime The sign out time that is X minutes later than off duty time is recorded as overtime set timezone settings and click Save Step 6 A new timezone is created 4 2 2 Attendance Shift Attendance shifts are the status of days weeks or months You can set status for each day within a week and a month or you can set working status for every single day There are four statuses Rest Working Off Duty an...

Page 35: ...gure 4 10 Attendance shift Day Figure 4 11 4 2 3 Holiday When doing attendance shift setting you need to set holidays so that users do not need to get their attendance checked Select Attendance Setting Holiday Step 1 The Holiday interface is displayed See Figure 4 12 ...

Page 36: ...hen click OK Step 3 A holiday is added See Figure 4 14 A holiday is created Figure 4 14 4 2 4 Attendance Event There are seven default attendance events Punch the Clock Sign In Go Out Come back Sign Out Overtime work sign out and Overtime work sign in Select Attendance Setting Attendance Event Step 1 The Attendance Event interface is displayed See Figure 4 15 Attendance Event Figure 4 15 Click and...

Page 37: ...ft schedules and temporary shift for users Click on the Attendance interface Step 1 The Shift Schedule interface is displayed See Figure 4 17 Shift schedule Figure 4 17 Select a department from the Default Department drop down list Step 2 Select users See Figure 4 18 Step 3 Select department and users Figure 4 18 ...

Page 38: ...he interface Step 5 And then you can set attendance shift start time and end time for the user you have selected Set attendance shift Figure 4 20 Double click the attendance shift names start time and end time and then you can select attendance shifts set start time and end time Click OK Step 6 The attendance shift of the user or users you selected will be displayed on the attendance interface See...

Page 39: ...his icon then you can set temporary for users Select users and select a temporary shift with blue T and then you can delete a temporary Means the day is a holiday Viewing Real Time Attendance Check Detail 4 4 When users are checking their attendance their information will be displayed on the Console interface See Figure 4 22 ...

Page 40: ...Attendance Configuration on SmartPSS 34 View real time attendance check detail Figure 4 22 ...

Page 41: ...ce Report 4 5 You can view the following information on the Report interface attendance statistics attendance detail overtime exception break leave first in last out and logs Click The Report interface is displayed See Figure 4 23 Report Figure 4 23 ...

Page 42: ... finger to the fingerprint recording area and make your fingerprint is centered on the recording area Fingers recommended Forefingers middle fingers and ring fingers are recommended Thumbs and little fingers cannot be put at the recording center easily Appendix figure 1 1 Recommended fingers Finger pressing method Correct method Appendix figure 1 2 Correct finger pressing ...

Page 43: ...Fingerprint Record Description 37 Incorrect method Appendix figure 1 3 Wrong finger pressing ...

Page 44: ...dix figure 2 1 Appendix figure 2 1 Press OK F4 to confirm Step 3 Letter Press until ABC is displayed on the screen Step 1 Enter letters Step 2 See Appendix figure 2 1 Appendix figure 2 2 Press OK F4 to confirm Step 3 Punctuation Press until is displayed on the screen Step 1 Press number key Step 2 Punctuations will be displayed on the screen Press F2 or F3 to select Step 3 Press OK F4 to confirm S...

Page 45: ...ast volume switch is on Q I cannot update the terminal by USB flash drive A Check if the terminal has recognized the USB flash drive and check update file name Q Failed to export by USB flash drive A Use USB flash drive in FAT32 format Q I forget administrator password A Contact the manufacturer Q I want to search for user attendance record A In the standby interface press and then press your fing...

Page 46: ...ommended to enable the auto check for updates function to obtain timely information of firmware updates released by the manufacturer We suggest that you download and use the latest version of client software Nice to have recommendations to improve your equipment network security 1 Physical Protection We suggest that you perform physical protection to equipment especially storage devices For exampl...

Page 47: ...ollowing services SNMP Choose SNMP v3 and set up strong encryption passwords and authentication passwords SMTP Choose TLS to access mailbox server FTP Choose SFTP and set up strong passwords AP hotspot Choose WPA2 PSK encryption mode and set up strong passwords 11 Audio and Video Encrypted Transmission If your audio and video data contents are very important or sensitive we recommend that you use ...

Page 48: ...ds If there are no communication requirements between two sub networks it is suggested to use VLAN network GAP and other technologies to partition the network so as to achieve the network isolation effect Establish the 802 1x access authentication system to reduce the risk of unauthorized access to private networks ...

Reviews: