background image

Installing the Device


8


1.3.3 Super 4U NVR Series 

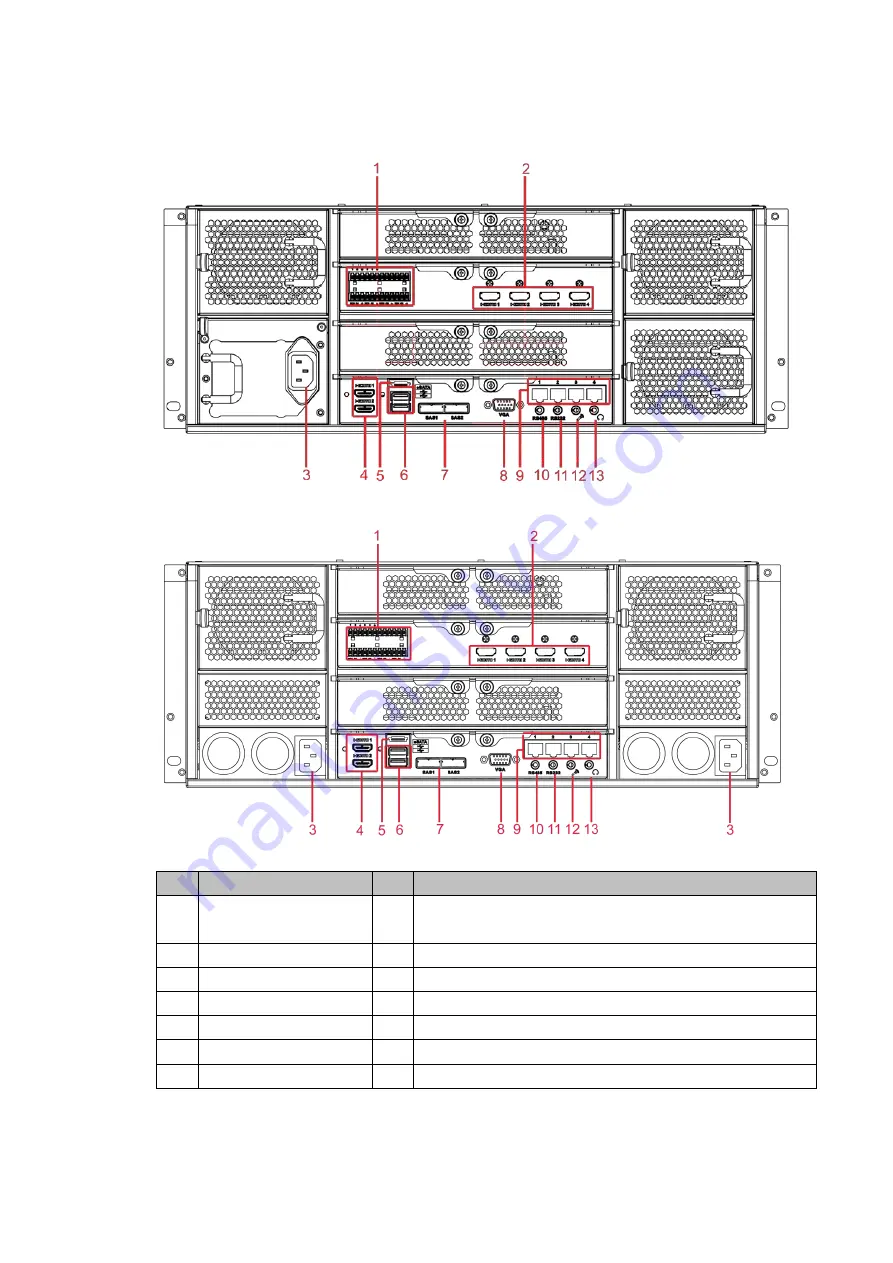
 Rear panel with single power 

Figure 1-12


 Rear panel with redundant power 

Figure 1-13


 Rear panel description 

Table 1-5

No.  Function 

No.  Function 

Alarm input/alarm 

output   

HDMI port (you can select to buy decoding card or 

optical card) 

Power port   

HDMI port   

eSATA port   

USB port   

SAS port   

Video VGA output 

Network port   

10 

RS485 port   

11 

RS232 port   

12 

Audio input port   

13 

Audio output port 


Summary of Contents for 724 Series

Page 1: ...Network Video Recorder NVR6XX 4KS2 724 Series Quick Start Guide ...

Page 2: ... be changed to any set of numbers between 1025 65535 Avoiding the default ports reduces the risk of outsiders being able to guess which ports you are using 3 Enable HTTPS SSL Set up an SSL Certificate to enable HTTPS This will encrypt all communication between your devices and recorder 4 Enable IP Filter Enabling your IP filter will prevent everyone except those with specified IP addresses from ac...

Page 3: ...ng SNMP you should do so only temporarily for tracing and testing purposes only 12 Multicast Multicast is used to share video streams between two recorders Currently there are no known issues involving Multicast but if you are not using this feature deactivation can enhance your network security 13 Check the Log If you suspect that someone has gained unauthorized access to your system you can chec...

Page 4: ...o the text Privacy Protection Notice As the device user or data controller you might collect personal data of others such as face fingerprints car plate number Email address phone number GPS and so on You need to be in compliance with the local privacy protection laws and regulations to protect the legitimate rights and interests of other people by implementing measures including but not limited t...

Page 5: ...unctions and operations description or errors in print If there is any doubt or dispute please refer to our final explanation Upgrade the reader software or try other mainstream reader software if the Guide in PDF format cannot be opened All trademarks registered trademarks and the company names in the Guide are the properties of their respective owners Please visit our website contact the supplie...

Page 6: ...rily Transport use and store the device within allowed humidity and temperature range Power Requirement Make sure to use the designated battery type Otherwise there may be explosion risk Make sure to use batteries according to requirements otherwise it may result in fire explosion or burning risks of batteries To replace batteries only the same type of batteries can be used Make sure to dispose th...

Page 7: ...K S2 3U NVR Series 2 1 2 3 Super 4U NVR Series 4 1 3 Rear Panel 5 1 3 1 Super 4K S2 2U NVR Series 6 1 3 2 Super 4K S2 3U NVR Series 7 1 3 3 Super 4U NVR Series 8 2 GUI Operations 9 2 1 Booting Up 9 2 2 Initializing the Device 9 2 3 Resetting Password 12 2 4 Startup Wizard 14 2 5 Preview 15 2 5 1 Preview Interface 15 2 5 2 Preview Control Bar 16 2 6 Record Search 17 2 7 Network Settings 20 2 8 Regi...

Page 8: ...d be caused by hit Accessories No missing 2 Labels Labels on the Device Device model conforms to the purchase order Not torn up NOTE Do not tear up or throw away the labels otherwise the warranty services are not ensured You need to provide the serial number of the product when you call the after sales service 3 Device Appearance No obvious damage Data cables power cables fan cables mainboard No c...

Page 9: ... 1 2 Description of buttons and indicators on front panel Table 1 1 No Icon Function SN Icon Function 1 Status Status indicator light 2 HDD HDD indicator light 3 NET Network indicator light 4 Power Power indicator light 5 USB port 6 Power on off button 7 ALARM Alarm indicator light 1 2 2 Super 4K S2 3U NVR Series Front panel with LCD Figure 1 3 ...

Page 10: ...curred It becomes on via the software detection The indicator light becomes on when there is a local alarm 4 Network indicator The blue network indicator is on after you connected the Device to the network 5 USB port Connect to external USB storage device mouse etc 6 Front panel lock It is to lock the front panel It prevents HDD from being stolen or accidentally plugged and unplugged HDD slots Fig...

Page 11: ...rm indicator becomes on once an alarm occurred It becomes on via the software detection The indicator becomes on when there is a local alarm 5 System HDD Indicator The blue light becomes on when it is reading and writing In the system HDD there are important configuration file factory default configuration file and device initial boot up data 6 Power button Press it once to turn on the Device Pres...

Page 12: ...8 9 12 13 16 17 20 21 24 See Figure 1 6 There are two indicators on the HDD bracket The power indicator is at the top The light is yellow after you connected the Device to the power The read write indicator is at the bottom The blue light flashes when system is reading or writing data 1 3 Rear Panel NOTE The following figures are for reference only The actual product shall prevail ...

Page 13: ...VR single power Figure 1 8 Super 4K S2 64 channel 128 channel 2U NVR redundant power Figure 1 9 Rear panel description Table 1 3 No Function No Function 1 Power input port 2 Alarm input alarm output RS485 port 2 RS232 port 4 Audio output 5 Audio input 6 VGA port 7 Network port 8 HDMI port 9 10 USB 3 0 port 11 eSATA port 12 Power button ...

Page 14: ...le 1 4 No Function No Function 1 Power on off button 2 Power input port 3 1000M fiber port 4 Network port 5 HDMI port 6 RS232 port 7 Video VGA output 8 Audio output 9 Audio input 10 USB3 0 port 11 USB3 0 port 12 eSATA port 13 SAS extension port 14 Alarm input output RS485 port 15 HDMI port The HD decoding card is not the default accessory Please purchase it if needed ...

Page 15: ... Figure 1 13 Rear panel description Table 1 5 No Function No Function 1 Alarm input alarm output 2 HDMI port you can select to buy decoding card or optical card 3 Power port 4 HDMI port 5 eSATA port 6 USB port 7 SAS port 8 Video VGA output 9 Network port 10 RS485 port 11 RS232 port 12 Audio input port 13 Audio output port ...

Page 16: ... power adapter first and then connect it to the power socket Always use the stable current with little ripple interference It is recommended to use UPS Connect the Device to the monitor plug into the power socket and then press the power button to boot up the Device 2 2 Initializing the Device NOTE Only devices of some series support this function When booting up for the first time you need to con...

Page 17: ...number letter and special character excluding and It is recommended to set a password of high security according to the prompt Set the unlock pattern or click Skip Step 3 After setting unlock pattern the password protection setting interface is displayed See Figure 2 2 NOTE Once you have configured the unlock pattern the system will require the unlock pattern as the default login method If you ski...

Page 18: ...tection parameter description Table 2 1 Password Protection Mode Description Email Address Enter the reserved email address In the Email Address box enter an email address for password reset In case you forgot password enter the security code that you will get from this reserved email address to reset the password of admin Security Questions Configure the security questions and answers In case you...

Page 19: ... the security questions configured before If the security questions are not configured system displays that Password reset is closed You need to contact the customer service for help Click on the login interface Step 1 The Reset Password interface is displayed See Figure 2 3 NOTE On the unlock pattern interface click Forgot Unlock Pattern to switch to the password login interface and then click If...

Page 20: ...login password Step 3 Email In Figure 2 4 follow the prompts on the interface to scan the QR code and then enter the security code you get via the assigned email NOTE For the same QR code you can scan max twice to get two security codes Refresh the QR code if you want to get security code again The security code in your email is only valid for 24 hours Security questions In Figure 2 4 in the Reset...

Page 21: ...items on the startup wizard the startup wizard automatically hides when booting up the Device next time After you successfully initialize the Device the Startup Wizard is displayed See Figure 2 6 Click Next to enter the startup wizard to configure the Device quickly The interface is different for different devices Please see the actual situation For details see User s Manual NOTE Once the power is...

Page 22: ...1 and Channel 16 are exchanged Control window split by the mouse wheel On the preview interface you can switch window split by the rolling of the mouse wheel 2 5 1 Preview Interface After normal login the Device enters the preview interface Each window is overlaid with the date time channel name and window number At the bottom of the window the record and alarm status icons are displayed For detai...

Page 23: ...p center of the current channel preview interface and you can see the control bar See Figure 2 7 If the cursor stays at this area for six seconds without any operation the control bar automatically hides Preview control bar Figure 2 7 For icon description on the control bar see Table 2 3 Icon description Table 2 3 No Icon Description 1 Instant playback 2 Digital zoom 3 Instant backup 4 Manual snap...

Page 24: ...ow playback at the same time It depends on the product channel number 2 Playback control pane Play Pause There are three ways for you to start the playback Play button Click the valid period of the time bar Double click any file in the file list In fast or slow play mode click it to switch between play and pause Stop Backward play In normal play mode left click the button and the file starts backw...

Page 25: ...ck this icon again to stop the MD video play When you switch to some other file in the file list it switches to MD play of the corresponding file During MD play you cannot switch timeline play backward or play frame by frame NOTE For details see Smart Search in User s Manual Playback volume Snapshot In full screen mode click this icon to snapshot a picture Snapshot backup supports path selection C...

Page 26: ... If the picture exists in the HDD before changed to a redundant disk you can select to play the picture from the redundant HDD 8 Calendar In any playback mode click a date in the calendar and the records of the corresponding date is displayed The one in blue means record picture is available that day The one without color means no record picture that day 9 Playback mode and channel selection Selec...

Page 27: ...er out all the human faces to form a file list Double click the file to play the corresponding record or picture File list Click this icon to display the searched record files You can lock or unlock the files Fish eye playback de warping 11 Video clip Clip a record and save it 12 Backup Backup record file 13 Timeline unit Including and The smaller the time unit the larger the magnification 2 7 Net...

Page 28: ...GUI Operations 21 TCP IP Figure 2 9 Click Step 2 The Edit interface is displayed See Figure 2 10 Edit Figure 2 10 ...

Page 29: ...ect the NIC to bind The binding comes into effect only after device reboot NOTE In fault tolerance and load balancing mode binding network cards is supported and the card number shall be no less than 2 Ports of different materials such as optical port and electrical port cannot be bound to each other IP Version You can select IPv4 or IPv6 Both types are supported currently MAC Address Display the ...

Page 30: ... can be effective only after device reboot Set the network parameters Step 4 TCP IP parameter description Table 2 6 Parameter Description IP Version You can select IPv4 or IPv6 Both types are supported currently Preferred DNS D DNS server IP address Alternate DNS DNS server alternate IP address Default Card Set according to the actual situation It shall be in the same network segment with the IP a...

Page 31: ...GUI Operations 24 Registration Figure 2 11 2 9 Shutdown Select Main Menu SHUT DOWN The SHUT DOWN interface is displayed Click Shut down ...

Page 32: ... Device into the address bar Press Step 1 Enter key The Login interface is displayed See Figure 3 1 Login Figure 3 1 Enter the username and password Step 2 The default username is admin and the login password is the one you set in device initialization To ensure device security it is recommended to modify the admin password regularly and keep it properly Click Login Step 3 The Preview interface is...

Page 33: ...Web Login 26 Enter C Program Files webrec WEB30 WebPlugin and run the uninstall tool uninst exe The system automatically deletes the control Enter C Program Files webrec and delete the Single folder ...

Reviews: