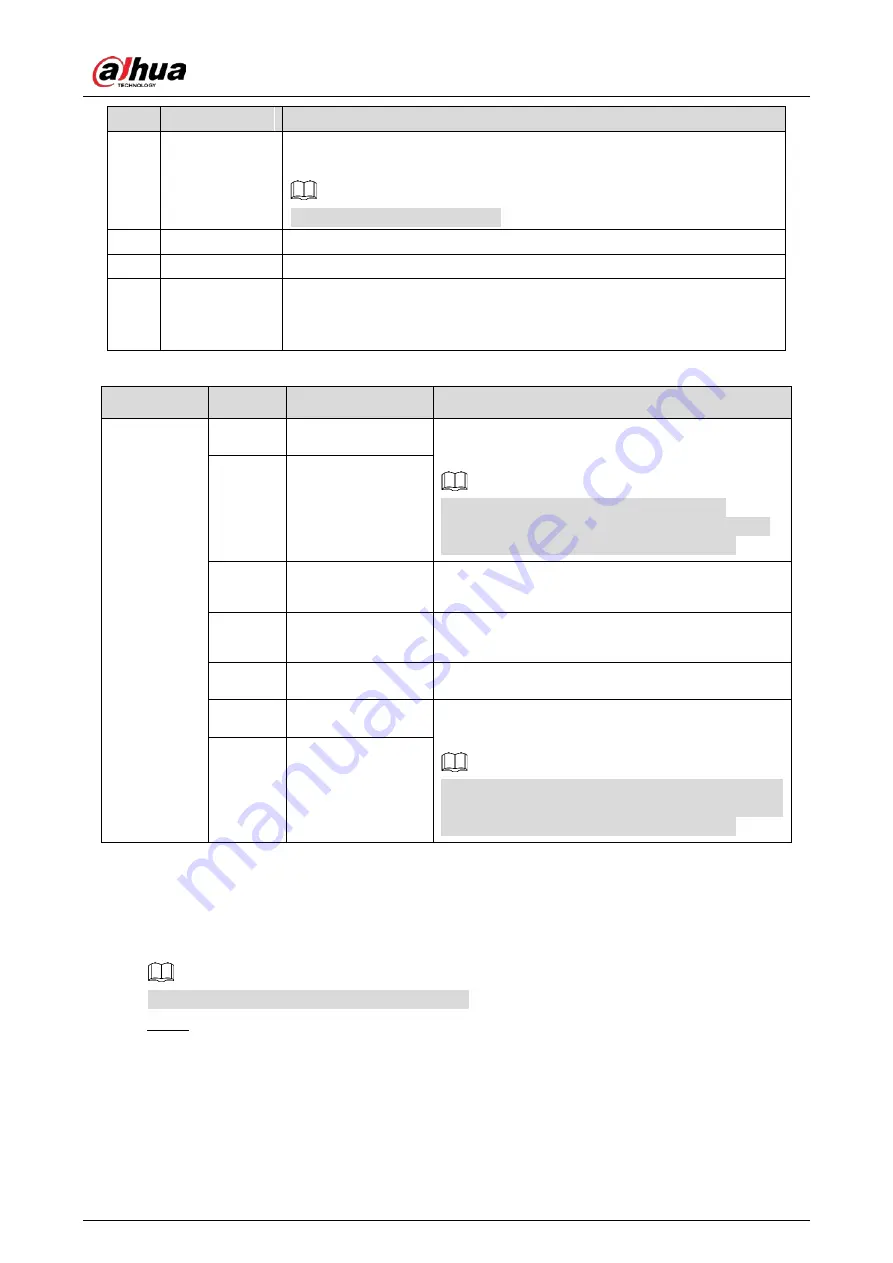
Dahua Technology IPC-EBW81242-AS-S2 Quick Start Manual Download Page 8

Quick Start Guide


No. 

Port Name 

Description 

Ethernet Port 


Connects to network with network cable. 


Provides power to the device with PoE. 


PoE is available on select model. 

Audio input 

Connects to sound-pick-up device to receive audio signal. 

Audio output 

Connects to speaker to output audio signal. 

Alarm I/O 

Includes alarm signal input and output ports, the number of I/O ports 
Might vary on different devices. For detailed information, see 
Table 1-2. 

Table 1-2


Alarm I/O port information 

Port name   

No. 

Connector name   

Description   

I/O port   

ALARM_OUT1 

Alarm output port 1 outputs alarm signal to alarm 

device.   


When connecting to alarm device, only the 

ALARM_OUT 1 port and ALARM_OUT_GND 1 port 

with the same number can be used together. 

ALM_OUT_GND1 

ALARM_IN1 

Alarm input port 1 receives the switch signal of 
external alarm source. 

ALARM_IN2 

Alarm input port 2 receives the switch signal of 
external alarm source. 

ALM_IN_GND 

Alarm input GND. 

ALARM_OUT2 

Alarm output port 2 outputs alarm signal to alarm 

device.   


When connecting to alarm device, only the 

ALARM_OUT  2  port and ALARM_OUT_GND 2  port 

with the same number can be used together. 

ALM_OUT_GND2 


Connecting Alarm Input/output 

1.2


Alarm input/output is available on select models. 


Connect alarm input device to the alarm input end of the I/O port. 

Step 1

Device collects different states of alarm input port when the input signal is idling and being 
grounded. Device collects logic "1" when input signal connecting to 3.3 V or idling; device 
collects logic "0" when input signal being grounded. 

Summary of Contents for IPC-EBW81242-AS-S2

Page 1: ...Panoramic Fisheye Network Camera Quick Start Guide V1 0 0 ZHEJIANG DAHUA VISION TECHNOLOGY CO LTD...

Page 2: ...local privacy protection laws and regulations to protect the legitimate rights and interests of other people by implementing measures which include but are not limited Providing clear and visible ide...

Page 3: ...reserve the right of final explanation Upgrade the reader software or try other mainstream reader software if the manual in PDF format cannot be opened All trademarks registered trademarks and the com...

Page 4: ...void fire or lightning Keep sound ventilation to avoid heat accumulation Transport use and store the device within the range of allowed humidity and temperature Heavy stress violent vibration or water...

Page 5: ...can also remove dust with an air blower WARNING Please strengthen the protection of network device data and personal information by adopting measures which include but not limited to using strong pas...

Page 6: ...put output 2 1 2 2 Network Configuration 4 Initializing Device 4 2 1 Changing Device IP Address 6 2 2 Logging in Web Page 7 2 3 3 Installation 8 Packing List 8 3 1 Dimension 8 3 2 Installing Device 9...

Page 7: ...e to avoid short circuit and water damage For detailed operation see FAQ manual Cables Figure 1 1 Table 1 1 Cable information No Port Name Description 1 Power input Inputs 12 VDC power Please be sure...

Page 8: ...LARM_OUT_GND 1 port with the same number can be used together 2 ALM_OUT_GND1 3 ALARM_IN1 Alarm input port 1 receives the switch signal of external alarm source 4 ALARM_IN2 Alarm input port 2 receives...

Page 9: ...utput Alarm output Figure 1 3 Log in web page and configure alarm input and alarm output in alarm setting Step 3 The alarm input on the web page is corresponding to the alarm input end of the I O port...

Page 10: ...faces are for reference only Initializing Device 2 1 Double click ConfigTool exe to open the tool Step 1 Click Step 2 Click Search Setting Step 3 Setting Figure 2 1 Select the searching way Step 4 Cur...

Page 11: ...elect the devices to be initialized and then click Initialize Step 7 If you do not provide the linked information for password reset you can reset the password only through XML file When initializing...

Page 12: ...ices in one time This section is based on changing IP addresses in batches Changing IP addresses in batches is available only when the corresponding devices have the same login password Follow Step 1...

Page 13: ...server when you select DHCP Click OK Step 4 Logging in to Web Page 2 3 Open IE browser enter the IP address of the device in the address bar and press the Enter Step 1 key If the setup wizard is disp...

Page 14: ...3 1 The tools required for the installation including electric drill are not provided in the packing The operation manual and related tool are contained in the disk or the QR code Packing list Figure...

Page 15: ...3 3 3 3 1 Installation Method Installation Type Figure 3 3 Covering Mode Figure 3 4 Find the gap on the camera body align it with the TOP on the corresponding quick mounting board rotate the camera bo...

Page 16: ...the device Install SD card Figure 3 5 3 3 3 Attaching Device Make sure the mounting surface is strong enough to hold at least three times of the total weight of device and bracket Connect the host gr...

Page 17: ...Quick Start Guide 11 Attach device Figure 3 6...

Page 18: ...Quick Start Guide 12 Cable going through ceiling mount Figure 3 7...

Page 19: ...Quick Start Guide 13 Cable going through wall mount Figure 3 8...

Page 20: ...ck Start Guide 14 3 3 4 Installing Waterproof Connector This part is only needed when a waterproof connector comes with the device and the device is used outdoors Install waterproof connector Figure 3...

Page 21: ...Quick Start Guide...

Reviews: