


WARNING!
· After stopping the engine, fill fuel in good ventilating area. Keep firmly in mind that it is prohibited
to smoke and flame around the area. Never overfill fuel at any time.
· Prevent skin from contacting with fuel and avoid inhaling fuel vapor.
· Prohibit children from contacting fuel.
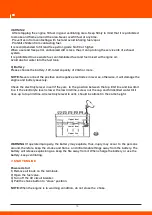
It is recommended to fill lead free petrol, grade No 90 or higher.
When use lead free petrol, carbonized dirt is less, thus it can prolong the service life of exhaust
system.
It is prohibited to use waste fuel, contaminated fuel and fuel mixed with engine oil.
Avoid dust or water into the fuel tank.
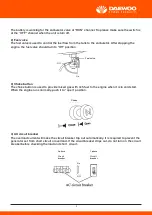
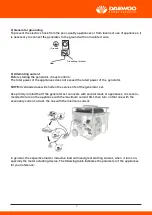
3) Battery
Please choose the battery, 12V, rated capacity of 20Ah or more.
NOTE:
Never connect the positive and negative electrodes in reverse, otherwise, it will damage the
engine and battery severely.
Check the electrolyte level in cell if they are in the position between the top limit line and low limit
line. If the electrolyte level is lower the low limit line, screw out the cap and fill distilled water till it
rises up to top limit line. All electrolyte level in cells should be almost in the same height.
WARNING!
If operate improperly, the battery may explode
,
thus, injury may occur to the persons
around, therefore, keep the smoke and flame and inflammable things away from the battery. The
battery will release explosion gas, keep the fire away from it. When charge the battery or use the
battery, keep ventilating.
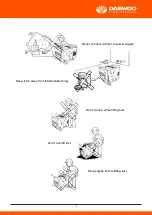
7. START ENGINE
Powered start
1) Remove all loads on the terminals.
2) Open the fuel valve.
3) Turn off the AC circuit breaker.
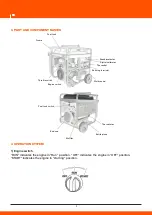
4)
Pull the choke button to “close” position.
NOTE:
When the engine is in warming condition, do not close the choke.
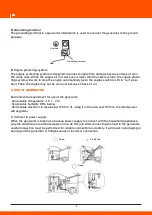
5) Turn the start switch to “start” position.
6) After starting the engine, release the “start ” switch immediately, the switch will return back to
“run ” position.
7) After warming up the engine, push the choke button to “open” position.
NOTE:
· Do not let the switch stay in “start” position over 5 seconds, or the starter may be damaged. If the
engine can not be started at first time, start the engine again at an interval of over 10 seconds.
· If the starter speed degrades after using it a period of time, it means charging the battery is neces-
sary.
8. STOPPING ENGINE
1) Turn off the AC circuit breaker.
2) Turn off the engine switch.
3) Close the fuel valve.
NOTE:
If an emergency stop is necessary, turn off the engine switch directly.
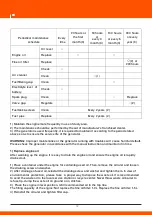
9. MAINTENANCE SCHEDULE
Good maintenance and service gives an assurance that the generator runs in safety and economy
and without any failures, in the meanwhile it is in favor of environment protection.
WARNING:
There is carbon monoxide in the emission of the engine, do not maintain the engine
before stopping it. If it must maintain during the engine running , it
is required to do it in good ventilation.
Periodical maintenance and service ensures that the generator runs in good condition. The periodi-
cal maintenance schedule indicates as follows:
1) Maintain the engine more frequently in use of dusty area.
2) The maintenance should be performed by the aid of manufacturer’s franchised dealer.
3) If the generator is used frequently, it is required to maintain it according to the period stated
above so as to ensure the service life of the generator.
WARNING:
Improper maintenance or the generator running with troubles will cause harmful default.
Please check the generator in accordance with the manual instruction and maintain it in time.
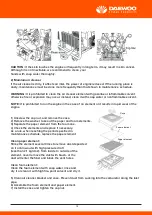
1) Replace engine oil
After warming up the engine, it is easy to drain the engine oil and ensure the engine oil is rapidly
drained out.
1) Place a container under the engine for containing used oil. Then, remove the oil ruler and loosen
the draining screw and washer.
2) After drainage of used oil, reinstall the draining screw and washer and tighten them. In view of
environmental protection, please take a proper way to dispose the waste oil. It is recommended
to send the waste oil to the local service station or recycle center. Never throw waste oil barrel to
refuse tip, dump the waste oil on ground or in ditches.
3) Place the engine in level position, refill recommended oil to the top line.
The filling capacity of the engine: Not replace the fine oil filter: 1.3 L Replace the fine oil filter: 1.5 L
4) Reinstall the oil ruler and tighten filler cap.
CAUTION:
If the skin touches the engine oil frequently in long term, it may result in skin cancer.
Although it is not inevitable, we recommend to clean your
hands with soap water thoroughly.
2) Maintain air cleaner
If the air cleaner is dirty, it affects air inlet, the power of engine reduced. If the running place is
dusty, maintenance must be done more frequently than that shown in maintenance schedule.
WARNING:
It is prohibited to clean the air cleaner element with gasoline or inflammable solvent
otherwise fire or explosion may occur, instead, clean it with soap water or nonflammable solvent.
NOTE:
It is prohibited to run the engine in the case of no element or it results in rapid wear of the
engine.
1) Unscrew the cap nut, and remove the case.
2) Remove the washer
,
take out the paper and foam elements.
3)
Separate the paper element from the foam one.
4) Check the elements and replace if necessary.
As a rule, when reaching the period specified in
maintenance schedule, replace the paper element
Clean paper element:
Strike the element several times to remove dust deposited
on it or blow out with high pressure draft
(less than 2.1 kg/cm2), from inside to outside of the
element, never remove the dust with brush, or the
dust will enter the fiber and block the vent holes.
Clean foam element:
Clean the foam element with soap water
,
rinse and
dry it or clean it with high fire-point solvent and dry it.
5) Clean air cleaner bracket and case. Prevent dust from sucking into the carburetor along the inlet
pipe.
6) Assemble the foam element and paper element.
7) Install the case and tighten the cap nut.
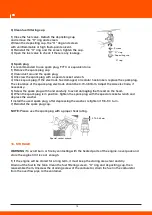
3) Clean fuel filtering cup
1) Close the fuel valve. Detach the depositing cup
and remove the “O” ring and screen.
2)Clean the depositing cup, the “O” ring and screen
with uninflammable or high flash-point solvent.
3) Reinstall the “O” ring and the screen
,
tighten the cup.
4) Open the fuel valve to check if there is any leakage.
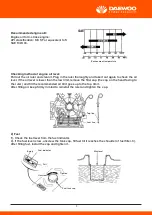
4) Spark plug
It is recommended to use spark plug, F7TC or equivalent one.
1) Remove the spark plug cap
2) Clean dust around the spark plug.
3) Unscrew the spark plug with a special socket wrench.
4) Check spark plug. If the electrode has damaged, or isolator has broken, replace the spark plug.
The clearance of the spark plug electrode should be 0.70-0.80mm. Adjust the side electrode, if
necessary.
5) Screw the spark plug with hand carefully to avoid damaging the thread on the head.
6) When the spark plug is in position, tighten the spark plug with the special socket wrench and
depress the washer.
If install the used spark plug
,
after depressing the washer, retighten it 1/8-1/4 turn.
7) Reinstall the spark plug cap.
NOTE:
Please use the spark plug with a proper heat rating.
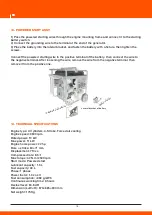
10. STORAGE
WARNING:
To avoid burn or fire by contacting with the heated parts of the engine, never pack and
store the engine till it is cool enough.
1) If the engine will be stored for a long term, it must keep the storing area clear and dry.
Drain out the fuel in the tank. Clean the fuel filtering screen, “O” ring and depositing cup, then
reassemble them. Unscrew the draining screw of the carburetor
,
drain the fuel in the carburetor
from the overflow pipe to the container.
WARNING:
As a ruler, gasoline is an inflammable and explosive liquid. After stopping the engine,
drain fuel in ventilating condition. Prohibit firing and smoking
during drainage.
2) Remove the oil level ruler, unscrew the draining screw and drain out the engine oil in crankcase.
Tighten the draining screw, fill fresh oil to the top line, then reinstall the ruler.
3) Remove two spark plugs, fill 5 lm-10 lm oil (a spoon of oil) in the combustion chamber. Rotate the
crankshaft in several turns to scatter the oil in the head, then reinstall the spark plugs.
4) Rotate the engine slowly till a drag is felt. In such case, all valves are closed to prevent the humi-
dity from air into the head.
5) Place the generator set in dry and ventilating area.
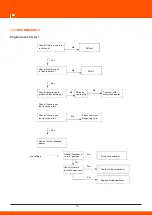
11. TROUBLESHOOT
Engine does not start
:
11


