background image

PLAYBACK

45

Recording to TV

Basic Recording

Basic Recording

Follow the instructions below to record a TV program.

1

Turn on the DVD RVCR and load a
recordable disc or tape.

Make sure your TV input is set to view the DVD
RVCR.

2

Set the desired Recording mode by pressing
[REC MODE] repeatedly.

DVD: HQ (High Quality - 1 hr/disc), SP (Standard
Play - 2 hrs/disc), EP (Extended Play - 4 hrs/disc),
or SEP (Super Long Play - 8 hrs/disc). 
VCR: SP (Standard Play), LP (Long Play - 2 times
SP)

3

If your DVD RVCR does not show a
TV program, press [INPUT] on the remote
control. Use [PR+/–] to select the TV channel
you wish to record.

4

Press [AUDIO] to select the audio channel to
record (Stereo, BIL, or Mono).

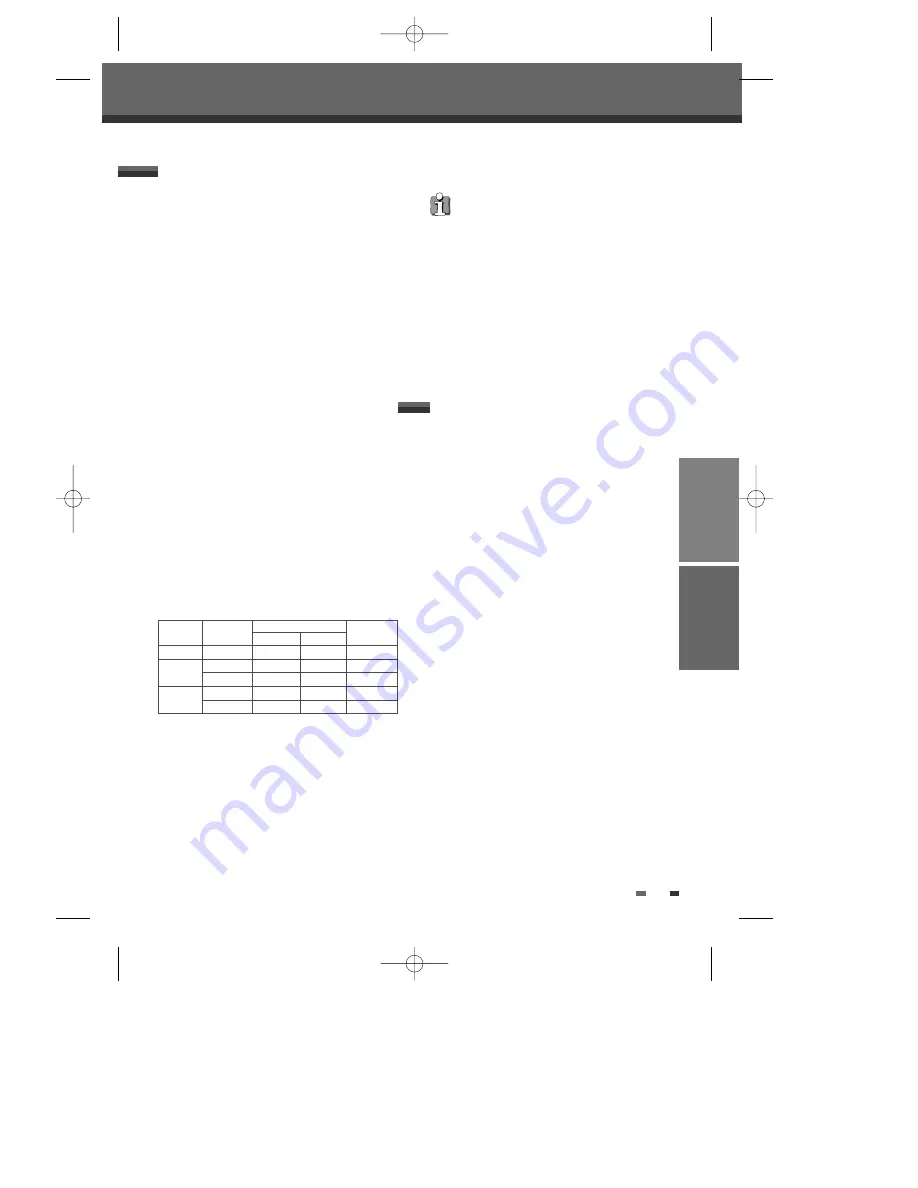
The table below shows what audio channel will be
recorded with different settings and different types
of broadcasts.
The last column (Monitor Audio) shows what you
will hear during recording. For example, if the TV
broadcast is in Stereo, then setting the DVD
RVCR to Stereo will record the
broadcast in Stereo, and the Monitor Audio will
also be in Stereo.

5

Press [REC (

)] once.

Recording will start. The REC indicator lights on
the front panel display.
Recording continues until you press [STOP] or the
disc is full.
To record for a fixed length of time, see One
Touch Record.

6

Press [STOP (

)] to stop recording.

Broadcast Audio

Monitor

L Ch

R Ch

Audio

MONO

MONO

MONO

MONO

MONO

STEREO

L

R

STEREO

MONO

MONO

MONO

MONO

BIL I

BIL I

BIL I

BIL I

BIL II

BIL II

BIL II

BIL II

TV

Broadcast

STEREO

BIL

Selected

Audio

The maximum number of DVD titles per disc is
49. If the DVD RVCR is powered off
during DVD recording, the recording will not be
saved.

If a DVD+RW or unfinalised DVD+R disc is
inserted in the tray, no title is played
automatically after loading is finished. 

If you are recording to a blank DVD+R (+RW)
disc, it may take up to 7 minutes (it depends on
disc) for post processing after recording. 

RECORDING

One Touch Recording allows you to add recording
time in fixed increments at the touch of a button.

1

Follow steps 1-4 under Recording from TV.

2

Press [REC (

)] repeatedly to set the length of

the recording.

Recording starts after the first press. Each
subsequent press increases the recording time by
30 minutes  (DVD) within the available space or
30 minutes (VCR, to a maximum of 10 hours).
The recording time is displayed on the front panel
display.

One Touch Record (OTR)

DF-H7BD2D-JB-I(GB)  2008.4.11 1:53 PM  ˘

` 45   mac001  1200DPI 100LPI

Summary of Contents for DRV-6705

Page 1: ...DVD Recorder VCR DVD Recorder VCR DRV 6705 User Manual DF H7BD2D JB I GB 2008 4 11 1 52 PM A mac001 1200DPI 100LPI ...

Page 2: ...ture Make sure the product is placed at least 10 cm apart from other home appliances or obstacles to ensure sufficient ventilation The product should not be exposed to dripping or splashing and no objects filled with liquids such as vases should be placed on top of the product Before a storm and or lightning unplug the product from the mains supply and aerial Put the product on a steady flat surfa...

Page 3: ...UCT CAUTION TO REDUCE THE RISK OF ELECTRIC SHOCK DO NOT REMOVE COVER OR BACK NO USER SERVICEABLE PARTS INSIDE REFER SERVICING TO QUALIFIED SERVICE PERSONNEL The lightning flash with arrowhead symbol within an equilateral triangle is intended to alert the user to the presence of uninsulated dangerous voltage within the product s enclosure that may be of sufficient magnitude to constitute a risk of ...

Page 4: ...ked or covered These openings must not be blocked by placing the unit on a bed sofa rug or other similar surface This unit should never be placed near or over a radiator or heat radiator This unit should not be placed in a built in installation such as a bookcase or rack unless proper ventilation is provided or the manufacturer s instructions have been adhered to 10 POWER SOURCES This unit should ...

Page 5: ... mounted to a wall or ceiling only as recommended by the manufacturer 23 HEAT The product should be situated away from heat sources such as radiators heat registers stoves or other products including amplifiers that produce heat 24 To prevent battery electrolyte leakage which may result in injury and damage to the unit or other objects observe the following precautions A All batteries must be inst...

Page 6: ... Table of Contents _______________________5 Overview ______________________________6 Identification of Controls _________________10 Introduction Connecting Antenna Cable _______________15 Connecting a TV ________________________15 Connecting an Amplifier Receiver __________17 Connecting Optional Equipment __________18 Connecting a Digital Camcorder ___________18 Connections Initial Installation __...

Page 7: ...recordings titles are marked deleted title Before a DVD R can be played in a DVD player it must be finalised in the DVD Recorder VCR Once this process is complete no further recordings can be added What can I do with my DVD Recorder VCR Your DVD Recorder VCR is a machine for recording and playing back digital video discs with two way compatibility with the universal DVD video standard This means e...

Page 8: ...may be played by your player Title The main film accompanying feature content or music album Each title is assigned a title reference number enabling you to locate it easily Chapter Sections of a movie or a musical piece that are smaller than titles A title is composed of one or several chapters Each chapter is assigned a number to enable you to easily locate the chapter you want Depending on the ...

Page 9: ...being recorded When recording a TV broadcast if the reception is poor or the picture contains interference the recording times may be shorter Discs recorded at high speeds equal to or greater than 2X may not be recognized If you record still pictures or audio only the recording time may be longer The displayed times for recording and time remaining may not always add up to the exact length of the ...

Page 10: ...ting environment For details please contact your nearest dealer Remote Control Operation Range Point the remote control at the remote sensor and press the buttons Distance Within 23 ft 7 m of the remote sensor Angle Within 30 in each direction of the remote sensor Remote Control Battery Installation Detach the battery cover on the rear of the remote control and insert two AAA batteries Make sure t...

Page 11: ...rder VCR on and off Cassette Compartment VCR deck Insert a video cassette here Disc Tray DVD deck Insert a disc here VCR EJECT Ejects the tape in the VCR deck REC Starts recording Press repeatedly to set the recording time STOP Stops playback or recording PLAY PAUSE Starts playback of a disc or tape Pauses playback or recording temporarily REW DVD Skips to previous chapter VCR Rewinds the tape dur...

Page 12: ...VCR Timer Recording is in standby mode Indicates the VCR is recording OTR Recording mode Recording Pause mode Indicates when the DVD Recorder VCR is locked Indicates the DVD Recorder VCR is in VCR mode set by TV VCR button Indicates the DVD Recorder VCR is in TV mode set by TV VCR button Others AV 1 AV1 input AV 2 AV2 input Copy DVD to VCR copying VCR to DVD copying F AV Front AV input DV DV input...

Page 13: ...ecorder VCR on and off Opens and closes the disc tray in DVD mode Ejects the tape in the VCR deck in VCR mode Switches the DVD Recorder VCR input to TV tuner AV1 AV2 FAV or DV Selects DVD mode Selects VCR mode Displays or exits the Setup menu Displays information about the currently loaded disc VHS tape or TV channel Displays the Timer Recording menu Confirms menu selections œ Selects menu options...

Page 14: ...r TV does not support Progressive Scan do NOT change to Progressive Scan mode When video output mode is changed from RGB to Interlace or Progressive Scart 1 will not be correct colour for Component video As component outputs have their own Jacks on the back side change the TV input into Component input after connecting the component cables from the DVD Recorder VCR to TV Changing from Interlace or...

Page 15: ... RF IN FROM ANT Connect to your antenna or cable TV outlet RF OUT TO TV Connect to a TV with an RF input Scart socket 1 Connection of a TV set Composite output and RGB output COAXIAL Digital Audio Out Connect to an amplifier with a coaxial digital audio input Rear panel Caution Do not touch the inner pins of the jacks on the rear panel Electrostatic discharge may cause permanent damage to the DVD ...

Page 16: ...will work with all input sources Please refer to the manuals for your TV VCR stereo system or other devices as necessary to make the best connections For better sound reproduction connect the DVD Recorder VCR s AUDIO OUT jacks to the audio in jacks of your amplifier receiver stereo or audio video equipment See Connecting an Amplifier Receiver on page 17 Caution Make sure the DVD Recorder VCR is co...

Page 17: ... 24 Progressive Scan does not work with the RF Audio Video or S Video connections Scart Connection 1 Plug a scart cable into the scart socket EURO AV1 at the back of the DVD Recorder VCR and the corresponding scart socket at the back of the TV set V 2 Plug a scart cable into the blue scart socket EURO AV2 DECODER at the back of the DVD Recorder VCR and the corresponding scart socket at the back of...

Page 18: ...s one or more of the audio formats provided by your DVD Recorder VCR MPEG 2 Dolby Digital and DTS Check the receiver manual and the logos on the front of the receiver Due to the DTS Licensing agreement the digital output will be in DTS digital out when the DTS audio stream is selected If the audio format of the digital output does not match the capabilities of your receiver the receiver will produ...

Page 19: ...k it is possible to connect a DV digital camcorder video deck or DVD R RW recorder and digitally transfer DV tapes or DVD R RW discs to DVD R DVD RW Use a DV cable not supplied to connect the DV In Out jack of your DV camcorder video deck to the front panel DV IN jack of the DVD Recorder VCR Connecting a Digital Camcorder This jack is for connection to DV equipment only It is not compatible with d...

Page 20: ...st follow the initial installation process to set the time date channels and language preferences for the DVD Recorder VCR Initial Installation Initial Installation Re Installation This set is equipped with a multi tuner for receiving many countries broadcasts In order to receive broadcasts when in different countries follow as below 1 Press SETUP and select the Restore Defaults using œ Then RESET...

Page 21: ...se to select Standard 6 Use œ to select the desired Standard PAL BG PAL II or PAL DK 7 Use to select Reception 8 Use œ to select the desired broadcast system Antenna or Cable Antenna If you are using a standard antenna to receive channels Cable TV If you are using basic cable to receive channels 9 Use to select Auto Search 10 Search the real channel number by pressing œ 11 Select Fine Tune You can...

Page 22: ...ecoder connected to socket EURO AV2 press œ to select On 14 Use to select Store Channel 15 Use œ to select program number to store 16 Use to select Program Name Press to move to the second level If your DVD Recorder VCR is showing no station name or is showing a station name incorrectly you can correct this 17 Keyboard screen will appear when you press to move to the second level You can create th...

Page 23: ...PR number you want to adjust Then press ENTER Move Up Down After tuning TV stations into your DVD Recorder VCR you may wish to change the order of PR s you have in your set to your preference 1 Use to select Move Up or Move Down and press ENTER 2 The selected PR will be moved up or moved down Edit After tuning TV stations into your DVD Recorder VCR you may wish to put a name 4 digits into any chan...

Page 24: ...r VCR Setup menu and on screen displays 1 Press SETUP The Setup menu appears 2 Use to select Language 3 While Language is selected press to select OSD Language 4 Press ENTER to move to the second level 5 Use to select the desired language 6 Press ENTER to confirm your selection then press SETUP to exit the menu Menu Subtitle Audio Language Select your preferred language for Disc Menus Subtitles an...

Page 25: ...ace mode you can watch RGB signal with connecting the recorder to analog television using the SCART jacks Interlace 576i or Progressive 576p If you connect the DVD Recorder VCR to a digital television DTV or Monitor using the COMPONENT jacks set Video Output to 576i or 576p i Interlaced scan mode p Progressive scan mode Follow the same procedure as TV Aspect to change the Video Output 1 Press SETU...

Page 26: ...igital only for DVD or MPEG soundtrack If the DVD is recorded with a DTS sound track then no sound will be heard Setup menu Preference Audio Setting Dynamic Range While watching DVD movies you may wish to compress the dynamic range of the audio output the difference between the loudest and quietest passages This allows you to listen to a movie at a lower volume without losing clarity of sound Set ...

Page 27: ...e parental level from Adult to Kid safe 1 Press SETUP 2 Use to select Preference 3 While Preference is selected press to select Parental Control And press ENTER 4 Use to select parental level and press ENTER The Password Input dialog will appear Enter a 4 digit password using the 0 9 buttons If this is the first time you have entered a password you will be prompted to enter the password again to c...

Page 28: ...Clock enables the DVD Recorder VCR to set the clock automatically whenever it is in Standby mode plugged in but powered off Auto Clock is only available for models with the VPS PDC function Some broadcasting stations may send the time and date along with the VPS PDC data The video will automatically use this time and date during the initial setting up procedure during normal use and every time you...

Page 29: ...C status This feature enables you to search for Index marks or specific times on your VHS tapes 1 While Preference is selected from the setup menu press to select VCR 2 Press ENTER 3 The VCR submenu is displayed 4 Select Index Index or Go To Zero If you select Index or Index and press ENTER your DVD Recorder VCR will locate your index mark and begin playback If you select Go To Zero and press ENTE...

Page 30: ...try language channel and clock settings again Restore Default Do you want to Restore Default OK Cancel Setup menu System DivX R VOD DRM We provide you the DivX VOD Video On Demand registration code that allows you to rent and purchase videos using the DivX VOD service For more information visit www divx com vod System DivX R VOD DRM Confirm Back Exit ENTER MENU SETUP DivX R Video On Demand Your re...

Page 31: ... the disc format everything recorded on the disc will be erased While the disc is initialising the red disc mark appears on the TV screen Finalising fixes the recordings in place so that the disc can be played on a regular DVD player or computer equipped with a suitable DVD ROM drive Finalising a Video mode disc creates a menu screen for navigating the disc This is accessed by pressing MENU 1 Pres...

Page 32: ...our selection Save Save a new label after finishing entering characters Space Inserts a space at the cursor position Backspace Deletes the previous character at the cursor position Cancel Cancel the keyboard Disc Protect Disc Disc Label Disc Confirm Back Exit ENTER MENU SETUP Format Finalize Protect Disc Label Disc Info Protect Do you want to protect this disc OK Cancel Disc Confirm Back Exit ENTE...

Page 33: ...g on DVD R DVD R or DVD RW discs the entered name is displayed on the DVD player only after finalisation Disc Info includes Label numbers of titles media type status space remainder Disc Disc Info Disc Confirm Back Exit ENTER MENU SETUP Format Finalize Protect Disc Label Disc Info Disc Disc Info Confirm Back Exit ENTER MENU SETUP Label No label Title No 2 Media DVD RW Status Recordable PAL Space 2...

Page 34: ...o channel STEREO MONO RIGHT or LEFT Subtitle Shows the current subtitle language and changes the setting 1 Press DISPLAY during playback The on screen display appears on the TV screen The On Screen Display provides feedback on the status of the DVD Recorder VCR and or the currently loaded disc or VCR To access the On Screen Display or OSD press DISPLAY To display information about the currently lo...

Page 35: ...uttons on the remote control or PR buttons on the front panel Changing TV Channels 2 Use to select the Subtitle icon on the on screen display 3 Use œ repeatedly to select desired subtitle language Repeat 1 Press DISPLAY during playback The on screen display appears on the TV screen 2 Use to select the REPEAT icon on the on screen display 3 Use œ repeatedly to select a desired repeat mode DVD Title...

Page 36: ...ecorder VCR 3 Press STOP to stop playback The STOP icon appears on the TV screen If the tape reaches the end before STOP is pressed the DVD Recorder VCR will automatically stop and rewind Playing a VHS Tape Auto Tracking The automatic tracking function adjusts the picture to remove snow or streaks It works in the following cases When a tape is played for the first time When the tape speed SP LP ch...

Page 37: ...repeatedly to adjust the Slow Motion playback speed Counter Memory Function This is useful if there is a section of tape you want to view immediately after recording or if you want to return to the same point several times 1 Begin recording or playing a tape 2 At the point you want to locate later reset the real time counter to 0 00 00 by pressing CLEAR Continue to play or record 3 Press STOP when...

Page 38: ... the disc tray 3 Load your disc in the tray with the playback side down label side up 4 Press OPEN CLOSE to close the tray 5 LOAD appears on the front panel display and playback starts automatically when using DVD VIDEO and finalised discs If playback does not start press PLAY In some cases the Disc menu may appear instead Playing a DVD When a DVD RW or unfinalised DVD R R RW is inserted no title ...

Page 39: ...le number Selecting Chapters When a title on a disc has more than one chapter you can select among all available chapters as follows 1 Press PREV or NEXT briefly during playback to select the next or previous chapter 2 To skip directly to any chapter during playback press DISPLAY Use to select the Chapter icon Use œ to select the desired chapter number Disc Menu Many DVDs contain Disc menus that a...

Page 40: ...file then press ENTER You could see the third menu when you press ENTER on the selected files Play play the selected file Playlist add the selected file to playlist Cancel cancel the third menu 5 If you want to add a file to the playlist press while the file is selected After selecting files as many as you want press ENTER to go to the submenu DivX Playback Disc Media Picture Audio DivX avi drink ...

Page 41: ... are used under license When the image sound structure of a recorded file have not been undergone the interleave it will output either the image or the sound Subtitles When the subtitles are not displayed provided although it has a file of subtitles 1 Move to the Menu of DivX by pressing the STOP button 2 Use to select a file of subtitles you want by using it 3 Select the file of subtitles at that...

Page 42: ...e end of the disc 4 You can select Play Playlist and Cancel on the second menu For creating a playlist check tracks by using then press ENTER to activate the second menu Use to select Playlist and press ENTER The usage of Playlist is same with DivX on the previous page 5 While playing an Audio CD use or œ œ for x2 x4 x8 x16 x32 speed playback 6 Use PLAY PAUSE to pause playback while the disc is pl...

Page 43: ... press ENTER The second menu appears MP3 Playback On the MP3 CD menu you can display the folders on the disc Use to select the folder icon on the MP3 CD menu then press ENTER and select OPEN You can also display just the tracks in the folders Use to select a folder then press Press REPEAT to repeat a track file and press again to repeat the whole media Disc Media Picture Audio DivX 01_32kbps mp3 0...

Page 44: ...sh mode MENU Back to the Main Browser STOP Switch to the DIGEST screen and you can select the image using œ Help Digest Zoom Back Move Slide Show Menu Help Rotate Play the next time Play the previous picture Enter Exit zoom mode Jump to the index file Switch refresh mode Return to main menu Disc Media Picture Audio DivX 1003110651 jpeg 1004338855 jpeg 1006164275 jpeg 1006164514 jpeg 101148_wallpap...

Page 45: ... The music playback will not stop 6 Go to Picture category and select the image files and press ENTER Select Play on the third menu to start slideshow 7 The MP3 files you selected continue to playback during the JPEG slide show Playing MP3 Files During a Slide Show The DVD Recorder VCR can playback up to 1000 files per disc Customers should note that permission is required in order to download MP3...

Page 46: ...lights on the front panel display Recording continues until you press STOP or the disc is full To record for a fixed length of time see One Touch Record 6 Press STOP to stop recording Broadcast Audio Monitor L Ch R Ch Audio MONO MONO MONO MONO MONO STEREO L R STEREO MONO MONO MONO MONO BIL I BIL I BIL I BIL I BIL II BIL II BIL II BIL II TV Broadcast STEREO BIL Selected Audio The maximum number of ...

Page 47: ...AY PAUSE REW and FF functions 2 Press COPY while DVD is in resume stop STOP mode 3 Follow the same procedure 5 7 One Touch Copy DVD to VHS Basic Recording During one touch copy you can search or change REC SPEED and resume copy 1 During One Touch Copy press PLAY PAUSE to enter COPY EDIT mode Copy Edit DVD VCR Copy to Tape Choose quality and press COPY key SP LP Exit 1 Press PLAY PAUSE to pause the...

Page 48: ... VCR DVD on the front panel 5 Press ENTER to select the desired Record Mode in Copy to Disc menu HQ High Quality 1 hr disc SP Standard Play 2 hrs disc EP Extended Play 4 hrs disc SEP Very Low Quality 8 hrs disc 6 Press VCR DVD again to start copying 7 Stop the Copy Process To stop copying at any time press STOP Copying will stop automatically when the VHS tape ends If the VHS videotape you are att...

Page 49: ...oves the cursor left right Changes the setting of the current cursor position Press MENU to go back to the previous step Press ENTER after filling in all the program information Press TIMER to exit the Timer Record menu 5 If you modify the saved timer record list select a slot you want to modify by using Press ENTER on the selected slot then the menu will appear Edit to edit each item Delete to de...

Page 50: ... change the information by pressing ENTER and select Edit on the menu as explained above Select the appropriate input field using If required change the information using If all the information is correct press the ENTER button The programming information is stored in a TIMER block Timer Recording using ShowView system Timer Recording Target Quality Repeat DVD SP Once ShowView No 523_ _ _ _ _ _ Ti...

Page 51: ...the recording may not complete successfully Timer Recording Troubleshooting Recording Priority Timer Recording and OTR One Touch Record have the same priority but they have lower priority than manual recording During manual recording Timer Recording or OTR will be ignored The Timer indicator lights on the front panel display when the DVD Recorder VCR is ready for the Timer Recording The timer indi...

Page 52: ... see page 18 2 Press INPUT repeatedly to select the DV input DV appears on the front panel display and the TV screen Recording from a Digital Camcorder If your source is copy protected you will not be able to record it using the DVD Recorder VCR See Copyright Notice on page 7 for more details Recording from an External Input Recording from an External Input 3 Find the place on the camcorder tape f...

Page 53: ...Follow these instructions to play back a scene from the Title List 1 Select the title to playback using œ and press ENTER 2 Then select Play using on the left side menu of the screen Press ENTER to play the title Or press PLAY PAUSE to play the title 3 To stop playback at any time press STOP Then it will return to the TV screen Repeat While playing the DVD each press of the REPEAT button changes t...

Page 54: ...side menu 3 Press ENTER to go to submenu 4 Select Rename using 5 Press ENTER to change the title name 6 The Keyboard Menu will be displayed Use œ to select a character or function and press ENTER See pages 31 32 7 After the new title name is complete select SAVE and press ENTER Renaming Labeling a DVD title Protect Protecting title please wait 80 Confirm Back Exit Title List Play Erase Edit Protec...

Page 55: ...o submenu 4 Select Divide using 5 Press ENTER to divide the title in two separate titles 6 Press PLAY to start dividing and the curser will be on the Divide 7 Press ENTER when the scene you want to divide into two parts appears You can use PREV NEXT or œœ to search the scene you want to divide into two parts 8 Press ENTER while the curser is on the OK Dividing a DVD title Confirm Back Exit Title L...

Page 56: ...Cancel A B Erase Title 8 DVD VR Follow these instructions to set an index picture 1 Select the title to be edited using œ and press ENTER 2 Then select Edit using on the left side menu 3 Press ENTER to go to submenu 4 Select Set Idx Pic using 5 Press PLAY to start playing and the curser will be on the Set Idx Pic 6 Press ENTER when the scene you want to set an index picture appears and the curser ...

Page 57: ...operly Use INPUT to select AV input channel AV1 AV2 AVF or DV The power cord is disconnected The TV is not set to receive DVD Recorder VCR signal output The video cable is not connected securely The TV power is turned off The equipment connected with the audio cable is not set to receive DVD Recorder VCR signal output The audio cables are not connected securely The power on the equipment connected...

Page 58: ... copy once material cannot be played on other players The remaining blank space on the disc is insufficient The source you are trying to record is copy protected When setting the recording channel the channel is tuned on your TV s tuner Clock in DVD Recorder VCR is not set to correct time Timer has been programmed incorrectly TIMER indicator light does not appear after programming timer TV is not ...

Page 59: ... plugged into an AC power outlet with the power on This will help prevent condensation When condensation has occurred wait a few hours for the DVD Recorder VCR to dry before using it Moisture Condensation Moisture condensation can occur In locations where moisture condensation may occur DF H7BD2D JB I GB 2008 4 11 1 53 PM 58 mac001 1200DPI 100LPI ...

Page 60: ...z 8 Hz to 22 kHz CD 8 Hz to 20 kHz Video S N More than 60 dB Audio S N More than 90 dB Harmonic distortion Less than 0 06 Dynamic range More than 90 dB Resolution Over 500 lines HQ Recording Inputs Antenna In Antenna or CATV input 75 Ω Video In 1 0 Vp p 75 Ω sync negative RCA jack x 2 Audio In 8 8 dBm more than 47 k RCA jack L R x 2 DV IN 4pin i LINK IEEE 1394 standard Outputs Video Out Composite ...

Reviews: