background image

21

VCR

Oper

ation

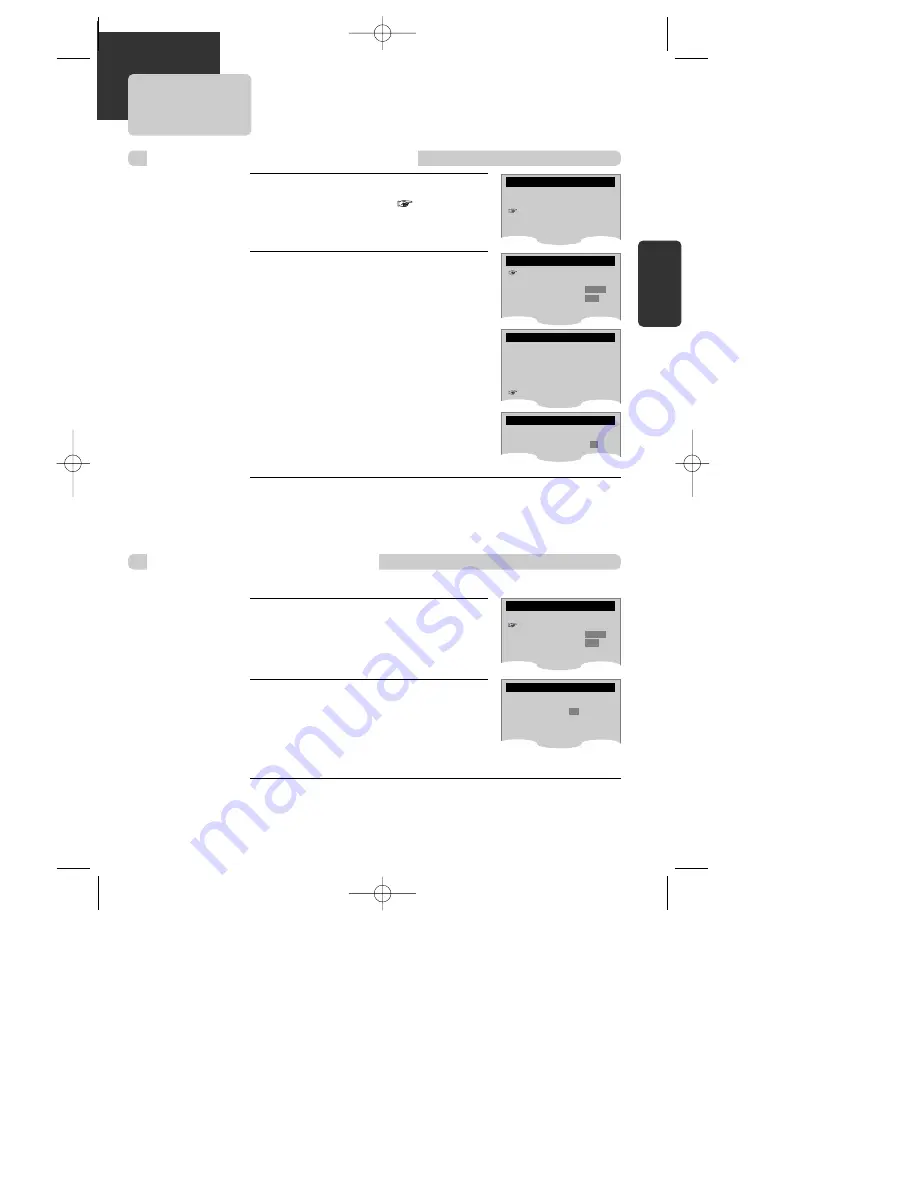
To Memorize Channels Manually 

To add additional channels without affecting your existing stored channels, follow the steps below:

Press [SETUP] button and select
ÒCHANNEL SETÓ.
Select ÒAdd/Remove ChannelsÓ. 

1

1

Select the desired channel and
memorize it.

Press [NUMBER] button of remote control to
select the desired channel to memorize. 
When [

] button is pressed, ÒREMOVEDÓ under

channel number converts into Ò

ADDEDÓ

.

2

2

Check the memorized channel.

To check the memorized channel, press [CH up/down] button on remote
control. 

3

3

ADD/REMOVE CHANNELS

Channel 02

is now ADDED.

Memorizing TV Channels

Press [SETUP] button.

Press [

] button to move 

into CHANNEL

SET, and then select CHANNEL SET with
[ENTER] button. 

Select ÒAuto Channel SearchÓ. 

Press [ENTER] button in CHANNEL SET window
to select AUTO CHANNEL SEARCH. 

Select ÒDetect AutomaticallyÓ. 

Press [ENTER] button in AUTO CHANNEL SEARCH
window to detect the channel automatically.

Channel number changes successively from 01
to 125, while only broadcasting channels are
memorized automatically. When memory
process is completed, the lowest numberÕs one
of memorized channels is displayed.

Please, check the memorized channels.

To check the memorized channels, press [CH up/down] button on remote
control. 

1

1

2

2

3

3

To Memorize Channels Automatically 

SETUP

CLOCK SET
TIMER RECORDINGS
CHANNEL SET
FUNCTIONS
LANGUAGE SELECT

AUTO CHANNEL SEARCH

What type of signal are 
you using?

Cable TV
Antenna
Detect Automatically

AUTO CHANNEL SEARCH

Now scanning channel 11

CHANNEL SET

Auto Channel Search
Add/Remove Channels
Signal Type:

CABLE

Channel Change:

CH3

CHANNEL SET

Auto Channel Search
Add/Remove Channels
Signal Type:

CABLE

Channel Change:

CH3

DR-C91/92D1N-BS  04.1.19 9:51 PM  ˘

`

21

Summary of Contents for DR-C913B

Page 1: ...h other region code it does not operate Please only use a disc with region code 1 or ALL is a Prohibition mark If this mark is displayed in operating the product please wait for a while then use it If...

Page 2: ...Avoid direct exposure to beam CAUTION Do not open the top cover There are no user serviceable parts inside the Unit leave all servicing to qualified service personnel CLASS 1 LASER PRODUCT FCC NOTICE...

Page 3: ...d or covered These openings must not be blocked by placing the unit on a bed sofa rug or other similar surface This unit should never be placed near or over a radiator or heat radiator This unit shoul...

Page 4: ...t yourself as opening or removing covers may expose you to dangerous voltage or other hazards Refer all servicing to qualified service personnel 22 Damage Requiring Service Unplug this unit from the w...

Page 5: ...D 4 3 for Pan and Scan 4 3 for Letter Box and 16 9 for Wide Repeat playback title and chapter for DVD track and disc for VCD CD Repeat a defined period from A to B DVD Selective Play VCD CD MP3 You ca...

Page 6: ...t Follow instructions in using chemical cleaners Do not use any type of solvent such as gasoline or benzene as they may cause deterioration or paint peel off Checking Video is a high precision device...

Page 7: ...g the radio stations 50 Listening to the radio 51 Speaker Setup Speaker Setup for enjoying the surround sound effect 52 Delay Time Setting 54 Setting the sound level 56 Installation DVD Playback 32 Pl...

Page 8: ...een in VHS mode The indicator lights in red in Recording mode 1 DVD P SCAN indicator The indicator lights in yellow green in DVD mode The indicator lights in red in Progressive Scan mode 2 Operation D...

Page 9: ...cator Dolby Digital indicator Prologic II indicator FM AM indicator Playback indicator 1 Pause indicator 2 Multi Angle indicator 3 DTS indicator 4 DSP indicator 5 PCM indicator 6 PBC PlayBack Control...

Page 10: ...unit AM Antenna Jack S Video Output Jack DVD only COMPONENT Progressive Out Jack DVD only To obtain better screen quality connect the unit to a TV or monitor with a COMPONENT 480i or 480p input Note V...

Page 11: ...nnel button DVD PREVIOUS move into a previous chapter or track NEXT Move into a next chapter or track button DVD OPEN CLOSE button VCR EJECT button SOUND MUTE button RADIO FM AM Select button Q SLEEP...

Page 12: ...idity L R VCR REC DVD P SCAN VCR DVD AM FM CH PRESET REC P SCAN SOUND FIELD CH PRESET MIN MAX PHONES Accessories Remote Control 2 Batteries RF cable AM antenna FM antenna Connecting cable to Audio Vid...

Page 13: ...cable of Audio Video jack Select VCR mode by pressing TV INPUT button in TV you can view more clear screen and sound than connection with RF cable only Method Method 3 3 Connecting to a TV that has a...

Page 14: ...from other units Out A jack used to send signal of this unit to other units Connect with Audio Video terminal you can enjoy more clear video and audio Use INPUT button in this remote control to select...

Page 15: ...o the FM antenna connector FM wire antenna supplied AM loop antenna supplied To prevent noise pickup keep the AM loop antenna away from the DVD Receiver and other component Be sure to fully extend the...

Page 16: ...of bass frequency Connect an active subwoofer to the WOOFER OUT connector using a monaural audio cord not supplied When you connect an active subwoofer disconnect the woofer from the WOOFER speaker co...

Page 17: ...o to display Video1 Video2 or Video3 in TV screen 3 3 Press PLAY button in other video equipment 4 4 Press REC button in DVD Video if you want to record contents of other video equipment 5 5 Press Pau...

Page 18: ...OF ELECTRIC SHOCK DO NOT OPEN 20 18 16 14 12 10 8 6 4 3 21 19 17 15 13 11 9 7 5 3 1 S VIDEO S VIDEO INPUT 1 1 Connect Audio jack Connect AUDIO OUT in rear panel of DVD Video to In jack of stereo sound...

Page 19: ...ct VCR Press VCR button If VCR mode is correctly selected VCR indicator on the front panel is lighted Then remote control button works as VCR function Press the VCR button then it becomes to the VCR O...

Page 20: ...SET screen If CLOCK SET is completed press SETUP button 1 1 2 2 3 3 SETUP CLOCK SET TIMER RECORDINGS CHANNEL SET FUNCTIONS LANGUAGE SELECT Move Select End SETUP ENTER CLOCK SET Time and Date Set Auto...

Page 21: ...playback NOTE VCR doesn t have Slow Reverse Playback function If you want to watch a series of screens one by one FRAME ADVANCE press button in Pause mode Each time you press this button the picture a...

Page 22: ...HANNEL SET window to select AUTO CHANNEL SEARCH Select Detect Automatically Press ENTER button in AUTO CHANNEL SEARCH window to detect the channel automatically Channel number changes successively fro...

Page 23: ...ER to toggle between CABLE and ANTENNA When the desired viewing mode is displayed press SETUP twice to exit CHANNEL SET Auto Channel Search Add Remove Channels Signal Type CABLE Channel Change CH3 To...

Page 24: ...TUP ENTER Move Select End SETUP ENTER Switch the VCR to TV or VCR mode automatically This feature controls whether the TV VCR switch changes automatically to the VCR mode when the VCR is turned on Pre...

Page 25: ...n the video cassette tape when the recording session began Searching a cassette tape for programs indexing Press SETUP button and select FUNCTIONS Select Go To Search 1 1 You can mark a segment of the...

Page 26: ...on the third time and the tape counter also disappears from the screen and to return to the original display Press SETUP button and select CLOCK SET Move into Auto DST with 1 1 Press ENTER to switch b...

Page 27: ...le Press AUDIO in stereo or SAP mode to select mono sound To return to stereo sound either press the AUDIO button again or reselect the channel STEREO MONO SAP When recording a stereo signal the recor...

Page 28: ...nguage is set and recorded in the DISC it is automatically played in the set language in every playing 4 4 A user can set OSD language Audio Subtitle and Disc Menu In case a disc does not include sett...

Page 29: ...lect Screen Saver by pressing button Press ENTER button to select the desired setting If bright scenes continue to be displayed in screen TV can be damaged Set the screensaver to On the screensaver fu...

Page 30: ...u have selected above press the or buttons To adjust the Delay setting for the speaker you have selected above press the or buttons Note For additional speaker setting information refer to Speaker Set...

Page 31: ...d if A password has been set and the unit is in Lock mode the disc has a rating assigned The initial password is 3308 In case you forget newly input password you can use 3308 as a password DVD initial...

Page 32: ...To return to DVD settings select Default from the Ratings menu by pressing the or buttons and select Reset 5 5 Password Unassigned Parental 8 ADULT Default Reset Reset Audio Display Ratings Language D...

Page 33: ...case of CD VCD1 1 and MP3 the disc plays in order of its track numbers CD MP3 3 3 To stop it press button For pause press PLAY PAUSE button in playback mode If you press this button once more it star...

Page 34: ...ress or button in Playback mode You can watch the desired screen in the slow forward reverse playback For the case of Video CD this reverse slow playback function is unavailable The mark will appear I...

Page 35: ...c menu screen will appear only when the disc has PBC function and PBC ON is activated 1 1 Press the ENTER button or PLAY button after pressing the button to select the desired title The selected title...

Page 36: ...D Playing a programmed order DVD VCD CD Program Track 001 00 03 12 Track 002 00 03 54 Track 003 00 02 08 Track 004 00 03 16 Track 005 00 03 11 Track 006 00 04 48 Track 007 00 03 48 Track 008 00 03 02...

Page 37: ...using the NUMBER or buttons 2 2 DVD You may repeat a defined period from A to B At the point where you want to start the repeat playback press A B button The right figure appears and repeat playback s...

Page 38: ...elected position 3 3 If you want to search with a time please select the Time window with buttons and enter the new time number to be searched using the NUMBER buttons 2 2 VCD CD Searching VCD and CD...

Page 39: ...ayback mode and time elapsed To exit from Display mode press DISPLAY button again DVD VCD CD Confirming the current VCD CD disc mode T 001 C 020 01 46 03 T 001 00 49 29 1 3 Stereo 1 4 Dolby Digital 5...

Page 40: ...you can move the cursor to MP3 Music File To playback MP3 File press ENTER key MP3 Confirming the current MP3 disc mode Confirming the current PLAY mode on screen Track List DIR DIR mp3 001 A 002 A 0...

Page 41: ...title information by using buttons In completing selecting please press SUBTITLE button one more A certain disc may not support audio select or subtitle select Each time you press SOUND FIELD button i...

Page 42: ...ter and the point can be changed with the operation of button If a disc includes multi angle information the user can watch a screen in multi angles The function is limited to a DVD disc supporting mu...

Page 43: ...layed correctly on the on screen display This unit can read the maximum 999 files and folder The sampling frequency must be within 4kHz 48kHz The ability of this unit to read JPG discs is dependent on...

Page 44: ...Also they are different according to discs If it is a VCD2 0 select PBC ON mode by pressing TITLE PBC button This function is not available for CD and VCD1 1 1 1 Move the cursor to the desired item w...

Page 45: ...ess VCR button of remote control to change into VCR mode Power on TV and select Ch 3 or press INPUT button of TV set to select External Input mode Insert a recordable tape Insert a tape with safety ta...

Page 46: ...1 1 First follow the steps 1 to 4 in Recording With VCR 2 2 Press REC button as much as you want See the Recording Times Table below Once continuous recording until you press STOP button Twice record...

Page 47: ...d Select the date start time and end time to record with NUMBER buttons 5 5 Turn on the TV Make sure that current time is set correctly Insert a recordable tape with safety tab Prior to the setting pr...

Page 48: ...the details to delete 2 2 PROGRAM1 ONE TIME Channel 104 Cable Start Date 06 04 Start Time 10 10 AM End Time 11 10 AM Tape Speed SP PROGRAM1 ONE TIME Channel 104 Cable Start Date 06 04 Start Time 10 10...

Page 49: ...ter setting the timer recording program if you insert a video cassette without a safety tab into the unit In power on mode the unit will playback automatically REC IN ADV will be scrolled on the displ...

Page 50: ...cording to TIMER REC procedures select TIMER RECORDINGS SET window and complete the settings At this time the video channel should be input in CH3 or CH4 EXTERNAL INPUT of the converter connected chan...

Page 51: ...ase Scanning stops when the DVD Receiver tunes in a station 2 2 Press MEMORY button A preset number will display in the display window 3 3 Press PRESET button to select the preset number you want 4 4...

Page 52: ...ime you press the button the DVD receiver tunes in one preset station at a time 2 2 Adjust the volume by rotating VOLUME on the front panel or pressing VOL or VOL button repeatedly 3 3 To turn off the...

Page 53: ...dential Unpublished works Copyright 1992 1997 Dolby Laboratories All rights reserved Manufactured under license from Digital Theater Systems Inc US Pat No 5 451 942 and other worldwide patents issued...

Page 54: ...eate sound motion and atmosphere required for surround playback For optimum sound effects do not place the rear speakers too far behind the listening position Install them at or above the height of th...

Page 55: ...time 5ms In Dolby Pro Logic mode Center delay time no setting Rear delay time 15 30ms If the rear delay time is set in Dolby Digital mode in the Dolby Pro Logic mode the delay time will be set automa...

Page 56: ...the DELAY button to select the desired speaker to set Each time you press the DELAY button it changes in the following order FL Front Left CT Center FR Front Right SL Surround Left SR Surround Right...

Page 57: ...n case of Configure 2 or 3 it is impossible to adjust the Level setting for the Woofer WF Small Speaker applied with high pass filter Large Speaker applied without high pass filter 5 5 To adjust the v...

Page 58: ...tone if you adjust the sound level it will be paused in the current speaker channel 2 2 In Dolby Digital and Dolby Pro Logic mode by using the test tone function you can easily adjust the sound balan...

Page 59: ...e for ALL regions Therefore this player will play DVD discs marked with labels containing the region number 1 or ALL Region 1 Region ALL 1 ALL Terms related with DVD DVD A DVD abbreviation of Digital...

Page 60: ...mpromised sound quality Bitstream Digital audio data that is decoded into an analog signal for subsequent output to speakers Lt Rt It indicates L R of Dolby Digital 2CH Downmix output Downmix DOWNMIX...

Page 61: ...rms related with VCR AFT Automatic fine tuning a circuit that automatically adjusts TV reception to optimum condition CABLE Cable television Index Search A feature of this VCR that automatically recor...

Page 62: ...some contaminants or be damaged A disc may be bad one Please check the connection with Dolby Digital amplifier Please check the plugs are connected with one another tightly Some contaminants may be r...

Page 63: ...s why a safe mode to protect a videotape is operated automatically Please pull out the tape and input it again In case the product is used for a long time a videotape may not be ejected for a film in...

Page 64: ...rminal Please check whether the clock is right Please check whether the timer recording info is right Please check a tab on a tape whether it is broke or not If it was broken please scotch tape it Was...

Page 65: ...put DVD only Analogue AUDIO output 2 CH 2 0Vrms Playable tape Very high dense tapes with VHS marks Playable disc DVD VIDEO CD CD 12mm CD 8mm MP3 CD R CD RW Tape speed SP 33 35mm s SLP 11 12mm s Playti...

Page 66: ...tructions furnished by us nor units which have been repaired or altered outside of our factory nor to cases where the serial number thereof has been removed defaced or changed This warranty is in lieu...

Reviews: