background image

Sound

Adjustment

40


When adjusting sound to taste

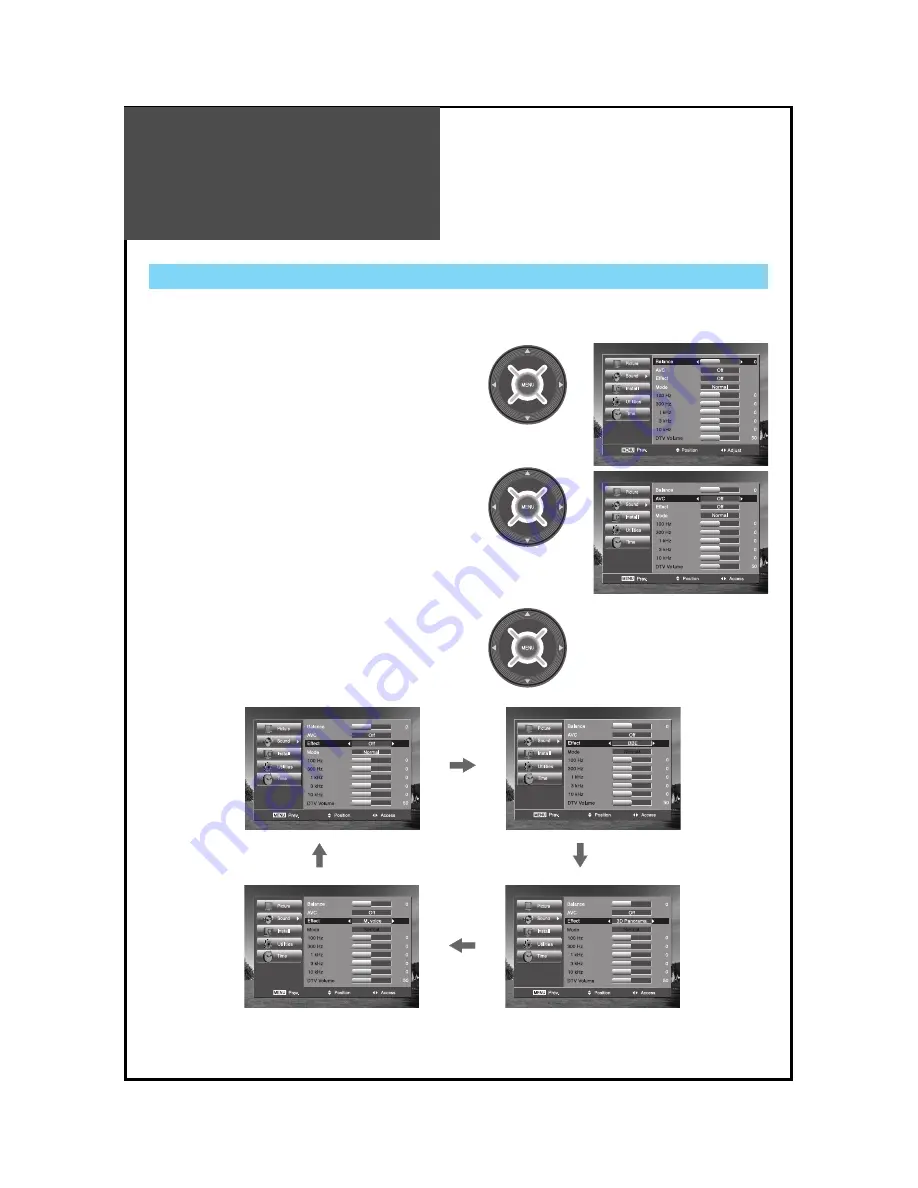
1. Adjust the Balance

• Move to 

Balance

in the 

Sound

menu. 

• Adjust the balance level by using the "LEFT/RIGHT"

buttons.

2. Select AVC(Auto Volume Control)

• Move to 

AVC

in the 

Sound

menu. 

• Select either 

AVC ON

or 

OFF

using the "LEFT/RIGHT"

buttons.

3. Sound mode selects what you want.

• Move to 

Effect

in the 

Sound

menu. 

• Select desirable Effect using the "LEFT/RIGHT" buttons.

Off => BBE => M.voice => 3D Panorama

- The user can enjoy various the sounds by adjusting Balance, AVC, Effect, Equalizer and Digital Volume.


Summary of Contents for DLV-42U1GMB

Page 1: ...LCD TELEVISION INSTRUCTION MANUAL DLV 42U1GMB DLV 46U1UMB...

Page 2: ...ve the droplets for a long time staining and discoloration may occur If the surface of the LCD panel is dirty clean it using absorbent cotton or soft cloth with water If the liquid crystal material le...

Page 3: ...ER SERVICEABLE PARTS INSIDE REFER SERVICING TO QUALIFIED SERVICE PERSONNEL The lightning flash with arrowhead symbol within an equilateral triangle is intended to alert the user to the presence of uni...

Page 4: ...nings in the cabinet and never place the set in a confined space such as built in cabinet unless proper ventilation is provided Leave a minimum 10 cm gap all around the unit 8 Power Source This TV sho...

Page 5: ...lified service personnel 17 Damage Requiring Service Unplug the TV from the wall outlet and refer servicing to qualified service personnel under the following conditions a When the power supply cord o...

Page 6: ...qualified service personnel for repair Do not put on or use the product near water and moisture such as in a bathroom washbowl etc It may be a cause of fire and electric shock hazards To prevent fire...

Page 7: ...andfireiftheantenna touchesorfallsontheelectricwire thus itmustbe installedfirmly andfaraway from thecables This section must be read carefully and followed by the user prior to the operation of the p...

Page 8: ...Each Part 21 Basic Guide Parts of the Remote Controller 23 Method To Use Basic Menu 25 To Watch TV 26 Channel Programming 28 Setting Up TV Stations 29 Selection of AV COMP MMP Input Signal 33 Selectio...

Page 9: ...le holder enclosed on the back of TV PICTURE 1 ASSEMBLY METHOD After you push the A prominence part of cable holder in the hole rotate the cable holder clockwise as an angle of 90 You can separate in...

Page 10: ...screen image and bad reception may be a cause of wrong antenna connection Be sure to check its direction and place when installing 2 Connect the combining adapter to the antenna input at the left sid...

Page 11: ...the back of the TV set ANT CABLE ANT CABLE CTV Antenna Connection Such community TV Antenna installation may be found in most co op apartments Antenna socket at the back of the TV set When a coaxial c...

Page 12: ...nna Connection Outdoor Antenna connection such as VHF or and UHF may be necessary for installation at private houses VHF Antenna UHF Antenna ANT CABLE BACK OF THE TV SET ANT CABLE Single Antenna Conne...

Page 13: ...nd S Video OUT terminal the S Video connection is recommended for better picture quality Connecting with an External Source You may connect an S Video Side input to enjoy clearer and brighter picture...

Page 14: ...or better picture quality Watching the Camcorder Recording or Video Game on TV 1 Prepare the S Video and RCA connector 2 These connectors connect to AV INPUT like below the picture 3 Turn on the TV se...

Page 15: ...nent video please check the colour of the cable between the DVD and TV set Note If your AV device has both Video OUT terminal and S Video OUT terminal S Video connection is recommended for better pict...

Page 16: ...ection 15 BACK OF THE TV SET Set Top Box BACK OF THE TV SET When connecting with a HDMI cable When connecting with a component cable Note When the Set Top Box output is DVI signal then the Audio cable...

Page 17: ...ust PC resolution to available resolution in LCD TV 2 Connect between PC and TV set using the HDMI and Audio cable like below the picture 3 Turn on the PC and TV set 4 Select HDMI mode by pressing HDM...

Page 18: ...on available in LCD TV Resolution V freq HDMI PC D Sub Component Standard 640 X 480 60Hz O O X VESA Standard 72Hz O O X VESA Standard 75Hz O O X VESA Standard 60Hz O O X VESA Standard 800 X 600 72Hz O...

Page 19: ...rs combined 3 Do not remove the source media under processing or you may lose all the data inside 4 Supportable Flash Memory Card Type 5 Supportable Multimedia Format Supported Flash Memory Cards Comp...

Page 20: ...installed a cable receiver Cable TV Broadcasting Station External Input Connection Source Antenna Input Connection Watching cable television is only possible after you have subscribed to the local bro...

Page 21: ...al AMP 20 Surround L Surround R R L Center Woofer Dolby Digital AMP I N P U T Optical output If you connect the optical output to the Dolby digital AMP you can listen to cleaner and clearer multi chan...

Page 22: ...to enter and exit the MENU Button Use this button to TV STAND BY mode TV ON mode Remote controller signal receiver The screen contains the remote controller signal receiving window therefore point th...

Page 23: ...Name of Each Part 22 Rear of TV Set Side of TV Set Right side of TV Set Left side of TV Set...

Page 24: ...grammes on TV mode See page 32 7 NUMBER Press the numbers on this board you can select PR directly in TV mode EX When you want to select PR10 you should press down 1 and 0 within 2second If you only p...

Page 25: ...multimedia PC HDMI the aspect only work as the 16 9 mode 28 PICTURE Picture modes change as follows Normal Soft Move User Sharp Normal 29 SLEEP Sleep Timer setting OFF 30min 60min 90min 120min OFF Not...

Page 26: ...us DEMO and Smart Window Auto clock Set current time On time setup Off time setup On time PR Volume Time zone NSW ACT VIC QLD SA WA TAS NT and Daylight saving 2 Press the PR button You may setup accor...

Page 27: ...PR or digit key in the ST BY mode Note The buttons of the remote control and the set operate only when AC power turn on You must pull out the plug of TV set to shut off the AC Power To suddenly turn s...

Page 28: ...mote control 2 Press the PR button Select the desired program by pressing the PR button or the number button 3 Adjust volume Sound reduces by pressing the VOL button Sound increases by pressing the VO...

Page 29: ...on Set ATS Broadcast and select Analog Digital with LEFT RIGHT buttons 3 Select the Auto Programme Place the selection bar on Auto Programme and press the LEFT RIGHT buttons 4 Please wait until the P...

Page 30: ...RIGHT buttons 2 Searching for channel in the Manual Programme Menu Move the selection bar to the Band with UP DOWN buttons Select the desired Band with LEFT RIGHT buttons Move the selection bar to the...

Page 31: ...Press the Cursor buttons to adjust the fine tuning 2 Enter a station name Move to selection bar to the Name Press the LEFT RIGHT buttons to enter the station name You can enter a station name with Cu...

Page 32: ...tons Press the Skip Red button then the color of the station name is changed to red 2 Moving the program positions Move to Programme EDIT in the Install menu Move the selection bar to program number t...

Page 33: ...as the selected programme order Reveals how strong your DTV signal is and whether you need to adjust your antenna The higher the signal strength the less likely you are to experience picture degradat...

Page 34: ...Comp 2 MMP HDMI1 HDMI2 HDMI3 PC DTV Note If sound signal is mono method connect it to the L terminal of the sound input terminal When watching video Camcorder DVD Cable TV with AV 1 Press the AV COMP...

Page 35: ...1 HDMI 2 HDMI 3 PC HDMI 1 Resolution V freq HDMI PC D Sub Component Standard 640 X 480 60Hz O O X VESA Standard 72Hz O O X VESA Standard 75Hz O O X VESA Standard 60Hz O O X VESA Standard 800 X 600 72...

Page 36: ...PC Menu Press the LEFT RIGHT buttons to adjust the frequency of display image 4 Adjustment of the Phase Move to Phase in the PC Menu Press the LEFT RIGHT buttons to adjust the phase to get a clearer p...

Page 37: ...the user to customize settings as desired Sharp For a clear cur image emphasizing high contrast for sports viewing When setting up various screen modes 1 Pressing the PICTURE button Screen changes as...

Page 38: ...mode Note The Tint function is not available when receiving PAL RF AV HDMI and PC input The adjusted levels are stored automatically in User mode When adjusting the screen to taste 1 Select PICTURE b...

Page 39: ...reen in the Picture menu Select either Full Screen ON or OFF using the LEFT RIGHT buttons Through LCD Backlight Control You can reduce the power consumption When adjusting the LCD Lamp Mode 1 Move to...

Page 40: ...ant Move to Mode in the Sound menu then the sound status changes as followed Normal User Concert Hall Live Theater Studio Normal Mode function is working as follows Note Mode function is available in...

Page 41: ...elect AVC Auto Volume Control Move to AVC in the Sound menu Select either AVC ON or OFF using the LEFT RIGHT buttons 3 Sound mode selects what you want Move to Effect in the Sound menu Select desirabl...

Page 42: ...Move to Mode in the Sound menu Adjust User mode using the LEFT RIGHT buttons Select and use the relevant frequency by pressing the UP DOWN buttons You can adjust the degree of the frequency by using t...

Page 43: ...epeatedly Stereo and MPEG Dolby Digital Digital TV mode only 1 Mono Sound Selection In Stereo reception if the stereo is weak you can switch to MONO by pressing the button Then the OSD character will...

Page 44: ...m Normal 4 3 Note Wide 16 9 16 9 will display a true 16 9 anamorphic picture with no aspect distortions Zoom Enlarge vertical size of the Wide 16 9 picture Normal 4 3 General TV screen currently broad...

Page 45: ...y Note The TV is set up with the initial password 0000 1 Setup of Subtitle Move to Subtitle in the Utilities menu Select Subtitle to On Off using the LEFT RIGHT buttons Lock Move to Lock in the Utilit...

Page 46: ...ntal guidance Digital TV mode only Prevents children from watching certain children s TV programs according to the ratings limit set Blocking Off Permits all programs R Restricted AV Adult audiences M...

Page 47: ...ock mode the Install menu is not displayed and the Volume controls is limited by 60 If you want to set up Hotel Lock mode contact your retailer or service agent Hotel Lock Access Position Lock Access...

Page 48: ...h LEFT RIGHT buttons Set the Month with the UP DOWN buttons and then press the Menu button to complete Place the cursor to Year with LEFT RIGHT buttons Set the Year with the UP DOWN buttons and then p...

Page 49: ...then press the Menu button to complete Place the cursor to AM PM with LEFT RIGHT buttons Set the AM PM with the UP DOWN buttons and then press the Menu button to complete Move to On time Volume in th...

Page 50: ...sor to Clock with LEFT RIGHT t buttons Set the Clock with the UP DOWN buttons and then press the Menu button to complete Place the cursor to Minute with LEFT RIGHT buttons Set the Minute with the UP D...

Page 51: ...cture Of Picture 50 1 Watching PIP POP By pressing the PIP POP button on the remote controller repeatedly you can select one of the following settings If you want to change the position of sub picture...

Page 52: ...o change sub screen input press the P INPUT button Sub screen change as followed PIP POP table PIP POP mode table ATV DTV VIDEO COMP COMP 1080P HDMI PC MMP ATV X X O O X X O DTV X O O X X X O VIDEO X...

Page 53: ...elect 5 Slide SLIDE SHOW 6 Fast Backward Fast Backward Play x2 x3 x4 x5 Play in Music and Movie menu 7 Prev Go to Previous picture track and page In the Playback list go to page list up 8 Next Go to n...

Page 54: ...moving on to function selection menu Function Selection 1 Select one of the 5 funtions to operate and press OK button Note NO DEVICE message appears if the source selected on the remote is not connect...

Page 55: ...the capability to special operation such as Rotating Zooming Note Photo Help Menu Bar 1 Start pause playback 2 Stop photo playback and return to photo preview 3 Rotate the picture 90 clockwise 4 Disp...

Page 56: ...Slide Show For Music Help Menu Bar press SUB MENU For Photo Help Menu Bar press SUB MENU a second time To exit Help Menu Bar press SUB MENU again Note Music Help Menu Bar slide show only 1 Start paus...

Page 57: ...up to 800 x 450 under 4Mbps is pressed Check to see if the subtile file is below 200kb in size when subtitle doesn t display during movie playback Note Movie Help Menu Bar 1 Start pause playback 2 St...

Page 58: ...tion you will see e Book file list on the screen 2 Highlight the file to playback and press the OK button If the Slide button is pressed e Book plays auto scroll with background music Note Auto scroll...

Page 59: ...tup Version Note SlideShow option 1 SlideShow Speed Fast Nornal Slow 2 Slideshow Effect SlideShow type Normal Random Bottom_Top Top_Bottom L R R L 3 Background Music On Off 4 SlideShow On Off Music Re...

Page 60: ...screen and no longer updated or switched to other subpages Pressing the HOLD button again the current subpage appears CALLING UP SUBPAGE DIRECTLY Pressing the SUBPAGE button appears Enter the subpage...

Page 61: ...annels 4 General Information Channel number Displays the current channel number Channel name Displays the current channel name Program name Displays the current Program name Program time Displays the...

Page 62: ...he GUIDE button to access EPG directly you can see all channels broadcasting now Note The EPG channel is only available when watching DVB channels 1 Select a desired channel Select a channel with the...

Page 63: ...the antenna or its connection is correct and if not correct the noise antenna fault or connection cable fault Check if car traffic or neon sign disturbs the sound effect Stripes on Check the susceptib...

Page 64: ...often you may need to improve your aerial system to provide a better signal This TV contains a complex microprocessor which enables you to view enhanced digital services Occasionally this device may...

Page 65: ...mode input format If registered resolution and frequency on the table no listed then no picture will be displayed No signal appears on Ensure that the signal cable is firmly connected to PC and TV th...

Page 66: ...080 WUXGA Brightness 500 500 Pixel Pitch 0 4845 x 0 4845 0 1767 x 0 1767 Contrast Ratio 6000 1 MAX 6000 1 MAX Dimension W x H x D with stand 1044 x 692 x 124 9 mm 1144 x 745 5 x 127 5 mm without stand...

Reviews: