background image

24

Basic Use

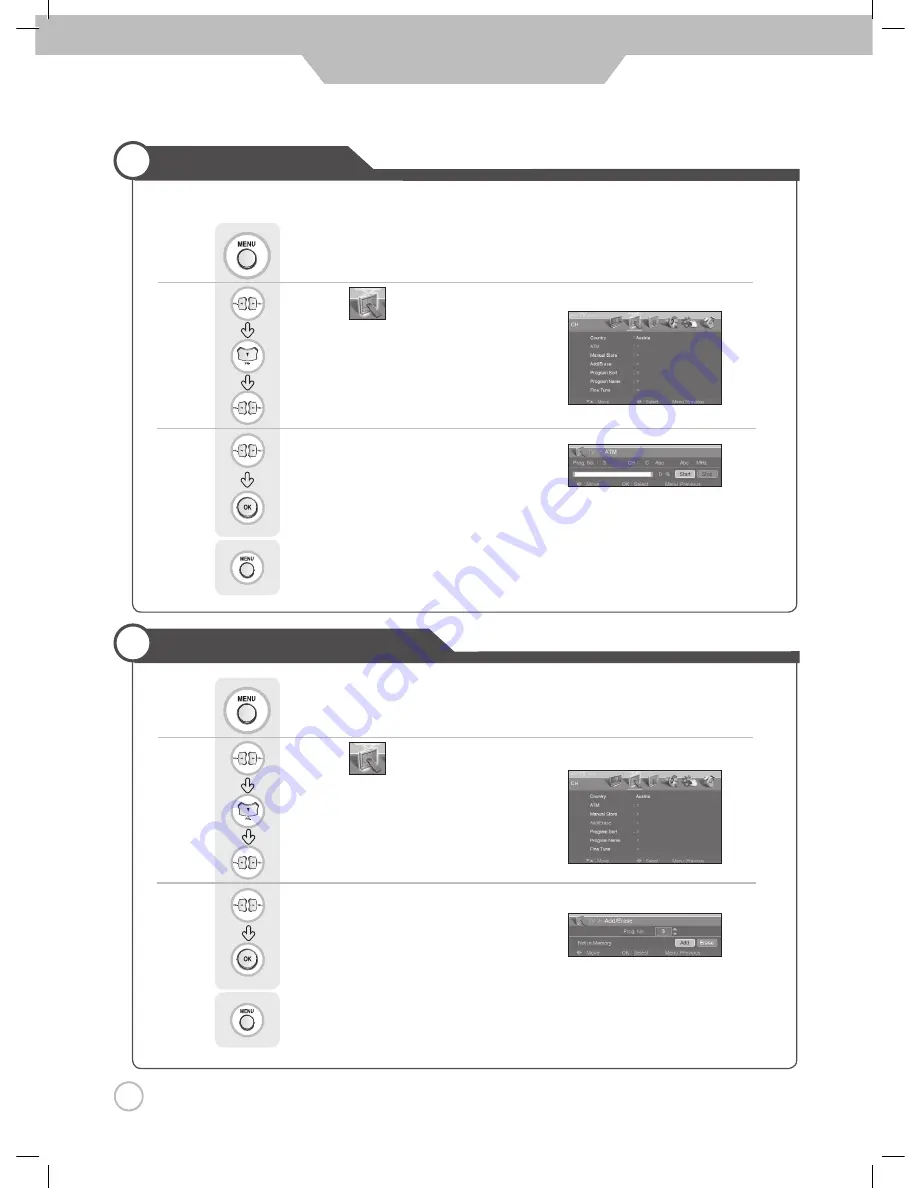
To set or erase a Program

Setting Programs

• Use the Auto Search function to preset all programs that are being broadcast 

Use 

to move to 

.

Press 

to move to "ATM".

Press 

to select.

Use 

to move to 

.

Press 

to move to "Add/ Erase"

Press 

to select.

Press 


.

Use 

to move to  "Add" or "Erase".

Press 

to select.

Press 

to go back to the previous menu.

Press 


.

Use 

to move to "Start".

Press 

to select.


•  Press "Start" to start the automatic program search/set function 

All broadcasting programs will be set.


Press 

to go back to the previous menu.

Summary of Contents for DLP-2622

Page 1: ...LCD TV User s Manual Model No DLP 2622 DLP 3022 Please observe all safety precautions when using this product Please read this manual carefully before using this product Helpline No 0870 100 2525...

Page 2: ...ctions DVD Connections DTV Connections PC Connections Basic Use Powering the LCD TV Initial Settings Watching TV Selecting Input Source Using the Menu To Set Location Setting Programs To set or erase...

Page 3: ...cture Viewing Picture in Picture Auto Volume Level Stereo Settings Resetting LCD TV Setting Setting Time Automatic Power On Off Teletext Monitor Using TV as a Monitor Adjusting PC Picture Adjusting Co...

Page 4: ...n a short circuit or overload occurs If necessary install a ground fault circuit breaker Never ground to a telephone line lightning rod or metal gas pipe Doing so may result in fire electric shock or...

Page 5: ...nit near any heat source such as a fireplace or space heater Doing so poses a serious risk of fire Install the unit at an adeq uate distance from the wall to ensure sufficient ventilation If the tempe...

Page 6: ...ith the power cord connected to the outlet may cause damage to the cord resulting in fire or electric shock Wipe off any moisture dirt or dust on the power plug pins with a clean dry cloth Failure to...

Page 7: ...ect PC D Sub input for displaying high resolution SXGA 1280x1024 60Hz PC images HDTV Ready Display Enables you to view high definition digital pictures using a DVD player or HDTV set top receiver Vari...

Page 8: ...OSD MENU Display Button Source select Button TV SCART 1 SCART 2 Composite S Video Component 1 DVD Component 2 DTV PC Select Button Standby Button Main Power Button Please turn off the main power swit...

Page 9: ...ation Power Cord Remote Control Battery 2 AAA 1 5V Antenna Cable SCART Cable User s Manual S Video Input Component 1 DVD Input 480i 576i Component 2 DTV Input 480p 720p 1080i RGB PC Input VGA SXGA 60H...

Page 10: ...an improperly ventilated location can cause a fire or damage to the LCD TV due to increased temperature Mounting on a Wall Your LCD TV can be mounted on a wall as shown in the figure above Mounting o...

Page 11: ...l jack with a coaxial outlet and then connect the coaxial antenna cable to the wall jack Coaxial Round Antenna Cable Copper Wire Wall Jack with coaxial outlet For a House Using an Outdoor Antenna To i...

Page 12: ...IP CONTROL KEY page 34 35 11 PIP PIP ON OFF 12 INPUT PIP INPUT SELECT KEY 13 POSITION PIP POSITION CONTROL KEY 14 P SIZE PIPAND PBP MODE CHANGE 15 P SWAP PIP SOURCE SWAP 16 S SWAP SOUND SWAP KEY 17 AU...

Page 13: ...heck that the batteries have power 3 Check that the LCD TV is powered and that it is properly plugged in 4 Check if any three wavelength lamp special fluorescent or neon sign is turned on near the LCD...

Page 14: ...s Composite Out terminal using the Composite cable Make sure the colour of the terminals and the colour of the cable are the same Use the S Video cable for higher picture quality Connection terminals...

Page 15: ...t the SCART terminal of the LCD TV and the cable broadcasting receiver with the SCART cable Use the S Video cable for higher picture quality Composite Cable S Video Cable LCD TV Back view LCD TV Back...

Page 16: ...o mode Please refer to the User s manual of Camcorder Video game for more information 4 Insert tape into Camcorder and press play button or insert disc into the Video game console Connection terminals...

Page 17: ...k view LCD TV Back view LCD TV Back view R L R L DVD PR PB Y DVD PR PB Y S Video Cable 1 Connect LCD TV s Y PB PR terminal in Component 1 to DVD s Video Out terminal using the external cable 2 Connect...

Page 18: ...t Connect Audio Cable from the Audio output terminal of receiver to the PC Audio input terminal of the LCD TV This function does work in Component of 480p 720p Connect the SCART terminal of the LCD TV...

Page 19: ...to change your PC video format to less than SXGA mode How to Use as PC Connect LCD TV s RGB terminal to PC s RGB terminal using the D Sub cable Connect LCD TV s PC Audio terminal to PC s Audio termin...

Page 20: ...check that the Main Power button on the LCD TV main body is turned on The main power indicator will light up red if turned on CAUTION After turning off the main Power please wait at least more than 3...

Page 21: ...phone or a bell rings Press to go back to the channel you were previously viewing increases the program decreases the program Press button again to hear the sound again Press button on the remote cont...

Page 22: ...urces will be automatically detected and displayed on picture but you may select an activated source when the input cable is connected only You can switch between the TV signal and the input signal of...

Page 23: ...tem Standard PAL Phase Alternative Line SECAM S quential Coule r Am moire L SECAM France D K SECAM Russia Poland Czechoslovakia Hungary I PAL United Kingdom Hongkong B G PAL Germany Netherland Switzer...

Page 24: ...move to ATM Press to select Use to move to Press to move to Add Erase Press to select Press Use to move to Add or Erase Press to select Press to go back to the previous menu Press Use to move to Star...

Page 25: ...picture repeatedly to adjust the settings Use to move to Press to move to Custom Adjust Press to select Custom Mode Brightness It adjusts the brightness of the image Contrast It adjusts the contrast...

Page 26: ...o move to the desired category Use to adjust the setting Press to go back to the previous menu Custom Select when listening to the sound to user s preference Standard It is the flat sound setting with...

Page 27: ...move to Language Press to select Press Use to select the desired language Press to go back to the previous menu Selecting the Menu Language Menu picture can be viewed in the language preferred by the...

Page 28: ...ect the On Press to go back to the previous menu Setting Blue Background The LCD TV can be set to display blue screen when no TV signal or signal from other connected appliances are being received If...

Page 29: ...by approx 5 Zoom 2 It enlarges the natural picture factor by approx 10 4 3 It is the standard format of broadcasting 14 9 It makes 14 9 format for input signal Panorama Zoom1 Zoom2 4 3 normal 14 9 Pre...

Page 30: ...save the Program settings Use to move to Press to move to WSS Press to select Changing the Program Press Use to select the Panorama or 4 3 Press to go back to the previous menu Use to move to Press t...

Page 31: ...move to Press to move to Program Sort Press to select Press Use to move to the desired Program Number Press to move to the next category Use to move to the Preferred Program Number Press to select Pr...

Page 32: ...rams can be stored to make it easier to find Use to move to Press to move to Program Name Press to select Press Use to move to the desired Program Number Press to move to program name Use to register...

Page 33: ...or lines appear Use to move to Press to move to Fine Tune Press to select Press Use to tune Press to go back to the previous menu To return to initial setting use to select Reset and press To view th...

Page 34: ...an be changed to display picture from the desired input source PIP function is not supported between COMPONENT2 and PC in PIP function Press to move to Input Source Press to select Use to select the d...

Page 35: ...n Press to select Use to select the desired position Press to go back to the previous menu Or press button on the remote control The main picture and the sub picture will swap Press to move to PIP Swa...

Page 36: ...Audio cable to the L white or R red socket and set the Mono L or Mono R from the MTS mode Or press button on the remote control Multi Television Sound Use to move to Press to move to MTS Press to sel...

Page 37: ...Press to move to Reset Press to select Press Use to select the YES Press to select Resetting LCD TV Settings It resets all of the parameters to the factory default The LCD TV will turn off The parame...

Page 38: ...tion Setting Time Use to move to Press to move to Clock Press to move one step Use to adjust the desired hour Press to move one step Use to adjust the desired minute Press to go back to the previous m...

Page 39: ...mes the Sleep button is pressed the TV will be turned off after 30 60 90 120 150 or 180 minutes To have the TV turn off after you fall a sleep Use to move to Press to move to desired category Press to...

Page 40: ...oded along the bottom line with the same coloured buttons Special Teletext Function key MIX In the mix mode display the underlying video and the teletext page display are both simultaneously visible o...

Page 41: ...move to Press to move to PC Press to select Use to move to desired category Use to adjust the setting Press to go back to the previous menu Press Auto Adjustment in progress Phase It adjusts the phas...

Page 42: ...our Temp Press to select Use to select the desired category Press to go back to the previous menu Press Cool 1 This results in a blueish tone Cool 2 This results in a more blueish tone Normal This is...

Page 43: ...k to control monitor s functions externally by external equipment How to connect a external equipment External adjustment Set ID Use to move to Press to move to Set ID Press to select Use to select th...

Page 44: ...ief time in the process of slowly after the power is turned on image elimination processing in order to hide temporary picture noise that occurs when the power is turned on But if the picture does not...

Page 45: ...e you can use it in every location as well as residential areas Others Problem Action Remote controller does not work 1 Check if main power is On 2 Check that the batteries of the remote controller we...

Page 46: ...Viewing Angle 85 85 85 85 85 85 85 85 Input signal PAL SECAM SD HD VGA SXGA Tuner PAL SECAM RGB Input D Sub D Sub 15pin AC Input AC100 240V 50 60Hz 2A AC100 240V 50 60Hz 2A Power Consumption 140W 150...

Page 47: ...GB Maintenance and Service Memo...

Page 48: ...DMP3913300 D I G I T A L A R T...

Reviews: