


11
e.
Time
–
Press the
Left
(6) and
Right
(9) buttons to set the alarm on hours and minutes.
Press the
Select
button (8) to confirm.
f.
Sound
–
Press the
Left
(6) and
Right
(9) buttons to select from the various sounds to
wake up to
Melody
,
Internet Radio
,
FM
or
Beep
. Press the
Select
button (8) to confirm.
iii.
Volume
–
Press the
Left
(6) and
Right
(9) buttons to adjust the volume of the alarm. Press the
Select
button (8) to confirm.
NB
after the alarm has sounded, press the
Standby
button once (4) to silence the alarm.
Alternatively press the
Volume/Snooze
button (14)
on top of the radio to enter a 5-minute
snooze period.
d.
Timer
–
Press the
Left
(6) and
Right
(9) buttons to set the time required, press the
Select
button (8) to
start the timer counting down. Once the timer has counted to zero, a beeper will sound, press the
Volume/Snooze
control (14) on the top of the radio to silence and reset the timer.
e.
Language
–
Press the
Left
(6) and
Right
(9) buttons to scroll through the operating languages: English,
Deutsch, Nederlands, Svenska, Norsk Bokmål, Dansk. Press the
Select
button (8) to select the language
required.
f.
Dimmer
–
Press the
Left
(6) and
Right
(9) buttons and press the
Select
button (8) to select one of the
two dimmer modes:
i.
Turn On
–
the
LCD Display
(13) will stay illuminated, press the
Select
button (8) to activate the
‘Turn On’ mode and p
ress the
Left
(6) and
Right
(9) buttons to set the brightness level.
ii.
Power Saving
–
the
LCD Display
(13) will dim after short period of time, press the
Select
button
(8) to activate the ‘Power Saving’
mode and press the
Left
(6) and
Right
(9) buttons to set the
brightness level before dimming.
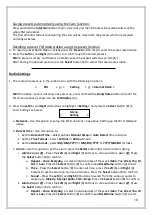
g.
Power Saver
–
This setting determines the time interval after which the radio powers down after no
playback of audio or no presses of the buttons on the front panel.
i.
Press the
Left
(6) and
Right
(9) buttons to select
5, 15, 30
minutes or
Turn Off
(the power saver).
ii.
Press the
Select
button (8) to enter the selection.
h.
Sleep Timer
–
The sleep timer allows you to listen to music for a set time before the radio turns itself
off automatically:
i.
Press the
Left
(6) and
Right
(9) buttons to select from Sleep
Off, 15, 30, 60, 90, 120, 150,
or
180
minutes
ii.
Press the
Select
button (8) to confirm how many minutes the radio will be on for until it turns
off.
NB
pressing the
Sleep/Sound
button (10) briefly once will also enter the sleep timer mode.
i.
Weather
–
Set the location of where you are to get the latest weather in your area:
i.
Press the
Left
(6) and
Right
(9) buttons to select the continent.
Press the
Select
button (8) to
confirm.
ii.
Press the
Left
(6) and
Right
(9) buttons to select the country.
Press the
Select
button (8) to confirm.
iii.
Press the
Left
(6) and
Right
(9) buttons to select the area of the country.
Press the
Select
button
(8) to confirm.
iv.
Finally press the
Left
and
Right
(9) buttons to select your town.
Press the
Select
button (8) to
confirm.
NB
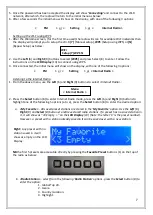
The weather for your area will then be shown on the
LCD Display
(13) whilst the radio is in standby, it
will show current temperature and the likelihood of rain in percent alternating with the time and date.
Press the
Left
(6) and
Right
(9) buttons to show the forecast up to 4 days ahead.
j.
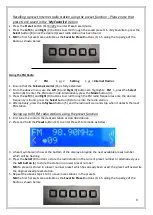
FM Setup
–
Set the FM radio preferences.
i.
Mode
–
Press the
Left
(6) and
Right
(9) buttons to set the FM radio sound to be in
Stereo
or
Mono
(
NB
the headphone output is stereo). Press the
Select
button (8) to confirm.
Summary of Contents for AVS1400
Page 1: ...1 Internet FM Radio...


