18
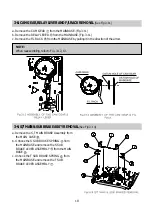
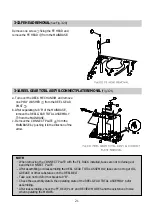
3-8. CAM GEAR, RELAY LEVER AND F/L RACK REMOVAL
(See Fig.3-11)
a. Remove the CAM GEAR
from the MAINBASE. (Fig.3-11)
b. Remove the RELAY LEVER
from the MAINBASE. (Fig. 3-11)
c. Remove the F/L RACK
from the MAINBASE by pulling it in the direction of the arrow.
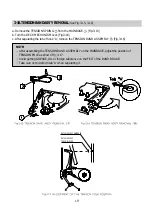
NOTE:
When reassembling, refer to Fig. 3-12, 13.
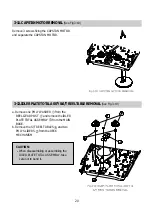
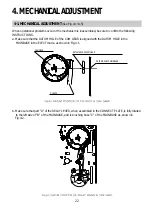
3-9. S/T MAIN & SUB BRAKE ASS'Y REMOVAL
(See Fig.3-14)
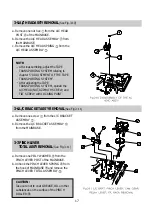
a. Remove the S, T MAIN BRAKE Assembly from
the MAIN VASE
b. Unhook the S SUB BRAKE SPRING
from
the MAINBASE and remove the S SUB
BRAKE LEVER ASSEMBLY
from the MAIN
BASE .
c. Unhook the T SUB BRAKE SPRING
from
the MAINBASE and remove the T SUB
BRAKE LEVER ASSEMBLY
.
Summary of Contents for GB14H3
Page 5: ...4 CIRCUIT BLOCK DIAGRAM ...
Page 12: ... 11 SCHEMATIC DIAGRAM ...
Page 13: ... 12 SCHEMATIC DIAGRAM ...
Page 14: ...13 EXPLODED VIEW 1 14H3 ...
Page 15: ...14 EXPLODED VIEW 2 14H4 ...
Page 16: ...15 EXPLODED VIEW 3 20H3 ...
Page 17: ...16 EXPLODED VIEW 4 20H4 ...
Page 18: ...17 EXPLODED VIEW 5 21H4 ...
Page 19: ......
Page 20: ......
Page 58: ...3 1 2 1 WIRE DIAGRAM 1 2WIREDIAGRAM ...
Page 62: ...7 2 1 2 PARTS LOCATION OF FRONT LOADING ASS Y A TOP VIEW B FRONT VIEW ...
Page 92: ...37 6 EXPLODEDVIEWANDPARTSLIST 6 1 EXPLODEDVIEWOFDECKASS Y TOPVIEW ...
Page 93: ...38 6 2 EXPLODEDVIEWOFDECKASS Y BOTTOMVIEW ...
Page 94: ...39 6 3 EXPLODEDVIEWOFF LASS Y ...
Page 95: ...40 ...


