


12
Verifying Proper Operation
WARNING
• Make sure that power to the electrical outlet is turned
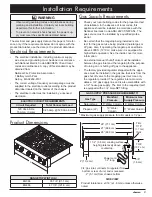
off at the circuit breaker or fuse box and that the gas
is turned off at the gas supply valve before proceed-
ing.
• The rangetop must be properly grounded at all times
when electrical power is applied.
Prior to operating the rangetop, read the accompanying use
and care manual carefully.
1. Make sure all the
rangetop burner con-
trols are in the
OFF
position.
2. Connect the power
cord to the electrical outlet.
3. Turn on power to the electrical outlet at the circuit
breaker or fuse box.
4. Gently push in and turn one burner control knob at a
time counterclockwise to the
HIGH
position. Verify that
the associated burner igniter sparks, then return the
knob to the
OFF
position. Repeat for all of the remain-
ing control knobs.
5. Turn on the gas supply valve.
6. Perform the following ignition test for all of the burners:
• Push in and turn one of the control knobs counter-
clockwise to the
HIGH
position. Only the igniter for
the selected burner will spark. It may take up to four
seconds for the gas to ignite, at which time the ignit-
er will stop sparking. If ignition does not occur within
four seconds, turn the knob to the
OFF
position, wait
for at least five minutes to allow any gas to dissipate,
then repeat the test.
• Once the burner lights, the control knob can be rotat-
ed counterclockwise from
HIGH
to
LOW
to adjust the
flame height progressively.
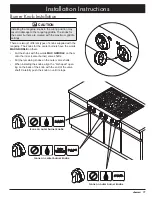
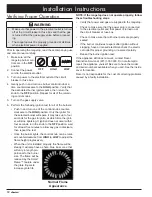
• When the unit is installed properly, the flame will be
steady. It will also have a sharp, blue inner cone that
will vary in length pro-
portional to the burner
size. The flame will be
reduced by the Smart
Flame™ feature under
the grate fingers to
increase grate life.
NOTE: If the rangetop does not operate properly, follow
these troubleshooting steps:
• Verify that power and gas are supplied to the rangetop.
• Check to make sure that the power plug is connected
to the electrical outlet and that power is turned on at
the circuit breaker or fuse box.
• Check to make sure that all burner parts are properly
seated.
• If the burner continues to spark after ignition without
stopping, have a licensed electrician check the electri-
cal outlet for proper grounding or reversed polarity.
• Repeat the burner ignition test.
If the appliance still does not work, contact Dacor
Distinctive Service at (877) 337-3226. Do not attempt to
repair the appliance yourself. Be sure to have the model
and serial numbers available when you call. See the inside
cover for location.
Dacor is not responsible for the cost of correcting problems
caused by a faulty installation.
Normal Flame
Appearance
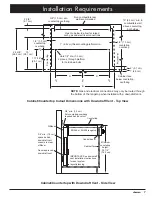
Installation Instructions
OFF
HIGH
LOW