background image

3

• Phillips screwdriver     
• Electric drill     
•  1/2”, 5/8” and 3/32” drill bits
• 1-1/2” wood bit or metal hole cutter 

(if metal cabinet is used)     

• Saw to cut exhaust opening  


(if needed)

• Protective drop cloth for product and 

range - you may also use carton for 

protection

• Scissors     

• Pencil     
• Tape measure     
• Tape

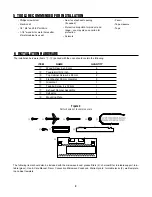
Figure 4

Parts shown not to common scale.

  ITEM NAME 

QuANTITy 


1


Wood Screw 5 x 30 mm 

6


2


Toggle Bolt 3/16 inch 

4


3


Top Cabinet Screw 5 x 60 mm 

2


4


Flat Washer 30 mm diameter 

2


5


Grommet 

1


6


Tapping Screw 4 x 12 mm 

1


7


Exhaust Damper Assembly 


8


Deflector 

1


9


Mounting Plate 

1

The installation hardware (items 

1

 - 

8

) packed with the oven should contain the following:

5  TOOLS RECOMMENDED FOR INSTALLATION

6  INSTALLATION HARDWARE

The following items should also be included with the microwave-hood: grease filters (2), charcoal filter, turntable support, turn-

table (glass), Use & Care Manual, Dacor Convection Microwave Cookbook, Warranty card, turntable racks (2), wall template, 

top cabinet template

1

5

6

7

2

3

4

8

9

Summary of Contents for PCOR30

Page 1: ...the gaps Wall construction should be a minimum of 2 x 4 wood studding and 3 8 or more thick dry wall or plaster lath The mounting surfaces must be capable of supporting a weight of 110 pounds the oven...

Page 2: ...ection procedures 4 HOOD EXHAUST DUCT When the hood is vented to the outside a hood exhaust duct is required All ductwork must be metal Do not under any cir cumstances use plastic duct work Check that...

Page 3: ...h 4 3 Top Cabinet Screw 5 x 60 mm 2 4 Flat Washer 30 mm diameter 2 5 Grommet 1 6 Tapping Screw 4 x 12 mm 1 7 Exhaust Damper Assembly 1 8 Deflector 1 9 Mounting Plate 1 The installation hardware items...

Page 4: ...nd save 4 screws that hold fan cover in place Remove fan cover bracket as shown in Fig 6 2 Remove hood fan unit carefully and slip wires out of wire box Rotate hood fan unit 90 so that exhaust ports a...

Page 5: ...rly placed Check steps 3 and 4 again 7 Attach the fan cover bracket to the oven unit with 4 existing screws as shown in Fig 9 NOTE The exhaust damper assembly is not required for recirculat ing exhaus...

Page 6: ...appropriate and put the toggle nuts onto the toggle bolts See Fig 12 Refer to instructions in wall template 3 Position the mounting plate with the toggle bolts attached at the wall location and inser...

Page 7: ...ward In the case of a non recessed bottom in the top cabinet the hole for the cord may need to be enlarged Remove the carton portions 6 Tighten the two unit mounting screws located in the grease filte...

Page 8: ...the installation instructions and the wall and top cabinet templates 2 Plug in the power cord 3 Keep the use and care manual MOUNTING DEFLECTOR Secure the deflector with 3 tapping screws 4 x 12mm pac...

Reviews: