Dacor Epicure OBS36 Use And Care Manual Download Page 22

20

to replace a light bulb, follow these steps:

replace the light bulb only with Dacor part number 

1. 

100429. See the page 22 for ordering information. 

Disconnect the outdoor grill power cord from the elec

-

2. 

trical outlet.
hold your hand under the lens for support and gently 

3. 

pry it loose using a spatula or table knife. Pull the lens 

cover straight out.
Grasp the old bulb and pull it straight out of the 

4. 

socket.
Using a glove, insert the new bulb into the socket.

5. 

To reinstall the lens, first 

6. 

line up the lens and the 

light fixture, with the cutout 

toward the bottom. Gently 

press the lens into its origi

-

nal position.
reconnect the power cord.

7. 

Care and Cleaning

Light Bulb Replacement

 warning

to avoid an electrical shock and fire hazard, be sure 

• 

to disconnect the outdoor grill power cord from the 

electrical outlet and close the gas shut-off valve when


replacing the light bulb(s).
to avoid personal injury, make sure the outdoor grill 

• 

and the light bulb(s) are cool before replacing the 

light bulb(s).
Always make sure the lens covers are in place when 

• 

using the outdoor grill. the lens covers protect the 

bulbs from breakage.
replacing the lens cover without lining up the cutout 

• 

with the light socket will damage the light fixture.
Do not use a screwdriver to remove the lens.

• 

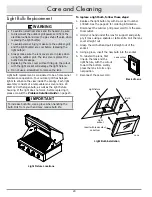
Light bulb replacement is considered to be a homeowner 

maintenance operation. Your outdoor grill has halogen 

lights to enhance the view inside the canopy. each light 

assembly consists of a removable lens cover and a 20 

Watt 12 Volt halogen bulb, as well as the light fixture 

housing. If the light does not work, before replacing it, 

please consult the 

Problem Solution Guide

 on page 23.

 iMPortant

to increase bulb life, use a glove when handling the 

bulb. Oils from your hand may reduce bulb life.

Lens cutout

Back of Lens

Light Fixture Locations

Light fixture

Insert with lens cutout 

on bottom

Bulb

Light

socket

Light Bulb installation

Lens

Summary of Contents for Epicure OBS36

Page 1: ...arts and Accessories 22 Before You Call for Service 23 Warranty and Service 24 Warranty Card Back Cover Tested in accordance with the latest edition of ANSI Z21 58 2006 CSA 1 6 2006 Standard for Outdo...

Page 2: ...2007 Dacor all rights reserved...

Page 3: ...onditions that you don t understand Safety Symbols and Labels danger Immediate hazards that WILL result in severe personal injury or death warning Hazards or unsafe actions that COULD result in severe...

Page 4: ...been damaged or dropped Do not operate the rotisserie motor if it is damaged or malfunctioning Make sure that this appliance has been properly installed by a qualified installer according to the accom...

Page 5: ...t allow children to operate it play with the controls pull on the handle or touch other parts Do not store items of interest to children on top of or above the appliance Children could be burned or in...

Page 6: ...ers allow you to cook foods best cooked in pots and pans to free up space in the grill compartment L Side Burner Grate Models OB52 OBS52 and OBSB162 The porcelain coated cast iron grate covers the sid...

Page 7: ...Models OB52 and OBS52 Models OB36 and OBS36 Grill Cart Model OBC36 Shown Not Shown Cart Models OBC52 and OBCW52 Locking wheels B B B A A A D D F F I I J J E E G G V U R R P P T T N N O O M M L L K K C...

Page 8: ...goes over the top of the grate and helps keep the side burner clean when not in use Setting Up Your Outdoor Grill Electrical Requirements warning Connect the power cords for this outdoor cooking gas a...

Page 9: ...burner assembly OB52 OBS52 and OBSB162 only Side burner cover Side burner grate Side burner cap Side burner base Grill compartment grates Flame spreaders Drip tray Warming rack Side burner head Outdo...

Page 10: ...d LP tank beyond 80 percent full by weight Unused or extra LP tanks must be stored outdoors in a well ventilated area out of the direct sunlight and or sources of high heat flames or sparks out of rea...

Page 11: ...peration If using an LP tank close the shut off valve on the top 3 of the tank once the outdoor grill is off and cool Selecting and Using Cookware for the Optional Side Burner warning Use cookware onl...

Page 12: ...After lighting if you hear a whooshing sound immediately turn the burner control knob off Wait several minutes before trying to light the burner again Lighting and Preheating Grill Compartment Make su...

Page 13: ...nt discoloration Burner Lighting Notes Dacor s automatic re ignition system will automati cally ignite an extinguished flame If the igniter does not work for one of the standard burners it may be lit...

Page 14: ...hting Procedures Grill Compartment warning Use the manual lighting procedure only in the event that one or more of the igniters is not working Use only the Dacor supplied match light tool or a long st...

Page 15: ...compartment Tighten the thumb screws firmly Continued Operating Your Outdoor Grill Rotisserie Cooking warning To avoid an explosion or fire hazard do not use the rotisserie burner during high wind co...

Page 16: ...serie rod and readjust If the food is not rotating properly it will not cook evenly Push in on the rotisserie burner control knob and 6 turn it counter clockwise to the LIGHT HIGH posi tion The ignite...

Page 17: ...asant smoke Brisket chicken and pork Pecan More subtle flavor than hickory Burns easily good for lower tempera ture smoking Pork chicken lamb fish and cheeses Smoker Cooking Use the smoker box to add...

Page 18: ...e time required to sear depends on the meat type and thickness Adjust the heat level and or time accordingly to prevent burning Flip the meat and sear on the other side for about the 4 same amount of...

Page 19: ...r nylon pad for cleaning the surfaces of your outdoor grill Do not clean any of the outdoor grill parts in a dishwasher They may be damaged Do not attempt to manually clean the rotisserie burner or op...

Page 20: ...tional sear burner are cleaned by leaving them on at high heat for five min utes after cooking If there is excessive grime and grease build up around the outside and below the sear burner it may be re...

Page 21: ...f erratic clicking is still present make sure the igniter is completely dry If the unit still exhibits problems after drying call your local Dacor Authorized Service Agent Cleaning the Exterior Knobs...

Page 22: ...replacing the light bulb s To avoid personal injury make sure the outdoor grill and the light bulb s are cool before replacing the light bulb s Always make sure the lens covers are in place when usin...

Page 23: ...all the appliances dis 2 connected plug in the appliance rotisserie plugs and turn them on one at a time If the GFI trips when an appliance device is plugged in and turned on call for service See pag...

Page 24: ...Freestanding cart with warming drawer for models OB52 and OBS52 OBC52 Rotisserie motor assembly 700482 Rotisserie rod 101179 Rotisserie forks set of 2 AGFS Replacement porcelain warming rack 101154 Re...

Page 25: ...Grill section Outdoor grill set up to use a different type of gas natural or LP Have qualified service technician check to make sure that the outdoor grill is set up for the type of gas Gas regulator...

Page 26: ...ISTRICT OF COLUMBIA AND CANADA LIMITED FIRST YEAR WARRANTY If your DACOR product fails to function within one year of the original date of purchase due to a defect in material or workmanship DACOR wil...

Page 27: ...RANTY PROCESSING DEPT PO BOX 90070 CITY OF INDUSTRY CA 91715 9907 NO POSTAGE NECESSARY IF MAILED IN THE UNITED STATES BUSINESS REPLY MAIL FIRST CLASS MAIL CITY OF INDUSTRY CA PERMIT NO 1600 POSTAGE WI...

Page 28: ...ilder B Magazine G Architect Designer C Appliance Dealer Showroom H Another Dacor Owner D Kitchen Dealer Showroom I Model Home E Home Show J Other 2 Where did you buy your Dacor appliances A Appliance...

Reviews: