


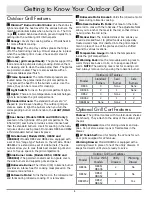


12
to manually light the optional sear burner:
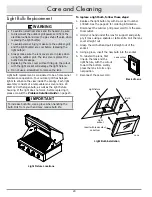
make sure the drip tray is in place.
1.
make sure all control knobs are in the
2.
oFF
position.
make sure the grate above the sear burner is in place.
3.
If using a LP tank, turn the valve on the top of the
4.
tank, counter-clockwise, to the fully open position.
Use the provided match holder or a long stem match
5.
to light the burner manually. Insert a lit match at an
angle through the grate above the sear burner. While
keeping the lit end of the match a little above the
surface of the sear burner, push in on the control knob
and turn it counter-clockwise. If you do not experi-
ence immediate ignition, turn the knob back to the
oFF
position. Leave the canopy open and wait five
minutes. repeat the lighting procedure.
If the burner does not light after two tries, see the
6.
Before You Call for Service
section on page 23.
to manually light one of the optional sear burners:
make sure the drip tray is in place.
1.
make sure all control knobs are in the
2.
oFF
position.
If using a LP tank, turn the valve on the top of the
3.
tank, counter-clockwise, to the fully open position.
Use the provided match holder or a long stem match
4.
to light the burner manually. With the end of the lit
match next to the burner holes, push in on the cor
-
responding control knob and turn it counter-clockwise.
If you do not experience immediate ignition, turn the
knob back to the
oFF
position. Wait five minutes, and
repeat the lighting procedure.
If the burner does not light after two tries, see the
5.
Before You Call for Service
section on page 23.
Lighting the Burners (Continued)
Manual Lighting Procedures - Grill
Compartment
warning
use the manual lighting procedure only in the
event that one or more of the igniters is not
working:
Use only the Dacor supplied match light tool or a long
•
stemmed match.
Do not attempt to light the optional sear burner
•
without the grate above it in place. Do not attempt
to light the standard burners without the flame
spreaders in place.
make sure all control knobs are in the
•
oFF
position
before performing the manual lighting procedure.
If a flame that has been lit manually goes out,
•
immediately turn the control knob to the
oFF
position
to avoid a fire or explosion hazard. Allow five minutes
for gas to dissipate before re-lighting it.
to manually light the rotisserie burner, see page 14.
to manually light the standard u shaped burners:
make sure the drip tray is in place.
1.
make sure all control knobs are in the
2.
oFF
position.
Open the canopy and remove all of the grates above
3.
the standard burners. If the appliance is equipped
with the optional sear burner, leave the grate above it
in place.
If using a LP tank, turn the valve on the top of the
4.
tank, counter-clockwise, to the fully open position.
Find the lighting hole in the front of the flame
5.
spreader located directly behind the front control
panel for the burner you intend to light.
Use the provided match holder or a long stem match
6.
to light the burner manually. Push in on the control
knob and turn it counter-clockwise while inserting a lit
match into the lighting hole. If you do not experience
immediate ignition, turn the knob back to the
oFF
position. Leave the
canopy open and wait
five minutes. Repeat
the lighting procedure.
If the burner does not
7.
light after two tries,
see the
Before You
Call for Service
sec
-
tion on page 23.
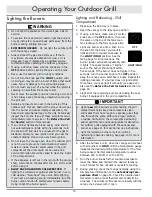
Operating Your Outdoor Grill
Lighting
hole
Sear burner


