background image

English


21

Installation 

Instruction

s

Installing the Rangetop

, cont.

Making the Electrical Connections

WARNING

Disconnect power at the main circuit breaker or fuse box before making electrical


connections.

BEFORE

 operating/testing, follow the grounding requirements 

(pg.

 30

)

 of this


manual. Improper

connection of the grounding plug is an electric-shock risk.

The electrical system

 (

including power cord

)

 is factory-installed/-wired. Altering


any part of this

system may cause a short or overload.

1.

Plug in the power cord. (Ensure the outlet meets all applicable electrical codes

; s

ee 

pg.


18

.)

2.

After installing the rangetop, c

heck the gas-supply line to verify it was not damaged


and


remains connected. 

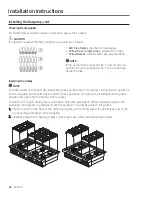
Assembling the Rangetop Burners

CAUTION

Do not operate the rangetop burners without all burner parts in place.

To avoid electric shock, do not:

– push in any burner controls while removing the burner.

– remove the top or touch the electrode of any burner while another burner is on.

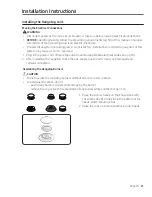
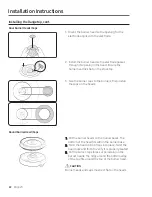
1.

Place the burner heads on their bases


(see left).

The electrodes fit in the slot in the


bottom of the

heads, which should lie


flat.

2.

Place the caps on 

their respective 

burner head

s

.

Summary of Contents for DTT36M974PS

Page 1: ...Installation Instructions Part No 112136 Rev H Modernist Rangetop DTT48M976 DTT36M974...

Page 2: ...t Is In the Box Parts and Tools Needed Installation Requirements In Preparation Overall Rangetop Dimensions Countertop Cutout Dimensions Gas Supply Requirements Special Gas Requirements gas models sol...

Page 3: ...as supplies Observe all governing regulations Installation requires basic mechanical skills The installer shall ensure proper installation Product failure due to improper installation is not warrantie...

Page 4: ...Dacor Customer Assurance Team Before calling have the rangetop s model serial numbers available see the data label right hand side of the rangetop chassis Dacor Customer Assurance Phone 800 793 0093...

Page 5: ...or gas fitter qualified or licensed by the State of Massachusetts When using ball type gas shut off valves you must use the T handle type Multiple flexible gas lines must not be connected in series Ge...

Page 6: ...not use the rangetop Do not light a match candle or cigarette or turn on any gas or electric appliances Do not touch any electrical switches or plug in a power cord Do not use any phone in your build...

Page 7: ...ctrician should determine the proper path for this ground wire Electrical service to the rangetop must conform to local codes in the absence of which it should meet the latest ANSI NFPA No 70 Latest R...

Page 8: ...t use cookware that is substantially larger than the grate Turn cookware handles away from surface burners and the rangetop front edge Stand back from the range while frying Heat frying oils slowly an...

Page 9: ...tes 3 Burner heads 6 and Brass caps 7 Porcelain caps 6 NOTE Verify that all supplied parts are present If your rangetop was damaged during shipping or specified parts are missing contact your local re...

Page 10: ...n ID x 5 ft Flare union adapter in NPT x in ID Flare union adapter in NPT x in ID 135 degree elbow option 90 degree elbow option Tools Needed Flat blade screwdriver Phillips screwdriver Open end or ad...

Page 11: ...rangetop complies with the maximum allowable wood cabinet temperature of 194 F 90 C Ensure the wall covering countertops and surrounding cabinets can withstand this temperature to avoid discoloration...

Page 12: ...lation Requirements Overall Rangetop Dimensions 28 3 16 71 6 cm 27 1 2 69 9 cm 25 11 16 65 3 cm 22 1 4 56 5 cm 36 91 1 cm DTT36M974 48 121 6 cm DTT48M976 28 3 16 71 6 cm 27 1 2 69 9 cm 25 11 16 65 3 c...

Page 13: ...ang both sides 10 25 4 cm to combustible side wall min both sides Mounting platform 1 2 5 cm min thickness 36 91 4 cm typical 7 3 4 19 7 cm Recommended gas and electrical service location consult loca...

Page 14: ...back of chassis Gas and electrical connections at right rear section of chassis 24 61 0 cm Cabinet face Countertop Mounting platform Installed control panel overhang 1 3 8 3 5 cm Cabinet Countertop Cu...

Page 15: ...Offset C Downdraft Vent Cutout Approved Downdraft Vent Models DTT36M976 36 91 4 cm 16 5 8 42 2 cm 33 1 2 85 1 cm MRV3615M S DTT48M976 48 121 9 cm 20 13 16 52 9 cm 43 1 2 110 5 cm MRV48M S IMPORTANT Us...

Page 16: ...tout IMPORTANT See downdraft installation instructions for duct system layout planning Cabinet face Stiffener 3 8 min 1 0 cm space behind downdraft vent chassis to clear stiffener MRV Modernist downdr...

Page 17: ...Have a qualified technician install the connectors For a new rangetop never install used connectors which can leak gas and cause personal injury Use only new flexible connectors WARNING Gas leaks may...

Page 18: ...x All gas models are equipped with a power cord with an equipment grounding conductor and a grounding plug All gas models in the US and Canada require a 120 V 60 Hz AC approved electrical service with...

Page 19: ...Shut off the main gas supply valve before disconnecting the old rangetop 2 Complete the gas hookup 3 Open the gas valve and relight the burners on any other gas appliances NOTE Because hard piping res...

Page 20: ...ookup Installer Inform the consumer of the location of the gas shut off valve Gas Shut Off Valve Flex Connector 6 ft max 0 5 in or 0 75 in Gas Pipe Adapter Adapter Gas Flow into Cooktop Pressure Regul...

Page 21: ...rt or overload 1 Plug in the power cord Ensure the outlet meets all applicable electrical codes see pg 18 2 After installing the rangetop check the gas supply line to verify it was not damaged and rem...

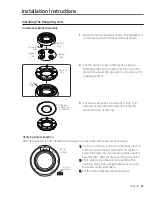
Page 22: ...top 3 Size the burner caps to the burners then install the caps on the heads Round Burner Head Caps 1 Put the burner heads on the burner bases The bottom of the head fits within the burner base 2 Twis...

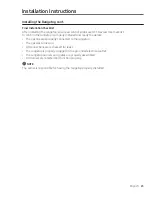
Page 23: ...bs on the bottom of the ring to the slots on the head Wiggle each ring to ensure it is properly seated 2 Burner ring Tab slots Verifying Burner Function After the cooktop is fully installed and plugge...

Page 24: ...es Installing the Grates NOTE For best results and longest life install the grates as instructed The grates occupy specific positions on the rangetop and should only be used in those positions To help...

Page 25: ...op is properly installed and ready to operate The gas line was properly connected to the rangetop The gas was turned on All connections were checked for leaks The rangetop is properly plugged in to a...

Page 26: ...26 English Notes...

Page 27: ...English 27 Notes...

Page 28: ...Dacor 14425 Clark Avenue City of Industry CA 91745 Phone 800 793 0093 Fax 626 403 3130 www dacor com DG68 00942A 00...

Reviews: