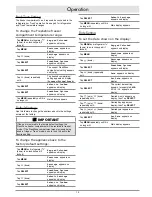
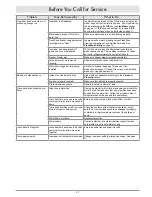
background image

21

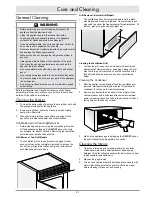
Grill Removal - Bottom Grill Models


• 

The ventilation grill on bottom grill models is held in place 

with magnets and is easy to remove. On some models, you 

may need to pull out the freezer drawer for easier access. To 

remove, grasp the grill and pull straight out. 

Cleaning the Ventilation Grill

• 

To clean the grill, use a vacuum cleaner with a soft brush 

attachment at maximum power, sweeping it along the vent 

slits. While the grill is removed, check the condition of the 

(finned) condenser and remove any dust, as instructed 

below.

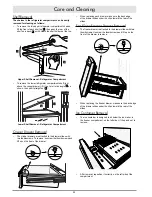
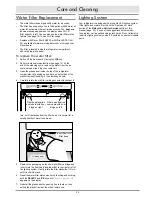
Cleaning the Condenser

1.  After the appliance is switched off and the ventilation grill 

removed, wait approximately 30 minutes for the (finned) 

condenser to cool down to room temperature.

2.  Remove any dust build-up as shown in the picture. Use a 

vacuum cleaner with a soft brush attachment at maximum 

power, sweeping it back and forth in the direction of the fins, 

taking care not to bend any of them.

3.  Start up the appliance again by tapping the 

ON/OFF

 key on 

the control panel for approximately 3 seconds.

Cleaning the Interior

1.  Clean the internal parts by washing them with a solution 

of lukewarm water and a small amount of dishwashing 
detergent. See the following sections for instructions on how 
to disassemble removable parts.

2.  Rinse and dry right away.

3. 

The ice cube container should be cleaned occasionally with 

warm water. Make sure that you switch off the ice maker 
before cleaning it. Rinse out and wipe dry.

Care and Cleaning 

General Cleaning

 WARNING

•  Before performing any sort of cleaning, disconnect the 

appliance from the electrical outlet.

•  Clean this appliance only in the manner instructed. 

• 

The edges of the condenser are sharp. Use adequate 

protection for hands and arms when cleaning it.

•  Use only nonflammable, non-corrosive cleaners. Failure to 

do so can result in explosion, fire or death.  

•  Never use abrasive or metallic products which could scratch 

and damage the finishes permanently.

•  Make sure you do not damage the refrigeration system in 

any way.

•  Always wipe metallic finishes in the direction of the grain.

•  Do not use the sponge on aluminium parts, such as the 

edges of the glass shelves.

•  Do not use water on the electrical parts, lights and control 

panel.

•  Do not bring cold glass parts into contact with boiling water.

• 

To prevent damage, do not wash any parts of the appliance  

in a dishwasher.

•  Do not use mechanical devices or other methods to speed 

up defrosting.

Both the refrigerator and FreshZone freezer sections defrost 
automatically. Clean both sections once a month to avoid odor 
build-up. Wipe spills up immediately.

Cleaning the Exterior

1. 

To clean the parts made of steel use the micro-fiber cloth and 

the sponge provided with the appliance. 

2.  Every now and then, polish the steel, wipe with a slightly 

damp micro-fiber cloth.

3. 

Take special care to keep the ventilation openings in the 

appliance or inside the cabinet free of obstructions.

Ventilation Grill Cleaning/Removal

• 

Before cleaning and/or removing the ventilation grill, switch 
off the appliance by tapping the 

ON/OFF

 key on the main 

control panel for about 3 seconds. Removing the ventilation 
grill allows you to clean the back side.

Grill Removal - Top Grill Models


• 

The ventilation grill on top grill models is hinged for easy 

access, but cannot be completely removed. To access the 

back of the grill (and the condenser), grasp the bottom on 
both sides and pull out and up.

Summary of Contents for Discovery DYF30BFBPL

Page 1: ...Care and Cleaning 21 Before You Call for Service 24 Warranty and Service 28 Warranty Card Back Cover Table of Contents Models DYF30BFBPL DYF30BFBPR DYF30BFBSL DYF30BFBSR DYF30BFTSL DYF30BFTSR DYF36BF...

Page 2: ...2015 Dacor all rights reserved...

Page 3: ...G Hazards or unsafe practices that COULD result in severe personal injury or death CAUTION CAUTION Hazards or unsafe practices that COULD result in minor personal injury or property damage READ AND SA...

Page 4: ...pull straight out from the electrical outlet Disconnect this appliance when not in use Do not install repair modify or replace any part of the appliance unless specifically recommended in the literat...

Page 5: ...G Automatic ice maker H Automatic drawer closing system J Dual refrigeration system K Control panel display L Adjustable door shelves M Door with self closing hinges N LED lighting P FreshZone freezer...

Page 6: ...pliances various settings See page 7 for more details Up Down refrigerator Tap the refrigerator Up and Down keys to change the refrigerator temperature setting or to navigate through the control panel...

Page 7: ...ge when freezer section is set to refrigerator using the FreshZone feature 36 F to 48 F 2 C to 8 C Unlocking the Keypad Anytime the appliance is turned on and the control panel has not been used for a...

Page 8: ...cated in the upper drawer of the freezer compartment After removal make sure to reposition it correctly as shown Ice Maker Operation Tap the ICE key to turn ON or OFF The button is lit when the ice ma...

Page 9: ...y Mode to save energy see page 9 Control Panel Functions Settings IMPORTANT Adjustment of the control panel settings is not possible when the refrigerator is starting up for the first time Changes mad...

Page 10: ...CT Max Cool ON OFF appears on display Tap down Max Cool Time appears on display Tap SELECT Set Hours appears on display Tap up or down repeatedly until Desired Max Cool hours appear on display Tap SEL...

Page 11: ...tions appears on display Tap SELECT Max Cool Fridge appears on display Tap down repeatedly until Max Cool FreshZone appears on display Tap SELECT Max Cool ON OFF appears on display Tap down Max Cool T...

Page 12: ...nger lit Main display appears Operation Holiday FreshZone In case of prolonged absences in conjunction with the Holiday Fridge function this function allows considerable energy savings by raising the...

Page 13: ...erages quickly by placing them inside the FreshZone freezer compartment You can select a duration of 1 to 45 minutes A tone will indicate when the optimal temperature has been reached After removing t...

Page 14: ...ze appears on display Tap SELECT Set Cube Size appears on display Tap MENU repeatedly until it is no longer lit Main display appears Ice Maker Fast Ice Function The Fast Ice function increases the qua...

Page 15: ...r needs to be replaced To view the filter status Tap MENU and refrigerator down to un lock keypad if locked Key pad Unlocked appears on display Tap MENU Functions appears on display Tap SELECT Max Coo...

Page 16: ...on display Tap down repeatedly until Filter Bypass appears on display Tap SELECT Filter Bypass On appears on display Tap down Filter Bypass Off appears on display Tap SELECT Filter Bypass appears on d...

Page 17: ...be sure to set it back to the desired setting To change the appliance back to the factory default settings Tap MENU and refrigerator down to un lock keypad if locked Key pad Unlocked appears on displ...

Page 18: ...ppears on display Tap down repeatedly until Date appears on display Tap SELECT Set Date appears on display Tap down repeatedly until Show Date appears on display Tap SELECT DATE 01 15 15 Off appears o...

Page 19: ...dly until it is no longer lit Main display appears 12 24HR Time Setting The appliance is set to 12 hour non military time at the factory 24 hour time is also known as military time 1 36 PM 13 36 milit...

Page 20: ...keypad lock Tap MENU and refrigerator down to un lock keypad if locked Key pad Unlocked appears on display Tap MENU Functions appears on display Tap down Settings appears on display Tap SELECT FreshZo...

Page 21: ...ff Max Cool FreshZone On Max Cool Time Set Hours 1 Holiday FreshZone Holiday ON OFF Holiday FreshZone Off Holiday FreshZone On Holiday Time Set Days 1 Beverage Cooler Set Cooling Time Set Time 20 min...

Page 22: ...idge Default Setting Date Set Date DATE 01 30 09 Show Date DATE 01 30 09 On DATE 01 30 09 Off Time Set Time TIME 01 01 Show Time TIME 01 01 On TIME 01 01 Off Set View Set 12 Set 24 Language English Es...

Page 23: ...s appliance only in the manner instructed The edges of the condenser are sharp Use adequate protection for hands and arms when cleaning it Use only nonflammable non corrosive cleaners Failure to do so...

Page 24: ...he front of the drawer Care and Cleaning When replacing each drawer make sure the back edge of the drawer slides under the clips toward the rear of the slides FreshZone Freezer Drawer Removal The free...

Page 25: ...4 turn until it detaches from the filter head It is normal for a small quantity of water to come out 5 Remove the packaging on the new water filter cartridge and insert it into the filter head locate...

Page 26: ...ld Refrigerator compartment too cold Wait for 12 hours if malfunction persists call Dacor Customer Service for advice Fridge too warm Refrigerator compartment too warm See Problem Solution Guide Initi...

Page 27: ...s for temperature to return to normal FreshZone Freezer compartment too warm refrigerator compartment OK FreshZone freezer compartment set to different temperature range than that desired The FreshZon...

Page 28: ...nced by tapping ALARM key ALARM key will continue to flash Condensation inside and outside of appliance Humid climate Formation of condensation normal in humid climates Door drawer open or ajar for a...

Page 29: ...ilter may not be installed properly or clogged replace it Bad odor inside appliance Inside of compartment is dirty Clean inside of appliance according to the Care and Cleaning section Food not properl...

Page 30: ...r limitation of inconsequential damages so the above limitations or exclusions may not apply to you This warranty gives you specific legal rights and you may also have other rights that vary from stat...

Page 31: ...RANTY PROCESSING DEPT PO BOX 90070 CITY OF INDUSTRY CA 91715 9907 NO POSTAGE NECESSARY IF MAILED IN THE UNITED STATES BUSINESS REPLY MAIL FIRST CLASS MAIL CITY OF INDUSTRY CA PERMIT NO 1600 POSTAGE WI...

Page 32: ...e G Architect Designer C Appliance Dealer Showroom H Another Dacor Owner D Kitchen Dealer Showroom I Model Home E Home Show J Other 2 Where did you buy your Dacor appliances A Appliance Dealer D Build...

Reviews: