www.dmail.eu
Useful and Unique Ideas
The warranty is valid for normal use of the device as defined in the user’s guide.
Excluded from this warranty, damage due to a cause unrelated to the device. In particular, the warranty does not apply
if the unit has been damaged following a collision or a fall, a false move, a connection that does not comply with the
instructions or requirements specified in this manual, the effect of lightning overvoltage sector, inadequate protection
against heat, moisture or frost.
This warranty gives you specific rights, and you may also have other rights that vary from state to state. If for any reason
this product needs to be returned to the store where purchased it must be packed in its original carton/package.
UsER’s mANUAL
WARRANTy
DIGITAL PhOTO fRAmE WATCh
It’s a digital watch and a photo frame.
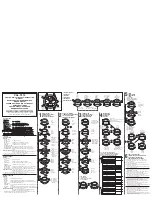
Buttons and their functions:
Menu/Play “
q
” button: UP “
?
” button; DOWN “
/
” button
• To switch the device on/off and to enter the main Menu, press “
q
” Menu/Play
button. The display will show MC ONSEN logo, then press and hold “
q
” button for
3 seconds to enter the slide show. When in slide show mode or in time mode, press
and hold “
q
”Menu/Play button to switch the device off.
• When in slide show mode, press “
q
” button to enter the main Menu.
• To display the PREVIOUS photo or menu step, press “
?
” button.
• To display the NEXT photo or menu step, press “
/
” button.
• When switching on, the device will show the photo index on the photo display
interface.
UsB CONNECTION
Connect the device to a PC using the USB cable. To enter the USB connection Menu,
display the USB connection window or click on “connecting USB” in the Main menu.
Connect the PC by selecting the “Yes” option. Now you can download the photos using
a self-installing software. Exit by selecting the “Cancel” option.
TO sET ThE sLIDE shOW, sELECT “sLIDE shOW” OPTION
To enter the Slide Show Menu, press “Menu/Play”. “Slide Show 3 sec” will show on the
display.
To set the display time, press “up” or “down” buttons (you can choose between 0 and 15
sec). Save the selected display time and exit the menu by pressing “Menu/Play” button.
TO sET AUTO Off OPTION, sELECT “AUTO Off” OPTION
To enter the Auto Off Menu, press “Menu/Play”. “Auto Off 30 sec” will show on the
display.
To set the auto off time, press “up” or “down” buttons (you can choose between 0 and 30
sec). Save the selected time and exit the menu by pressing “Menu/Play” button.
When “00” auto off time is selected, the device must be switched off manually.
TO ADJUsT DIsPLAy’s BACKLIGhT BRIGhTNEss, sELECT “BACKLIGhT” OPTION
To enter the Backlight Menu, press “Menu/Play”. “Backlight 21” will show on the display.
To adjust the display’s backlight brightness, press “up” or “down” buttons (you can
choose one level between 00-21). Save the selected brightness and exit the menu by
pressing “Menu/Play” button.
TO ENTER TImE AND CALENDAR sETTING, sELECT “TImE” OPTION
Press “Menu/Play” button to display the watch.
TO sET TImE AND CALENDAR, sELECT “TImE” OPTION
To enter the “Time Setting” Menu, press “Menu/Play”. (Month-Day-Year-Hour-Min-Sec-
Date)
To select the option, press “up” or “down” buttons; set time and date by pressing “up” or
“down” buttons. Save the settings and exit the menu by pressing “Menu/Play” button.
Note: To adjust the watch in real time, connect it to the PC using the USB cable.
TO DELETE ONE ORE mORE PhOTOs, sELECT “DELETE” OPTION
To enter the Delete Menu, Press “Menu/Play”. “Delete one”, “Delete all” and “Cancel” will
show on the display.
To delete one photo: select the photo, press “Menu/Play” button and select “Delete one”
option by pressing the “up” or “down” buttons. Confirm deleting photo by pressing “Yes”
or cancel and exit by pressing “No”.
WARNING
: If a photo cannot be deleted when in slide show mode, remove the photo
(selecting “00” display time). Now you can delete the photo.
To delete one photo: select the photo, press “Menu/Play” button, select “Delete one”
option by pressing the “up” or “down” buttons. Confirm deleting photo by pressing “Yes”
or cancel and exit by pressing “No”.
To delete all the photos, select “Delete all” option.
This product must be handled with care. Please follow these warnings:
Keep this device, its attachments and spare parts out of reach of children and pets.
Use only suited attachments.
Keep the device away from rain, moisture and liquids; do not store the device or its
attachments close to flammable liquids, explosives or gas.
Do not use or store this product in dusty areas to avoid damages.
Do not expose the device to extreme temperatures (electronic circuits may be
damaged).
Do not put the device into microwave, electric or gas ovens or near heath sources,
danger of explosion.
Do not drop or hit the device: electronic circuits may be damaged and the case may
break.
Clean the device with a damp cloth. Do not use chemicals or liquid detergents.
The device must be repaired only by qualified experienced technicians.
Imported by:
European deluxe industries s.r.l.
Via Ponchielli, 47 - 20052 Monza - Italy
Display: 1.2-3.5” CSTN/TFTLCD
Slide Show: Automatic or manual
Supported files: BMP, JPG, PHG
Functions: Calendar and watch
Battery: 3.7V lithium rechargeable provided with recharging USB cable.
mAIN mENU fUNCTIONs
WARNINGs
sPECIfICATIONs
Cod. 292771
Press “Menu/Play” button, select “Delete all” option by pressing the “up” or “down” but-
tons. Confirm deleting all photos by pressing “Yes” or cancel and exit by pressing “No”.
NOTE: If you do not press “Menu/Play” button within 5 seconds, any setting will be
cancelled.
TO EXIT mAIN mENU, sELECT “EXIT” OPTION
To exit Main Menu and enter slide show, press “Menu/Play” button.