background image

174

D-Link ShareCenter DNS-315 User Manual

Step 4.

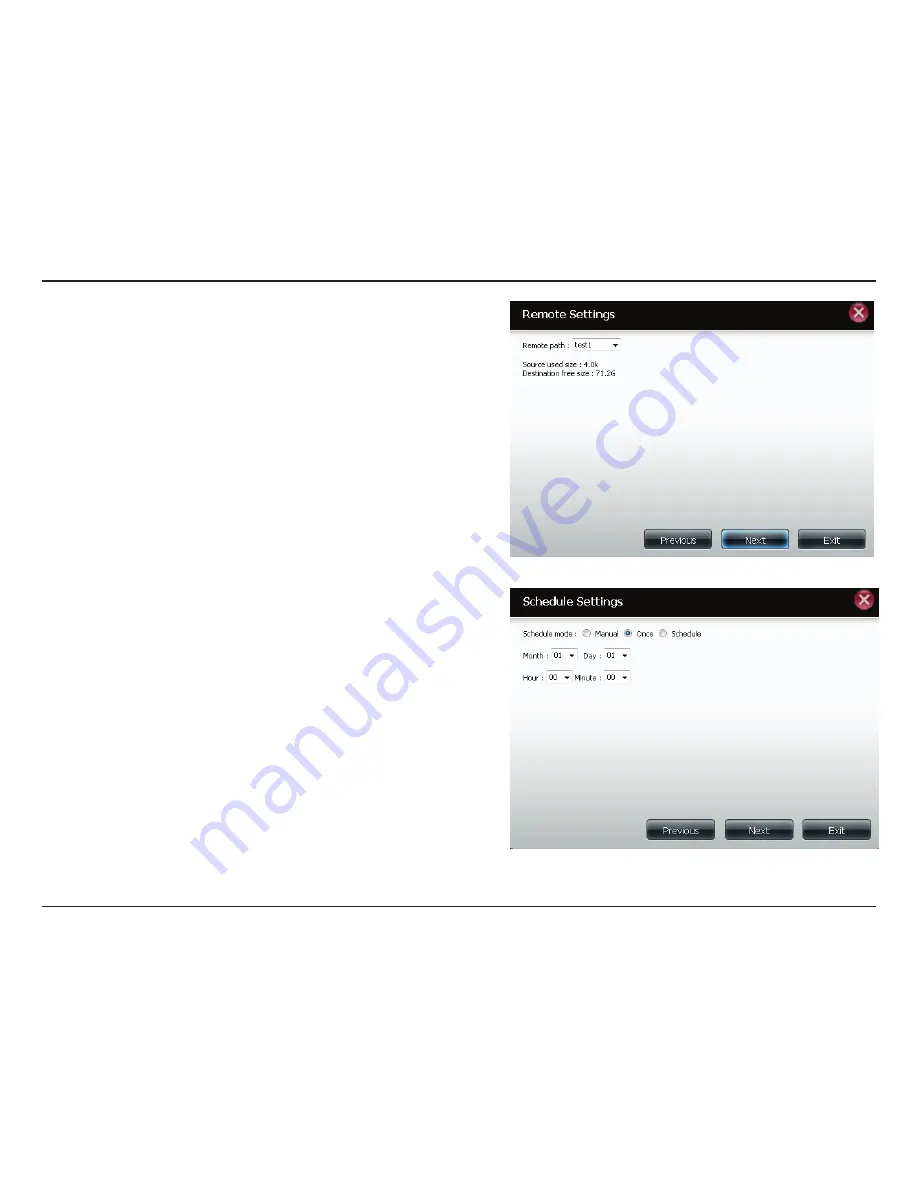
Remote 

Settings

Remote Path

: Using the browse button, select the file 

system (folder) path to the remote target or source system 

for backup.

Step 5 

Schedule 

Settings

Scheduled Mode: 

Manual

: Check either yes or no selection below to start 

the backup (yes) immediately on completion of the wizard 

or (no) manually start the backup from the Remote Backup 

list.

Once

 - select this option to run the Remote Backup once 

at a specific date and time set here.

Scheduled

: select this option to set the backup to occur 

daily, weekly, monthly per a specific schedule.

Summary of Contents for ShareCenter DNS-315

Page 1: ...USER MANUAL ShareCenter TM DNS 315 VERSION 1 1 ...

Page 2: ...izard Detaching the Cover 21 ShareCenter Setup Wizard Installing the Hard Drive 22 ShareCenter Setup Wizard Screwing the Hard Drive into Place 23 ShareCenter Setup Wizard Sliding the Cover Shutting the Device 24 ShareCenter Setup Wizard Attaching the Cover Closing the Device 25 ShareCenter Setup Wizard Connect the DNS 315 to your Network 26 ShareCenter Setup Wizard Power on your DNS 315 27 ShareCe...

Page 3: ...ome to ShareCenter Setup Wizard 57 ShareCenter Setup Wizard Start Page 58 Disk Management Hard Drive Configuration 62 Hard Drive Configuration Wizard 63 Hard Drive Configuration Wizard Physical Disk information 64 Hard Drive Configuration Wizard Volume Configuration Summary 65 Hard Drive Configuration Wizard Warning Message 66 Hard Drive Configuration Wizard Formatting 67 Hard Drive Configuration ...

Page 4: ...res Wizard 122 Account Management Admin Password 127 Network Management LAN Setup 128 Network Management LAN Setup 129 Network Management Link Speed Settings 132 Network Management LLTD Settings 133 Network Management Dynamic DNS Settings 134 Network Management Dynamic DNS Providers 135 Network Management UPnP Router Detection 136 Network Management UPnP Router Detection 137 Network Management Por...

Page 5: ...Backups Time Machine 180 Applications Local Backups Time Machine 181 Applications Local Backups Time Machine 182 Applications Local Backups USB Backups 183 Applications P2P Downloads Settings 187 Applications P2P Downloads P2P Settings 188 Applications P2P Downloads Downloads 189 Applications P2P Downloads Downloads 190 Applications Web File Server 191 Applications Amazon S3 193 Applications Amazo...

Page 6: ...onment with employee specific sensitive data or for the home where you can ensure your children will only have access to age appropriate material The DNS 315 will be available to any computer PC MAC or Linux based on your network without the need to install any software on the computer Back up your music photo and video collections to the DNS 315 for safekeeping Then enjoy the benefits of the buil...

Page 7: ...Quick Installation Guide 12V 2A Output Power Adapter Cat5 Ethernet Cable 6 x Screws Package Contents Note Using a power supply with a different voltage than the one included with the ShareCenter will cause damage and void the warranty for this product If any of the above items are missing please contact your reseller ...

Page 8: ...or Windows 7 3 5 SATA Hard Drive s Operating System Compatibility The DNS 315 is compatible with the following operating system Windows Windows XP Windows Vista Windows 7 Mac OS X Leopard Snow Leapard Lion For the highest performance and reliability always install the latest updates and service packs For Windows computers go to the Start menu and select Windows Update For Mac computers go to the A...

Page 9: ...File System EXT4 for internal HDD FAT32 NTFS for USB external Storage File System Management Unicode Support for both Samba and FTP server File sharing Windows Mac Linux FTP server FTP over explicit SSL TLS mode FTPES FTP bandwidth and connection control FTP support FXP Download Management HTTP FTP schedule download Peer to peer download support Disk Management HDD S M A R T test Scandisk Reformat...

Page 10: ...n System Management Support Storage Utility OS support Windows XP Vista 7 and Mac OS X Two access modes supported Open Share mode and Account User mode no setup necessary in open mode Support Configuration file save load System status Network Recycle bin System FTP Log Syslog Client Email SMS notifications USB port support External Storage device Printer server MTP PTP Media Streaming UPnP AV serv...

Page 11: ... solid when the drive is connected but inactive The WHITE light will blink when the drive is being accessed It will illuminate AMBER if free drive capacity is less than 5 It will illuminate RED if the drive fails USB LED This WHITE light will illuminate when a USB Storage device is inserted into the USB port When there s traffic this light will blink It will illuminate AMBER if it fails to mount t...

Page 12: ...evice Click it again for 5 seconds to unmount the USB storage device USB Port Use this port to attach a USB device Gigabit Ethernet Port Use the Gigabit Ethernet Port to connect the ShareCenter to the local network The port is equipped with both a LINK Traffic R and Speed LED L to indicate connectivity and traffic respectively to the local LAN Power Receptacle Connect the supplied power cord to th...

Page 13: ...utton Use the Power Button to safely power up and power down the DNS 315 to avoid data loss or data damage to the drive Use the Reset Button and the Power button together to Repair the hard drive on the DNS 315 COMPONENT DESCRIPTION Reset Button Press and hold the button for over 5 seconds to reset the DNS 315 ...

Page 14: ...9 D Link ShareCenter DNS 315 User Manual LED Notifications When all lights are inactive the system is powered down When the Power LED is flickering white the DNS 315 is powered on ...

Page 15: ...10 D Link ShareCenter DNS 315 User Manual LED Notifications When the HDD LED is amber the free HDD capacity is less than 5 it is in use When the HDD LED is red then the HDD fails ...

Page 16: ...SB LED is amber that means the USB storage is installed but failed to mount the device When the HDD LED is red but the USB LED is orange it means that data is not being transferred to the HDD correctly Check the USB Flash drive Make sure the device is installed correctly ...

Page 17: ...damaged by rough handling shock or vibration Always observe the following precautions when unpacking and installing your DNS 315 Do not drop or jolt the DNS 315 Do not move the drive during activity Secure it tightly with the screws provided Do not use this product as a portable drive To allow proper ventilation do not block any of the drive enclosure s air slots ...

Page 18: ...uctions for connecting the drive to your network and installing the ShareCenter software It includes the following topics Connecting the DNS 315 Getting Started with the ShareCenter Setup Wizard Connecting the DNS 315 To connect the DNS 315 Depending on your region if required change the power adapters as follows ...

Page 19: ...ect the DNS 315 to the router using an Ethernet Cat5 cable 3 Connect the Power cord to the DNS 315 4 Plug the socket into the wall unit To run the Storage Utility or the ShareCenter Setup wizard insert the ShareCenter CD into your CD ROM drive The auto run feature starts the program Click Start to begin The ShareCenter Setup wizard provides a Welcome screen Follow the instructions carefully ...

Page 20: ...ng a Hard Drive in the DNS 315 Step 1 Unscrew the two screws at the bottom of the DNS 315 Step 2 Slide the cover away from you until it unhooks from the base Note about Installing a new hard drive Please power off the DNS 315 before removing the cover ...

Page 21: ... the cover from its base Step 4 Keep the DNS 315 in the upright position and insert a 3 5 hard drive into the drive bay of the device Ensure the SATA connector is aligned with the SATA socket at the base of the unit otherwise the DNS 315 will not power on correctly ...

Page 22: ...ShareCenter DNS 315 User Manual Step 5 Screw all six screws supplied to secure the hard drive to the base unit Step 6 Flip the cover back to align with the red line on the bracket Step 7 Slide the cover downwards ...

Page 23: ...nsert it into your computer Important Ensure that your internet connection is active Do not connect any USB storage devices yet Step 10 Click the gray Start button on the welcome screen to begin the Setup Wizard Follow the instructions on the screen Default IP DHCP use D Link Storage Utility to search Default Username admin Default Password leave this blank ...

Page 24: ...iguration for the Local LAN Configure the ShareCenter Name Description and Workgroup Configure the Dynamic DNS settings and or if necessary show you how to apply for a DDNS account Setup the System Time and Date Configure the E Mail Settings where the ShareCenter System Alerts are then sent Setup and format the Hard Drive RAID configuration Map the ShareCenter Volumes as Network Drives on your com...

Page 25: ...5 User Manual ShareCenter Setup Wizard Welcome Screen This step below is the startup screen The ShareCenter Setup Wizard guides you through the entire installation process Select your language from the drop down list and click New ...

Page 26: ...21 D Link ShareCenter DNS 315 User Manual ShareCenter Setup Wizard Detaching the Cover This step below shows you how to unscrew and slide the ShareCenter to install the hard drive Click Next to continue ...

Page 27: ... Link ShareCenter DNS 315 User Manual ShareCenter Setup Wizard Installing the Hard Drive This step above shows you how to open your ShareCenter so that you can install one hard drive Click Next to continue ...

Page 28: ...23 D Link ShareCenter DNS 315 User Manual ShareCenter Setup Wizard Screwing the Hard Drive into Place Use all six screws to firmly attach the hard drive to the base of the DNS 315 Click Next to continue ...

Page 29: ...er DNS 315 User Manual ShareCenter Setup Wizard Sliding the Cover Shutting the Device Use the hooks on the cover to allign it with the red lines on the bracket Slide it into place and shut the cover Click Next to continue ...

Page 30: ...eCenter DNS 315 User Manual Slide the DNS 315 cover towards you and screw the device firmly into place using the remaining screws Click Next to continue ShareCenter Setup Wizard Attaching the Cover Closing the Device ...

Page 31: ...Link ShareCenter DNS 315 User Manual Connect one end of your Ethernet cable to the DNS 315 and the other end to your router Click Next to continue ShareCenter Setup Wizard Connect the DNS 315 to your Network ...

Page 32: ...nk ShareCenter DNS 315 User Manual Connect the power cord at the back of your DNS 315 plug it into a wall socket and press the power button Click Next to continue ShareCenter Setup Wizard Power on your DNS 315 ...

Page 33: ... ShareCenter DNS 315 User Manual Once the DNS 315 is powered on the ShareCenter Setup Wizard automatically detects your device Select the device and click Next ShareCenter Setup Wizard Connecting to the DNS 315 ...

Page 34: ...29 D Link ShareCenter DNS 315 User Manual The Setup Wizard prepares the hard drive in the DNS 315 ShareCenter Setup Wizard Connecting to the DNS 315 ...

Page 35: ...30 D Link ShareCenter DNS 315 User Manual The Setup Wizard warns you of data loss before the format process commenses ShareCenter Setup Wizard Format Warning ...

Page 36: ...31 D Link ShareCenter DNS 315 User Manual The Setup Wizard formats the hard drive ShareCenter Setup Wizard Format ...

Page 37: ...32 D Link ShareCenter DNS 315 User Manual The Setup Wizard format is complete ShareCenter Setup Wizard Format Complete ...

Page 38: ...33 D Link ShareCenter DNS 315 User Manual The Setup Wizard restarts the DNS 315 ShareCenter Setup Wizard Restart ...

Page 39: ...NS 315 User Manual If the Setup Wizard encounters any problems it might be due to faulty wiring cables or the hard drive isn t fixed firmly into the cage This error will normally appear ShareCenter Setup Wizard Device Errors ...

Page 40: ...35 D Link ShareCenter DNS 315 User Manual The Setup Wizard proceeds to the next stage of setting up your DNS 315 creating setup parameters ShareCenter Setup Wizard Logging into your NAS ...

Page 41: ...36 D Link ShareCenter DNS 315 User Manual The Setup Wizard proceeds to the next stage of setting up your DNS 315 creating setup parameters ShareCenter Setup Wizard Creating a New Password ...

Page 42: ...c and Static Dynamic allows the DHCP router to set the IP address while Static allows you to set the IP address In the example below we have set up the DNS 315 using DHCP which is the default Ask your systems administrator for help before proceeding with Static IP configuration ShareCenter Setup Wizard Configuring the IP Address ...

Page 43: ...rd asks you to enter the workgroup details Refer to your current network settings or consult your network administrator for help The workgroup settings should be the same as other devices on the network ShareCenter Setup Wizard Configuring Device Information ...

Page 44: ...S 315 User Manual The Setup Wizard introduces you to a feature called DDNS This feature is optional You can decide whether you want to install this feature or not from the wizard setup ShareCenter Setup Wizard Introducing DDNS ...

Page 45: ... D Link ShareCenter DNS 315 User Manual The Setup Wizard asks you to confirm your DDNS settings Click Yes to apply for a DDNS account Click No to skip this step ShareCenter Setup Wizard DDNS Confirmation ...

Page 46: ...g on the web link shown You need to do the following Create an account with a username and password Create a hostname that DDNS service will use to track your ShareCenter no matter what the Local Network WAN settings are i e public IP address Configure your ShareCenter with the hostname and DDNS service provider details Configure your router to forward port 80 Follow the steps listed here in order...

Page 47: ...r DNS 315 User Manual ShareCenter Setup Wizard Configuring Time Zone Settings Configure the Time Zone settings enable your own NTP Server or sync your PC clock with that of your DNS 315 Once complete click Next to continue ...

Page 48: ...ration Configure your email to work with the DNS 315 The DNS 315 will send you alerts when the system is down However you must have all mail server information nearby or a contact your systems administrator for assistance Click Skip to set this up later or complete the details and click Next ...

Page 49: ...nk ShareCenter DNS 315 User Manual ShareCenter Setup Wizard Configuring Email Integration You can also set anonymous parameters for email integration Select and edit this field if you wish to use this function ...

Page 50: ...45 D Link ShareCenter DNS 315 User Manual ShareCenter Setup Wizard Mapping the DNS 315 Map the DNS 315 to your network by selecting a alphabetical letter to the drive ...

Page 51: ...r Manual ShareCenter Setup Wizard Configuration Summary The final process is to read the Configuration Summary This page shows all the changes you made to the configuration during the Setup Wizard Click Finish to exit the setup wizard ...

Page 52: ...eCenter DNS 315 User Manual ShareCenter Setup Wizard Repair Wizard This step below is the startup screen The ShareCenter Setup Wizard guides you through the repair process Click Repair to begin fixing your hard drive ...

Page 53: ...eCenter Setup Wizard Repair Wizard The Repair wizard instructs you to shutdown your DNS 315 Power the system on again and press the Reset button at the same time Release the Reset button once the orange light starts blinking Click Next to continue ...

Page 54: ... and discovers the DNS 315 If there is no DNS 315 image captured in the Please select a device space click the Refresh button If the Refresh button doesn t provide any NAS your hard drive might be faulty Remove the drive and insert a new hard drive If you experience no problems click Next to continue ...

Page 55: ...etup Wizard Repair Wizard The Repair Wizard continues the same wizard instructions as per page 24 Follow the instructions from page 24 to the end of the wizard The instructions guides you to setup your DNS 315 in the same manner as doing a new installation ...

Page 56: ... Manual ShareCenter on your Browser Once you have setup your DNS 315 a more detailed configuration of the NAS can be configured using the browser based software Open your favorite browser enter the IP address of your DNS 315 and log in ...

Page 57: ... on the product CD to locate the device on your network and make any necessary changes D Link Storage Utility Network Storage Device The D Link Storage Utility displays any ShareCenter devices it detects on the network here Refresh Click Refresh to refresh the device list Configuration Click Configuration to access the Web based configuration of the ShareCenter LAN Configure the LAN Settings for t...

Page 58: ...the IP address listed for the device Make sure the browser is not configured to use a proxy server Note The computer used to access the ShareCenter web based configuration manager must be on the same subnet as the ShareCenter If your network is using a DHCP server and the computer receives IP settings from DHCP server the ShareCenter will automatically be in the same subnet ...

Page 59: ... using the Setup Wizard Click Login Note Thecomputer usedtoaccesstheShareCenterweb based configuration manager must be on the same subnet as the ShareCenter If your network is using a DHCP server and the computer receives IP settings from DHCP the ShareCenter will automatically be in the same subnet Web UI Login Configuration ...

Page 60: ...ons Configuration for y y FTP HTTP and P2P Downloads y y Remote and Local Backups y y the Web File Server y y Amazon S3 Management Contains the y y SetupWizard step throughsettingsforpassword time zone and connectivity y y Disk Management Format Disk and perform Disk Diagnostics y y Network Management Configures the LAN settings Dynamic DNS and Port Forwarding y y Application Management Configures...

Page 61: ... DNS 315 User Manual Management This tab contains the Setup Wizard Disk Management Account Management Network Management Application Management System Management and Status Icons Click each of the icons to see the submenus ...

Page 62: ...d The ShareCenter has a System Wizard that allows you to quickly configure some of the basic device settings Click the System Wizard icon to start the Setup Wizard Please note that there is only one hard drive in the DNS 315 Click the RunWizard button to start the setup wizard ...

Page 63: ...58 D Link ShareCenter DNS 315 User Manual Click Next to continue ShareCenter Setup Wizard Start Page Read the steps thoroughly and click Next to continue ...

Page 64: ...al Click Next to continue Update the administrator account password here and confirm it or leave it at default blank Set the timezone to the appropriate geographic zone closest to your location from the drop down menu Click Next to continue ...

Page 65: ...gn a workgroup and name to the ShareCenter in addition to a short description Click Next to continue Click Next to continue TheShareCenterLANparameterscaneitheruseDHCP to obtain its IP settings dynamically or Static to set them manually in the parameters below ...

Page 66: ...email parameters in the boxes below The email account will then receive Event Alerts from the ShareCenter Use the previous button to go back and check your settingsotherwiseifyouaresatisfiedwiththesettings click the finish button to save the settings Click Exit to end the wizard without saving the settings ...

Page 67: ... DNS 315 User Manual Disk Management Hard Drive Configuration If you have inserted a new hard drive into the DNS 315 it s unlikely that it will be formatted Under Disk Management you can re format the drive Click Format Now ...

Page 68: ...63 D Link ShareCenter DNS 315 User Manual Hard Drive Configuration Wizard Follow the instructions on the start page and click Next to continue ...

Page 69: ...64 D Link ShareCenter DNS 315 User Manual Hard Drive Configuration Wizard Physical Disk information See the disk information from the manufacturer and click Next to continue ...

Page 70: ...D Link ShareCenter DNS 315 User Manual Hard Drive Configuration Wizard Volume Configuration Summary The wizard helps to create the volume size and type Click Format to continue or click Exit to do nothing ...

Page 71: ...66 D Link ShareCenter DNS 315 User Manual Hard Drive Configuration Wizard Warning Message A warning message informs you that the hard drive will be formatted Click Yes to proceed Click No to cancel ...

Page 72: ...67 D Link ShareCenter DNS 315 User Manual Hard Drive Configuration Wizard Formatting The wizard formats the drive This process is quick ...

Page 73: ...315 User Manual Hard Drive Configuration Wizard Setup Complete The wizard is complete The summary provides information on the Volume Name File System Mode we can only have standard Mode on the DNS 315 and only one disk no array ...

Page 74: ...ead performance of the hard drive The results are displayed as Passed Failed on the web UI and can also be sent as an e mail alert Extended Test Runs an extended S M A R T test This test requires a lot more time to complete However it is a more thorough and complete test when compared to the Quick Test Send result by E mail Enable this function in order to have the results of the S M A R T test se...

Page 75: ...r Manual Disk Management Quick Test To run the Quick Test click the hard drive select the radio button next to Quick Test and click Start You can also run an Extended Test With both options you have the choice to be notified via email ...

Page 76: ...71 D Link ShareCenter DNS 315 User Manual Disk Management Quick Test Warning A new window giving a brief explanation about S M A R T appears Click Yes to continue ...

Page 77: ... Link ShareCenter DNS 315 User Manual Disk Management S M A R T Schedule To create a schedule click the blue arrow to preview the drop down schedule list and set the date and time Then click Create Schedule ...

Page 78: ...73 D Link ShareCenter DNS 315 User Manual Disk Management S M A R T Schedule If you didn t select the hard drive a warning message will inform you of an error ...

Page 79: ...ter DNS 315 User Manual Disk Management Schedule List Once you have created the schedule click the blue arrow next to Schedule List You will be able to see the list you created Click the Trash Can to delete the Schedule ...

Page 80: ...75 D Link ShareCenter DNS 315 User Manual Disk Management Deleting the Schedule List If you clicked the Trash Can the Schedule List will not show the deleted schedule anymore ...

Page 81: ...76 D Link ShareCenter DNS 315 User Manual Disk Management Scan Disk Click Disk Management Scan Disk Under Volume check the drop down list and select your hard drive Click Scan Disk ...

Page 82: ...77 D Link ShareCenter DNS 315 User Manual Disk Management Scan Disk Once again you will be warned of lsot data Click Yes to continue No to cancel ...

Page 83: ...78 D Link ShareCenter DNS 315 User Manual Disk Management Performing the Scan Disk The wizard scans the drive ...

Page 84: ...79 D Link ShareCenter DNS 315 User Manual Disk Management Performing the Scan Disk Once the scan is complete it will show SUCCESS Click Finish to exit ...

Page 85: ...80 D Link ShareCenter DNS 315 User Manual Disk Management Performing the Scan Disk The Scan checks for errors and completes the process ...

Page 86: ...t Users and Groups The Users Groups menu is used to create and manage user and group accounts Up to 256 users and 32 groups can be created By default all users have read and write access to all folders but access rules can be created in the Network Shares menu ...

Page 87: ... configuration Modify Click on an existing user in the table so that it is highlighted in red and then Click the Modify button to change the configuration of an existing user Delete Click on an existing user in the table so that it is highlighted in red and then click the Delete button to remove a User from the configuration Import Users Your ShareCenter can import users from an excel spreadsheet ...

Page 88: ...o the setup wizard for adding or modifying a user This wizard will guide the user through the setup process In this wizard the user will be able to 1 Create a new user account 2 Join the user to a group 3 Configure the appropriate network shares settings 4 Configure the user quota 5 View a summary of the configuration before completing the addition Click on the Next button to continue Click on the...

Page 89: ...84 D Link ShareCenter DNS 315 User Manual Account Management Username and Password Create a Single User or Create Multiple Users Click Next to continue ...

Page 90: ...r Name and Password for the new user account The password needs to be confirmed by re entering the password in the Confirm Password field Click on the Previous button to return to the previous window Click on the Next button to accept the changes and continue to the next window Click on the Exit button to discard the changes made and return to the User Group window ...

Page 91: ... indicate this Choose to configure this user account to belong to a group or not Select the appropriate Group Name by ticking the check box Click on the Previous button to return to the previous window Click on the Next button to accept the change and continue to the next window Click on the Exit button to discard the changes made and return to the User Group window ...

Page 92: ...e appropriate Network Access settings for the user by simply ticking one of the following options Read Only Read Write or Deny Access Click on the Previous button to return to the previous window Click on the Next button to accept the change and continue to the next window Click on the Exit button to discard the changes made and return to the User Group window ...

Page 93: ...TP CIFs AFP and WebDAV CIFS is short for Common Internet File System AFP is short for Apple Filing Protocol FTP is short for File Transfer Protocol WebDAV is short for Web based Distributed Authoring and Versioning Click on the Back button to return to the previous window Click on the Next button to accept the change and continue to the next window Click on the Exit button to discard the changes m...

Page 94: ...89 D Link ShareCenter DNS 315 User Manual Account Management WebDAV If you have set WebDAV up then also set the rules for it Set the right priviledges for it Read Only or Read Write ...

Page 95: ... Quota settings for the user account Enter the quota amount in the block s indicated in Megabytes By entering 0Mb the quota will be set to unlimited Click on the Back button to return to the previous window Click on the Next button to accept the change and continue to the next window Click on the Exit button to discard the changes made and return to the User Group window ...

Page 96: ...ck on the Back button to return to the previous window Click on the Completed button to accept the change and complete the wizard Click on the Exit button to discard the changes made and return to the User Group window After the new account has been created a window will appear that states the account was created successfully Click on the OK button to continue ...

Page 97: ...omes the user to the setup wizard for adding or modifying a group This wizard will guide the user through the process In this wizard the user will be able to 1 Create a new group 2 Join the user to a group 3 Configure the appropriate network shares settings 4 Configure the quota settings 5 View a summary of the configuration before completing the addition Click on the Next button to continue Click...

Page 98: ...e for the new group being created Click on the Previous button to return to the previous window Click on the Next button to accept the change and continue to the next window Click on the Exit button to discard the changes made and return to the User Group window ...

Page 99: ...ot Select the appropriate user s by ticking the check box next to it Click on the Previous button to return to the previous window Click on the Next button to accept the change and continue to the next window Click on the Exit button to discard the changes made and return to the User Group window ...

Page 100: ...y simply ticking one of the following options Read Only Read Write or Deny Access Click on the Previous button to return to the previous window Click on the Next button to accept the change and continue to the next window Click on the Exit button to discard the changes made and return to the User Group window ...

Page 101: ...mon Internet File System AFP is short for Apple Filing Protocol FTP is short for File Transfer Protocol WebDAV is short for Web based Distributed Authoring and Versioning Click on the Previous button to return to the previous window Click on the Next button to accept the change and continue to the next window Click on the Exit button to discard the changes made and return to the User Group window ...

Page 102: ...97 D Link ShareCenter DNS 315 User Manual Set the WebDAV settings for the Group Read Only or Read Write Click Next to continue ...

Page 103: ... the block indicated in Megabytes By entering 0Mb the quota will be set to unlimited Click on the Previous button to return to the previous window Click on the Next button to accept the change and continue to the next window Click on the Exit button to discard the changes made and return to the User Group window ...

Page 104: ...ccept the change and completed the wizard Click on the Exit button to discard the changes made and return to the User Group window After the new group has been created a window will appear that states the group was created successfully Click on the OK button to continue A final message appears indicating the group was created successfully and added to the ShareCenter configuration Success ...

Page 105: ...100 D Link ShareCenter DNS 315 User Manual Account Management Import Users Click Account Management Users Groups Import Users ...

Page 106: ...101 D Link ShareCenter DNS 315 User Manual Account Management Import Users The Import Wizard starts up ...

Page 107: ...er DNS 315 User Manual Account Management Import Users Click the Download button to see a sample file Click Overwrite Duplicate Accounts if this is necessary Then click Choose File to import the list Click Next to continue ...

Page 108: ...103 D Link ShareCenter DNS 315 User Manual Account Management Import Users Assign the Priviledges and Access Methods Click Next to continue ...

Page 109: ...ShareCenter DNS 315 User Manual Account Management Import Users If there is a problem with the user list the wizard will show the table in red Click Finish to close the wizard or go back to change the import file ...

Page 110: ... user or User List has been authorized The User List configuration is correct A Red X icon means the User or User List is not authorized The User List configuration is incorrect A Yellow warning icon means the User and User List is authorized However not all imported items are authenticated Shared Folders are not imported and have to be manually configured ...

Page 111: ...for both individual users and Group User Accounts Assigning a quota to a user or a group will limit the amount of storage allocated to the User or Group Account By default users and groups do not have a quota Click the enabled button to enforce the quotas set in the Users Groups management or the tables below ...

Page 112: ...hareCenter DNS 315 User Manual Account Management User Quota Settings Select Users and Groups to modify their properties Click the blue arrow to view a larger view of these settings Click the User and click Modify ...

Page 113: ...areCenter DNS 315 User Manual Account Management User Quota Settings When you ve clicked the Modify button a Quota Settings window appears If you wish you can change the quota amount as seen in the two images below ...

Page 114: ...User Manual Account Management Group Quota Settings You can also set the Group Quota Settings These settings can be setup using similar steps as with the User Quota Settings Click the Group press Modify and change the quota settings ...

Page 115: ...hares ISO Mount Shares The Network Shares Settings window allows the user to add modify and remove both new and existing Network Share and ISO Mount Share Settings To add a rule click on the New button To modify an existing rule click on the Modify button To remove a rule click on the Delete button To select a rule simply click on the rule and the entry should change to a red color that indicates ...

Page 116: ... Start This window welcomes the user to the setup wizard for adding or modifying a network share This wizard will guide the user through the steps of setup In this wizard the user will be able to 1 Select share folders 2 Configure shared folder access rights 3 Configure network access settings 4 View a summary of the configuration before completing Click on the Next button to continue Click on the...

Page 117: ...u can also create a new folder by clicking the plus button Enter the new Folder name and select it to choose it Click on the Previous button to return to the previous window Click on the Next button to accept the change and continue to the next window Click on the Exit button to discard the changes made and return to the Network Shares Page ...

Page 118: ...to this folder to all the accounts Select Specific User group to only allow certain users or groups access to this folder Click on the Previous button to return to the previous window Click on the Next button to accept the change and continue to the next window Click on the Exit button to discard the changes made and return to the Network Shares Page ...

Page 119: ...Write and Deny Access This procedure can also be used to block certain users from accessing certain folders Click on the Previous button to return to the previous window Click on the Next button to accept the change and continue to the next window Click on the Exit button to discard the changes made and return to the Network Shares Page ...

Page 120: ...ngs Edit the Oplocks Comments and or recycle Click on the Previous button to return to the previous window Click on the Next button to accept the change and continue to the next window Click on the Exit button to discard the changes made and return to the Network Shares Page ...

Page 121: ...t File System AFP is short for Apple Filing Protocol FTP is short for File Transfer Protocol NFS is short for Network File System WebDAV is short for Web based Distributed Authoring and Versioning Click on the Previous button to return to the previous window Click on the Next button to accept the change and continue to the next window Click on the Exit button to discard the changes made and return...

Page 122: ...ne No Access 2 FTP Anonymous Read Only Limited Access 3 FTP Anonymous Read Write Full Access Click on the Previous button to return to the previous window Click on the Next button to accept the change and continue to the next window Click on the Exit button to discard the changes made and return to the Network Shares Page ...

Page 123: ...ates all hosts Root Squash Disables writing to the Root owned directories and files on the system when the user has root access privileges Write provide write permisson to the file system Click on the Previous button to return to the previous window Click on the Next button to accept the change and continue to the next window Click on the Exit button to discard the changes made and return to the N...

Page 124: ...ite priviledges on the WebDAV settings Click on the Previous button to return to the previous window Click on the Next button to accept the change and continue to the next window Click on the Exit button to discard the changes made and return to the Network Shares Page ...

Page 125: ...ummary of the share created Click on the Previous button to return to the previous window Click on the Finish button to accept the change and complete the wizard Click on the Exit button to discard the changes made and return to the Network Shares Page ...

Page 126: ... D Link ShareCenter DNS 315 User Manual Once you have clicked the Finish button you will be redirected to the main Network Shares Settings screen Here you have a brief setup of all the options in the table ...

Page 127: ...ion will describe how to add a new ISO mount on the ShareCenter To add an ISO Mount click on the New button A easy to configure wizard will be launched and look like the following In Account Management under Network Shares the section ISO Mount Shares Settings allows the user to add new ISO mounts ...

Page 128: ...he configuration before completing Click on the Next button to continue Click on the Exit button to discard the changes made and return to the Network Shares Page Step 1 Expand one of your Volume File System trees to select the desired iso file to be mounted Check the box to the left of the iso file to select it Click on the Previous button to return to the previous window Click on the Next button...

Page 129: ...xt button to accept the change and continue to the next window Click on the Exit button to discard the changes made and return to the Network Shares Page Step 2 1 The user can assign Read Only or Deny Access privileges to the ISO Mount share here Click on the appropriate radio button for the privileges you would like to assign Click on the Previous button to return to the previous window Click on ...

Page 130: ...t a user can use to access this share Options to choose from are FTP NFS and WebDAV CIFS and AFP are set as default CIFS is short for Common Internet File System AFP is short for Apple Filing Protocol FTP is short for File Transfer Protocol NFS is short for Network File System WebDAV is short for Web based Distributed Authoring and Versioning Click on the Previous button to return to the previous ...

Page 131: ...ow Click on the Finsh button to accept the change and complete the wizard Click on the Exit button to discard the changes made and return to the Network Shares Page Step 4 Using the D Link Storage Utility the ISO Mount Share can now be mapped to your computer so that you can access it and the files within it as a normal network share is accessed Step 5 ...

Page 132: ...t Management Admin Password Username This field cannot be modified as the administrator always uses the admin username Password Input the existing admin password New Password Input the new admin password Confirm Password Repeat the new admin passoword ...

Page 133: ...128 D Link ShareCenter DNS 315 User Manual Network Management LAN Setup The LAN Settings allows you to enable LLTD and to configure the Link Speed and the IP address as a DHCP client or Static IP ...

Page 134: ...AN Settings click Setup The LAN Setup Wizard initiates Here you can setuptheLANSettings ClickNexttocontinue Step 1 In Step 1 you can choose between DHCP or Static IP In DHCP the router automatically generates your IP Address In Static IP you may enter your own parameters Select either DHCP or Static IP Step 2 ...

Page 135: ...D Link ShareCenter DNS 315 User Manual Here are the Static IP options you can change Click Next to continue Step 3 Step 2 shows the summary of your DHCP IP settings Click Finish to complete the setup Step 4 ...

Page 136: ...131 D Link ShareCenter DNS 315 User Manual Here is the summary of the Static IP settings Click Finish to complete the setup Step 5 You are prompted to restart your DNS 315 Click OK to continue Step 6 ...

Page 137: ...he current ethernet bit rate in Mega bits per second Link Speed Select either Auto Auto Negotiate 100 Mbps or 1000 Mbps by clicking the appropriate radio button Then click the Save Settings button to save the new settings Network Management Link Speed Settings ...

Page 138: ...l LLTD The ShareCenter supports LLTD Link Layer Topology Discovery and is used by the Network Map application that is included in Windows Vista and Windows 7 Select to enable or disable LLTD on your ShareCenter Network Management LLTD Settings ...

Page 139: ... IP address DDNS Select Enable or Disable Server Address Enter the DDNS server address or select from the drop down menu Host Name Enter your DDNS host name Username or Key Enter your DDNS username or key Password or Key Enter your DDNS password or key Verify Password or Key Re enter your password or key Status Displays your DDNS status When the user clicks on the Sign up for D Link s Free DDNS se...

Page 140: ...k ShareCenter DNS 315 User Manual DDNS Providers Include At the time this manual was written all free dns providers as illustrated above worked smoothly with the DNS 315 Network Management Dynamic DNS Providers ...

Page 141: ...nP router detection and Port Forwarding Configure UPnP router detection only if you have a UPnP router on your network Login selectNetworkManagement Clickthebluebutton torevealtheUPnProutersettings Click Testtorunsearch Do not turn your NAS off at this stage The DNS 315 is searching for the router ...

Page 142: ...137 D Link ShareCenter DNS 315 User Manual Network Management UPnP Router Detection ThewizardfindstheUPnProuteronthenetwork ClickthebluearrowtorevealthePortForwarding options ...

Page 143: ...eCenter DNS 315 User Manual Network Management Port Forwarding Login select Network Management Click the blue arrow to reveal Port Forwarding settings Click Add The Port Forwarding wizard starts Click Next to continue ...

Page 144: ...t Forwarding Rule Click the radio button Select default service scan orclicktheradiobutton CustomaPortForwardingservice Click Next to continue Select the default service you wish to Port Forward You can select more than one port Click Previous to change the Port Forward Rule or Finish to end the wizard ...

Page 145: ...t incoming TCP connections passive mode must be used Client Language Most standard FTP clients like Windows FTP only support Western European code page when transferring files Support has been added for non standard FTP clients that are capable of supporting these character sets Flow Control Allow you to limit the amount of bandwidth available for each user SSL TLS Here the user can enable the SSL...

Page 146: ...d the FTP server to your liking click Save Settings Below the main window there is a section to block specific IP addresses Enter those IP addresses that you wish to deny access to your FTP server Click the New button Application Management FTP Server Settings Window ...

Page 147: ...orary selection and choose from the drop down list how long you wish to block the IP 5 minutes 30 minutes 1 hour or 1 day Click Apply when done The IP address will show in the table Block IP List Select the IP address if you wish to delete it the selection turns red and click the Delete button Application Management Blocked IP addresses ...

Page 148: ...s is a summary of the FTP on off status which port it is using the maximum users accessing the device its flow control the idle time for the server the langaunge supported whether SSL is enabled disabled and the passive mode settings To stop the FTP server click the Stop FTP Server button Application Management FTP Server Status Report ...

Page 149: ...es and folder lists UPnP AV Server Select Enable or Disable to enable or disable the ShareCenter UPnP AV Server After enabling the UPnP AV Server option the following window will appear In the window the user will be able to add delete and view existing UPnP AV Server shared folders Add Delete To add a new folder to the shared list click on the Add button To delete an existing folder click on the ...

Page 150: ...145 D Link ShareCenter DNS 315 User Manual Click Enable Add Application Management AV Server ...

Page 151: ...ume you want to share and click Apply The system initializes the file folder A confirmation box appears confirming a positive result Click OK To delete a share just select the item it turns red and click the Delete button Application Management UPnP AV Server ...

Page 152: ...shared files and folder lists iTunes Server Folder Select to enable or disable the iTunes Server Specifies the folder or directory that will be shared by the iTunes server Select root to share all files on all volumes or click Browse to select a specific folders Password Sets password for the iTunes server Optional MP3 Tag Codepage Here the user can select the MP3 Tag Codepage used by this device ...

Page 153: ...148 D Link ShareCenter DNS 315 User Manual Select the ShareCenter When prompted enter in the iTunes server password Click OK Media stored on the ShareCenter will then be available for use in iTunes ...

Page 154: ...isabled to reduce CPU resource overhead AFP Service Select enable to allow MAC OS based systems to connect to your ShareCenter using AFP protocol Select disable to prevent unnecessary CPU resource depletion when AFP is not being used Save Settings Click this button to save the enable or disable action of the AFP service Notice Enabling AFP service will disable oplocks Application Management AFP Se...

Page 155: ...e Refresh All button to update all the shared files and folder lists NFS Service Select enable to allow systems that support NFS to connect to your ShareCenter using NFS protocol Select disable to prevent unnecessary CPU resource depletion when NFS is not being used Save Settings Click this button to save the enable or disable action of the NFS service Notice Applying NFS service to any Share will...

Page 156: ...want to install After selecting the language pack then click Apply to install the language pack Language Pack List In the languages window you will see a table where the the loaded language packs will be displayed and can be enabled at will by simply clicking the play button More than one language pack can be installed but only one language pack can be used at a time Please Note Keep a keen lookou...

Page 157: ...ttings Shows the current date time and time zone settings of the ShareCenter Manually Enter the complete time and date settings manually Click Save Settings to apply these settings To synchronize the device clock with your computer click the Set time from my computer button Timezone Select your time zone from the drop down menu Click Save Settings after selecting your time zone NTP Server Network ...

Page 158: ... what the ShareCenter will appear as on the network By default the device name is dlink xxxxxx where xxxxxx is the last six digits of the MAC address Description Assign a device description to the device Click Save Settings to accept these changes The device settings page allows you to assign a workgroup name and description to the device You can access this device by typing the host name in the U...

Page 159: ...d restarts the machine Default Clicking default restarts the ShareCenter with the original factory default settings All previous settings that have been configured will be erased Shutdown Clicking this button turns off the ShareCenter by shutting down all systems and processes gracefully This helps prevent data loss System Management System Settings ...

Page 160: ...ation after a system reset browse to the file and click Load Idle Time Enter the time in minutes that the administrator and users will be allowed to remain idle while accessing the web UI System Temperature Threshold Here the user can configure the system temperature threshold value This value can be set in Fahrenheit or Celsius The device will automatically shutdown when it reaches the temperatur...

Page 161: ...ower up again when data is accessed HDD Hibernation Enable or Disable HDD Hibernation settings Turn Off Hard Drive Set the amount of idle time before the drives will go into hibernation Power Recover Enable or disable Power Recovery The Power Recovery feature will automatically restart your device from a previously unexpected shutdown due to a power failure System Management Power Management ...

Page 162: ... fan will change Off Low High depending on the internal temperature of the enclosure Power On Off Scheduling Configure the power On Off schedule Click on the enable radio button to turn on this function Enable or disable the power off days using the check box checked equals enabled for the specific day and configure the time for each day that the power off will occur Check the dates you wish to se...

Page 163: ...port number used here SMTP Server Enter the IP address or domain name of your outgoing mail server If you are unsure of this value contact your e mail provider or systems administrator Sender E mail Enter the from e mail address e g alerts share com This field does not require a valid e mail address However if your e mail client is filtering spam make sure you allow this address to be received Rec...

Page 164: ...h the add button Add button Click on the Add button and enter the information into the appropriate fields that your provider has given you to use for the configuration Delete button Remove the selected Service Provider from the configuration URL The specific service provider URL provided and added in the Add procedure Replace space character with If required by your service provider enter a charac...

Page 165: ...ndow with an appropriate Provider Name In the next window select the appropriate HTTP API URL parameter types definitions from the drop down menus next to the parsed fields of the URL Enter the HTTP API URL provided to you Enter your SMS Provider name here Choosed the appropriate type parameter in the drop down menu fortheparsedparametersoftheURL on the left System Management Adding an SMS Service...

Page 166: ...lerts to the Email or SMS settings by checking the events here Event Settings Select the information you want e mailed to the above address or sent over SMS messages to the above mobile number The items checked will be sent when necessary System Management Notifications Event Settings ...

Page 167: ...he FTP logs here Enable Syslog Turns on the Syslog server functionality of your ShareCenter to be able to receive logs from other ShareCenters Syslog Server IP Input the IP address here of an external Syslog server that you wish to send the logs of this ShareCenter to Clear Log Clicking the Clear Log button will delete all the existing logs Backup Log Clicking the Backup Log button will save the e...

Page 168: ... available download the file to your local computer Current Firmware Version This is the installed firmware that the ShareCenter uses to boot up on and is operating on Firnware Date This shows the date of when the firmware the SharCenter is using was created Firmware Upload When upgrading the firmware click Browse to select the new firmware file on your local computer Click Apply to begin the firm...

Page 169: ...agement you can configure USB Storage and USB Printers Click the blue arrow to reveal the USB storage Information It provides manufacturer product and size details Click the blue arrow to reveal the Printer Information It provides information on the manufacturer type and connection details ...

Page 170: ...tion Displays the local network settings of the ShareCenter Device Information Displays the workgroup name description current temperature packet counts and system uptime of the ShareCenter Volume Information Displays the hard drive information including the disk mode total size used and remaining drive space System Status System Information ...

Page 171: ...d status The Status of the hard drive will display the health of the hard drive If your hard drive is healthy the status will display Normal If your hard drive is not healthy the status will display Abnormal At any time if you wish to view the S M A R T table of the hard drive you can press the Normal Abnormal button After pressing the button a table appears with the S M A R T data below the table...

Page 172: ... Link ShareCenter DNS 315 User Manual System Status Resource Monitor Click the blue arrow to reveal the Resource Monitoring details It provides information on the CPU memory bandwidth and processes in action ...

Page 173: ...utton to specify that the source files folders are located on an FTP server URL Type in the URL location for the program software etc you wish to download and click the Test button Save To Browse or create a new file name where you want the downloaded life saved to Rename Enter a new or alternative name for whatever is being downloaded When Select the date and time for the download to occur Recurr...

Page 174: ...D Link ShareCenter DNS 315 User Manual Modify Click this button to modify changes to your schedule you created under the FTP HTTP Download Settings Delete Click this button to delete the specified schedule ...

Page 175: ...an configure your ShareCenter s Remote Backup functionality Enable remote backup service Check this box to enable the remote backup server functionality to that a remote NAS or Linux Note If you are not using the Remote Backup functionality of your ShareCenter leave this box unchecked so that your ShareCenter s performance will not be affected by the additional overhead used by this process Passwo...

Page 176: ...the Create button to build a new remote backup job on your ShareCenter Modify Click this button to make changes to your existing Remote Backup jobs in the Remote Backup list You must select the remote backup job first and then click the modify button Delete To remove a Remote Backup job select the job in the list and then click the Delete button Applications Remote Backups Remote Backups ...

Page 177: ... 1 Service Type NAS to NAS backup from the local NAS to a remote NAS or vice versa NAS to Linux back from the local NAS to a Linux file system or vice versa Local to Remote sets the backup source as the local NAS and the target destination for the backup files as the remote NAS or Linux file system Remote To Local sets the backup source as the remote NAS or Linux file system and the target destina...

Page 178: ... over any files in the target file system that are not part of the backup files or folders Therefore any existing files in the target system are preserved Incremental backup support Num Checking this box provides multiple backup capability at scheduled times The first backup The first backup in an incremental series captures all the files for backup Subsequent backups are incremental in that only ...

Page 179: ...Schedule Settings Scheduled Mode Manual Check either yes or no selection below to start the backup yes immediately on completion of the wizard or no manually start the backup from the Remote Backup list Once select this option to run the Remote Backup once at a specific date and time set here Scheduled select this option to set the backup to occur daily weekly monthly per a specific schedule ...

Page 180: ...kup job was unsuccessful during execution Enable Disable If the button shows a red circle the remote backup job is enabled Clicking the red button will disable the remote backup job ad the button will change to a green right pointing triangle Clicking the green triangle will enable the job again Backup now Clicking this button will execute the backup job immediately as long as the job is enabled R...

Page 181: ...only available for LAN Backups Username Enter the user name used here Password Enter the password used here Type Select File or Folder depending on what you want to download or backup URL Enter the URL of the site or server you are initiating a transfer from E g ftp 123 456 789 Test or ftp 123 456 789 test txt Save To Enter a valid destination drive on the ShareCenter or click Browse to select the...

Page 182: ...177 D Link ShareCenter DNS 315 User Manual Save SettingsDon t Save Settings Applications Local Backups Local Backups ...

Page 183: ... D Link ShareCenter DNS 315 User Manual Click the Modify button to change the settings you made or select the backup you want to delete and click the Delete button Applications Local Backups Local Backups ...

Page 184: ...me Machine In order to use this function the AFP service is required The AFP service will start automatically as soon as this function is enabled Enable Time Machine Click this to enable the Time Machine function to work with a MAC OS X Time Machine The Time Machine Settings list will appear when this checkbox is ticked Applications Local Backups Time Machine ...

Page 185: ...work Shares associated with the Time Machine backup New Adds a NAS folder as a Time Machine destination Delete Deletes a NAS folder setup as a Time Machine destination Remove all Network Shares Delete all the NAS folders in the list configured as Time Machine Destinations Applications Local Backups Time Machine ...

Page 186: ... Machine Settings have been already setup and you wish not to use these settings select it and click the Delete button The Time Machine Setup Wizard will guide you through the setup process Once the Wizard begins click Next then select the Share and click Next Applications Local Backups Time Machine ...

Page 187: ... Link ShareCenter DNS 315 User Manual The final table will look similar to the image below Select the share to delete it or click the Remove All Network Shares button Applications Local Backups Time Machine ...

Page 188: ...drive or an external hard drive to copy data from your NAS to the external storage MTP Backups is a data solution that continuously secures your data and makes restoration easy It allows for digital media data to be synchronized between your NAS and portable devices The main benefit to using MTP backups are that there are no need for drivers It is driverless The protocol resides on the NAS and all...

Page 189: ...SBBackups ClickBrowse under Destination Find the volume you want to backup to andclickSaveSettings Allfilesinthisvolumenowsupports MTP Under USB Backups click the Enable radio button Under Category select your USB backup format USB to NAS or NAS to USB Browse for your source ...

Page 190: ...185 D Link ShareCenter DNS 315 User Manual Under Source select the path where you want to backup Click Apply Click Browse to find the destination Select the path or USB device for your backup ...

Page 191: ...186 D Link ShareCenter DNS 315 User Manual Select the Type you wish to copy Click Save Settings ...

Page 192: ...ose an incoming connections port or you can configure the incoming connections port manually Seeding Here the user can configure some seeding options Torremt Save Path Here the torrent path will be displayed Encryption Here the user can choose to enable or disable the encryption used Bandwidth Control Here the user can choose to allow the device to automatically choose the bandwidth control speed ...

Page 193: ...188 D Link ShareCenter DNS 315 User Manual Applications P2P Downloads P2P Settings ...

Page 194: ... are being downloaded for each torrent Top Up Down Bottom The Top Up Down and Bottom buttons allows the user to move the selected P2P download in the task list The downloads at the top of the list carries more priority than the one list below them Delete The Delete button allows the user to remove a selected download This will remove not only the torrent file but also the partially downloaded file...

Page 195: ...190 D Link ShareCenter DNS 315 User Manual Applications P2P Downloads Downloads ...

Page 196: ...r download to your computer by navigating in the folder view on the left When you have found the file left click on it in the folder and file list in the center of the browser so that it is highlighted in red Then click on the Download button and save or open the file as needed Refresh Left click the Refresh button to update the folder and file view of the Web File Server Download Downloads the se...

Page 197: ...192 D Link ShareCenter DNS 315 User Manual ...

Page 198: ...s to how to go about it please consult the Amazon S3 How To guide for more information Click on the ShareCenter s Applications tab and then click the Amazon S3 icon to launch the Amazon S3 configuration window Step 1 To create the scheduled backup from the ShareCenter to the Amazon S3 bucket click on the Create button to launch the wizard which will step you through the configuration Step 2 ...

Page 199: ...ocal network share from where data will be backed up to or from 5 Set when the backup will be performed 6 Review all your settings This first window of the configuration window shows the 6 steps to follow in the subsequent wizard windows In each window click the Next button to proceed to the next window if you are satisfied with your settings Click the Previous button if you want to go back to che...

Page 200: ...DNS 315 User Manual Applications Amazon S3 Setup Wizard Input a job name for this backup Make sure to name the backup in a way that you can identify it in case you decide to create multiple backups on your ShareCenter Step 2 ...

Page 201: ...zard You should have received an Access Key and Secret Access Key in the email from Amazon AWS services when your account was confirmed Input those two credentials along with the name of the bucket Remote Path with the Region server selected when you created the bucket Step 3 ...

Page 202: ...to backup from the Amazon S3 bucket to the ShareCenter network share Set the Backup Type parameter to set the Backup job to either Overwrite Existing Files to write over any files in the target folder with the source files that have identical names Full Backup to create a separate folder containing the entire backup data for each time the job is executed Incremental Backup to write over files with...

Page 203: ...15 User Manual Applications Amazon S3 Setup Wizard In Step 4 of the wizard you can set the local path Click on the Browser button to browse to the network share of the ShareCenter where the data will be backed up to or from Step 5 ...

Page 204: ...e appropriate Schedule Mode to set when the backup is to be executed Click on Manual to start the backup later using a button that must be manually clicked on Click on Once to schedule a date and time to run the job one time only Click on Schedule to set a daily time when the job is to be run Step 6 ...

Page 205: ...Manual Applications Amazon S3 Setup Wizard IIn Step 6 review all your settings and click Previous to go back to make any changes Click Exit to exit the wizard without saving the job Click Finish to save the job and exit the wizard Step 7 ...

Page 206: ...tions Amazon S3 Backup Now that you have created a Amazon S3 Task you can either wait for the Task to execute per its schedule or click the Backup Now icon to execute it immediately A dialog box will ask you to confirm the backup as shown below Step 1 ...

Page 207: ...202 D Link ShareCenter DNS 315 User Manual Applications Amazon S3 Backup When the backup is executing the Status field should show Running Step 2 ...

Page 208: ...y Finish If your source files that you backed up are now missing or damaged at anytime you can now click the Restore icon in the Amazon S3 Task table and the files can be restored as required When you click the restore button in the table a dialog window will ask you which Backup date you wish to restore see the next page Step 3 ...

Page 209: ...tore icon in the Amazon S3 Tasks table the Restore window below will be presented Click the Apply button next to the backup date that is appropriate to restore all the data to the original source of the backup In this example below after the Apply button is clicked two folders are uploaded Step 4 ...

Page 210: ... Favorites tab using two different methods Re arranging the My Favorites View Within the My Favorites tab you can arrange the layout of the icon order according to your needs To move the position of an icon left click and drag the icon to a new position anywhere in the current icon locations Once you have dragged the icon to the new location release the mouse button and the other icons will automa...

Page 211: ...use the Drag and Drop method as per item 2 below 1 Right click on an icon in the applications or management tab and click on the Add to My Favorite menu item from the command list that appears 2 While holding the left button down over the icon drag it over the My Favorites tab drag and drop method You will see an white arrow pointing to the My Favorites tab which is highlighted when you start to d...

Page 212: ...e an Icon alias from the My Favorites tab simply right click on it and select Remove From My Favorite in the context selection that appears Right click an Icon alias in the My Favorites tabandselecttheRemoveFromMyFavorite option TheIconaliasshoulddisappearfrom the My Favorites tab view ...

Page 213: ...ing a Drive You can use the D Link Storage Utility to map drives to your computer Inster the ShareCenterTM CD into your CD ROM drive The Storage Utility will load and detect any ShareCenter devices that are on the local network Click Storage Utility ...

Page 214: ...p in the device list click Refresh Highlight an available ShareCenter Available Volumes will be displayed under Drive Mapping Highlight the volume you want to map Select an available drive letter from the drop down menu and click Connect Dnce connected your mapped drive S will appear in my Computer ...

Page 215: ...Center It is important to ensure that any of the printer manufacturer s drivers are already installed or available on any computer you want to print from Note Only Printer function is supported The ShareCenter does not support the copy and scan functions of Multi Function Printers To add a printer connect your printers USB cable to the USB port of your ShareCenter The printer should appear in your...

Page 216: ... printer driver from the installed Manufacturer list or use the Have Disk button to browse for the printer driver file The Windows Add Printer Wizard will launch Click OK to continue Connect to your ShareCenter with Samba and then double click the lp icon ...

Page 217: ... Link ShareCenter DNS 315 User Manual Once you have selected the proper driver as shown in the browse list then click OK to install the printer The printer is now installed and the printer queue will appear ...

Page 218: ...ShareCenter press and hold the USBCOPY UNMOUNT button for 1 second The ShareCenter will create a new folder in the Volume 1 folder and will copy all the files from the USB storage to this folder To unmount the USB storage device after the copy is complete press and hold the USBCOPY UNMOUNT button for 5 seconds When the USB Light has switched off then the USB storage un mounted successfully and is ...

Reviews: