4
2. Open a web browser and type in the default
host name of the DBA-2520P and press
Enter
.
The default host name is
DBA-2520P-XXXX
where
XXXX
represents the last 4 characters
of the MAC address listed on the device label
located on the bottom of the device.
3. When prompted, enter the default login
credentials:
User name:
admin
Password:
admin
Connecting Wirelessly
1. Connect the management computer to the
default SSID of the DBA-2520P. The SSID will be
in the format
DBA-2520P-XXXX
where
XXXX
represents the last 4 characters of the MAC
address listed on the device label located on the
bottom of the device.
2. Open a web browser and type in the default
host name of the DBA-2520P and press
Enter
.
The default host name is
DBA-2520P-XXXX
where
XXXX
represents the last 4 characters
of the MAC address listed on the device label
located on the bottom of the device.
3. When prompted, enter the default login
credentials:
User name:
admin
Password:
admin
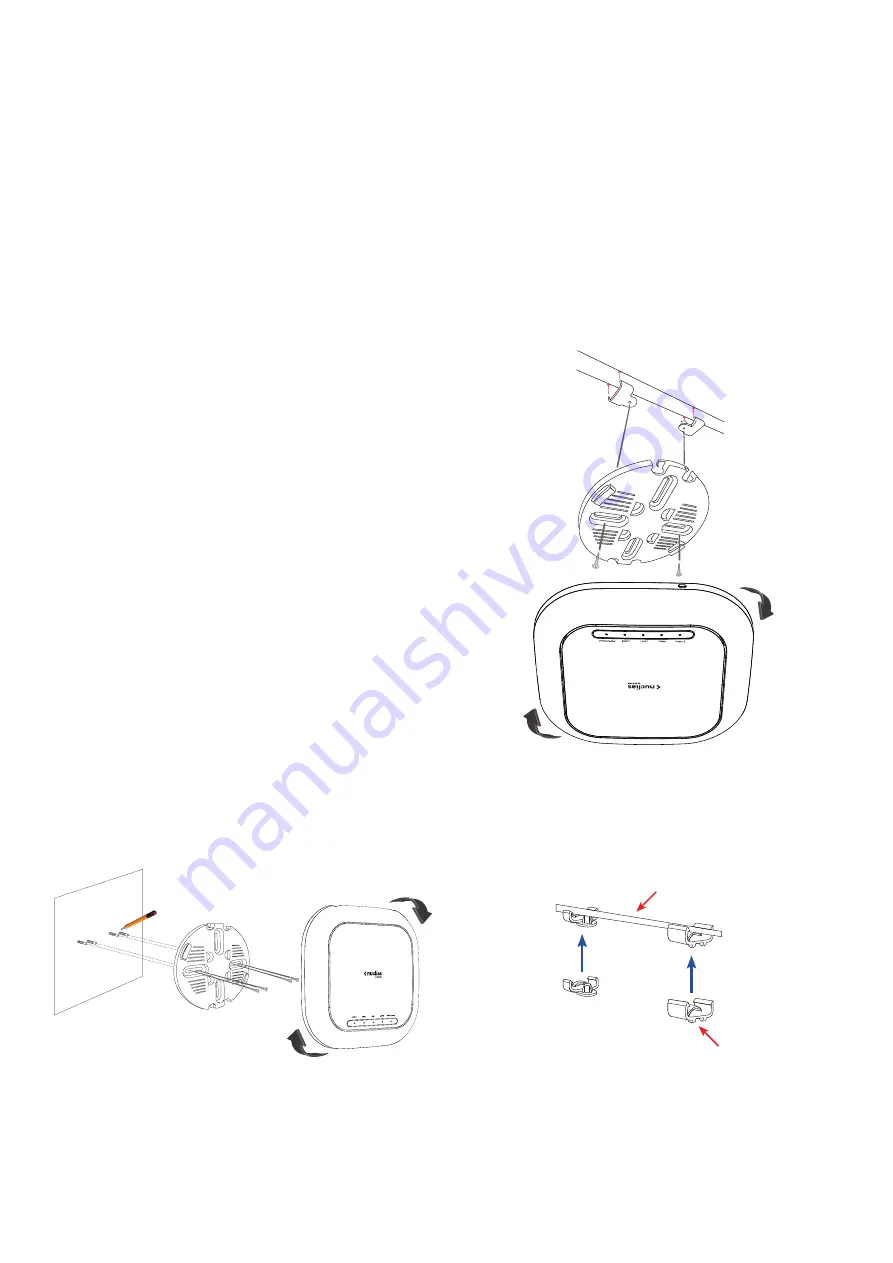
Mounting the Access Point
The DBA-2520P can be mounted on a wall or ceiling
for optimal coverage.
Mounting on a Solid Wall or Ceiling
Figure 5: Attaching the Lock Plate
1. Use the mounting plate to mark the location
where to drill the holes in the wall or ceiling.
2. Drill holes on the markings and place the
included anchors into the drilled holes.
3. Align and place the mounting plate on top of the
anchors and use the included screws to secure
the mounting plate to the surface.
4. Connect the Ethernet cable and power adapter
(optional) to the device.
5. Attach the DBA-2520P to the mounting plate by
placing it onto the plate and rotating clockwise
until the device locks into place.
Mounting on a Ceiling Crossbar
Figure 6: Attaching the Lock Plate
1. Clip the two included ceiling brackets onto the
ceiling crossbar. Make sure both brackets are
positioned in line with each other.
Ceiling bracket
Ceiling crossbar
Figure 7: Attaching the Ceiling Brackets


