background image

87

D-Link DAP-2680 User Manual

Web User Interface

System

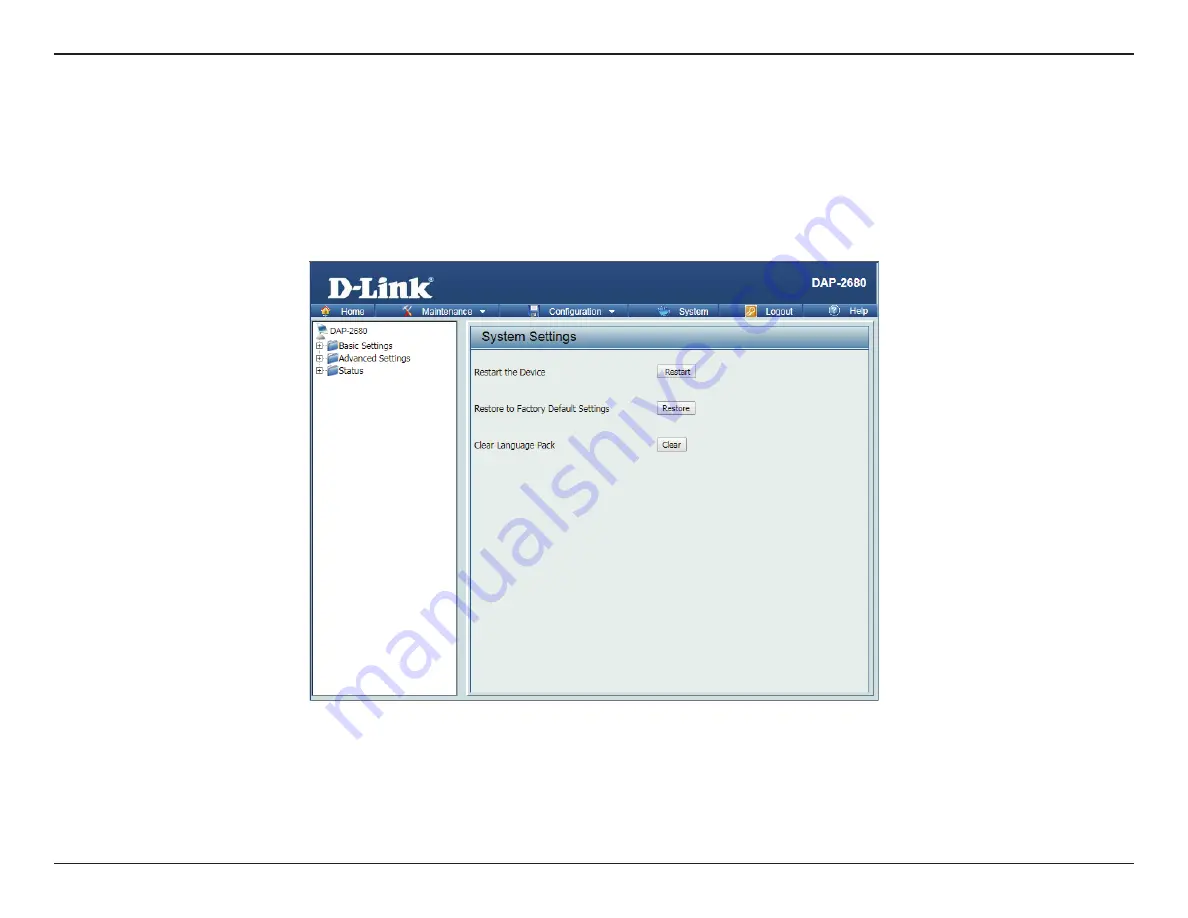
The System page allows the user to restart the unit, perform a factory reset or clear the language pack settings.


y

Restart the Device: Click 

Restart 

to restart the device.


y

Restore to Factory Default Settings: Click 

Restore

 to have all configuration parameters reset to their factory default values. All changes that 

have been made will be lost, even if you have issued a save.


y

Clear Language Pack: Click 

Clear 

to reset language to default settings.

Summary of Contents for NUCLIAS CONNECT DAP-2680

Page 1: ...NUCLIAS CONNECT DAP 2680 User Guide V 2 00 2019 Business Class Networking ...

Page 2: ...e 18 Wireless Security 20 Wired Equivalent Privacy WEP 20 Wi Fi Protected Access WPA WPA2 21 802 1x 23 LAN 24 IPv6 25 Advanced Settings 26 Performance 27 Wireless Resource 29 Multi SSID 31 VLAN 34 VLAN List 34 Port List 35 Add Edit VLAN 36 PVID Settings 37 Intrusion 38 Schedule 39 Internal RADIUS Server 40 ARP Spoofing Prevention 41 Bandwidth Optimization 42 Captive Portal 44 Authentication Settin...

Page 3: ...nistration Settings 78 Limit Administrator 79 System Name Settings 79 Login Settings 80 Console Settings 80 SNMP Settings 81 Ping Control Setting 81 LED Settings 81 DDP Control Setting 82 Country Setting 82 Nuclias Connect Settings 82 Firmware and SSL Certification Upload 83 Configuration File 84 Time and Date Settings 85 Configuration 86 System 87 Logout 88 Help 89 Knowledge Base 90 Wireless Basi...

Page 4: ...nect offers tremendous flexibility compared to traditional hardware based unified management systems Configuration can be done remotely Network traffic analytics are available at a glance in whole or in part Load Balancing Airtime Fairness and Localized Throttling are enabled Nuclias Connect supports multi tenancy so network admins can grant localized management authority for local networks In add...

Page 5: ...tics Authentication via Customizable Captive Portal 802 1x and RADIUS Server POP3 LDAP AD Backwards Compatibility Remote Config Batch Config Multilingual Support Intuitive Interface Multi Tenant Role Based Administration Payment Gateway Paypal Integration and Front Desk Ticket Management For more information on how to use Nuclias Connect with DAP 2680 please refer to the Nuclias Connect User Guide...

Page 6: ...puters with Windows Macintosh or Linux based operating systems with an installed Ethernet Adapter y y Internet Explorer 11 Safari 7 Firefox 28 or Google Chrome 33 and above for configuration Note Only use power supply adapter or any type of connection accessory supplied by the manufacturer Please contact your local supplier to get more information about the power supply adapter Setup ...

Page 7: ... Receptor Connect the power adapter 4 Reset Button Press and hold for ten seconds to reset the access point to the factory default settings Press and hold for one second to reboot the access point LED No Item LED Color Description 1 Power Status LED Solid Red Indicates the access point has malfunctioned Solid Green Indicates that the DAP 2680 is working properly Hardware Overview ...

Page 8: ...e into the LAN port of the DAP 2680 and the other end into a port on a 802 3at PoE switch 2 Separately purchase a DPE 301GI PoE injector if you need to connect the Access Point without a 802 3at PoE Switch 3 Separately purchase a power adaptor to plug into the power receptor of the DAP 2680 Configure the Access Point ComputerwithDHCPServer ComputerwithDHCPServer ComputerwithDHCPServer ...

Page 9: ...in Password admin 2 Connect the access point and your computer via DPE 301GI PoE injector Manage the access point from the computer Enter dap2680 local in the address field of your browser Log in to the Administration user interface The default login information is Username admin Password admin 3 Connect the access point and your computer to the same network switch Manage the access point from the...

Page 10: ...ime Before trying to configure NTP check perform a ping test with the NTP server In the NTP Server field enter the NTP server to use Then click the Time Zone drop down menu and select the appropriate time zone y y Setting System Time Manually From the System Date drop down menu select the Year Month and Day along with the Hour and Minutes appropriate for the AP y y Enable Daylight Saving Click the...

Page 11: ...nterface where the user can configure and monitor the device Launch a web browser type dap2680 local in the address field and then press Enter to login Most of the configurable settings are located in the menu of the left side of the web GUI which contains sections called Basic Settings Advanced Settings and Status ...

Page 12: ...s when the AP is booting up Channel Click the drop down menu to select the desired channel The function is only available when Auto Channel Selection is set to Disable Note The wireless adapters will automatically scan and match the wireless settings Basic Settings Wireless On the wireless settings page you can setup the basic wireless configuration for the access point The user can choose from 4 ...

Page 13: ... or 802 1X y y Select Open System to communicate the key across the network WEP y y Select Shared Key to limit communication to only those devices that share the same WEP settings If multi SSID is enabled this option is not available y y Select WPA Personal to secure your network using a password and dynamic key No RADIUS server is required y y Select WPA Enterprise to secure your network with the...

Page 14: ...uto Channel Selection is set to Disable Note The wireless adapters will automatically scan and match the wireless settings Channel Width Click the drop down menu to select 20 MHz Auto 20 40 MHz or Auto 20 40 80 MHz Select 20 MHz if you are not using any 802 11n wireless clients Auto 20 40 MHz allows you to connect to both 802 11n and 802 11b g or 802 11a wireless devices on your network AP MAC Add...

Page 15: ...m or WPA Personal y y Select Open System to communicate the key across the network y y Select WPA Personal to secure your network using a password and dynamic key changes No RADIUS server is required Save Click to save the updated configuration To make the updates permanent click Configuration Save and Activate ...

Page 16: ...le when Auto Channel Selection is Disable Note The wireless adapters will automatically scan and match the wireless settings Channel Width Click the drop down menu to select 20 MHz Auto 20 40 MHz or Auto 20 40 80 MHz Select 20 MHz if you are not using any 802 11n wireless clients Auto 20 40 MHz allows you to connect to both 802 11n and 802 11b g or 802 11a wireless devices on your network AP MAC A...

Page 17: ...stem or WPA Personal y y Select Open System to communicate the key across the network y y Select WPA Personal to secure your network using a password and dynamic key No RADIUS server is required Save Click to save the updated configuration To make the updates permanent click Configuration Save and Activate ...

Page 18: ... will automatically scan and match the wireless settings Channel The channel used will be displayed and matches the AP that the DAP 2680 is connected to when set to Wireless Client mode Channel Width Click the drop down menu to select 20 MHz Auto 20 40 MHz or Auto 20 40 80 MHz Select 20 MHz if you are not using any 802 11n wireless clients Auto 20 40 MHz allows you to connect to both 802 11n and 8...

Page 19: ...anual Web User Interface MAC Address When MAC Source is set to Manual click Scan to find the MAC address to clone Save Click to save the updated configuration To make the updates permanent click Configuration Save and Activate ...

Page 20: ...lient If the key does not match the one configured on the access point the access point will deny the connection request from the wireless client y y Shared Key will send a request to the access point and if the key used matches the one configured on the access point the access point will send a challenge to the client The client will then again send a confirmation of the same key back to the acce...

Page 21: ...o select one of the following Auto WPA or WPA2 WPA2 Only or WPA Only Auto WPA or WPA2 allows the device to select either setting to match the client configuration Cipher Type Click the drop down menu to select the cipher type for the WPA setting type Auto AES or TKIP Group Key Update Interval Enter the interval period in seconds in which the interval period is valid Encryption key Select the metho...

Page 22: ...ccess Protection Click the radio button to enable or disable Microsoft Network Access Protection RADIUS Server Mode Choose either external or internal RADIUS Server Enter the IP address of the RADIUS server to be used to authenticate RADIUS Port Enter the RADIUS port RADIUS Secret Enter the shared secret to be used between the radius server and the DAP to authenticate Accounting Mode Click the dro...

Page 23: ...ter the interval period in seconds in which the interval period is valid RADIUS Server Mode Choose either external or internal RADIUS Server Enter the IP address of the RADIUS server to be used to authenticate RADIUS Port Enter the RADIUS port RADIUS Secret Enter the shared secret to be used between the radius server and the DAP to authenticate Accounting Mode Click the drop down menu to enable or...

Page 24: ...ress setting mode y y Static IP Manual Select this setting to assign a static IP address to the device y y Dynamic IP DHCP Select this setting to obtain an IP address from a DHCP server on the network IP Address Enter the IP address to assign a static IP address Subnet Mask Enter the subnet mask All devices in the network must share the same subnet mask Default Gateway Enter the IP address of the ...

Page 25: ...option the DAP 2680 can get IPv6 address automatically The other fields will be grayed out y y Static to set IPv6 address manually IP Address Enter the LAN IPv6 address Prefix Enter the LAN subnet prefix length value Default Gateway Enter the LAN default gateway IPv6 address Save Click to save the updated configuration To make the updates permanent click Configuration Save and Activate ...

Page 26: ...ureadvancedsettingsconcerningPerformance WirelessResource Multi SSID VLAN Intrusion Schedule Internal RADIUS Server ARP Spoofing Prevention Bandwidth Optimization Captive Portal DHCP Server Filters and Traffic Control The following pages will explain settings found in the Advanced Settings section in more detail ...

Page 27: ...and 802 11b Mixed 802 11g and 802 11b and 802 11n Only y y 5GHz band supports Mixed 802 11n 802 11a 802 11a Only 802 11n Only and Mixed 802 11ac Please note that when backwards compatibility is enabled for legacy 802 11a g b clients degradation of 802 11n wireless performance is expected Data Rate When Wireless Mode is set to Mixed 802 11g and 802 11b for 2 4GHz and 802 11a Only for 5GHz click the...

Page 28: ...p down menu to enable or disable the short GI function Enabling a short guard interval can increase throughput However be aware that it can also increase the error rate in some installations due to increased sensitivity to radio frequency installations IGMP Snooping Click the drop down menu to enable or disable the IGMP Snooping function Internet Group Management Protocol allows the AP to recogniz...

Page 29: ...wireless band 2 4GHz or 5GHz Connection Limit Click the drop down menu to enable or disable the connection limit function The option is for load balancing This determines whether to limit the number of users accessing this device The exact number is entered in the User Limit field below This feature allows the user to share the wireless network traffic and the client using multiple APs If this fun...

Page 30: ...SI Threshold When Aging out is RSSI click the drop down menu to select the percentage of RSSI When the RSSI of wireless clients is lower than the specified percentage the device disconnects the wireless clients The function is only available when Aging out is RSSI Data Rate Threshold When Aging out is Data Rate click the drop down menu to select the threshold of data rate When the data rate of wir...

Page 31: ...en Index is not set to Primary SSID Enter the Service Set Identifier SSID designated for a specific wireless local area network WLAN The SSID can be easily changed to connect to an existing wireless network or to establish a new wireless network SSID Visibility This function is only available when Index is not set to Primary SSID Enable or Disable SSID visibility Enabling this feature broadcasts t...

Page 32: ...ons Auto WPA or WPA2 WPA2 Only or WPA1 Only Auto WPA or WPA2 allows you to use both WPA and WPA2 In addition you must configure Cipher Type and Group Key Update Interval Cipher Type When Security is WPA Personal or WPA Enterprise click the drop down menu to select Auto AES or TKIP Group Key Update Interval Enter the interval during which the group key will be valid Encryption key Select the means ...

Page 33: ...Manual Web User Interface Accounting Port Enter the accounting port Accounting Secret Enter the accounting secret Save Click to save the updated configuration To make the updates permanent click Configuration Save and Activate ...

Page 34: ... the current VLANs VLAN Status Click the radio button to enable or disable VLAN status Next go to the Add Edit VLAN tab to add or modify an item on the VLAN List tab VLAN Mode Displays the current VLAN mode Save Click to save the updated configuration To make the updates permanent click Configuration Save and Activate VID Displays the VID of the VLAN VLAN Name Displays the name of the VLAN Untag V...

Page 35: ...tagged packets as described in the IEEE 802 1Q standard VLAN Status Click the radio button to enable or disable VLAN status Next go to the Add Edit VLAN tab to add or modify an item on the VLAN List tab VLAN Mode Displays the current VLAN mode Save Click to save the updated configuration To make the updates permanent click Configuration Save and Activate Port Name Displays the name of the port Tag...

Page 36: ... Enter a value 1 4094 for the Internal VLAN VLAN Name Enter the VLAN name to add or modify Save Click to save the updated configuration To make the updates permanent click Configuration Save and Activate From the Port fields select the radio button to set Untag Tag Not Member settings to the Mgmt management and LAN ports The port configuration functions are also available for the defined 2 4GHz an...

Page 37: ...t VLAN mode PVID Auto Assign Status Click the radio button to enable or disable PVID auto assign status For each untagged port set the PVID of the port to its assigned VLAN ID For example if ports 1 2 3 4 and 5 are untagged members of VLAN 10 ports 1 2 3 4 and 5 would be configured with a PVID of 10 For better system consistency the following are recommended y y set MSSID ports S1 and S2 to 16 and...

Page 38: ...ategories y y Valid An AP which is authenticated to the network with encryption is classified as valid y y Neighbor A detected AP with a weak signal strength is classified as a suspect neighbor y y Rogue An AP that has been installed on the secure network without explicit authorization y y New An alternative category From the AP List select a detected AP and click Set as Valid Set as Neighborhood ...

Page 39: ...esired SSID SSID Displays the current SSID To create a new SSID go to the Wireless Settings window Basic Settings Wireless Day s Click the radio button to select All Week and Select Day s If Select Day s is selected check the specific days you want the rule to be effective on All Day s Check this box to have your settings apply 24 hours a day Start Time Enter the beginning hour and minute using a ...

Page 40: ...he RADIUS account Click the icon in the delete column to remove the RADIUS account We suggest you limit the number of accounts below 30 User Name Enter a name to authenticate user access to the internal RADIUS server Password Enter a password to authenticate user access to the internal RADIUS server The length of your password should be 8 64 Status Click the drop down menu to enable the internal R...

Page 41: ...ction By default this feature is disabled Gateway IP Address Enter a gateway IP address Gateway MAC Address Enter a gateway MAC address Add Click to create a defined rule Clear Click to remove the settings from the menu interface Delete All Click to delete all gateway entries Edit Click to edit the selected gateway entry Delete Click to delete the gateway entry Save Click to save the updated confi...

Page 42: ...drop down menu to select a rule y y Allocate average BW for each station AP will distribute average bandwidth for each client y y Allocate maximum BW for each station Specify the maximum bandwidth for each connected client y y Allocate different BW for 11a b g n stations The weight of 11b g n and 11a n client are 10 20 70 20 80 The AP distributes different bandwidth for 11a b g n clients y y Alloc...

Page 43: ...ar Click to remove the settings from the menu interface Edit Click to edit the selected gateway entry Delete Click to delete the gateway entry Save Click to save the updated configuration To make the updates permanent click Configuration Save and Activate ...

Page 44: ... session timeout value 1 1440 Band Click the drop down menu to select the wireless band 2 4GHz or 5GHz SSID Index Click the drop down menu to select the SSID for this Authentication Authentication Type By default the function is set to Disable For this example click the drop down menu to select Web Redirection Only Web Redirection State When Authentication Type is Web Redirection Only click the dr...

Page 45: ... be functional once this selection is made IP Address Assign a static IP address that is within the IP address range of your network Subnet Mask Enter the subnet mask All devices in the network must share the same subnet mask Gateway Enter the IP address of the gateway router in your network DNS Enter a DNS server IP address This is usually the local IP address of your gateway router Edit Click to...

Page 46: ...tication Type By default the function is set to Disable For this example click the drop down menu to select Username Password Web Redirection State When Authentication Type is Username Password click the drop down menu to enable web redirection state URL Path Click the drop down menu to select http or https then enter the URL of the website that will be used in the space provided IPIF Status Click...

Page 47: ...your network DNS Enter a DNS server IP address This is usually the local IP address of your gateway router Username Enter the username for the new account Password Enter the password for the new account Add Click to create a defined rule Clear Click to remove the settings from the menu interface Edit Click to edit the selected entry Delete Click to delete the selected entry Save Click to save the ...

Page 48: ...Authentication Type By default the function is set to Disable For this example click the drop down menu to select Passcode Web Redirection State When Authentication Type is Passcode click the drop down menu to enable web redirection state URL Path Click the drop down menu to select http or https then enter the URL of the website that will be used in the space provided IPIF Status Click the drop do...

Page 49: ...er of ticket that will be used Duration Enter the duration value in hours for this passcode Last Active Time Select the last active date for this passcode Year Month and Day selections can be made User Limit Enter the maximum amount of users that can use this passcode at the same time Add Click to create a defined rule Clear Click to remove the settings from the menu interface Delete All Click to ...

Page 50: ...on Type By default the function is set to Disable For this example click the drop down menu to select Remote RADIUS Web Redirection State When Authentication Type is set to Remote RADIUS click the drop down menu to enable web redirection state URL Path Click the drop down menu to select http or https then enter the URL of the website that will be used in the space provided IPIF Status Click the dr...

Page 51: ...S server IP address This is usually the local IP address of your gateway router Radius Server Enter the RADIUS server s IP address Radius Port Enter the RADIUS server s port number Radius Secret Enter the RADIUS server s shared secret Remote Radius Type Select the remote RADIUS server type Currently only SPAP will be used Edit Click to edit the selected entry Delete Click to delete the selected en...

Page 52: ...thentication Type By default the function is set to Disable For this example click the drop down menu to select LDAP Web Redirection State When Authentication Type is LDAP click the drop down menu to enable web redirection state URL Path Click the drop down menu to select http or https then enter the URL of the website that will be used in the space provided IPIF Status Click the drop down menu to...

Page 53: ...umber Authenticate Mode Click the drop down menu to select the authentication mode Username Enter the LDAP server account s username Password Enter the LDAP server account s password Base DN Enter the administrator s domain name Account Attribute Enter the LDAP account attribute string This string will be used to search for clients Identity Enter the identity s full path string Alternatively check...

Page 54: ...thentication Type By default the function is set to Disable For this example click the drop down menu to select POP3 Web Redirection State When Authentication Type is POP3 click the drop down menu to enable web redirection state URL Path Click the drop down menu to select http or https then enter the URL of the website that will be used in the space provided IPIF Status Click the drop down menu to...

Page 55: ...network DNS Enter a DNS server IP address This is usually the local IP address of your gateway router Server Enter the POP3 server s IP address or domain name Port Enter the POP server s port number Connection Type Click the drop down menu to select the connection type options include None or SSL TLS Edit Click to edit the selected entry Delete Click to delete the selected entry Save Click to save...

Page 56: ... login style file click Choose File Select the saved login style file and click Open and Upload to upload the login style file Login Page Style List Click the drop down menu to select the wireless band and login style that will be used in each SSID here Click to download the template file for the login page and click Delete to delete the template file Note The Left space field indicates the availa...

Page 57: ...s Enter each MAC address that you wish to include in your bypass list and click Add MAC Address List When a MAC address is entered it appears in the list Highlight a MAC address and click Delete icon to remove it from the list Upload MAC File To upload a MAC bypass list file click Choose File and navigate to the MAC bypass list file saved on the computer and then click Upload Download MAC File To ...

Page 58: ...work This protocol simplifies network management and allows new wireless devices to receive IP addresses automatically without the need to manually assign new IP addresses IP Assigned From Enter the first IP address available for assignment on your network IP Pool Range 1 254 Enter the number of IP addresses available for assignment IP addresses are increments of the IP address specified in the IP...

Page 59: ...k com into IP addresses Domain Name Enter the domain name of the network if applicable An example of a domain name is www dlink com Lease Time 60 31536000 sec Enter the lease time that the period of time before the DHCP server will assign new IP addresses Save Click to save the updated configuration To make the updates permanent click Configuration Save and Activate ...

Page 60: ...ally assign new IP addresses Host Name Enter the name of the host entry Spaces are not valid character options Assigned IP Enter the IP address of the device requesting association Assigned MAC Address Enter the MAC address of the device requesting association Subnet Mask Enter the subnet mask of the IP address specified in the IP Assigned From field Gateway Enter the gateway address for the wirel...

Page 61: ...the network that is assigned an IP address from the DHCP dynamic pool Assigned IP Address The current corresponding DHCP assigned IP address of the device Lease Time The length of time that the dynamic IP address will be valid Current DHCP Static Pools These are the IP address pools of the DHCP server assigned through the static pool settings Binding MAC Address The MAC address of a device on the ...

Page 62: ...Access Control List All other devices not on the list will be accepted SSID Index Click the drop down menu to select the SSID for the specified wireless band MAC Address Enter each MAC address that you wish to include in your filter list and click Add MAC Address List When a MAC address is entered it is added to the following index Highlight a listing and click Delete to remove it from the index C...

Page 63: ...iated wireless devices will be blocked Wireless devices can still send data to the Ethernet Internal Station Connection Click the radio button to a specific mode The modes are defined as follows y y Enable Allows communication between wireless clients connected to the same SSID and wireless clients connected to different SSIDs configured on this access point y y Disable Disallows communication bet...

Page 64: ...u to enable or disable the filter state By default this feature is disabled IP Address Enter the IP address or network address Subnet Mask Enter the subnet mask of the IP address or networks address IP Address List When an IP address is entered it appears in the list Highlight a IP address and click Delete icon to remove it from the list Upload IP Filter File To upload a IP filter list file click ...

Page 65: ... are also used in the QoS and Traffic Manager windows Once the desired uplink and downlink settings are finished click Save to let your changes take effect Ethernet Check the box to specify the Downlink or Uplink settings Downlink Bandwidth Enter the downlink bandwidth in Mbits per second Uplink Bandwidth Enter the uplink bandwidth in Mbits per second Save Click to save the updated configuration T...

Page 66: ... Settings window Uplink Bandwidth Enter the uplink bandwidth in Mbits per second This value is entered in the Uplink Downlink Settings window ACK DHCP ICMP DNS Priority Click the drop down menu to select the level of priority for the selected rule Web Traffic Priority Click the drop down menu to select the level of priority for the selected rule Ftp Traffic Priority Click the drop down menu to sel...

Page 67: ...rward to determine how to deal with unlisted client traffic Downlink Bandwidth Enter the downlink bandwidth in Mbits per second This value is entered in the Uplink Downlink Settings window Uplink Bandwidth Enter the uplink bandwidth in Mbits per second This value is entered in the Uplink Downlink Settings window Name Enter the name of the traffic manager rule Client IP optional Enter the client IP...

Page 68: ...e Status Section the user can monitor and view configuration settings of the access point Here the user can also view statistics about client information WDS information and more The following pages will explain settings found in the Status section in more detail ...

Page 69: ... Displays the assigned gateway DNS Displays the assigned DNS Network Name SSID Displays the SSID of 2 4GHz network Channel Displays the channel of 2 4GHz network Data Rate Displays the date rate of 2 4GHz network Security Displays the security of 2 4GHz network Network Name SSID Displays the SSID of 5GHz network Channel Displays the channel of 5GHz network Data Rate Displays the date rate of 5GHz ...

Page 70: ...lients SSID for the network MAC Displays the associated clients MAC address for the network Band Displays the associated clients band for the network Authentication Displays the associated authentication method for the network RSSI Displays the associated clients RSSI for the network Power Saving Mode Displays the associated clients power saving mode for the network System Info Displays the associ...

Page 71: ...od signal strength and status for the DAP 2680 s Wireless Distribution System network Name Displays the AP SSID for the network MAC Displays the AP MAC address for the network Authentication Displays the AP authentication method for the network Signal Displays the AP signal for the network Status Displays the AP status for the network ...

Page 72: ...er Interface Channel Analyze Wireless Band Click the drop down menu to select the wireless band 2 4GHz or 5GHz Detect Click Detect to initiate a scan of the network Wireless Summary The wireless summary list displays after clicking Detect ...

Page 73: ...tes Count Displays the transmitted bytes count Dropped Packet Count Displays the dropped packet count Received Packet Count Displays the received packet count Received Bytes Count Displays the received bytes count Dropped Packet Count Displays the dropped packet count Clear Click Clear to clear the Ethernet traffic statistics list Refresh Click Refresh to update the Ethernet traffic statistics lis...

Page 74: ...Displays the transmitted retry count Received Packet Count Displays the received packet count Received Bytes Count Displays the received bytes count Dropped Packet Count Displays the dropped packet count Received CRC Count Displays the received CRC count Received Decryption Error Count Displays the received decryption error count Received MIC Error Count Displays the received MIC error count Recei...

Page 75: ...iate and disassociate with AP and web login The web page holds up to 500 logs View Log Displays the AP s embedded memory holds logs up to 500 logs First Page Click to display the home View Log page Last Page Click to display the last View Log page Previous Click to display the page occurring before in order Next Click to display the page occurring after in order Clear Click to remove all listings ...

Page 76: ... drop down menu to select the SMTP server type options include Internal Gmail Hotmail Authentication Check the box to enable the authentication of the email notification SSL TLS Check the box to enable the SSL TLS function From Email Address Enter the email address To Email Address Enter the email address Email Server Address Enter the email server address SMTP Port Enter the SMTP port User Name E...

Page 77: ...Maintenance Section the user can monitor and view configuration settings of the access point Here the user can also view statistics about client information WDS information and more The following pages will explain settings found in the maintenance section in more detail ...

Page 78: ...dministration management interface By default the admin account is not configured with a password It is highly recommended to create a password before configuring the settings After modifying any settings the updated configuration must be saved to the device through the Configuration function otherwise the settings will not be saved to the firmware ...

Page 79: ...es to delete any setting change Limit Administrator Check one or more of the eight main categories to display the various hidden administrator parameters and settings displayed on the next five pages Each of the eight main categories display various hidden administrator parameters and settings System Name Settings System Name Enter the name of the device The default name is D Link DAP 2680 Locatio...

Page 80: ...x to apply and update the password Note To save the new configuration settings to the firmware click Configuration Save and Activate otherwise click Discard Changes to delete any setting change Console Settings Status Check the box to enable the console Console Protocol Click the radio button to select the type of protocol Timeout Click the drop down menu to select the timeout Note To save the new...

Page 81: ... to the firmware click Configuration Save and Activate otherwise click Discard Changes to delete any setting change Ping Control Setting Status Check the box to enable the ping control setting Note To save the new configuration settings to the firmware click Configuration Save and Activate otherwise click Discard Changes to delete any setting change LED Settings LED Status Click the radio button t...

Page 82: ...single group in order to increase ease of management Nuclias Connect and AP Array are mutually exclusive functions Enable Nuclias Connect Click the drop down menu to enable or disable Nuclias Connect Note To save the new configuration settings to the firmware click Configuration Save and Activate otherwise click Discard Changes to delete any setting change Country Setting Select a Country Choose f...

Page 83: ... current firmware version is displayed above the file location field After the latest firmware is downloaded click Choose File to locate the new firmware Once the file is selected click Open and Upload to begin updating the firmware Please don t turn the power off while upgrading Language Pack Upgrade After you have downloaded a language pack to your local drive click Choose File Select the langua...

Page 84: ...pload to update the configuration Download Configuration File Click Download to save the current configuration file to your local disk Note that if you save one configuration file with the administrator s password now after resetting your DAP 2680 and then updating to this saved configuration file the password will be gone Upload Nuclias Connect Network File After you have a saved Nuclias Connect ...

Page 85: ...Zone Date And Time Set the time for the AP or click Copy Your Computer s Time Settings to copy the time from the computer in use Make sure that the computer s time is set correctly Enable Daylight Saving Check the box to enable the daylight saving time settings Daylight Saving Offset Click the drop down menu to select the offsetting variable in minutes to adjust for daylight saving time Daylight S...

Page 86: ...iguration allows the user to save and activate or discard the configurations done y y Save and Activate Click Save and Activate to to retain your configuration changes across a system reboot y y Discard Changes Click Discard Changes to discard the settings you have made ...

Page 87: ...ge pack settings y y Restart the Device Click Restart to restart the device y y Restore to Factory Default Settings Click Restore to have all configuration parameters reset to their factory default values All changes that have been made will be lost even if you have issued a save y y Clear Language Pack Click Clear to reset language to default settings ...

Page 88: ...0 User Manual Web User Interface Logout Click Logout to allow the user to safely log out from the access point s web configuration Click on The current browser connection will be disconnected if you click here to logout ...

Page 89: ...89 D Link DAP 2680 User Manual Web User Interface Help The Help page is useful to view a brief description of the functions available on the access point in case the manual is not present ...

Page 90: ...oductivity increases when people can have access to data in any location within the operating range of their WLAN Management decisions based on real time information can significantly improve the efficiency of a worker y y Low implementation costs WLANs are easy to set up manage change and relocate Networks that frequently change can benefit from WLAN s ease of implementation WLANs can operate in ...

Page 91: ...eet thick 0 5 meters 3 45 degree angle appears to be almost 3 feet 1 meter thick At a 2 degree angle it looks over 42 feet 14 meters thick Position devices so that the signal will travel straight through a wall or ceiling instead of at an angle for better reception 4 Building Materials make a difference A solid metal door or aluminum studs may have a negative effect on the range Try to position ac...

Page 92: ...ort on the device if possible If the computer is turned off the link light may not be on y y Disable any internet security software running on the computer Software firewalls such as Zone Alarm Black Ice Sygate Norton Personal Firewall and Windows firewall may block access to the configuration pages Check the help files included with your firewall software for more information on disabling or conf...

Page 93: ... password box empty How to check your IP address After you install your network adapter by default the TCP IP settings should be set to obtain an IP address from a DHCP server i e wireless router automatically To verify your IP address please follow the steps below 1 Click on Start Run In the run box type cmd and click OK 2 At the prompt type ipconfig and press Enter This will display the IP addre...

Page 94: ... represents your network adapter and select Properties 3 Highlight Internet Protocol TCP IP and click Properties 4 Click Use the following IP address and enter an IP address that is on the same subnet as your network or the LAN IP address on your router Example If the router s LAN IP address is 192 168 0 1 make your IP address 192 168 0 X where X is a number between 2 and 99 Make sure that the num...

Page 95: ...Secure SSH Telnet Security y y WPA Personal Enterprise y y WPA2 Personal Enterprise y y WEP 64 128 bit Wireless Frequency Range y y 2 4 to 2 4835 GHz and 5 15 to 5 85 GHz Operating Voltage y y 12V 2A or 802 3at PoE Antenna Type y y Three Dual Dand Internal Antennas 2 4 Ghz 3 6 dBi 5 Ghz 4 2 dBi LEDs y y Power Status Temperature y y Operating 0 C to 40 C 32 F to 104 F y y Storing 20 C to 65 C 4 F t...

Page 96: ...96 D Link DAP 2680 User Manual Antenna Pattern Antenna Pattern Orientation H Plane E Plane 2 4GHz Ceiling Mounted 2 4GHz Ceiling Mounted ...

Page 97: ...97 D Link DAP 2680 User Manual Antenna Pattern Orientation H Plane E Plane 5GHz Ceiling Mounted 5GHz Ceiling Mounted ...

Reviews: