background image


Hardware Overview 

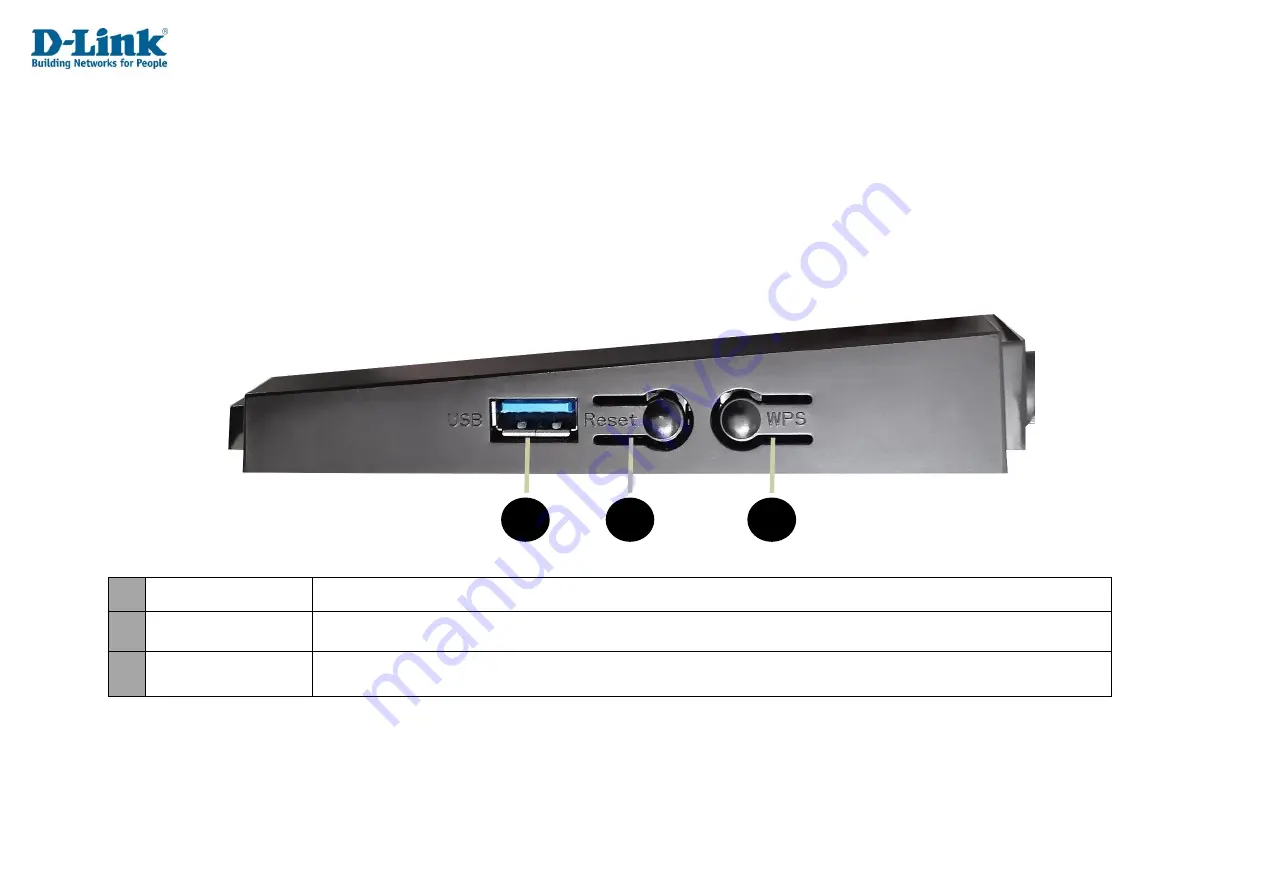
Side Panel 


6. 

USB 3.0 Port 

Connect to USB Storage Device 

7. 

Reset Button 

Press and Hold the Reset button for 25 seconds to reset the DWR-956M 

8. 

WPS Button 

Press to start the WPS process and automatically create an encrypted connection to a WPS client. 

6

7

8

Summary of Contents for DWR-956M

Page 1: ...LTE FIBRE Wi Fi AC1200 Dual Band Gigabit Router DWR 956M ...

Page 2: ... product names mentioned herein are trademarks or registered trademarks of their respective companies AppleR Apple logoR SafariR iPhoneR iPadR iPod touchR and MacintoshR are trademarks of Apple Inc registered in the U S and other countries App StoreSM is a service mark of Apple Inc Chrome browser Google Play and Android are trademarks of Google Inc Internet ExplorerR WindowsR and the Windows logo ...

Page 3: ...ardware Installation 17 Getting Started 18 Quick Setup 18 Configuration 23 Log in 23 Status 24 Device Information 24 WAN 25 Network 25 Ethernet 27 3G 4G 27 LAN 28 Network 28 Ethernet 28 WLAN 29 DHCP Client 29 Statistics 30 WAN 30 LAN 30 WLAN 31 ARP 31 Route 32 VoIP 32 Voice Status 32 Basic Setup 33 WAN Service 33 LAN 45 IPv4 Configuration 45 Reserved IP Address Settings 46 IPv6 Configuration 47 Wi...

Page 4: ...Server Settings 61 Port Triggering 62 Port Triggering Setting 62 Multi NAT 63 Multi NAT Edit 63 DMZ Settings 64 ALG Settings 64 Security 65 IP Filtering 65 Port Filter Rule Settings 66 MAC Filter 66 DDoS Protection 67 Parental Control 69 Access Time Restriction 69 Access Time Restriction Configuration 69 URL IP Filter 70 Access Time Restriction Configuration 71 Routing 71 Default Route 71 Static R...

Page 5: ...aring Service Setup 84 Storage Service FTP Service Setup 84 Storage Service FTP Client Settings 85 Storage Service TFTP Service Setup 85 Printer Service Setup 86 Multimedia Share Setup 86 Multimedia Share Setup 86 DNS 87 DDNS Settings 87 UPnP 88 Multicast 89 IGMP Settings 89 MLD Settings 90 SNMP 91 VOIP 91 Voice Mode 91 Basic Setup 92 Advance VoIP Setup 93 Media Settings 94 Fax Settings 94 Voice S...

Page 6: ...store Default Settings 107 Update Software 108 LTE Fota 108 Account Management Passwords 108 Logs 109 Log Level 109 Logs 110 Service Control 110 Access Control IP Address Configuration 111 Internet Time 112 Tools 113 Ping 113 Trace 113 Connect a Wireless Client to your Router 114 Troubleshooting 121 Wireless Basics 124 ...

Page 7: ...ower Adapter Ethernet Cable Quick Install Guide If any of the above items are missing or damaged please contact your reseller Note Using a power supply other than the one included with the DWR 956M may cause damage and void the warranty for this product ...

Page 8: ...iguration Utility Requirements Computer with the following Windows Macintosh or Linux based operating system An installed Ethernet adapter Browser Requirements Internet Explorer 10 or higher Microsoft EDGE Browser 20 or higher Firefox 11 or higher Safari 5 or higher Chrome 17 or higher Windows Users Make sure you have the latest version of Java installed Visit version of Java installed Visit www j...

Page 9: ... standard 10 100 ports Enjoy uninterrupted Internet service thanks to failover protection the WAN port to connect to Ethernet based networks while the built in SIM slots allows for mobile broadband zconnection With the addition of Advanced Quality of Service QoS data streams are separated which helps organize and prioritize your network traffic so your video streaming gaming and VoIP calls run smo...

Page 10: ...tering based on MAC address URL and or domain name Scheduling The wireless features can be scheduled to be active on a schedule you define Multiple Concurrent VPN Sessions The DWR 956M can pass through VPN sessions It supports multiple and concurrent IPSec and PPTP sessions so users behind the DWR 956M can access encrypted corporate networks User friendly Setup Wizard Through its easy to use web b...

Page 11: ...switch router ON OFF 2 Power Connector Connector for the supplied power adapter 3 Ethernet Ports Connects to Ethernet devices such as computers 4 WAN Port Connects to Ethernet WAN devices 5 FXS VoIP port Connects to an analogue telephone 1 1 2 1 3 1 4 1 5 1 ...

Page 12: ... Port Connect to USB Storage Device 7 Reset Button Press and Hold the Reset button for 25 seconds to reset the DWR 956M 8 WPS Button Press to start the WPS process and automatically create an encrypted connection to a WPS client 6 1 7 1 8 1 ...

Page 13: ...is properly connected and data is being transmitted OFF No connection or Cable not connected properly 3 LAN 1 2 3 4 Solid Blue A device is connected to the Ethernet port Blinking Blue A device is connected to the Ethernet port and data is being transmitted OFF Nothing is connected to the Ethernet port 1 1 2 1 3 1 4 1 5 1 6 1 7 1 8 1 ...

Page 14: ...OFF WPS disabled 6 USB Solid Blue USB storage device connected OFF No USB device connected or USB not detected 7 LTE Signal Red No Internet connection or SIM not reading Orange Device is connected to 2G service Green Device is connected to 3G Service Blue Device is connected to 4G service OFF LTE connection disabled 8 Phone Service Green Device is using CS dial mode Blue Device is using VoIP dial ...

Page 15: ...ibre service information provided by your Internet Service Provider handy This information is likely to include your Fibre account s Username and Password Your ISP may also supply you with additional WAN configuration settings which are necessary to establish a connection This information may include the connection type DHCP IP Static IP PPPoE or PPPoA and or ATM PVC details If you are connecting ...

Page 16: ...at a 45 degree angle appears to be almost 3 feet 1 meter thick At a 2 degree angle it looks over 42 feet 14 meters thick Position devices so that the signal will travel straight through a wall or ceiling instead of at an angle for better reception 3 Building materials make a difference A solid metal door or aluminum studs may have a negative effect on range Try to position access points wireless r...

Page 17: ...Manual Setup Hardware Installation ...

Page 18: ... up refer to Configuration on page Quick Setup Step 1 The Quick Setup menu is used to set up the Internet connection on the DWR 956M This is the first step in the Quick Setup tool and allows you to choose the connection type Step 1 Select Interface Type Please select which WAN interface to use 3G 4G or ETH Your ISP should inform you of what method you use to connect to the Internet Click Next to c...

Page 19: ...ssful please click the next button to continue to next step If both DHCP and PPPoE test fails For SIM card please verify sim card connectivity whether the SIM card is active and inserted correctly For Fibre please verify that your fibre is active and the cable from the ONT device is pluged into the blue port at the back of the DWR 956M ...

Page 20: ...ame password again here Note Using admin for the username password will not work on this step as this is the account details for your Fibre line which is unique to each client s account Step 4 If connection is on PPPoE device will now test if the configured account is valid If the test fails please click on the back button and double check that the details on step 3 are correct If the details have...

Page 21: ...age click Skip to skip this configuration or click Next to continue to Step 6 Step 6 In this step you can enter the change the web UI credentials The details used to log into the settings page of your router on 10 0 0 2 AdminName The username to log in to the web UI AdminPassword Enter the password here for logging into the web UI AdminPassword Enter the password for logging in to the web UI again...

Page 22: ...re Confirm Site Password Enter the site password again to confirm Site LAN IP Netmask Enter the LAN IP or Netmask for the site here Note Password cannot contain a space Click Back to go back to the pervious page or click Next to continue to Step 9 Step 8 In this step you can you can review everything for accuracy Click Back to go back to the pervious page or click Apply to apply all of the configu...

Page 23: ...fault the login details are admin for the username and admin for the password if you chose to not change the details on the wizard Click Log In to proceed or Cancel to clear your input Note If you cannot remember your password or cannot log in follow the factory reset procedure to restore the router to its default settings The web interface is used to set up and change settings on the DWR 956M Fol...

Page 24: ...ation and the uptime of the router Device Information Product Type The model number of the router Device ID The device ID of the router Hardware Version The hardware version of the router Software Version The software version of the router MAC Address The MAC address of the router System Up Time The amount of time that the router has been on for ...

Page 25: ...e WAN connection Type The WAN connection type IP Address Mask The IP address and subnet mask of the WAN connection Default Gateway The default gateway of the WAN connection Primary DNS The primary DNS of the WAN connection Secondary DNS The secondary DNS of the WAN connection Status The status of the WAN connection ...

Page 26: ...eway The default gateway of the WAN connection Primary DNS The primary DNS of the WAN connection Secondary DNS The secondary DNS of the WAN connection Status The status of the DS Lite connection Click Refresh to refresh the page L2TP LNS Status Connection Name The name of the WAN connection Type the WAN connection type IP Address Mask The IP address and subnet mask of the WAN connection Default Ga...

Page 27: ...received on the Ethernet connection Transmitted The number of bytes and packets sent on the Ethernet connection Click Refresh to refresh the page 3G 4G This displays xDSL status information Status The status of the 3G 4G connection Provider Shows the Netowork Provider for the SIM connection Network Type The connection type Signal The signal strength for the connection Cell id IMEI number for the D...

Page 28: ...s The IPv6 address of the LAN connection The LAN menu is used to display status information for the LAN interfaces on the router Ethernet This displays Ethernet status information Interface The name of the LAN interface Status The status of the LAN interface Speed The speed of the LAN interface Duplex The duplex of the LAN interface ...

Page 29: ... SSID Encryption Mode The encryption modes supported by the SSID Attached Devices Info IP Address The IP address of the device connected to the SSID MAC Address The MAC address of the device connected to the SSID Click Refresh to refresh the page DHCP Client This displays DHCP client status information Host Name The host name of the DHCP client MAC Address The MAC address of the DHCP client IP Add...

Page 30: ... connection Transmitted The number of bytes and packets sent and the number of errors and discarded packets on the WAN connection Click Refresh to refresh the page LAN This displays the LAN statistics Port The name of the LAN port Transmitted The number of bytes and packets sent and the number of errors and discarded packets on the LAN port Received The number of bytes and packets received and the...

Page 31: ...ent and the number of errors and discarded packets on the WLAN port Click Refresh to refresh the page ARP This displays Address Resolution Protocol ARP statistics IP Address The IP address used in the ARP lookup Flags The flags returned by the ARP lookup HW Address The MAC address used in the ARP lookup Device The interface used in the ARP lookup Click Clear to clear the ARP statistics and click R...

Page 32: ... for the route VoIP Voice Status The VoIP menu is used to display voice status information from the router Line The name of the VoIP line Voice Register Status The status of the VoIP line Coding Type The coding types supported by the VoIP line Tel The telephone number associated with the VoIP line Call State The call state of the VoIP line Call Waiting Status The call waiting status of the VoIP li...

Page 33: ...connection This can be INTERNET TR069 TR069_INTERNET VOIP INTERNET_VOIP TR069_VOIP TR069_INTERNET_VOIP or Other Edit Delete Click Edit to edit the current service profile Press Delete to delete Set New WAN Interface The interface of the connection type This can be ETH or 3G 4G Ethernet ETH is used for direct WAN connections to a fibre ONT Select 3G 4G for use with a SIM card in the device contact ...

Page 34: ...o enable or disable static DNS entries Tick this to enter static DNS entries or un tick it assign the DNS servers using DHCP Ticking the box displays other options on the page and these are documented below MAC Address Override Whether to enable or disable MAC address override on the WAN connection Choosing this option displays other options on the page and each of these is documented below Enable...

Page 35: ...receiving DHCP information on the WAN connection Tick this to enable the DHCP Option 66 DHCP Option 120 Whether to enable or disable DHCP Option 120 when receiving DHCP information on the WAN connection Tick this to enable the DHCP Option 120 Bound Ports These are the ports that are bound and that can share the same service type Tick the LAN or SSID ports to bind these ports Note A greyed out port...

Page 36: ...e NAT Firewall Whether to enable or disable packet filtering Tick this to enable packet filtering This feature is ticket by default IPv4 Static DNS Whether to enable or disable static DNS entries Tick this to enter static DNS entries or un tick it assigns the DNS servers using DHCP Ticking the box displays other options on the page these are documented below MAC Address Override Whether to enable ...

Page 37: ...r options on the page and each of these is documented below Click Advanced Settings to reveal more settings Mode Static Advanced Settings Bound Ports These are the ports that are bound and that can share the same service type Tick the LAN or SSID ports to bind these ports Note A greyed out port means it has been bound Click Apply to save your settings Click Back to cancel and return to the previou...

Page 38: ...this to enable packet filtering This feature is ticket by default IPv4 Static DNS Whether to enable or disable static DNS entries Tick this to enter static DNS entries or un tick it assign the DNS servers using DHCP Ticking the box displays other options on the page and these are documented below PPPoE Type The PPPoE type for the WAN connection This can be Normal PPPoE or PPPoE Proxy Choosing the ...

Page 39: ...lives that can be missed before the connection is deemed to be inactive This can be from 1 to 100 The default is 5 MAC Address Override Whether to enable or disable MAC address override on the WAN connection Choosing this option displays other options on the page and each of these is documented below Enable VLAN Whether to enable or disable VLAN settings on the WAN connection Choosing this option ...

Page 40: ...s These are the ports that are bound and that can share the same service type Note A greyed out port means it has been bound Click Apply to save your settings Click Back to cancel and return to the previous screen Click Refresh to update the current screen Interface ETH Mode Bridge Connection Name Assign a name for the connection here Enable Tick this to enable this connection and un tick it to di...

Page 41: ... through from the WAN connection Tick this to enable VLAN pass through This is un ticked by default DHCP Transparent Whether to enable or disable passing DHCP information through from the WAN connection Tick this to enable DHCP transparent This is un ticked by default Bound Ports These are the ports that are bound and that can share the same service type Tick the LAN or SSID ports to bind these po...

Page 42: ...069 or VOIP Click Advanced Settings to reveal more settings Mode Con bridge Advanced Settings VLAN PassThrough Whether to enable or disable passing VLANs through from the WAN connection Tick this to enable VLAN pass through This is un ticked by default Bound Ports These are the ports that are bound and that can share the same service type Tick the LAN or SSID ports to bind these ports Note A greye...

Page 43: ...tatic DNS Whether to enable or disable static DNS entries Tick this to enter static DNS entries Ticking the box displays other options on the page and these are documented below MAC Address Override Whether to enable or disable MAC address override on the WAN connection Choosing this option displays other options on the page and each of these are documented below Enable VLAN Whether to enable or d...

Page 44: ...e is documented below DHCP Option 66 Whether to enable or disable DHCP Option 66 when receiving DHCP information on the WAN connection Tick this to enable the DHCP Option 66 and un tick it to disable it DHCP Option 120 Whether to enable or disable DHCP Option 120 when receiving DHCP information on the WAN connection Tick this to enable the DHCP Option 120 and un tick it to disable it Bound Ports T...

Page 45: ...lients Domain Name The domain name for the router Disable DHCP If Disable DHCP is selected then the internal DHCP server will not be active on the local LAN Enable DHCP Relay Selected Enable DHCP Server Selected Relay IP The DHCP relay IP address to forward DHCP requests to from the local LAN Start PC The start IP address of the DHCP pool This will be the first address that can be assigned to a PC...

Page 46: ... Address The mac address of the machine you want to reserve the IP for IP Address The IP address to recerve with the mac address Description Enter a description for the rule Click Back to go back to the previous page click Add to add the reserved IP address to the Reserved IP Addresses List and click Refresh to refresh the page ...

Page 47: ...to enable the O Flag and set it to 0 to disable it DHCPv6 Server Whether to enable or disable the DHCPv6 server Tick this to enable the DHCPv6 server or un tick it to disable it This default is ticked Unique Local Prefix Whether to use a Unique Local Prefix for the private network Tick this to enable the Unique Local Prefix This default is ticked Unique Local GlobalID The Unique Local Global ID to...

Page 48: ...r disable the SSID Tick this to enable the SSID This default is ticked Enable Isolation Whether to enable or disable station isolation This prevents wireless clients on the same SSID from communicating with each other Tick this to enable isolation This default is un ticked Hide SSID Whether to hide or broadcast the SSID Tick this to hide the SSID This default is un ticked SSID The SSID name Enter ...

Page 49: ...er to use enable or disable station isolation This prevents wireless clients on the same SSID from communicating with each other Tick this to enable This default is un ticked Hide SSID Whether to hide or broadcast the SSID Tick this to hide the SSID This default is un ticked SSID The SSID name Enter the name of the SSID as you want it to be displayed in the router web interface and to clients Maxi...

Page 50: ...TKIP AES Authentication WEP Encryption Mode The encryption mode for the SSID This can be Open Share or Both Encryption Length The length of the encryption key for the SSID This can be 4 bits 10 hex digits or 128 bits 26 hex digits Key Index The default key to use for authentication The keys are numbered 1 to 4 and are listed below Key1 Authentication key 1 The SSID simultaneously supports up to 4 ...

Page 51: ...en Click Apply to apply the settings and click Refresh to refresh the page LAN The WAN menu is used to set advanced LAN settings on the DWR 956M LAN Ethernet Mode Configuration This allows you to set Ethernet settings for the LAN connections Port The port name This will usually be set to LAN1 to LAN4 Status The status of the port This will be Up if the link is up or Down if the link is down or dis...

Page 52: ... Mbps 2 Mbps 5 5 Mbps 11 Mbps 6 Mbps 9 Mbps 12 Mbps 18 Mbps 24 Mbps 36 Mbps 48 Mbps 54 Mbps MCS0 MCS1 MCS2 MCS3 MCS4 MCS5 MCS6 MCS7 MCS8 MCS9 MCS10 MCS11 MCS12 MCS13 MCS14 or MCS15 The default is Auto Rx Chain Power Save The RX Chain Power Save feature turns one of the receive chains off to save power TX Power The transmit power of the wireless radio This can be 100 80 50 30 or 10 The default is 1...

Page 53: ...enable or disable the short Guard Interval GI Tick this to enable the short GI The default is ticked WMM Whether to enable or disable Wi Fi Multimedia WMM Tick this to enable WMM The default is un ticked WMM APSD Whether to enable or disable WMM Automatic Power Save Delivery APSD Tick this to enable WMM The default is un ticked Mode 802 11n 802 11n g 802 11b g n Bandwidth The size of the frequency...

Page 54: ... and receive on This can be Auto MCS0 MCS1 MCS2 MCS3 MCS4 MCS5 MCS6 MCS7 MCS8 MCS9 MCS10 MCS11 MCS12 MCS13 MCS14 MCS15 or MCS32 The default is Auto Rx Chain Power Save The RX Chain Power Save feature turns one of the receive chains off to save power TX Power The transmit power of the wireless radio This can be 100 80 50 30 or 10 The default is 100 Choose Country Default is ZA Channel The channel t...

Page 55: ...ble the short GI The default is ticked WMM Whether to enable or disable Wi Fi Multimedia WMM Tick this to enable WMM The default is un ticked WMM APSD Whether to enable or disable WMM Automatic Power Save Delivery APSD Tick this to enable WMM The default is un ticked Mode 802 11a n ac 802 11ac Bandwidth The size of the frequency range to transmit and receive on This can be 20 MHz 20 40 MHz or 80 M...

Page 56: ...he rule MAC Restrict Mode Allow or Deny Disabled is selected by default To add a Mac Address click the Add button Mac address Mac address of device you want block or allow Description Give the rule a name Note Before selecting Allow or Deny you will need to add the Mac address first otherwise you will lock yourself out of the Selected SSID ...

Page 57: ... act as the WPS server and choose Enrollee for the router to act as the WPS client Choosing these options displays other options on the page and these are documented below Press WPS Button Press the physical WPS button on the router or the PBC button to initiate the WPS procedure Input PIN Number The PIN required to join the wireless network Negotiation Status The status of the WPS process Choose ...

Page 58: ...for the 5 GHz wireless band Tick this to enable WPS The default is ticked Choosing this option displays other options on the page and these are documented below Choose AP Role The WPS AP role This can be Registrar or Enrollee Choose Registrar for the router to act as the WPS server and choose Enrollee for the router to act as the WPS client Choosing these options displays other options on the page...

Page 59: ... to set Wireless Distribution System WDS settings for the 2 4GHz and 5 GHz wireless bands WDS Settings Wireless Mode The wireless mode to enable WDS for This can be 2 4G or 5G WDS Mode The WDS mode This can be Disabled Lazy Mode Repeater Mode Bridge Mode The default is Disabled Choosing the Lazy Mode Repeater Mode or Bridge Mode option displays other options on the page and these are documented be...

Page 60: ... Apply to apply the settings and click Refresh to refresh the page Click Scan to scan for wireless APs in the area to join to the WDS Channel Information This allows you to scan the local area for wireless networks Click Scan to scan for wireless APs in the area NAT The Network Address Translation NAT menu is used to set advanced NAT settings on the DWR 956M Virtual Server This allows you to set u...

Page 61: ...k mask for the NAT rule Leave this blank to accept any network mask Protocol The protocol for the NAT rule This can be TCP UDP or TCP UDP External Port The external port to NAT to from This can be a range or a single port Internal Port The internal port to NAT to from Internal IP Address The internal IP address for the NAT rule NAT Loopback Permits the access of a service via the public IP address...

Page 62: ...ype The port triggering type Choose Customization to enter custom ports or choose Application to use pre set ports for an application Choose the pre set application from the Choose drop down menu Protocol The protocol for the port triggering rule This can be TCP UDP or TCP UDP Name The name for the port triggering rule Start Port The start port for the port triggering rule End Port The end port fo...

Page 63: ...y the multi NAT rules to Type The multi NAT rule type This can be One to One or Many to One and allows either one private IP to be mapped to one public IP or multiple private IPs to be mapped to a single public IP Choosing the many to one option displays other options on the page and these are documented below Local Start IP The start IP address for the multi NAT rule Public IP The public IP addre...

Page 64: ...Settings TFTP Passthrough Whether to enable or disable TFTP passthrough FTP Passthrough Whether to enable or disable FTP passthrough PPTP Passthrough Whether to enable or disable PPTP passthrough RTSP Passthrough Whether to enable or disable RTSP passthrough L2TP Passthrough Whether to enable or disable L2TP passthrough H323 Passthrough Whether to enable or disable H323 passthrough SIP Passthrough...

Page 65: ...ck this to enable packet filtering The default is ticked WAN LAN Whether to add a whitelist or blacklist rule Choose Whitelist or Blacklist and click Add to add a new rule This is in the inbound direction LAN WAN Whether to add a whitelist or blacklist rule Choose Whitelist or Blacklist and click Add to add a new rule This is in the outbound direction Click Apply to apply the settings and click Re...

Page 66: ...ce Port The source port to use for the packet filtering rule Destination IP The destination IP to use for the packet filtering rule Destination Port The destination port to use for the packet filtering rule Click Back to go back to the previous page click Apply to apply the settings and click Refresh to refresh the page MAC Filter This allows you to set up MAC filtering rules on the DWR 956M MAC F...

Page 67: ...ection Peak SYN Number The peak number of TCP SYN packets that can be received per second The default is 30 Drop Broadcast ICMP Echo Request Whether to enable or disable Drop Broadcast ICMP Echo Request protection Fraggle Attack Protection Whether to enable or disable Fraggle Attack protection Echo Chargen Attack Protection Whether to enable or disable Echo Chargen Attack protection IP Land Attack...

Page 68: ...tting ACK and setting URG TCP Flags Unset SYN ACK FIN RST URG PSH Whether to enable or disable preventing illegal packets by unsetting SYN ACK FIN RST URG PSH TCP Flags Set SYN ACK FIN RST URG PSH Whether to enable or disable preventing illegal packets by setting SYN ACK FIN RST URG PSH TCP Flags Unset PSH Set SYN ACK FIN RST URG Whether to enable or disable preventing illegal packets by unsetting...

Page 69: ... to refresh the page Click Add to add a new access time restriction rule Access Time Restriction Configuration This allows you to add an access rule to block hosts from accessing the network based on the time of day Access Time Restriction Configuration User Name Custom name of the restriction Mac Address Enter the mac address which the rule will be applied to Days of the week The days of the week...

Page 70: ...Tick this to enable URL filters The default is un ticked Filter Mode The filter mode for the URL filter This can be Blacklist or Whitelist Choose Blacklist to block URLs and choose Whitelist to allow URLs Click Apply to apply the settings and click Refresh to refresh the page URL IP List Note a maximum of 16 access rules can be created Click Add to add a new URL and IP filter rule ...

Page 71: ...he week to block the host for Tick the days of the week when you want to block the URL Blocking Time The time that the URL will be blocked for This can be from 0 to 24 and from 0 to 59 It is in the format HH MM Click Back to go to back to the previous page and click Apply to apply the settings Routing The routing menu is used to set routing information on the DWR 956M Default Route Default gateway...

Page 72: ...ocumented below Enable Whether to enable or disable the static route Tick this to enable the static route The default is un ticked Destination Subnet The destination network to route traffic for Subnet Mask The destination subnet mask to route traffic for Gateway The router address to route traffic to for the route Metrics The metric to associate with the route This is used to prefer one route ove...

Page 73: ...te Enable Whether to enable or disable dynamic routing Tick this to enable dynamic routing Protocol The dynamic routing protocol This can be RIPv1 RIPv2 OSPF or BGP Choosing the RIPv1 RIPv2 or BGP option displays other options on the page and these are documented below Click Back to go back to the previous page click Apply to apply the settings and click Refresh to refresh the page IPv6 Static Rou...

Page 74: ...h to route traffic for Gateway The router address to route traffic to for the route Metrics The metric to associate with the route This is used to prefer one route over another Click Back to go back to the previous page click Apply to apply the settings and click Refresh to refresh the page IPv6 Dynamic Route This allows you to set up dynamic IPv6 routes to define how to route traffic for remote n...

Page 75: ...The maximum upstream bandwidth from the router Enter 0 to not limit the upstream bandwidth Scheduling Policy The scheduling policy for prioritizing traffic This can be Strict Priority SP Committed Access Rate CAR or Weighted Fair Queuing WFQ Choosing these options displays other options on the page These are shown below Enable Force Bandwidth Whether to enable or disable Force Bandwidth Tick this ...

Page 76: ...itted Access Rate CAR scheduling method Enable Whether to enable or disable the level for the CAR scheduling method Tick this to enable the level for the CAR scheduling method Guaranteed Bandwidth kbps The guaranteed bandwidth in kbps for each QoS level Scheduling Policy WFQ Number The QoS level for the Weighted Fair Queuing WFQ scheduling method Enable Whether to enable or disable the level for t...

Page 77: ...Classification List This allows you to classify traffic based on the traffic type Click Add Traffic Type to add a traffic type and click Add Flow to add a traffic flow ...

Page 78: ...r for the match result DSCP The DSCP value for the match result This can be Default AF11 001010 AF12 001100 AF13 001110 AF21 010010 AF22 010100 AF23 010110 AF31 011010 AF32 011100 AF33 011110 AF41 100010 AF42 100100 AF43 100110 CS1 001000 CS2 010000 CS3 011000 CS4 100000 CS5 101000 CS6 110000 CS7 111000 or EF 101110 802 1P Tag The 802 1P tag for the match result This can be 0 1 2 3 4 5 6 or 7 Clic...

Page 79: ...enter the subnet mask for the connected device Destination Address Enter the desitination address Destination Mask enter the subnet mask for the destination DSCP The DSCP value for the match result This can be Default AF11 001010 AF12 001100 AF13 001110 AF21 010010 AF22 010100 AF23 010110 AF31 011010 AF32 011100 AF33 011110 AF41 100010 AF42 100100 AF43 100110 CS1 001000 CS2 010000 CS3 011000 CS4 1...

Page 80: ...P flags Tick this to enable Click Apply to apply the settings and return to the previous page Bandwidth Limit The bandwidth limit menu is used to limit the bandwidth of traffic passing through the DWR 956M Port Bandwidth Limit Configuration This allows you to limit bandwidth based on port Port Bandwidth Limit Configuration Enable Whether to enable or disable the port bandwidth limit Tick this to e...

Page 81: ...Rate The maximum egress speed in kbps Click Apply to apply the settings and click Refresh to refresh the page IP Tunnel The IP tunnel menu is used to create tunnels for routing various types of traffic across a particular type of network IPv4 In IPv6 DSL Lite Tunnel Settings 6 in 4 Tunnel Configuration This allows you to create an IPv4 tunnel that tunnels IPv6 traffic Enable Whether to enable or d...

Page 82: ...lly IPv4 Mask Length The IPv4 mask length for the 6 in 4 tunnel 6rd Prefix with Prefix Length The 6rd prefix and prefix length to use with the 6 in 4 tunnel Border Relay IPv4 Address The border relay IPv4 address for the 6 in 4 tunnel Click Apply to apply the settings and click Refresh to refresh the page Generic Routing Encapsulation This allows you to create a Generic Routing Encapsulation GRE t...

Page 83: ...for the GRE tunnel Note this must start with gre Interface IP Address The interface IP address to use with the GRE tunnel Subnet Mask The interface IP address subnet mask to use with the GRE tunnel Tunnel Remote IP The remote tunnel IP address to use with the GRE tunnel Max TTL The maximum Time to Live TTL of the GRE tunnel packets Click Apply to apply the settings and click Refresh to refresh the...

Page 84: ... Enable Samba Service Whether to enable or disable the Samba service Tick this to enable the Samba service Click Apply to apply the settings and click Refresh to refresh the page Storage Service FTP Service Setup This is used to enable or disable the FTP server service Storage Service FTP Service Setup Enable FTP Service Whether to enable or disable the FTP service Tick this to enable the FTP serv...

Page 85: ...he device to download the file specified in the download URL to Save Path The location on the device to download the file specified in the download URL to Click Apply to apply the settings and click Refresh to refresh the page Storage Service TFTP Service Setup This is used to enable or disable the TFTP server service Storage Service FTP Service Setup Enable TFTP Service Whether to enable or disab...

Page 86: ...are Setup Enable DMS Whether to enable or disable the DMS service Tick this to enable the DMS service Share Folders The folders to share using the DMS service Choose Share All Folders to share all folders and choose Custom Shared Folder to share a custom folder Choosing the Custom Shared Folder option displays other options on the page and these are documented below Share Folders Custom Shared Fol...

Page 87: ...ngs and un tick it to disable it Click Apply to apply the settings Click Add to add a new DDNS entry DDNS Server The DDNS service to use with the router This can be one of the predefined entries or choose Other to enter a custom DDNS service Host Name The DNS name that you wish to update WAN Connection The WAN connection to use for the DDNS settings User Name The username for the DDNS service Pass...

Page 88: ...ay Device IGD Protocol Tick this to enable the IGD Protocol WAN Connection The WAN connection to use with the IGD Protocol Click Apply to apply the settings and click Refresh to refresh the page Blacklist Enable Whether to enable or disable the blacklist entry Tick this to enable the blacklist entry IP Address The IP address to blacklist from using the IGD Protocol Click Add to add a new blacklist...

Page 89: ...ta Source for IGMPv3 The maximum multicast data sources for IGMPv3 The default is 10 Fast Leave Enable Whether to enable or disable Fast Leave Tick this to enable Fast Leave Membership Join Immediate IPTV Whether to enable or disable Membership Join Immediate Tick this to enable Membership Join Immediate Click Apply to apply the settings and click Refresh to refresh the page Enable IGMP Snooping W...

Page 90: ...ticast Data Source for mldv2 The maximum multicast data sources for MLDv2 The default is 10 Fast Leave Enable Whether to enable or disable Fast Leave Tick this to enable Fast Leave Click Apply to apply the settings and click Refresh to refresh the page Enable MLD Snooping Whether to enable or disable MLD snooping Tick this to enable MLD snooping and un tick it to disable it Click Apply to apply th...

Page 91: ...ommunity The SNMP public community string Private community The SNMP private community string Trap Enable Whether to enable or disable SNMP Tick this to enable SNMP The default is un ticked Trap Version The SNMP trap version This can be SNMPv1 or SNMPv2 Trap Address The SNMP trap server IP address Click Apply to apply the settings and click Refresh to refresh the page VOIP The VOIP menu is used to...

Page 92: ...ick to enable testing of VOIP link Link Test Interval The number of seconds between VOIP link tests Retry Interval The number of seconds before retrying registration Enable P Asserted Identity Tick to enable P Asserted Identity Allow SIP Source IP address of the allow SIP source Connection 1 Enable By default the box is ticked Username Enter the username as provided by the VoIP SIP provider Passwo...

Page 93: ...Max Enter the maximum jitter time in miliseconds Media Negotiatory Select between remote or local negotiation Default is set to Remote side Connection 1 Echo Cancellation Echo cancellation eliminates the echo affect from sound on both parties It is best to have this enabled to improve the voice quality VAD Select this option to enable Voice Activation Detection Default is un ticked Send Gain Chang...

Page 94: ...ed Click Apply to apply the settings and click Refresh to refresh the page Fax Settings Here you can enable to disable the Fax Protocol for the Device Enable T38 Click to disable fax protocol This will prevent the device to look for fax transmitions if a call is received Click Apply to apply the settings and click Refresh to refresh the page ...

Page 95: ...Enter the Destination number to forward the calls when not answered Call Waiting Untick to disable call waiting Blind Transfer Untick to disable blind transfer Consecutive Transfer Untick to disable Consecutive Transfer Call Hold Untick to disable Call Hold feature 3 Way Talking Untock to disable conference call feature Hot Line Select between Default Right Now and Delay Destination Number Enter t...

Page 96: ...ne for the router Click Apply to apply the settings and click Refresh to refresh the page Digital Map This is where you can modify the dialing patern for the router If you whish to use a certain patern to dial out you can do it here Please Input Number Table Number Table Enter or modify the dialing patern for the DWR 956M Click Apply to apply the settings and click Refresh to refresh the page ...

Page 97: ... the call is hungup Howl Tone Timer Modify the Howl timer value Busy Tone Timer Modify the Busy Tone timer timeout while busy tone is played Country Tone Change the Country dial tone Connection 1 Flash Min Change the flash timer minimum value Flash Max Change the flash timer maximum value Click Apply to apply the settings and click Refresh to refresh the page CID Here you can select which mode to ...

Page 98: ...for the calls made on this router Info Shows you the call history Note before this can work you would need to use a USB flash drive connected to the the router Click Apply to apply the settings and click Refresh to refresh the page ...

Page 99: ...gs IPSec Tunnel Mode Connections IPSec Hardware Accelerate Whether to enable or disable IPSec hardware acceleration Tick this to enable IPSec hardware acceleration and un tick it to disable it The default is un ticked Click Apply to apply the settings and click Refresh to refresh the page Click Add to add a new IPSec tunnel ...

Page 100: ...The addresses that are allowed to access the IPSec tunnel This can be Subnet or Single Address Choosing the Subnet option displays other options on the page and these are documented below IP Address for VPN The IP addresses that are allowed to access the IPSec tunnel IP Subnetmask The subnet mask for the IP addresses allowed to access the IPSec tunnel Tunnel access from remote IP addresses The rem...

Page 101: ...age and these are documented below Perfect Forward Secrecy Whether to enable or disable perfect forward secrecy Tick this to enable perfect forward secrecy and untick it to disable it The default is un ticked Advanced IKE Settings Click Show Advanced Settings to show advanced Auto IKE settings Choosing this option displays other options on the page and these are documented below Phase 1 Mode The A...

Page 102: ...orithm The encryption algorithm to use with the IPSec tunnel This can be DES 3DES AES The default is DES Encryption Algorithm The encryption algorithm to use with the IPSec tunnel This can be DES 3DES AES The default is DES Integrity Algorithm The authentication algorithm to use with the IPSec tunnel This can be MD5 or SHA1 The default is MD5 Diffie Hellman Group The Diffie Hellman Group key size ...

Page 103: ...when Tunnel Interface IP Mode is set to static NAT Whether to enable or disable Network Address Translation Tick this to enable NAT The default is un ticked Default Route Allow all LAN WAN to be directed via the VPN Authentication Type Auto PAP or CHAP The Authentication Type of the LAC tunnel LNS Addr Mode The LNS addressing mode This can be FQDN or IP Default is FQDN LNS Domain Name IP The LNS F...

Page 104: ...r the DHCP table range Authentication Type The Authentication type for the LNS tunnel Access Lac Whether to enable or disable access to the LAC Tick this to enable access The default is un ticked Click Apply to apply the settings and click Refresh to refresh the page L2TP LNS User List Number The LNS user number User Name The username of the LNS user Password The LNS user s password Action Press t...

Page 105: ... LAN or netmask NAT Whether to enable or disable Network Address Translation Tick this to enable NAT The default is un ticked Firewall Whether to enable or disable a firewall Tick this to enable a firewall The default is un ticked Click Apply to apply the settings and click Refresh to refresh the page Static Route List Number The number of the static route in the list ascending order Destination S...

Page 106: ...ng LTE connection Management The Management menu is used to perform maintenance tasks on the DWR 956M Reboot This is used to reboot the router Click Reboot to reboot the router Settings Backup This is used to back up the router settings Click Backup Settings to save the router settings to a file on your PC ...

Page 107: ...MAC address to your PC Update Settings This is used to restore previously saved router settings Click Browse to select a file on your PC to upload This must be a file previously saved using the settings backup feature Click Update Settings to restore the previously saved router settings Restore Default Settings This is used to restore the default settings of the router Click Restore Default Settin...

Page 108: ...ware LTE Fota This allows you to update the LTE software firmware Account Management Passwords This is used to change user passwords Username The user to reset the password for Old Password The user s old password New Password The user s new password Confirm Password Confirm the user s new password Click Apply to apply the settings and click Refresh to refresh the page ...

Page 109: ... Notice Informational or Debug The default is Critical TFTP Server The address of a TFTP server to upload the log files to Press Upload Log File once the address has been entered to upload the log file Enable Log Server Whether to enable or disable logging to an external logging server Tick this to enable logging to an external logging server The default is un ticked Remote Log Server The address ...

Page 110: ...ar Log File to clear the router log file click Download Log File to download the router log file and click Refresh to refresh the page Service Control This is used to add remove and edit firewall rules Access Control IP Address Configuration ACL Enable Whether to enable or disable the firewall rules Tick this to enable the firewall rules The default is un ticked Click Apply to apply the settings C...

Page 111: ... for the firewall rule This can be IPv4 IPv6 or IPv4 6 Enable Whether to enable or disable the firewall rule Tick this to enable the firewall rule The default is un ticked Source IP The source IP address es for the firewall rule Enter a single IP address for the source address or enter a range of addresses in the beginning and end boxes Action The action for the firewall rule This can be ACCEPT or...

Page 112: ...3 An Internet time source to synchronize with Time Server 4 An Internet time source to synchronize with Time Server 5 An Internet time source to synchronize with Update Interval The interval at which to synchronize the local router clock with an Internet time source Retry Interval The interval at which to re try router clock synchronization in the event of a failure Time Zone The router timezone D...

Page 113: ...n to use for the ping test Click Ping to perform the ping test and click Refresh to refresh the page Trace This is used to perform traceroute tests The results of the test are displayed below the traceroute test options Host The host to send the ICMP messages to Max TTL The maximum Time to Live TTL for the ICMP messages The is the maximum number of hops that an ICMP packet can pass through before ...

Page 114: ...e refer to your user manual for the wireless device you want to connect to make sure you understand how to enable WPS Once you know follow the steps below Step 1 Press the WPS button on the DWR 956M for about 1 second The WPS LED on the front will start to blink Step 2 Within 2 minutes press the WPS button on your wireless device or launch the software utility and start the WPS process Step 3 Allo...

Page 115: ...d click on it 2 Clicking on this icon will display a list of wireless networks which are within range of your computer Select the desired network by clicking on the SSID 3 To connect to the SSID click Connect 4 To automatically connect with the router when your device next detects the SSID click the Connect Automatically check box 5 You will then be prompted to enter the Wi Fi password network sec...

Page 116: ...reless networks that are within connecting proximity of your computer Select the desired network by clicking on the network name 3 You will then be prompted to enter the network security key Wi Fi password for the wireless network Enter the password into the box and click Next 4 If you wish to use Wi Fi Protected Setup WPS to connect to the router you can also press the WPS button on your router d...

Page 117: ...stem tray lower right corner 2 The utility will display any available wireless networks in your area 3 Highlight the wireless connection with Wi Fi name SSID you would like to connect to and click the Connect button If you get a good signal but cannot access the Internet check your TCP IP settings for your wireless adapter Refer to the Networking Basics section in this manual for more information ...

Page 118: ...ed using WindowsR 7 Carry out the following steps to use WindowsR 7 to configure the WPS feature 1 Click the Start button and select Computer from the Start menu 2 Click Network on the left side 3 Double click the DWR 956M Will be displayed as RAlinkAPS ...

Page 119: ... PIN number on the router label in the Setup Wireless Setup menu in the Router s Web UI and click Next 5 Type a name to identify the network 6 To configure advanced settings click the Arrow icon Click Next to continue ...

Page 120: ...figuration to complete 8 The following window informs you that WPS on the DWR 956M has beenset up successfully Make a note of the security key as you may need to provide this security key if adding an older wireless device to the network in the future 9 Click Close to complete WPS setup ...

Page 121: ...Google Chrome 17 or higher Apple Safari 5 or higher Verify physical connectivity by checking for solid LAN lights on the device If you do not get a solid LAN light try using a different cable or connect to a different port on the device If the computer is turned off the link light may not be on Disable any Internet security software running on the computer Software firewalls such as ZoneAlarm Blac...

Page 122: ...tton and the router will go through its reboot process Wait about 30 seconds to access the router The default IP address is 10 0 0 2 When logging in the default username is admin and the default password it admin 3 Why can t I connect to certain sites or send and receive emails when connecting through my router If you are having a problem sending or receiving email or connecting to secure sites su...

Page 123: ...d your MTU you can now configure your router with the proper MTU size To change the MTU rate on your router follow the steps below Open your browser enter the IP address of your router 192 168 1 1 and click OK Enter your username admin and password blank by default Click OK to enter the web configuration page for the device Click on Setup and then click Manual Configure To change the MTU enter the...

Page 124: ... cabling and other fixed infrastructure have proven to be beneficial for many users Wireless users can use the same applications they use on a wired network Wireless adapter cards used on laptop and desktop systems support the same protocols as Ethernet adapter cards Under many circumstances it may be desirable for mobile network devices to link to a conventional Ethernet LAN in order to use serve...

Page 125: ...t the signal can reach out up to 30 miles to serve places like manufacturing plants industrial locations university and high school campuses airports golf courses and many other outdoor venues Wireless Personal Area Network WPAN Bluetooth is the industry standard wireless technology used for WPAN Bluetooth devices in WPAN operate in a range up to 30 feet away Compared to WLAN the speed and wireles...

Page 126: ... connect to the Internet from remote locations like airports hotels coffee shops libraries restaurants and convention centers Wireless network is easy to setup but if you re installing it for the first time it could be quite a task not knowing where to start That s why we ve put together a few setup steps and tips to help you through the process of setting up a wireless network Tips Here are a few...

Page 127: ...nual for detail information on how to set it up Wireless Modes There are basically two modes of networking Infrastructure All wireless clients will connect to an access point or wireless router Ad hoc Directly connecting to another computer for peer to peer communication using wireless network adapters on each computer such as two or more DWR 956M wireless network USB adapters An Infrastructure ne...

Page 128: ...ow Click on Start Run In the run box type cmd and click OK WindowsR 7 VistaR users type cmd in the Start Search box At the prompt type ipconfig and press Enter This will display the IP address subnet mask and the default gateway of your adapter If the address is 0 0 0 0 check your adapter installation security settings and the settings on your router Some firewall software programs may block a DHC...

Page 129: ...d select Properties Step 3 Highlight Internet Protocol version 4 TCP IP and click Properties Step 4 Click Use the following IP address and enter an IP address that is on the same subnet as your network or the LAN IP address on your router Example If the router s LAN IP address is 10 0 0 2 make your IP address 10 0 0 X where X is a number between 2 and 99 Make sure that the number you choose is not...

Page 130: ... Encryption Standard AES instead of TKIP User authentication which is generally missing in WEP through the extensible authentication protocol EAP WEP regulates access to a wireless network based on a computer s hardware specific MAC address which is relatively simple to be sniffed out and stolen EAP is built on a more robust public key encryption system to ensure that only authorized network users...

Page 131: ...11g IEEE 802 11n IEEE 802 11ac IEEE 802 3 IEEE 802 3u IEEE 802 3ab IEEE 802 3az IEEE 802 3x IEEE 802 11e IEEE 802 1p Wi Fi Encryption WPA Personal Enterprise WPA2 Personal Enterprise Wi Fi Protected Setup WPS PIN PBC Power Input 100 to 240 V AC 50 60 Hz Output 12 V DC 1 5 A Operating Temperature 0 to 40 C 32 to 104 F Storage Temperature 20 to 80 C 4 to 176 F Operating Humidity 5 to 85 maximum non ...

Page 132: ...may cause radio interference Frequency Band s Frequenzband Fréquence bande s Bandas de Frecuencia Frequenza e Frequentie s Max Output Power EIRP Max Output Power Consommation d énergie max Potencia máxima de Salida Potenza max Output Max Output Power 5 GHz 5 15 5 25 GHz 200mW 5 25 5 35 GHz 200Mw 5 47 5 725 GHz 1W 2 4 GHz 2 4 2 4835 GHz 100 mW ...

Reviews: