background image

46

D-Link DWR-730 User Manual

Section 3 - Configuration

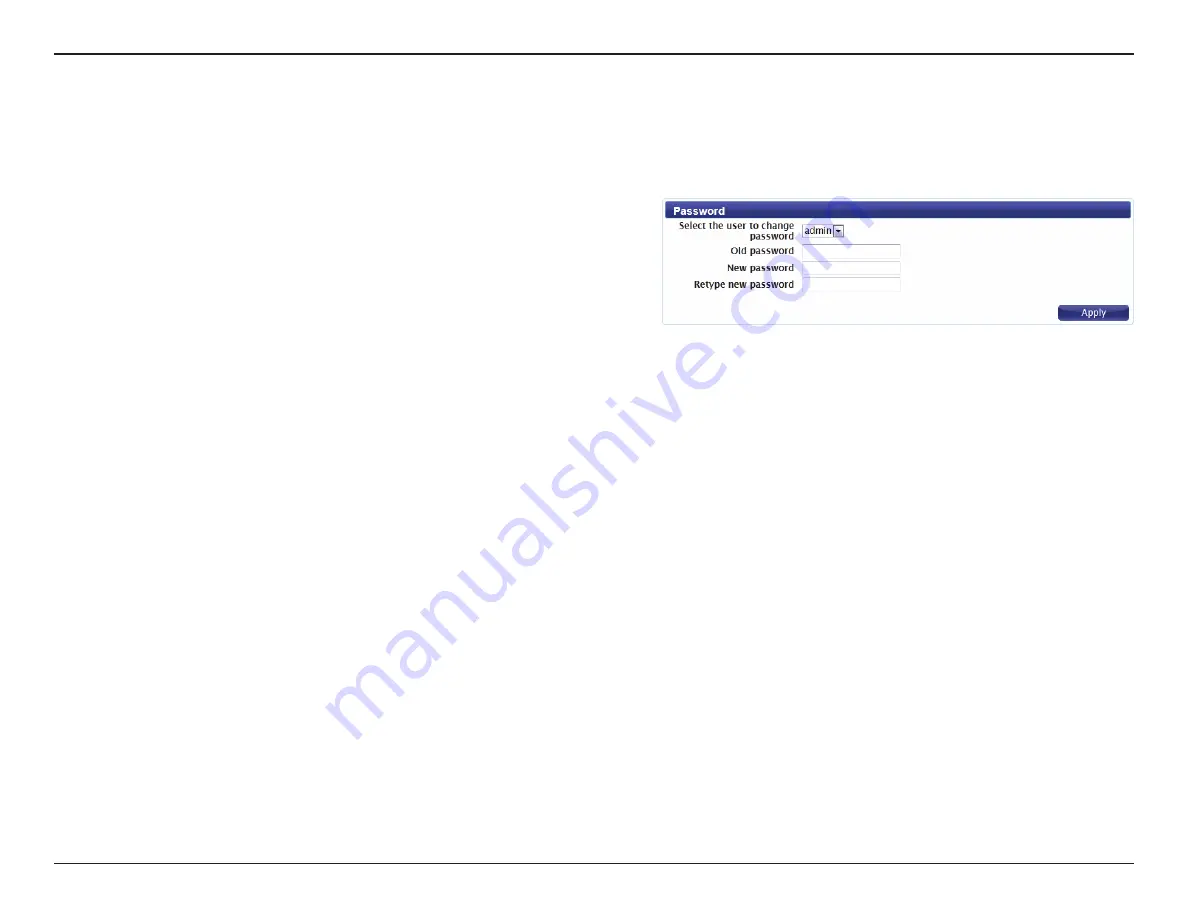
Password

Select whether you wish to change the password for the 

admin or user account from the drop down menu. 

Enter the existing password for this account.

Enter the new password for this account.

Type the new password again to confirm. 

Click 

Apply

 to save the current configuration. 

Select the user 

to change 

password:

Old Password:

New Password:

Retype New 

Password:

This page lets you change the configuration interface passwords for the Administrator (Admin) and User accounts. 

Summary of Contents for DWR-730/TK

Page 1: ...DWR 730 User Manual HSPA Mobile Router Version 1 0 10 18 2013 ...

Page 2: ...egistered trademarks of D Link Corporation or its subsidiaries in the United States or other countries All other company or product names mentioned herein are trademarks or registered trademarks of their respective companies Copyright 2013 by D Link Corporation Inc All rights reserved This publication may not be reproduced in whole or in part without prior expressed written permission from D Link ...

Page 3: ...tial Connection to the Router 9 Connect via USB 9 Connect via Wi Fi 10 Web based Configuration 12 Configuration Utility 12 Home 13 Navigation 13 Device Status 14 Home 15 Wizard 16 Internet 18 Connection 18 2G 3G Modem 20 SIM 21 PLMN 22 Network 23 Wi Fi 24 DHCP 25 NAT 26 SMS 28 New Message 28 Local 28 Wi Fi 29 Basic 29 Wireless Security 31 Wired Equivalent Privacy WEP 31 Wi Fi Protected Access WPA ...

Page 4: ...49 System Log 50 Connecting to a Wireless Network 51 Using Windows 8 51 Connecting to a Wireless Network 53 Using Windows 7 53 Configuring Wireless Security 55 Using Windows Vista 58 Configuring Wireless Security 59 Using Windows XP 61 Configure WEP 62 Configure WPA PSK 64 Troubleshooting 66 Networking Basics 68 Check your IP address 68 Statically Assign an IP address 69 Technical Specifications 7...

Page 5: ...Macintosh or Linux based operating systems Internet Explorer 8 Firefox 12 0 Chrome 20 0 or Safari 4 0 1 Subject to services and service terms available from your carrier Product Overview Package Contents D Link DWR 730 HSPA Mobile Router Battery USB Cable Power Adapter If any of the above items are missing from your package please contact your reseller ...

Page 6: ...our network right from a web interface This means that notebooks and netbooks without a CD ROM drive can connect and get up and running in no time Once the device is set up you can simply power it on to start up your portable mobile network meaning that you can share your mobile Internet connection without even needing a computer DesignedforTruePortability The DWR 730 HSPA Mobile Router is small a...

Page 7: ... quickly and easily using Wi Fi Protected Setup WPS Press and hold for more than 5 seconds to turn the wireless function on off microSD Card Slot Insert a microSD Card up to 32GB to access and share files and media wherever you go micro USB Connector Use the included cable to connect to a powered USB port to charge the device or to access the configuration utility WPS Button microUSB Port microSD ...

Page 8: ...r to the table below for the specific indications which are shown on the display 1 2 3 4 5 6 7 8 10 9 Number Function Icon Indication 1 Network Strength 0 5 Bars Indicates the strength of the current mobile network connection 2 Network Type H Currently connected to DC HSPA or HSPA mobile network H Currently connected to HSPA mobile network 3G Currently connected to WCDMA mobile network 2G Currentl...

Page 9: ...t battery level If charging the animation will indicate charging status and current battery level 7 Wi Fi Protected Setup WPS The device is ready for WPS association with wireless clients 8 Connection Method A The device is set to connect to the mobile network automatically M The device is set to connect to the mobile network manually D On Demand The device will connect to the preferred mobile net...

Page 10: ...s unplug and turn off the router before installing or removing the SIM card Never insert or remove the SIM card while the router is in use 3 Press and hold the power button on the side of the router a D Link willbedisplayedonthescreenastherouterperformsitsinitializationprocesses b Afterafewmoments theOLEDdisplaywillshowthecurrentstatusoftherouter svarious functions FormoredetailsontheOLEDdisplay p...

Page 11: ...lug the DWR 730 into your computer any necessary drivers will immediately install with your permission Note These drivers are Windows only Mac and Linux users will still be able to configure the DWR 730 using the web configuration utility described in Configuration Utility on page 12 ...

Page 12: ...is 1 5 feet thick 0 5 meters appears to be almost 3 feet 1 meter thick at a 45 degree angle At a 2 degree angle it appears over 42 feet 14 meters thick Position devices so that the signal will travel straight through a wall or ceiling instead of at an angle for better reception 3 Try to position access points wireless routers and computers so that the signal passes through open doorways and drywal...

Page 13: ...can be done using the included USB cable or by connecting wirelessly to the DWR 730 Once you have configured your router you will be able to connect using the Wi Fi settings that you have specified in the configuration process Ensure that the router is powered on and has sufficient battery power before commencing the setup process Connect via USB To connect to the router via USB plug the provided ...

Page 14: ...ating system or wireless client for further information on how to connect to a wireless network To connect to the router usingWi Fi open your operating system s wireless networking utility and scan for available networks to connect to By default the network name SSID of the DWR 730 will be in the format dlink_DWR 730xxxx where xxxx represents the last four character s of the router s MAC address O...

Page 15: ...your router The unique security key for your router will be displayed on a sticker in the router s battery bay Enter the security key in the box provided and click OK Your wireless connection utility should confirm that the connection is successful and you can move to the next step to continue to configuration process ...

Page 16: ... IP address of the router which is 192 168 0 1 by default Once you have reached the configuration utility through the installed software or your web browser you will need to log in Enter admin as the username and then enter the password By default the password is blank You can also select your language from the drop down menu Click Login to continue Configuration Utility ...

Page 17: ...s The Internet tab gives you Internet setup and settings options The Network tab allows you to configure the network settings for your Local Area Network LAN From the SMS you can view and send SMS messages via your mobile network The Wi Fi allows you to configure your Wi Fi network as well as add new devices using WPS The Security tab allows you to configure firewall and security settings to prote...

Page 18: ...ther than your service provider s home network Indicates that there is an Internet connection present Indicates that the router s Wi Fi network is currently active The number to the right of this icon indicates the number of wireless clients currently connected to the router s Wi Fi network Click this button to log out of the configuration interface SIM SMS Signal Strength Operator Name Roaming In...

Page 19: ... the current settings for the router s LAN This area shows the current status of your 2G or 3G mobile network connection This area displays a summary of the router s current WAN settings These details will reflect the mobile network connection which is being received from the service provider This area shows the amount of data which has been sent TX and received RX over the mobile network This inf...

Page 20: ...er the new address here If you change the IP address from the default you will need to enter the new address in your Internet browser s address bar in order to access the web based configuration utility If you wish to change the router s subnet mask enter it here Click Next to continue 2 3G Configuration If you wish to change the 2G or 3G service provider or connection type click on a profile in t...

Page 21: ...sing your new password once the wizard has been completed If you wish to change your wireless network name SSID enter a new name in the field provided If you change the SSID you may need to re connect to the router using the new SSID before you can access your network or the configuration utility Click Done to complete the wizard or click Back to return to the previous page After you have clicked ...

Page 22: ... Change to effect the change Select your preferred cellular network connection mode Auto Mode The router will automatically connect to your preferred mobile network and remain connected while the device is powered on Manual Mode You must manually connect to the preferred mobile network On Demand The router will connect to the preferred mobile network when Internet access is required Click Change t...

Page 23: ...connection Click the delete icon to delete this profile from the list Click OK to save the profile Click Apply to apply the profile settings and return to the Internet menu Name APN Protocol User Password Delete Connection Profiles Shows the type and status of the current mobile connection To change the connection profile select a user profile from the table below and click Set to activate the pro...

Page 24: ...lly select the modem type depending on the network it is connected to 3G Only The modem will only connect to 3G networks 2G Only The modem will only connect to 2G networks If you wish to change the modem type select your new modem type and click Change to effect the change Re enter the new PIN code Click Apply to apply the changes Information Network This section displays information about your 2G...

Page 25: ...nfiguration SIM Enter the PIN code for the SIM card Click Enable to turn on SIM lock or click Disable to turn off SIM lock PIN Code This section allows you to turn SIM lock on or off for the SIM card which is currently inserted into the router ...

Page 26: ... it and then click the Update button to select that network as the preferred network Click Query to refresh the list of available networks Note You will need to manually disconnect the current mobile data service before selecting a network using PLMN Please refer to Connection on page 18 for further information on how to do this Mode This page allows you to view available Public Land Mobile Networ...

Page 27: ...23 D Link DWR 730 User Manual Section 3 Configuration Network The Network pages allow you to check the current status of your Local Area Network LAN and make changes to LAN settings ...

Page 28: ...net mask for your Wi Fi network Click Apply to save the current configuration IPv6 Enter the IPv6 address for your Wi Fi network Enter the prefix to be used to delegate IPv6 addresses to the LAN Check the box to set the router announcement mode to autonomous Check the box to enable router announcement on link Click Apply to save the current configuration DNS Name Enter your router s DNS device nam...

Page 29: ...lick Apply to save the current configuration First Second Third DNS Server Static DHCP Use this option to specify a DHCP address reservation to a particular device or machine based on MAC address To add a new reservation click Add Enter the MAC address of the device or machine for which you wish to make the DHCP reservation Enter the IP address that you wish to reserve This address must be within ...

Page 30: ...e box to activate this rule Specify a name to identify the rule Select TCP or UDP as the protocol for the trigger ports from the drop down menu Enter the starting and ending trigger port for the rule Select TCP or UDP as the protocol for the ports to be opened from the drop down menu Enter the starting and ending ports to be opened when the trigger occurs Click the Delete icon to delete the rule C...

Page 31: ...nt a network s firewall or NAT This section enables you to enable various ALGs as required by specific applications To enable an ALG check the box next to the name of the rule Enter the Session Initiation Protocol SIP port required by your applications Click Apply to save the settings and return to the Network page SIP Port ...

Page 32: ...he SIM card s inbox and outbox as well as send new messages New Message Send To Messages Enter the phone number that you wish to send the message to Enter the body of the message to be sent Click Apply to save the current configuration Inbox This tab shows a summary of SMS messages in the inbox Outbox This tab shows a summary of messages in the outbox which are yet to be sent Local ...

Page 33: ...rted by the wireless clients which will be connecting to your network To have the router automatically select the optimal wireless channel select Auto from the drop down menu If you wish to select a particular channel select it from the drop down menu If you are using the 802 11n standard you can manually select the channel width which best suits your network environment Select the desired transmi...

Page 34: ...k If the SSID is hidden wireless clients must manually enter it in order to connect to your network Select the wireless encryption method that you wish to use from the drop down menu Depending on the method that you select you may need to configure additional settings For more information regarding wireless encryption and how to configure it please refer to Wireless Security on page 31 If you do n...

Page 35: ... Encryption Length Key 1 4 Select WEP from the drop down menu Select the desired authentication method from the drop down menu Auto The router will automatically determine the authentication method based on the client that is connecting to it Open System Clients do not require authentication in order to associate with the router The encryption key will be used to encrypt data packets sent over the...

Page 36: ...e used based on the client that is connecting to it WPA Clients will only be able to associate with the router using the WPA standard WPA2 Clients will only be able to associate with the router using the WPA2 standard Clients which do not support WPA2 will not be able to associate with the router Select the desired cipher type from the drop down menu TKIP This cipher is used by the WPA standard AE...

Page 37: ...mplemented in China You should only use this protocol if your wireless clients do not support any of the other security methods provided by the DWR 730 Encryption Type WAPI Pre Shared Key Select WAPI Personal from the drop down menu Select whether your key should use ASCII or HEX characters using the drop down menu Enter your desired key in the field provided Click Apply to save the current settin...

Page 38: ...lect the PIN method and continue to the next step A PIN is a unique number that can be used to add the router to an existing network or to create a new network For extra security a new PIN can be generated Click Generate to create a new PIN The current PIN will be shown in the field next to Current PIN This PIN can be used by wireless clients to join your network using the PIN method If the device...

Page 39: ...x to activate the rule Enter a name to identify the machine or station which will be filtered Enter the MAC address of the machine or station which you wish to filter Click the Delete icon to delete the rule from the table Click OK to save the current rule and add it to the table Click Apply to save all changes and return to the Wi Fi page Enable MAC Address Filter Mode Active Name MAC Address Del...

Page 40: ...36 D Link DWR 730 User Manual Section 3 Configuration The Station List tab shows a list of all wireless clients currently connected to your wireless network Station Lists ...

Page 41: ...dress to be filtered Enter the starting port on the source IP Enter the ending port on the source IP Enter the destination IP address to be filtered Enter the starting port of the destination IP Enter the ending port of the destination IP Select the protocol for the IP filter rule Click the icon to delete the IP filtering rule Click OK to save the filtering rule Click Apply to save the current con...

Page 42: ...filtered Enter the port for the source IP Enter the destination IP address to be filtered Enter the port on the destination IP Select the protocol for the IP filter rule Click the icon to delete the IP filtering rule Click OK to save the current filtering rule Click Apply to save the current configuration Active Source IP Source Port Destination IP Destination Port Protocol Delete ...

Page 43: ...machine you wish to filter packets Check the box for each day that you wish to activate the MAC filtering rule Enter the starting time at which you wish to activate the MAC filtering rule each day Enter the ending time at which you wish to deactivate the MAC filtering rule each day Click the icon to delete this MAC filtering rule Click OK to add the current rule to the rules list Click Apply to sa...

Page 44: ... the box next to the rule to enable prevention against that specific kind of DoS attack Click Apply to save the current configuration DoS Prevention Filters This section allows you to enable various security features to protect against Denial of Service DoS attacks ...

Page 45: ...k the box to activate the URL filtering rule Enter the URL that you wish to allow or deny access to If you enter a domain name all URLs under this domain will be allowed or denied access Click the icon to delete the rule Click Add to save the rule and add it to the rule table Click Apply to save the current configuration Enable URL Filter Blacklist Whitelist Active URL Delete The content filter al...

Page 46: ...tion 3 Configuration About This tab shows the router s basic information Application This tab allows you to configure the router s administrative functions such as time date remote access and firmware You can also access the system log ...

Page 47: ...where to save the configuration file Restore Click Browse to locate a previously saved configuration file on your computer Once you have located the file click Restore to configure the router according to the selected configuration file Reset to Default Click Reset to restore the router s settings to the factory defaults Important All settings stored on the router will be lost following a factory ...

Page 48: ...e to carry out the firmware upgrade process Important All current settings will be restored to their factory defaults following a firmware upgrade You can upgrade the firmware of the router here Make sure the firmware file you want to use is on the local hard drive of the computer Please check your local D Link support site or http support dlink com for firmware updates and language packs ...

Page 49: ...e number of minutes after which the router will enter standby mode if no activity is detected Enter the number of minutes after which the router will enter hibernate mode if no activity is detected Enter the number of minutes after which the router will shut down if no activity is detected Click Apply to save the current configuration Enable Auto Power Saving Enter Standby Mode Enter Hibernate Mod...

Page 50: ...nu Enter the existing password for this account Enter the new password for this account Type the new password again to confirm Click Apply to save the current configuration Select the user to change password Old Password New Password Retype New Password This page lets you change the configuration interface passwords for the Administrator Admin and User accounts ...

Page 51: ...er the current time If you selected Manual mode enter the current date If you selected Get time From Server select the desired time protocol from the drop down menu Enter up to four NTP server addresses which will be used to synchronize the router s system time and date Click Apply to save the current settings Current System Time Mode New Time New Date Time Protocol Time Server Address 1 4 Date an...

Page 52: ...ect your time zone from the drop down menu Check the box to enable automatic adjustment for daylight saving Enter the details of the starting date and time for daylight saving time in your region Enter the details of the ending date and time for daylight saving time in your region Click Apply to save the current settings ...

Page 53: ...49 D Link DWR 730 User Manual Section 3 Configuration Language Language Select your preferred language from the drop down menu Click Apply to save the current configuration ...

Page 54: ...e box to enable the router s log keeping function Click Apply to save the current configuration Log Display Click to update the log display Click to clear all log entries Select the level of log event which you wish to view from the drop down menu The system log displays a record of all events which occur while the router is running ...

Page 55: ...g an existing network you will need to know the security key Wi Fi password being used To join an existing network locate the wireless network icon in the taskbar next to the time display Wireless Icon Clicking on this icon will display a list of wireless networks which are within connecting proximity of your computer Select the desired network by clicking on the network name Connecting to a Wirel...

Page 56: ...ork Enter the password into the box and click Next If you wish to useWi Fi Protected Setup WPS to connect to the router you can also press theWPS button on your router at this point to enable the WPS function When you have established a successful connection to a wireless network the word Connected will appear next to the name of the network to which you are connected ...

Page 57: ...00 please refer to the user manual of your wireless adapter for help with connecting to a wireless network Most utilities will have a site survey option similar to the Windows 7 utility as seen below If you receive the Wireless Networks Detected bubble click on the center of the bubble to access the utility You can also click on the wireless icon in your system tray lower right corner The utility ...

Page 58: ...etwork Highlight the wireless network SSID you would like to connect to and click the Connect button If you get a good signal but cannot access the Internet check your TCP IP settings for your wireless adapter Refer to Networking Basics on page 68 for more information ...

Page 59: ...rity WPA WPA2 on your wireless router or access point before configuring your wireless adapter If you are joining an existing network you will need to know the security key or passphrase being used 2 The utility will display any available wireless networks in your area 1 Click on the wireless icon in your system tray lower right corner Wireless ...

Page 60: ...anual Section 4 Connecting to a Wireless Network 3 Highlight the wireless network SSID you would like to connect to and click the Connect button 4 The following window appears while your computer tries to connect to the router ...

Page 61: ...e same security key or passphrase that is on your router and click Connect It may take 20 30 seconds to connect to the wireless network If the connection fails please verify that the security settings are correct The key or passphrase must be exactly the same as on the wireless router ...

Page 62: ...dows Vista utility as seen below Right click on the wireless computer icon in your system tray lower right corner next to the time Select Connect to a network If you receive the Wireless Networks Detected bubble click on the center of the bubble to access the utility or The utility will display any available wireless networks in your area Click on a network displayed using the SSID and click the C...

Page 63: ...int before configuring your wireless adapter If you are joining an existing network you will need to know the security key or passphrase being used 2 Highlight the wireless network SSID you would like to connect to and click Connect 1 Open the Windows Vista Wireless Utility by right clicking on the wireless computer icon in your system tray lower right corner of screen Select Connect to a network ...

Page 64: ...e same security key or passphrase that is on your router and click Connect It may take 20 30 seconds to connect to the wireless network If the connection fails please verify that the security settings are correct The key or passphrase must be exactly the same as on the wireless router ...

Page 65: ... utilities will have a site survey option similar to the Windows XP utility as seen below Right click on the wireless computer icon in your system tray lower right corner next to the time Select View Available Wireless Networks If you receive the Wireless Networks Detected bubble click on the center of the bubble to access the utility or The utility will display any available wireless networks in ...

Page 66: ...guring your wireless adapter If you are joining an existing network you will need to know the WEP key being used 2 Highlight the wireless network SSID you would like to connect to and click Connect 1 Open the Windows XP Wireless Utility by right clicking on the wireless computer icon in your system tray lower right corner of screen Select View Available Wireless Networks ...

Page 67: ...twork Connection box will appear Enter the same WEP key that is on your router and click Connect It may take 20 30 seconds to connect to the wireless network If the connection fails please verify that the WEP settings are correct The WEP key must be exactly the same as on the wireless router ...

Page 68: ...figuring your wireless adapter If you are joining an existing network you will need to know the WPA key being used 2 Highlight the wireless network SSID you would like to connect to and click Connect 1 Open the Windows XP Wireless Utility by right clicking on the wireless computer icon in your system tray lower right corner of screen Select View Available Wireless Networks ...

Page 69: ...etwork Connection box will appear Enter theWPA PSK passphrase and click Connect It may take 20 30 seconds to connect to the wireless network If the connection fails please verify that the WPA PSK settings are correct The WPA PSK passphrase must be exactly the same as on the wireless router ...

Page 70: ...ted to any other devices such as routers or switches which might have the same IP address as the DWR 730 as this may cause an IP address conflict If you have a conflict temporarily unplug any other devices from your computer while you configure the DWR 730 You can also change the IP address of the DWR 730 in the Network section of the configuration utility Please refer to Wi Fi on page 24 for furt...

Page 71: ...Close your web browser if open and re open it 2 What can I do if I forgot my password If you forgot your password you must reset your router Please note that this process will change all your settings back to the factory defaults To reset the router first remove the back cover of the router to expose the battery Using a paperclip or similar object press and hold the reset button which is located i...

Page 72: ...our IP address please follow the steps below Click on Start Run In the run box type cmd and click OK Windows Vista users type cmd in the Start Search box At the prompt type ipconfig and press Enter This will display the IP address subnet mask and the default gateway of your adapter If the address is 0 0 0 0 check your adapter installation security settings and the settings on your router Some fire...

Page 73: ...eway the same as the LAN IP address of your router 192 168 0 1 Set Primary DNS the same as the LAN IP address of your router 192 168 0 1 The Secondary DNS is not needed or you may enter a DNS server from your ISP Step 5 Click OK twice to save your settings Click on Start Control Panel Network and Internet Connections Network Connections Configure your Internet Protocol IP settings Step 1 If you ar...

Page 74: ...802 11b 11 Mbps Antenna One internal antenna USB Interface micro USB port USIM Slot Standard 6 pin SIM card interface Status Indicators OLED display Storage microSD card slot Wireless Security 64 128 bit WEP Wired Equivalent Privacy WPA WPA2 Wi Fi Protected Access WAPI WLAN Authentication and Privacy Infrastructure Firewall Network Address Translation NAT Dimensions L x W x H 100 3 x 49 35 x 14 13...

Page 75: ... the protection of all persons regardless of age and health The guidelines use a unit of measurement known as the Specific Absorption Rate or SAR The SAR limit for mobile devices is 2 W kg and the highest SAR value for this device when tested complied with this limit To comply with radiofrequency radiation RF exposure guidelines during body worn operation this device must be used with a minimum of...

Reviews: