Quick Installation Guide
5
ENGLISH
Mounting on a Wall
1.
Place the U-shaped bracket against the
wall in the desired position. Use a 4 mm
drill bit to make four holes approximately
30 mm deep, then insert four wall anchors
into the holes.
2.
Use four screws to attach the U-shaped
bracket to the wall.
3.
Use four screws to attach the mounting
bracket to the rear panel of the
DWP-812KT, or eight screws to stack two
mounting brackets together, allowing
the DWP-812KT's angle to be adjusted
horizontally and vertically.
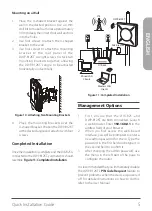
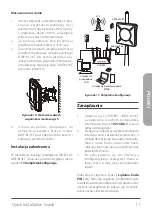
Figure 10: Attaching Two Mounting Brackets
4.
Place the mounting brackets over the
U-shaped bracket. Position the DWP-812KT
at the desired angle and attach it with four
screws.
Completed Installation
Once the installation is complete and the DIR-825 is
connected to the DWP-812KT, your network should
resemble
Figure 11: Completed Installation.
Figure 11: Completed Installation
Management Options
1.
First, ensure that the DIR-825 and
DWP-812KT are both connected. Launch
a web browser. Enter
192.168.0.1
in the
address field of your browser.
2.
When you first access the web-based
interface, you will be prompted to enter a
new admin password for the UI. Type the
password in the first field and retype it in
the second field to confirm it.
3.
After changing the admin password, use
the menu in the left part of the page to
configure the router.
It is recommended that you immediately disable
the DWP-812KT's
PIN Code Request
feature to
prevent problems when the device is powered
off. For detailed instructions on how to do this,
refer to the User Manual.
Wired LAN
Clients
Wireless LAN
Clients
DIR-825
DWP-812KT
PoE Injector
LTE

