4
Quick Installation Guide
ENGLISH
Connecting to the
Management Computer
Connecting via Ethernet
1.
Use an Ethernet cable to connect the
LAN port on the rear panel of the DIR-825
to an Ethernet port on the management
computer.
2.
Turn on the router by pressing the
POWER
button on its back panel.
3.
Make sure that the Ethernet adapter of
your PC is configured to obtain an IP
address automatically.
Connecting via Wi-Fi
1.
Turn on the DIR-825 by pressing the
POWER
button on its back panel.
2.
Make sure that the Wi-Fi adapter of your
PC is configured to obtain an IP address
automatically.
3.
Connect to the network DIR-825-XXXX
(for operating in the 2.4 GHz band) or
DIR-825-5G-XXXX (for operating in the 5 GHz
band), substituting the last four characters
of the DIR-825's MAC address for XXXX. Use
the WPS PIN from the barcode label as the
network key.
Mounting the DWP-812KT
Place the DWP-812KT outside, in an open area.
Obstructions such as windows or concrete
or wooden walls affect the transmission and
reception of wireless signals. Keep the DWP-812KT
away from appliances that produce strong electric
or magnetic fields such as dish satellite antennas.
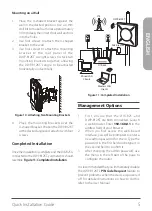
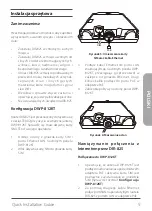
Mounting on a Pole
1.
Attach the U-shaped bracket to the pole
using the provided mounting ties.
Figure 7: Attaching the Bracket to the Pole
2.
Attach the other mounting bracket to the
rear panel of the DWP-812KT using four
mounting screws.
RF
PWR
ETH
SIM
RF
PWR
ETH
SIM
Figure 8: Attaching the Rear
Panel Mounting Bracket
3.
Place the mounting bracket over the
U-shaped bracket. Position the DWP-812KT
at the desired angle and attach it with four
screws.
Figure 9: Attaching the Bracket to the Pole

