background image

DSL-560I ADSL Router User’s Guide


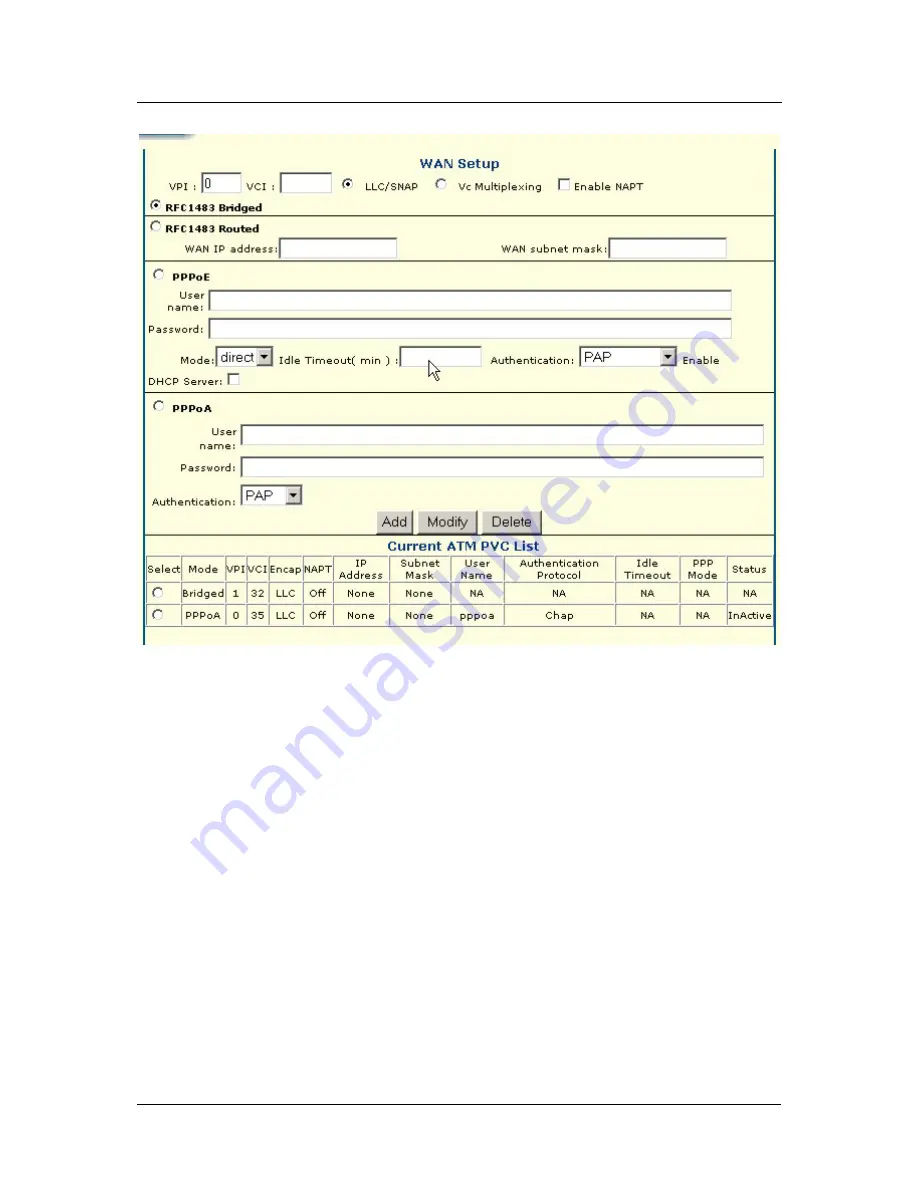
Figure 4 -  1. Configuring the WAN Connection (First Time Setup) 

When the Router is used to provide Internet access it actually must first access your service provider’s network, 
that is, it must communicate with computers and other routers owned by your service provider. These computers 
and routers then provide access to the Internet. The Router must be configured to communicate with the systems 
that give it access to the larger network. There are different methods or protocols used to make this 
communication possible, and both ends of the communication must agree on what method to use and how to set 
up the connection. This is what you will configure the Router to do, to agree with the service provider’s 
equipment and negotiate the terms of the connection using a language or protocol that both sides understand.  

Sometimes it is also necessary to configure settings that control the actual ADSL connection. The ADSL 
connection is what actually carries the data from one point to the other. So in addition to telling the Router what 
method it must use, you may also be asked to change the PVC (Permanent Virtual Channel) settings. These 
settings are defined by two numbers, the VPI (Virtual Path Indicator) and the VCI (Virtual Channel Indicator). 

All the information you need to make the changes needed for a functioning WAN connection should have been 
provided to you by your ISP or network service provider. 

To configure the WAN connection, open the WAN Setup menu and perform the steps listed below. Some of the 
settings do not need to be changed when you first set up the device but can be changed later if you choose.  


Do not change the 

VPI

 or 

VCI

 values unless you are required to do so. If these settings are incorrect, the 

ADSL connection will not function. Many users will be able to use the default settings. If you are told to 
change these, type in the values given to you by your service provider. 


18

Summary of Contents for DSL-560I

Page 1: ...DSL 560I ADSLRouter User sGuide September 2002 651SL560I015 ...

Page 2: ...Feuchtigkeit ausgesetzt d Wenn das Gerät nicht der Bedienungsanleitung ensprechend funktioniert oder Sie mit Hilfe dieser Anleitung keine Verbesserung erzielen e Das Gerät ist gefallen und oder das Gehäuse ist beschädigt f Wenn das Gerät deutliche Anzeichen eines Defektes aufweist 16 Bei Reparaturen dürfen nur Orginalersatzteile bzw den Orginalteilen entsprechende Teile verwendet werden Der Einsat...

Page 3: ...UT SHALL NOT APPLY TO ANY UPDATE OR REPLACEMENT WHICH MAY BE PROVIDED FOR DOWNLOAD VIA THE INTERNET OR TO ANY UPDATE WHICH MAY OTHERWISE BE PROVIDED FREE OF CHARGE D LINK S SOLE OBLIGATION UNDER THIS SOFTWARE WARRANTY SHALL BE TO REPLACE ANY DEFECTIVE SOFTWARE PRODUCT WITH PRODUCT WHICH SUBSTANTIALLY CONFORMS TO D LINK S APPLICABLE PRODUCT DOCUMENTATION PURCHASER ASSUMES RESPONSIBILITY FOR THE SEL...

Page 4: ...R INCIDENTAL OR CONSEQUENTIAL DAMAGES SO THE ABOVE LIMITATION MAY NOT APPLY TO YOU Trademarks Copyright 2000 D Link Corporation Contents subject to change without prior notice D Link is a registered trademark of D Link Corporation D Link Systems Inc All other trademarks belong to their respective proprietors Copyright Statement No part of this publication may be reproduced in any form or by any me...

Page 5: ...er Features 2 Front Panel 3 Rear Panel 4 LED Indicators 5 HARDWARE INSTALLATION 7 Connect ADSL Line 7 Compuer to Router Connection 7 Connect Ethernet LAN to Router 8 Hub or Switch to Router Connection 8 Power On Router 9 CONFIGURING THE ROUTER FOR THE FIRST TIME 10 Configuring IP Settings on Your Computer 10 Access the Configuration Manager 17 Configure the Router 17 WEB BASED MANAGEMENT 20 Access...

Page 6: ...42 IGMP Proxy 42 Bridge 43 Spanning Tree 44 Filter 46 Interface 47 TCP IP 48 DHCP Lease 49 AAL5 49 SNDCP 50 Loopback 50 Ping 51 TECHNICAL SPECIFICATIONS 52 LAN IP SETUP 54 Assigning Network IP Addresses 54 Using the Default IP Address 54 Manual IP Address Assignment 54 Using DHCP 55 Changing the IP Address of the Router 55 IP CONCEPTS 56 IP Addresses 56 Subnet Mask 58 MICROFILTERS AND SPLITTERS 59...

Page 7: ...outer can be described in general terms in the following steps 1 Gather information and equipment needed to install the device Before you begin the actual installation make sure you have all the necessary information and equipment 2 Install the hardware that is connect the cables Ethernet and telephone to the device and connect the power adapter 3 Check the IP settings on your computer and change ...

Page 8: ...tional software must be installed if you are using what is called a bridged connection For a bridged connection the information needed to make and maintain the Internet connection is stored on your computer not in the Router This type of connection is similar to the arrangement used for analog dial up modems but the connection speed is much faster Various terms are to describe a bridged ADSL conne...

Page 9: ...ns it will be necessary to provide additional VPI and VCI values for the device These numbers define a unique route used on the ATM backbone of the WAN Chapter 5 contains instruction on how to set up additional PVCs for accounts using more than one virtual connection Packing List Open the shipping carton and carefully remove all items In addition to this User s Guide ascertain that you have 1 One ...

Page 10: ......

Page 11: ...te the recommendations of the ADSL Forum regarding framing data format and upper layer protocols Router Description and Operation The DSL 560I ADSL Router is designed to provide a simple cost effective and secure ADSL Internet connection for your small to medium sized private network The DSL 560I combines the benefits of high speed ADSL connection technology and TCP IP routing with a conventional ...

Page 12: ... will remain in the routing table and never age out If you wish to define a specific route that will always be used for data traffic from your LAN to a specific destination within your LAN for example to another router or a server or outside your network to a ISP defined default gateway for instance Default Routing This allows you to choose a default path for incoming data packets for which the de...

Page 13: ...DSL 560I ADSL Router User s Guide Front Panel Place the Router in a location that allows a view of the LED indicators on the front panel 3 ...

Page 14: ...nections to the Router are made at the rear panel The power switch and factory reset button is located here as well Power Cord connects here Ethernet port connect thernet cable E here The factory reset button is located here ADSL port connect ADSL cable here 4 ...

Page 15: ...r Steady green light indicates the unit is powered on Status Blinking light indicates a normal state Off or steady On means the device is malfunction ADSL Link Steady green light indicates a valid ADSL connection This will light after the ADSL negotiation process has been settled ADSL Act Blinking green light indicates an active WAN session 5 ...

Page 16: ...DSL 560I ADSL Router User s Guide Ethernet Link Steady green light indicates a valid Ethernet connection Ethernet Act Blinking green indicates an active Ethernet session 6 ...

Page 17: ...ne end of the cable into the Router s ADSL port RJ 11 receptacle on its rear panel and insert the other end into the wall jack The ADSL connection is the WAN interface It links the Router to the network service provider s backbone infrastructure This is the Router s access point to the Internet The Router must undergo a negotiation process to establish the terms of the ADSL connection During this ...

Page 18: ...ng the Router directly to a PC or server use a normal straight through cable You should use a crossed cable when connecting the Router to a normal MDI X port on a switch or hub Use a normal straight through cable when connecting it to an uplink MDI II port on a hub or switch The Ethernet Link LED indicator will indicate a valid connection The rules governing Ethernet cable lengths apply to the LAN...

Page 19: ...n Router To power on the device 1 Insert the AC Power Adapter cord into the power receptacle located on the Router s back panel and plug the adapter into a nearby power source 2 You should see the Power LED indicator light up and remain lit 9 ...

Page 20: ...uration for a computer running a Windows OS to be a DHCP client 2 Configure the WAN Connection Once you have successfully logged in the Router s Web configuration menu you can proceed to change the settings for the ADSL connection and the Service Provider s signing on process There are different methods used to establish the connection to the service provider s network and ultimately to the Intern...

Page 21: ...indows XP for DHCP Use the following steps to configure a computer running Windows XP to be a DHCP client 1 From the Start menu on your desktop go to click on Control Panel 2 In the Control Panel folder click on Network and Internet Connections 11 ...

Page 22: ...he Network and Internet Connections folder click on Network Connections 4 In the Network Connections folder highlight the Local Area Connection icon by clicking on it once A new option is revealed under Network Tabs in the left side panel 12 ...

Page 23: ...e settings of the connection under Network Tabs 6 In the General Tab of the Local Area Connection Properties menu highlight Internet Protocol TCP IP under This connection uses the following items by clicking on it once Click on the Properties button 13 ...

Page 24: ... display as an installed component click Install 6 In the Select Network Component Type dialog box select Protocol and then click Add 7 Select Internet Protocol TCP IP in the Network Protocols list and then click OK 8 You may be prompted to install files from your Windows 2000 installation CD or other media Follow the instructions to install the files 9 If prompted click OK to restart your compute...

Page 25: ...k and Dial up Connections window right click the Network icon and then select Properties 3 In the Network Properties dialog box select TCP IP and then click Properties 4 In the TCP IP Settings dialog box click the Obtain and IP address automatically option 5 Double click OK twice to confirm and save your changes and then close the Control Panel Your computer is now ready to obtain its IP addresses...

Page 26: ...ck the Protocols tab 4 The Protocols tab displays a list of currently installed network protocols If the list includes TCP IP then the protocol has already been enabled Skip to Configure IP Information 5 If TCP IP does not display as an installed component click Add 6 In the Select Network Protocol dialog box select TCP IP and then click OK You may be prompted to install files from your Windows NT...

Page 27: ... the IP address of the Router Type in http followed by the default IP address 192 168 0 1 in the address bar of the browser The URL in the address bar should read http 192 168 0 1 A new window will appear and you will be prompted for a user name and password to access the web based manager Use the default user name admin and password admin for first time set up You should change the web based mana...

Page 28: ...lso necessary to configure settings that control the actual ADSL connection The ADSL connection is what actually carries the data from one point to the other So in addition to telling the Router what method it must use you may also be asked to change the PVC Permanent Virtual Channel settings These settings are defined by two numbers the VPI Virtual Path Indicator and the VCI Virtual Channel Indic...

Page 29: ...n method used pap or chap choose Enabled for Connect On Demand and leave the Idle Time setting at 0 3 2 If you have selected a Bridge Encapsulation there is no more change needed to establish the WAN connection for the Router However you will probably have to install some sort of connection software on your computer Go to step 6 and finalize the Router configuration then install any additional sof...

Page 30: ...ou are accessing the web based manager you must type its default IP address 192 168 0 1 in the address bar of the browser The URL in the address bar should read http 192 168 0 1 If you change the IP address you will use the new IP address to access the web based manager In the page that opens click on the Login to web based management module button A new window will appear and you will be prompted...

Page 31: ...tle of these buttons to view the menu associated with it These are the menus you will use to configure manage and monitor the Router Basic The information contained in the Basic folder are Access Control ADSL Stats WAN Setup LAN Setup Routing Setup Save Reboot Erase Reboot Router Configuration All the settings that define Router operations on both the LAN and WAN can be configured with the menus l...

Page 32: ...mon Encapsulation and connection methods commonly used for ADSL service The information that is needed for the different method varies according to connection type Therefore the menu will change to offer different settings depending on whether the connection is a PPP or Bridged connection type To configure a single PVC profile select the Encapsulation setting first This may change the user configu...

Page 33: ...our network account is billed according to the amount of time the Router is actually connected to the Internet enter an appropriate Idle Time value in seconds This will disconnect the Router after the WAN connection has been idle for the amount of time specified The default value 0 Table 5 1 WAN Connection Configuration Additional Virtual Connections PVCs The Router can use up to eight simultaneou...

Page 34: ...may use the same user name password combination for more than one PVC unless you are specifically told not to do this by your service provider It is recommended however that a different combination be used whenever it is practical Also for PPP connections select the Authentication and Idle Time settings see Table 5 1 WAN Connection Configuration 4 Click the Add button when you have entered all the...

Page 35: ...pear with the new settings in the Current ATM PVC List menu To delete an exiting PVC 1 Select the PVC profile you want to delete by selecting the item in the Current ATM PVC List 2 Click the Delete button The PVC profile will disappear from the Current ATM PVC List at the bottom of the page 25 ...

Page 36: ...t IP Address Menu The Ethernet IP Address displays the current LAN IP settings of the Router To change the IP address type in the new LAN IP Address in the space provided and type in a Subnet Mask Click on the Apply button You will be prompted again to restart the device Restart now or continue to make changes and save the changes later Figure 5 4 26 ...

Page 37: ...the password on an existing user profile The following screen will appear when you click Add Enter a User Name and Password Select Menu or HTTP under Services and enter Permissions Then click Apply to create user profile It will then appear under List of Users The following screen will appear when you click Modify Enter User Name Authorization Old Authorization and Permission settings Then click A...

Page 38: ... s Guide To change the password on a user profile that already exists click on Password to bring up the menu below Enter the Old Password New Password and Confirm Password settings to change password of existing user profile 28 ...

Page 39: ...ique used for ADSL connection G DMT or G lite Up Stream Rate of data transmission upstream kbps Down Stream Rate of data transmission downstream kbps Attenuation Downstream Upstream attenuation of signal in dB Near end and Far end SNR Margin Downstream Upstream Signal to Noise Ratio in dB Near end and Far end HEC Count Header Error Check count Firmware Firmware version 15 min ES Counter CRC Errors...

Page 40: ... destined for a particular network or subnet use a predetermined gateway The List of Static Routes table tells you how many routes are currently configured and the Network ID Subnet Mask and Next Hop IP of each route The Rip Information option lets you select Rip Status Off or On and Version information Save and Reboot Gives you to the option to save the current configuration or reboot the Router ...

Page 41: ...DSL 560I ADSL Router User s Guide Erase and Reboot Gives you the option to erase current settings or reboot Router 31 ...

Page 42: ...ed The information contained in the Advanced folders are listed as follows ADSL Mode Redirect Port NAT DHCP Server SNMP Interface VCC PPPoE PPPoA IGMP Proxy Bridge Spanning Tree Filters Interface TCP IP DHCP Lease AAL5 SNDCP Loopback Ping 32 ...

Page 43: ...dous packets to a proxy server outside your firewall For example you can configure the Router to direct HTTP packets to a designated HTTP server in the DMZ Other common applications might include directing incoming SMTP packets to an Email server for data scrutiny and improved network efficiency Port Redirection can be used to redirect TCP or UDP packets to a specified port and a specified IP addr...

Page 44: ... Internet IP addresses Secondly the NAT process creates an added degree of security by hiding your private network behind one IP address The NAT function will normally only allow incoming packets that are generated in response to a request from a host within the LAN If your network uses web servers FTP servers or other proxies used for data requests from outside the private network you can use NAT...

Page 45: ... the Router to act as a DHCP server for the LAN This menu lists DHCP Entries To add another entry click Add and enter the appropriate settings IfName Subnet mask NetMask StartIp End Ip Gateway Broadcast DNS Lease Time To delete a DHCP entry simply select the entry and click Delete 35 ...

Page 46: ...DSL 560I ADSL Router User s Guide SNMP This menu lists SNMP parameters You may modify by clicking Modify and entering the appropriate settings 36 ...

Page 47: ...DSL 560I ADSL Router User s Guide Interface This menu gives a list of interface entries For each entry an IP address subnet mask MAC address and status are given 37 ...

Page 48: ...terface entry and click on Configure Interface A screen such as the one below should appear for an Ethernet Interface Configuration Each interface is configured in its own separate screen For an ATM Interface Configuration a screen such as the one below will appear 38 ...

Page 49: ...configure your DNS Default Gateway click on DNS Default G W A screen such as the one below will appear Enter the appropriate settings VCC This menu provides a list of VCCs Click List Ipoa to bring up a list of IPOAs that are configured 39 ...

Page 50: ... ADSL Router User s Guide To configure a VCC click on Add The following screen will appear Enter the information requested and click Apply To delete simply select the VCC you wish to delete and click Delete 40 ...

Page 51: ...how VCC Quality to display the screen below PPPoE This menu lists PPPoE Entries Click Start to initiate the process Click Stop to terminate the process You may delete an entry by clicking Delete PPPoE entries are entered in the Wan Setup page 41 ...

Page 52: ...is menu lists PPPoA connections Click Start to initiate the process Click Stop to terminate the process You may delete an entry by clicking Delete PPPoA entries are entered in the Wan Setup page IGMP Proxy This menu lists IGMP Proxy entries 42 ...

Page 53: ...60I ADSL Router User s Guide Bridge This menu lists bridge entries Click on GroupInfo to bring up Group Interfaces window Click on interfaces to select them and then click on Apply to put them into effect 43 ...

Page 54: ...VC to bring up the following Bridge Configuration menu Enter the interface name vpi settings vci settings and encapsulation type Then click Apply to place configuration into effect Spanning Tree This menu provides a list of spanning tree entries 44 ...

Page 55: ... Click on STP Parameters to bring up read only window List of Spanning Tree Parameters Click Continue to proceed Click ConfigPort to bring up Port Configuration window below Enter settings and click Apply to put settings into effect 45 ...

Page 56: ...r This menu displays a list of filter entries Click on Filter Parameters to bring up read only List of Filter Parameters Click on Add to configure filter by entering a MAC address and Frame option Click Apply to place settings into effect 46 ...

Page 57: ...DSL 560I ADSL Router User s Guide Interface This menu gives a read only list of interface statistics ordered by interface name 47 ...

Page 58: ...DSL 560I ADSL Router User s Guide TCP IP This menu provides TCP IP Statistics 48 ...

Page 59: ...DSL 560I ADSL Router User s Guide DHCP Lease This menu gives DHCP Lease Statistics AAL5 This menu gives AAL5 Statistics 49 ...

Page 60: ...s Guide SNDCP This menu gives SNDCP statistics Loopback This menu item allows the user to perform an OAM Loopback by entering Flow Type VPI settings VCI settings and Loopback ID Click Start Loopback to initiate loopback test 50 ...

Page 61: ...DSL 560I ADSL Router User s Guide Ping This menu allows the user to perform a Ping test by entering the host name or IP address Click Submit to initate ping 51 ...

Page 62: ... RFC 1631 NAT RFC 1877 Automatic IP assignment RFC 2516 PPP over Ethernet Supports RFC 2131 and RFC 2132 DHCP Compatible with all T1 413 issue 2 full rate DMT over analog POTS and CO DSLAM equipment Supports ATM Forum UNI V3 1 PVC PROTOCOLS TCP IP UDP RIP 1 RIP 2 IGMP DHCP BOOTP ARP AAL5 DATA TRANSFER RATE G dmt full rate Downstream up to 8 Mbps Upstream up to 640 Kbps G lite Downstream up to 1 5 ...

Page 63: ...put 100V 240V AC 50 60Hz Output 7 5V DC 1 5A Power Consumption 5 Watts max Operating Temperature 5 to 40 C Humidity 5 to 95 non condensing Dimensions 190 mm x 116 8 mm x 30 9 mm Weight 360 gm EMI CE Class B Safety CSA International Reliability Mean Time Between Failure MTBF min 4 years 53 ...

Page 64: ...you can instruct the Router to automatically assign them using DHCP The simplest method is to use DHCP The DHCP function is active by default Manual IP Address Assignment Manually configuring IP settings for the LAN means you must manually set an IP address subnet mask and IP address of the default gateway the Router s IP address on each networked computer The example listed below describes IP con...

Page 65: ...on how to use configure the Router for DHCP Changing the IP Address of the Router When planning your LAN IP address setup you may use any scheme allowed by rules that govern IP assignment It may be more convenient or easier to remember an IP scheme that use a different address for the Router Or you may be installing the Router on a network that has already established the IP settings Changing the ...

Page 66: ...assigned to each of the millions of networks and each of the computers on those networks Such a number is called an IP address To make IP addresses easy to understand the originators of IP adopted a system of representation called dotted decimal or dotted quad notation Below are examples of IP addresses written in this format 201 202 203 204 189 21 241 56 125 87 0 1 Each of the four values in an I...

Page 67: ...s this portion is not all 0 or all 255 Values outside the range of 0 to 255 can never appear in an IP address 0 to 255 is the full range of integer values that can be expressed with eight bits The network portion must be the same for all the IP devices on a discrete physical network a single Ethernet LAN for example or a WAN link The host portion must be different for each IP device or to be more ...

Page 68: ...sk In the absence of subnetworks standard TCP IP addressing may be used by specifying subnet masks as shown below IP Class Subnet Mask Class A 255 0 0 0 Class B 255 255 0 0 Class C 255 255 255 0 Subnet mask settings other than those listed above add significance to the interpretation of bits in the IP address The bits of the subnet mask correspond directly to the bits of the IP address Any bit an ...

Page 69: ...d to use any type of filter device Follow the instructions given to you by your ADSL service provider about where and how you should connect the Modem to the ADSL line Microfilters Unless you are instructed to use a line splitter see below it will be necessary to install a microfilter low pass filter device for each telephone or telephone device answering machines Faxes etc that share the line wit...

Page 70: ...rs The splitter has three RJ 11 ports used to connect to the wall jack the Modem and if desired a telephone or telephone device The connection ports are typically labeled as follows Line This port connects to the wall jack ADSL This port connects to the Modem Phone This port connects to a telephone or other telephone device The diagram below illustrates the proper use of the splitter Line Splitter...

Page 71: ...L 20 2 635 6176 FAX 20 2 635 6192 URL www dlink me com E MAIL support dlink me com fateen dlink me com Finland D Link Finland Thlli ja Pakkahuone Katajanokanlaituri 5 FIN 00160 Helsinki TEL 358 9 622 91660 FAX 358 9 622 91661 URL www dlink fi com France D Link France Le Florilege 2 Allee de la Fresnerie 78330 Fontenay le Fleury France TEL 33 1 3023 8688 FAX 33 1 3023 8689 URL www dlink france fr E...

Page 72: ...ink Sweden P O Box 15036 S 167 15 Bromma Sweden TEL 46 0 8 564 61900 FAX 46 0 8 564 61901 E MAIL info dlink se URL www dlink se Taiwan D Link Taiwan 2F No 119 Pao Chung Rd Hsin Tien Taipei Taiwan TEL 886 2 2910 2626 FAX 886 2 2910 1515 URL www dlinktw com tw E MAIL dssqa tsc dlinktw com tw Turkey D Link Middle East Deniz Bilgisayar Buyukdere Cad Naci Kasim Sk No 5 Mecidiyekoy Istanbul Turkey TEL 9...

Page 73: ...99 1000 or more 3 What network protocol s does your organization use XNS IPX TCP IP DECnet Others_______________________________________________________ 4 What network operating system s does your organization use D Link LANsmart Novell NetWare NetWare Lite SCO Unix Xenix PC NFS 3Com 3 Open Banyan Vines DECnet Pathwork Windows NT Windows NTAS Windows 95 Others______________________________________...

Page 74: ......

Reviews: