background image

DSL-500G ADSL Router User’s Guide


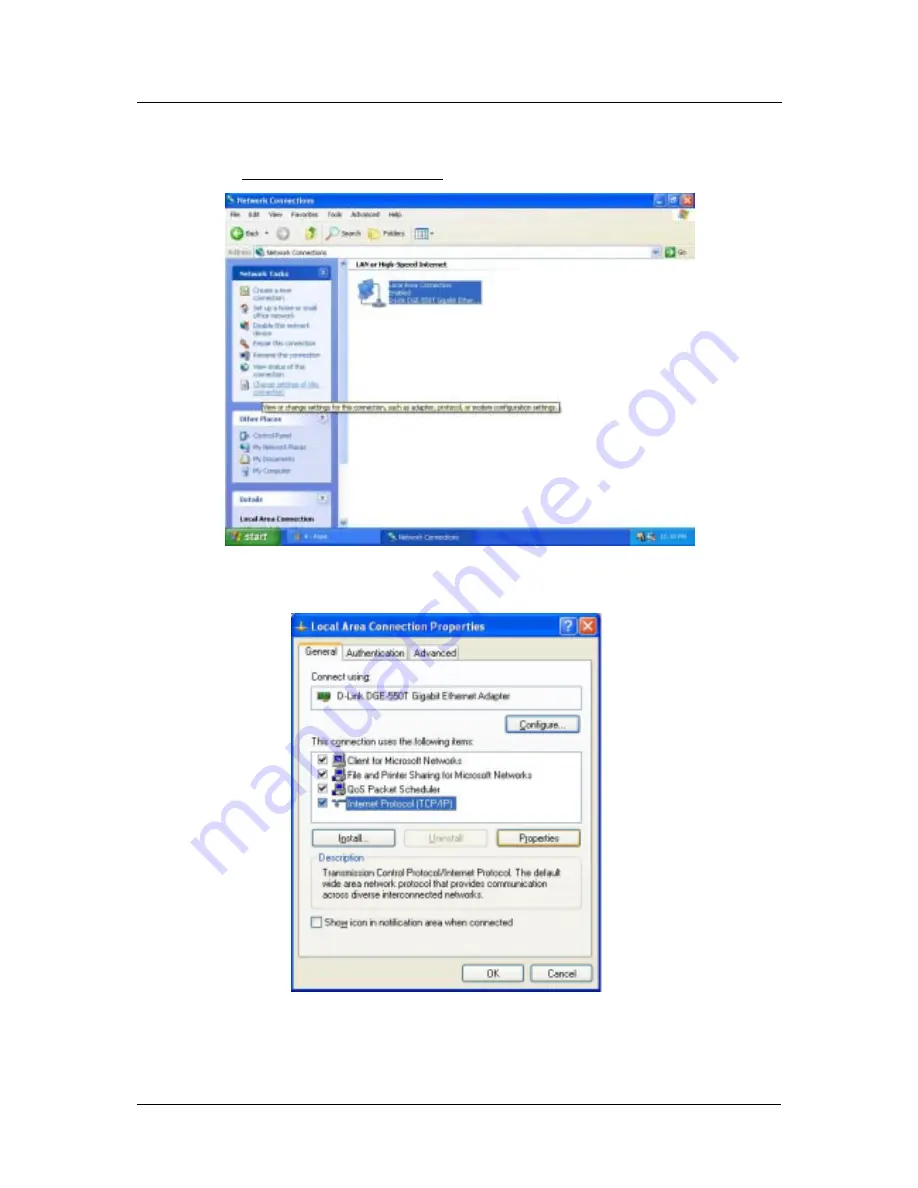
5. Click 

on 

Change settings of the connection

 under Network Tabs. 


6. In 

the 

General

 Tab of the 

Local Area Connection Properties

 menu, highlight 

Internet Protocol 

(TCP/IP)

 under “This connection uses the following items:” by clicking on it once. Click on the 

Properties

 button.  


8

Summary of Contents for DSL-500G

Page 1: ...DSL 500G ADSL Router User s Guide November 2002 ...

Page 2: ...Feuchtigkeit ausgesetzt d Wenn das Gerät nicht der Bedienungsanleitung ensprechend funktioniert oder Sie mit Hilfe dieser Anleitung keine Verbesserung erzielen e Das Gerät ist gefallen und oder das Gehäuse ist beschädigt f Wenn das Gerät deutliche Anzeichen eines Defektes aufweist 16 Bei Reparaturen dürfen nur Orginalersatzteile bzw den Orginalteilen entsprechende Teile verwendet werden Der Einsat...

Page 3: ...UT SHALL NOT APPLY TO ANY UPDATE OR REPLACEMENT WHICH MAY BE PROVIDED FOR DOWNLOAD VIA THE INTERNET OR TO ANY UPDATE WHICH MAY OTHERWISE BE PROVIDED FREE OF CHARGE D LINK S SOLE OBLIGATION UNDER THIS SOFTWARE WARRANTY SHALL BE TO REPLACE ANY DEFECTIVE SOFTWARE PRODUCT WITH PRODUCT WHICH SUBSTANTIALLY CONFORMS TO D LINK S APPLICABLE PRODUCT DOCUMENTATION PURCHASER ASSUMES RESPONSIBILITY FOR THE SEL...

Page 4: ...ited States Copyright Act of 1976 FCC Warning This device complies with part 15 of the FCC Rules Operation is subject to the following two conditions 1 This device may not cause harmful interference and 2 this device must accept any interference received including interference that may cause undesired operation This equipment has been tested and found to comply with the limits for a Class B digita...

Page 5: ...Settings on Your Computer 5 ACCESS THE WEB CONFIGURATION MANAGER 12 Configure WAN Connection ADSL Service Connection 14 WEB CONFIGURATION MANAGEMENT GUIDE 16 Quick Configuration 17 HOME PAGE SYSTEM VIEW 18 Change LAN IP Settings 19 DHCP Service Modes 20 WAN CONFIGURATION OPTIONS 21 ATM VC Configuration 21 PPP Configuration 23 IpoA Configuration 25 EOA Configuration 27 BRIDGE CONFIGURATION 29 ROUTI...

Page 6: ...5 Add IPoA Interface 26 Figure 16 EOA Configuration 27 Figure 17 EOA Interface Modify 28 Figure 18 Bridge Configuration Menu 30 Figure 19 IP Route Table 31 Figure 20 IP Address Table 32 Figure 21 NAT Configuration 33 Figure 22 Add NAT Rule 33 Figure 23 RIP Configuration 35 Figure 24 Firewall Configuration 36 Figure 25 IP Filter Configuration 38 Figure 26 IP Filter Rule Add 39 Figure 27 DNS Configu...

Page 7: ...ed in general terms in the following steps 1 Gather information and equipment needed to install the device Before you begin the actual installation make sure you have all the necessary information and equipment 2 Install the hardware that is connect the cables Ethernet and telephone to the device and connect the power adapter 3 Check the IP settings on your computer and change them if necessary so...

Page 8: ...e is said to be invisible since it does not have an IP address The IP address is actually configure on the computer connected to the Ethernet LAN interface If you are using the device in bridge mode it is recommended that you run firewall software on the computer connected to it Additional Software It may be necessary to install software on your computer that enables the computer to access the Int...

Page 9: ...r s Guide ascertain that you have 1 One DSL 500G ADSL Ethernet Router 2 One CD ROM with this User s Guide and the Quick Installation Guide 3 One twisted pair telephone cable used for ADSL connection 4 One straight through Ethernet cable 5 One AC power adapter suitable for your electric service 6 One Quick Installation Guide hardcopy ix ...

Page 10: ......

Page 11: ...t and upper layer protocols Router Description and Operation The DSL 500G ADSL Router is designed to provide a simple cost effective and secure ADSL Internet connection for your small to medium sized private network The ADSL connection technology enables many interactive multi media applications such as video conferencing and collaborative computing The Router is easy to install and use The DSL 50...

Page 12: ...lid ADSL connection This will light after the ADSL negotiation process has been settled Blinking green light indicates an active WAN session Ethernet Link Act Steady green light indicates a valid Ethernet connection Blinking green indicates an active Ethernet session Rear Panel All cable connections to the Router are made at the rear panel The factory reset button is located here as well Ethernet ...

Page 13: ...ter Connection Connect Ethernet LAN to Router The Router may be connected to any 10 100BASE TX Ethernet LAN Any connection to an Ethernet concentrating device such as a switch or hub must operate at a speed of 10 100 Mbps only When connecting the Router to any Ethernet device that is capable of operating at speeds higher than 10Mbps be sure that the device has auto negotiation NWay enabled for the...

Page 14: ...ink port on the switch or hub for another device connect to any on the other MDI X ports 1x 2x etc with a cross wired cable or use crossover adapter Figure 4 Switch to Router Connection Power On Router To power on the device 1 Insert the AC Power Adapter cord into the power receptacle located on the back of the Router and plug the adapter into a nearby power source 2 You should see the Power LED i...

Page 15: ...on and connect to the service provider s network There are different methods used to establish the connection to the service provider s network and ultimately to the Internet You should know what Encapsulation and connection type you are required to use for your ADSL service It is also possible that you must change the PVC settings used for the ADSL connection Your service provider should provide ...

Page 16: ...indows XP for DHCP Use the following steps to configure a computer running Windows XP to be a DHCP client 1 From the Start menu on your desktop go to click on Control Panel 2 In the Control Panel folder click on Network and Internet Connections 6 ...

Page 17: ...the Network and Internet Connections folder click on Network Connections 4 In the Network Connections folder highlight the Local Area Connection icon by clicking on it once A new option is revealed under Network Tabs in the left side panel 7 ...

Page 18: ...e settings of the connection under Network Tabs 6 In the General Tab of the Local Area Connection Properties menu highlight Internet Protocol TCP IP under This connection uses the following items by clicking on it once Click on the Properties button 8 ...

Page 19: ... display as an installed component click Install 6 In the Select Network Component Type dialog box select Protocol and then click Add 7 Select Internet Protocol TCP IP in the Network Protocols list and then click OK 8 You may be prompted to install files from your Windows 2000 installation CD or other media Follow the instructions to install the files 9 If prompted click OK to restart your compute...

Page 20: ...n 2 In Network and Dial up Connections window right click the Network icon and then select Properties 3 In the Network Properties dialog box select TCP IP and then click Properties 4 In the TCP IP Settings dialog box click the Obtain and IP address automatically option 5 Double click OK twice to confirm and save your changes and then close the Control Panel Your computer is now ready to use the Ro...

Page 21: ...splays a list of currently installed network protocols If the list includes TCP IP then the protocol has already been enabled Skip to Configure IP Information 5 If TCP IP does not display as an installed component click Add 6 In the Select Network Protocol dialog box select TCP IP and then click OK You may be prompted to install files from your Windows NT installation CD or other media Follow the ...

Page 22: ... web based management software launch your web browser software and use the LAN IP address of the Router to access the management software The default LAN IP address of the Router is used in the Address bar of your web browser window Type in http followed by the default IP address 10 1 1 1 in the address bar of the browser The URL in the address bar should read http 10 1 1 1 A new window appears p...

Page 23: ...in Menu First Time Log On In the Home folder you will see two hyperlinks Home and Quick Configuration You need to access the Quick Configuration menu double click on the hyperlink for this menu Once you have accessed the menu you can change the Router s configuration settings as instructed by your ISP You will then need to save or Submit the settings to the flash memory of the Router Finally you w...

Page 24: ...for the initial connection 3 Connection Type Change connection method and packet encapsulation technique as instructed by your ISP The available connection types are PPPoE LLC PPPoE VC Mux PPPoA LLC PPPoA VC Mux IPoA LLC IPoA VC Mux Bridged IP LLC Bridged IP VC Mux form the pull down menu Default Connection Type PPPoE LLC 4 VPI If instructed to change this type in the VPI value for the initial con...

Page 25: ...een successfully committed to memory You must now reboot the device to put the settings into effect Make sure Reboot is selected in the Reboot Mode pull down menu and click IMPORTANT Do not reboot the device using the Reset button on the back panel of the Router to activate new changes This button resets the device settings to the FACTORY default values Any custom settings will be lost After the R...

Page 26: ...e Router The Bridging and Routing folders contain two of the same hyperlinked menus the ATM VCC page and the EoA page These are used to configure settings that allow the Router to operate on the service provider s network If you are using the Router for multiple virtual connections these menus are also used to configure these additional virtual connections PVCs Figure 5 Router Web based Quick Conf...

Page 27: ...your ISP to get this information You may have to use the public IP address for your computer In this case you do not enter the IP address here but configure these settings for your computer Default Route When enabled this setting specifies that the IP address specified above will be used as the default route for your LAN Whenever one of your LAN computers attempts to access the Internet the data w...

Page 28: ...IPoA interface Multiple software defined interfaces may be configured to use the DSL connection Click on the interface names to view the configuration menus for these interfaces Each interface should display a lower interface name such as aal 5 Click on the lower interface name to view or change the ATM VC settings that this interface uses LAN Interface Displays the software names and various sett...

Page 29: ... through the WAN port The external DHCP server may be part of the ISP s network The remaining alternative Internal DHCP Server is used to obtain IP settings from a DHCP server within the Ethernet LAN The IP settings will sent through the LAN port LAN IP Address The IP address your computers use to identify the device s LAN port Note that the public IP address assigned to you by your ISP is not you...

Page 30: ...gs or receive them from a DHCP server on your LAN or from the ISP see previous section Figure 8 DHCP Mode Configuration Choose one the options below from the DHCP Mode drop down menu DHCP Server This is the default mode for the Router In this mode it provides DHCP services to properly configured hosts on the Ethernet LAN DHCP Relay In this mode the Router is an intermediary device or relay agent b...

Page 31: ...ATM virtual channel connection VCC The VCC properties define the path the Router uses to communicate with your ISP over the ATM network To view your current configuration log into the Configuration Manager and then click the ATM VCC button in the Bridging folder The ATM VCC Configuration page displays as shown below Figure 9 ATM VCC Configuration Menu Additional Virtual Connections In order to use...

Page 32: ... communication between the Router and service provider If you are adding a new VCC Interface or changing the existing VPI value type in the new VPI value VCI If you are adding a new VCC Interface or changing the existing VCI value type in the new VCI value Mux Type Select VC Mux or LLC from pull down menu MAX Proto per AAL5 This setting indicates the number of higher level interfaces that the VC c...

Page 33: ...figure the following settings on the PPP Configuration page Inactivity TimeOut mins The time in minutes that must elapse before a PPP connection times out due to inactivity Ignore WAN to LAN traffic while monitoring activity When enabled data traffic traveling in the incoming direction from the WAN port to the LAN port will not count as activity on the WAN port i e it will not prevent the connecti...

Page 34: ...e with PPoE interfaces but not with PPoA interfaces The name of the ISP service you are using with this PPP connection ISPs may offer different types of services for example for online gaming or business communications each requiring a different login and other connection properties Use DHCP When set to Enable the device will acquire additional IP information from the ISP s DHCP server The PPP con...

Page 35: ...ject to a less restrictive set of protections because they originate within the network The term DMZ de militarized zone in Internet networking terms refers to computers that are available for both public and in network accesses such as a company s public Web server Netmask The netmask you want to assign to the interface RFC 1577 Specifies whether the IPoA protocol to be used complies with the IEF...

Page 36: ...e Sec Type drop down list select the level of firewall security for the interface Public Private or DMZ 4 In the RFC 1577 Click the Yes radio button if the interface complies with the IETF specification RFC 1577 and click the Add button 5 Click the Submit button A confirmation page will display to confirm your changes 6 Click the Close to return to the IPoA page and view the new interface in the t...

Page 37: ... ISP Before creating an EOA interface or modifying the default settings contact your ISP to determine which type of protocol they use IMPORTANT Your ISP may use a protocol other than EOA for communication with the Router such as the point to point protocol PPP One type of PPP named PPP over Ethernet PPPoE actually works on top of the EOA protocol The other type PPP over ATM PPPoA does not However ...

Page 38: ...ay differ if this address is not available Some ISPs use static IP settings that are manually assigned to each account If your service provider instructs you to configure a Static IP Address type in the global IP Address for this EOA interface Net Mask If you are assigned a Static IP Address and Net Mask type in the Net Mask for this EOA interface Use DHCP When checked this setting instructs the d...

Page 39: ...interface associated with each MAC in its bridge forwarding table When the bridge receives a data packet it compares its destination MAC to the entries in the bridge forwarding table When the packet s destination MAC address matches one of the entries it forwards the packet through the interface that connects to the corresponding network The bridge does not send the data directly to the receiving ...

Page 40: ...ration settings open the Commit Reboot menu and click the Commit button to save your changes to permanent memory Note If you enable bridging on an interface that has already been assigned an IP address then it is considered IP enabled and will route rather than bridge IP packets received on the interface The interface will bridge non IP data it receives however You can determine whether the Ethern...

Page 41: ...t can also be specified as all zeros to indicate that this route should be used for all destinations for which no other route is defined this is the route that creates the default gateway Netmask Indicates which parts of the destination address refer to the network and which parts refer to a computer on the network The default gateway uses a netmask of 0 0 0 0 Next Hop Specifies the next IP addres...

Page 42: ...ck Commit button to save your changes to permanent memory IP Address The IP Address Table lists the IP addresses network masks Net Mask and interface names IF Name for each of its IP enabled interfaces Figure 19 IP Address Table The listed IP addresses include The IP address of the device s Ethernet LAN port eth 0 The IP address of the WAN interface ppp 0 eoa 0 or ipoa 0 depending on the connectio...

Page 43: ... NAT by selecting the Enable or Disable option in the configuration menu and submitting the settings Figure 20 NAT Configuration To view the NAT Rule setting menu or the NAT Translations entries select the option from the NAT Options drop down menu To configure NAT Rules select the NAT Rule Entry option and click the Add button A new window is displayed Figure 21 Add NAT Rule From the Rule Flavor ...

Page 44: ...Address From Type the public IP address assigned to you by your ISP Global Address To If you have multiple WAN interfaces in both the Global Address From and Global Address To fields type the IP address of the interface to which this rule applies This rule will not be enforced for data that arrives on other PPP interfaces If you have multiple WAN interfaces and want the rule to be enforced on a ra...

Page 45: ...pdate Time These are global settings for all interfaces that use RIP Age is the amount of time in seconds that the device s RIP table will retain each route that it learns from adjacent computers Update Time specifies how frequently the Router will send out its routing table its neighbors 2 In the IF Name column select the name of the interface on which you want to enable RIP For communication wit...

Page 46: ...addresses which are used to create subnets and other features Select RIP2 if all other routing devices on your LAN support this version of the protocol 6 Click the Add button The new RIP entry will display in the table 7 Click the Enable radio button to enable the RIP feature 8 Click the Submit button to save the settings in temporary memory When you are done making changes to the configuration se...

Page 47: ... the percentage of concurrent IP sessions that can be used for ICMP messages If the percentage is exceeded then older ICMP IP sessions will be replaced by new sessions as the are initiated Max Single Host Connection Sets the percentage of concurrent IP session that can originate from a single computer This percentage should take into account the number of hosts on the LAN Log Destination Specifies...

Page 48: ... Filter rules take effect based on the security level specified in each rule For example when High is selected only those rules that are assigned a security value of High will be in effect The same is true for the Medium and Low settings When None is selected IP Filtering is disabled Private Public DMZ Default Action This setting specifies a default action to be taken Accept or Deny on private pub...

Page 49: ... IP filter rule you set various criteria that must be met in order for the rule to be invoked Use these instructions to add a new IP filter rule 1 On the main IP Filter page click the Add button to display the IP Filter Rule Add page Figure 25 IP Filter Rule Add 2 Enter or select data for each field that applies to your rule The following table describes the fields Rule ID Each rule must be assign...

Page 50: ... address that is numerically less than or equal to the specified address gt any source IP address that is numerically greater than the specified address eq any source IP address that is numerically equal to the specified address neq any source IP address that is not equal to the specified address range any source IP address that is within the specified range inclusive out of range any source IP ad...

Page 51: ...tions specified in their packet headers Yes The rule will be applied only to packets that contain header options No The rule will be applied only to packets that do not contain header options Ignore Default The rule will be applied to packets whether or not they contain header options assuming that they match the other criteria Packet Size Specifies that the IP Filter rule will take affect only on...

Page 52: ... is not a DNS server it forwards domain name lookup requests that it receives from LAN computers to a DNS server at the ISP It then relays the DNS server s response to the PC When performing DNS relay the device must maintain the IP addresses of the DNS servers it contacts It can learn these addresses in either or both of the following ways Learned through PPP If the device uses a PPP connection t...

Page 53: ...ing a PPP connection or if you want to specify DNS addresses in addition to those learned through PPP configure the DNS addresses on the Router as follows a Click the Services tab and then click DNS in the task bar The DNS Configuration page displays b Type the IP address of the DNS server in an empty row and click the Add button You can enter only two addresses c Click the Enable radio button and...

Page 54: ...s to be sent to multiple hosts on the Internet and is often used for handling e mail mailing lists and teleconferencing videoconferencing RARP Reverse Address Resolution Protocol This IP protocol provides a way for computers to determine their own IP addresses when they only know their hardware address i e MAC addresses Certain types of computers such as diskless workstations must use RARP to dete...

Page 55: ...nent memory Changing the Manager Password The first time you log into the Web Configuration Manager use the default user ID and password admin and admin The system allows only one user ID and password Only the password can be changed Access the User Configuration menu in the Admin folder Figure 28 Change User Password To change user name and password used for management privileges log into the Con...

Page 56: ...u to commit changes to permanent storage After you have submitted all the configuration changes you want to make for this session click on the Commit Reboot button in the Admin folder to view the Commit Reboot page Figure 29 Commit and Reboot To save current configuration settings as they have been submitted click Disregard the selection in the Reboot Mode drop down list it does not affect the com...

Page 57: ...m settings Image Upgrade Use the Image Upgrade menu to update firmware from a file on your system Figure 30 Image Firmware Upgrade Upgrade File Type in the full path and file name of the firmware file to be uploaded Alternatively you may click the Browse button to search for the file on your system When the filenames have been entered click the Upload button to commence loading the firmware file I...

Page 58: ...ow Select the Virtual Circuit and click the Submit button A message will appear informing you if the loop test succeeded or failed The diagnostics utility will run a series of test to check whether the device s connections are up and working This takes only a few seconds The program reports whether the test passed or failed A test may be skipped if the program determines that no suitable interface...

Page 59: ...ems in the functioning of the system To display the Alarm page log into the Configuration Manager click the Alarm button in the Admin folder Figure 32 Alarm Trap Information Page Listed under Alarm Trap Information are the time and date of each recorded alarm event the type of alarm and a brief statement indicating its cause To remove all entries from the list click the Clear button New entries wi...

Page 60: ...eam up to 1 5 Mbps Upstream up to 512 Kbps MEDIA INTERFACE EXCHANGE RJ 11 port ADSL telephone line connection RJ 45 port for 10 100 BASE T Ethernet connection Physical and Environmental DC inputs Power Adapter 120 VAC to 230 VAC 60Hz 24W 9 V AC 1A Power Consumption 9 Watts Max Operating Temperature 5 to 40 C 41 to 104 F Humidity 5 to 95 non condensing Dimensions 142 mm x 105 mm x 30 mm Weight 300 ...

Page 61: ...t your telephone line into two separate lines one for regular telephone service and the other for ADSL then you do not need to use any type of filter device Follow the instructions given to you by your ADSL service provider ISP or telephone company about where and how you should connect the Router to the ADSL line In Line Filters Two common styles of low pass filters are shown in this section the ...

Page 62: ...plitter has three RJ 11 ports used to connect to the wall jack the Router and if desired a telephone or telephone device The connection ports are typically labeled as follows Line This port connects to the wall jack ADSL This port connects to the Router Phone This port connects to a telephone or other telephone device The diagram below illustrates the proper use of the split line style filter Figu...

Page 63: ...L 20 2 635 6176 FAX 20 2 635 6192 URL www dlink me com E MAIL support dlink me com fateen dlink me com Finland D Link Finland Thlli ja Pakkahuone Katajanokanlaituri 5 FIN 00160 Helsinki TEL 358 9 622 91660 FAX 358 9 622 91661 URL www dlink fi com France D Link France Le Florilege 2 Allee de la Fresnerie 78330 Fontenay le Fleury France TEL 33 1 3023 8688 FAX 33 1 3023 8689 URL www dlink france fr E...

Page 64: ...ink Sweden P O Box 15036 S 167 15 Bromma Sweden TEL 46 0 8 564 61900 FAX 46 0 8 564 61901 E MAIL info dlink se URL www dlink se Taiwan D Link Taiwan 2F No 119 Pao Chung Rd Hsin Tien Taipei Taiwan TEL 886 2 2910 2626 FAX 886 2 2910 1515 URL www dlinktw com tw E MAIL dssqa tsc dlinktw com tw Turkey D Link Middle East Deniz Bilgisayar Buyukdere Cad Naci Kasim Sk No 5 Mecidiyekoy Istanbul Turkey TEL 9...

Page 65: ...999 1000 or more 3 What network protocol s does your organization use XNS IPX TCP IP DECnet Others_______________________________________________________ 4 What network operating system s does your organization use D Link LANsmart Novell NetWare NetWare Lite SCO Unix Xenix PC NFS 3Com 3 Open Banyan Vines DECnet Pathwork Windows NT Windows NTAS Windows 95 Others_____________________________________...

Page 66: ......

Reviews: