background image

3

Install the Router

When all the equipment and information has been assembled, you may proceed to install the Router. Follow these steps:

Step 1

Connect the Router

It will be convenient to place the Router near the PC used for initial configuration of the Router. Select a
location that allows access to the connections on the rear panel. You should be able to see the LED indicators on
the front panel. When selecting the location for the Router, allow room to access the connections on the rear
panel. Also allow some ventilation space above the Router.

Router Cable Connections

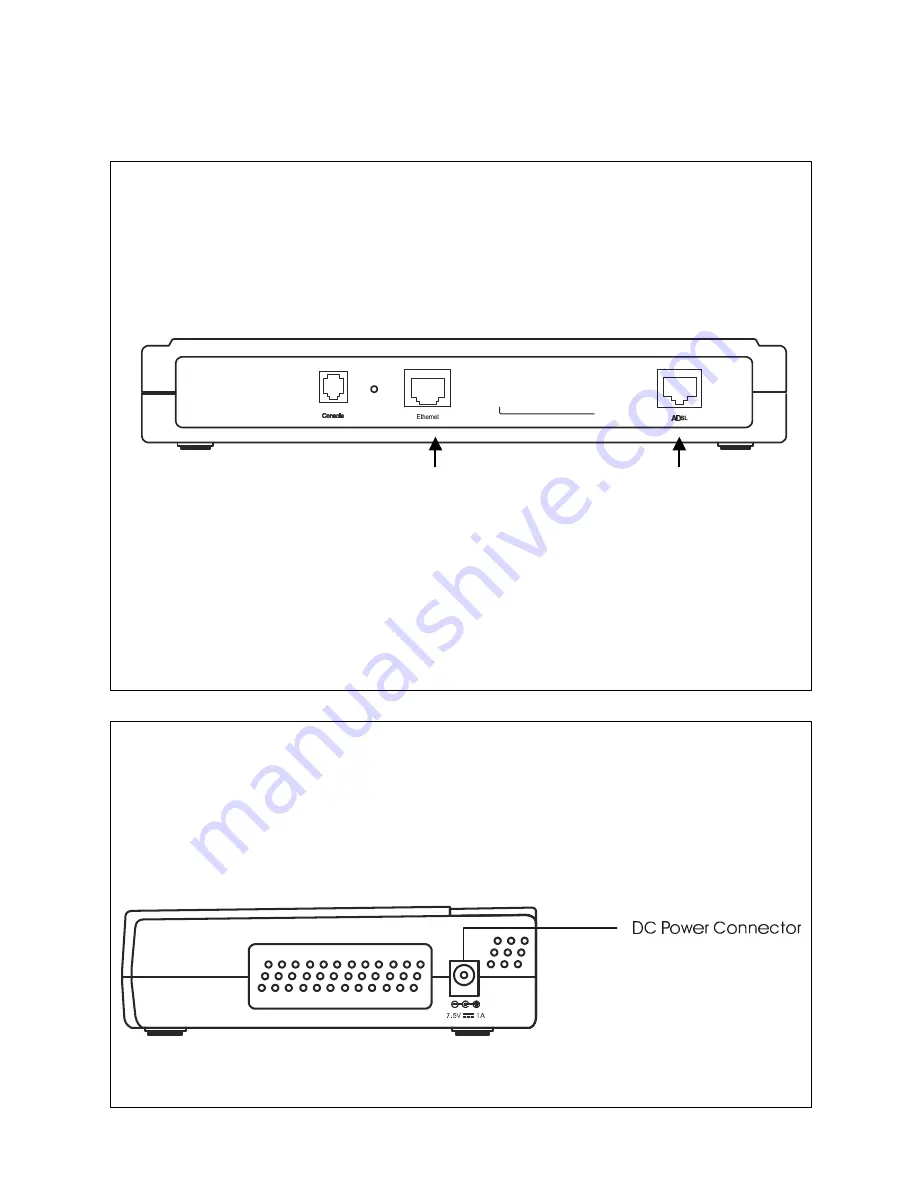
All communication cables connect to the Router on the back of the device as illustrated in the diagram above.

Connection Procedure

If the Manager PC is connected to an existing LAN, disconnect it now. Connect the Router to the Ethernet NIC
card of the Manager PC to the Ethernet port (RJ-45). Use Category 5 or better straight-through Ethernet cable. A
valid connection will be indicated by the Ethernet Link LED indicator corresponding to the connected port.

Connect the ADSL port to the ADSL telephone outlet (RJ-11) using the ADSL telephone cable included with the
device.

Step 2

Power On Router

To power on the device:

1.


Insert the AC Power Adapter cord into the power receptacle located on the right side panel of the Router and plug
the adapter into a nearby power source.

2.


You should see the Power LED indicator light up and remain lit.

Right Side Panel

Connect to PC

Connect ADSL

Summary of Contents for DSL-500

Page 1: ...DSL 500 ADSL Router Quickstart Guide Installation and setup for a single computer For LAN installation see the User s Guide 6DSL500Q 03...

Page 2: ......

Page 3: ...ive devices that connect to the ADSL device and or telephone using standard telephone cable Ask your service provider for more information about the use of low pass filters with your installation Requ...

Page 4: ...Internet require a unique global IP address For bridged connections the global IP settings must reside in a TCP IP enabled device on the LAN side of the bridge such as a PC server or firewall hardwar...

Page 5: ...he back of the device as illustrated in the diagram above Connection Procedure If the Manager PC is connected to an existing LAN disconnect it now Connect the Router to the Ethernet NIC card of the Ma...

Page 6: ...will act as a DHCP server by default In order to simplify this procedure it is advisable use the DHCP server function The Manager PC must be configured to obtain an IP address from the Router The fol...

Page 7: ...continued 3 Under the Configuration tab select the TCP IP component and click Properties 4 Choose the Obtain an IP address automatically option and click OK 5 Restart the PC to let the new setting tak...

Page 8: ...http 192 168 0 1 In the page that opens click on the Login to web based management module button in the center A new window will appear and you will be prompted for a user name and password to access...

Page 9: ...restarted In the Bridge Router Configuration window follow these steps to establish the WAN connection using PPPoA 1 Under PPPoA Login enter the Login User Name used for your network account The user...

Page 10: ...Profile menu this is described in its own section in Chapter 5 To change the connection profile using the Bridge Router Configuration menu follow these steps 1 In the Bridge Router Configuration wind...

Page 11: ...set to the default value 0 Click on the OK button on the bottom of the window The Save changes and reboot system message prompt appears 7 Click OK to save a restart The Router will connect to the WAN...

Reviews: