background image

13

D-Link DIR-619L User Manual

Section 3 - Configuration

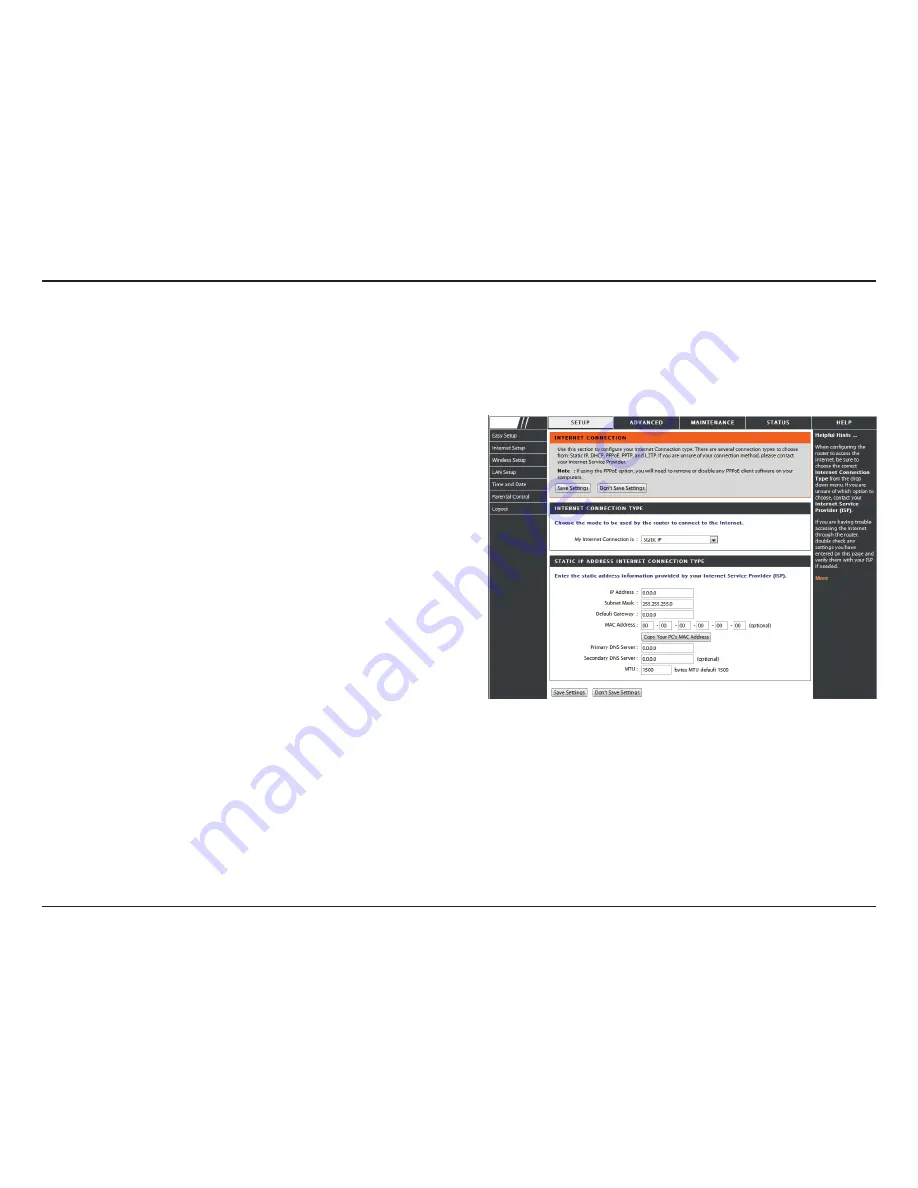
Enter the IP address assigned by your ISP.

Enter the Subnet Mask assigned by your ISP.

Enter the Gateway assigned by your ISP.

The default MAC Address is set to the WAN’s physical interface 

MAC address on the Broadband Router. It is not recommended 

that you change the default MAC address unless required by 

your ISP.

The default MAC address is set to the WAN’s physical interface 

MAC address on the Broadband Router. You can use the 

Clone 

MAC Address

 button to copy the MAC address of the Ethernet 

Card installed by your ISP and replace the WAN MAC address 

with the MAC address of the router. It is not recommended that 

you change the default MAC address unless required by your ISP.

Enter the Primary DNS server IP address assigned by your ISP.

This is optional.

Maximum Transmission Unit - you may need to change the 

MTU for optimal performance with your specific ISP. 

1492

 is 

the default MTU.

IP Address:

Subnet Mask:

ISP Gateway:

MAC Address:

Clone MAC 

Address:

Primary DNS 

Address:

Secondary DNS 

Address:

MTU:

Internet Setup

Static (assigned by ISP)

Select Static IP Address if all WAN IP information is provided to you by your ISP. You will need to enter in the IP address, subnet mask, gateway 

address, and DNS address(es) provided to you by your ISP. Each IP address entered in the fields must be in the appropriate IP form, which are four 

octets separated by a dot (x.x.x.x). The Router will not accept the IP address if it is not in this format.

DIR-619L

Summary of Contents for DIR-619L

Page 1: ...User Manual Wireless N 300 Cloud Router Version 1 00 08 28 2012 ...

Page 2: ...ks of D Link Corporation or its subsidiaries in the United States or other countries All other company or product names mentioned herein are trademarks or registered trademarks of their respective companies Copyright 2012 by D Link Systems Inc All rights reserved This publication may not be reproduced in whole or in part without prior expressed written permission from D Link Systems Inc Revision D...

Page 3: ...on Utility 8 Internet Setup 13 Static assigned by ISP 13 Dynamic 14 PPPoE 15 PPTP 16 L2TP 17 Wireless Setup 18 LAN Setup 23 DHCP Server Settings 24 Time and Date 25 Parental Control 26 Port Forwarding 27 Application Rules 28 Access Control 29 Traffic Control 30 Firewall DMZ 31 Advanced Wireless 32 Advanced Network 33 Routing 34 Device Administration 35 Save and Restore 36 Firmware Update 37 DDNS S...

Page 4: ...n 58 WCN 2 0 in Windows Vista 58 Initial Router Configuration for Wi Fi Protection 58 Setting Up a Configured Router 59 ChangingtheComputerNameandJoiningaWorkgroup 60 Configuring the IP Address in Vista 62 Setting Up a Connection or Network Wirelessly 65 Connecting to a Secured Wireless Network WEP WPA PSK WPA2 PSK 70 Connecting to an Unsecured Wireless Network 74 Troubleshooting 78 Wireless Basic...

Page 5: ...tosh orLinux based operatingsystemswithaninstalledEthernetadapter Internet Explorer 8 or Firefox 2 0 or above for configuration Package Contents Note Using a power supply with a different voltage rating than the one included with the DIR 619L will cause damage and void the warranty for this product Note Always attach the power cord plug to the power supply before inserting the power cord and conne...

Page 6: ...e that your router is up to date with the latest features mydlink will notify you when an update is available for your router You can monitor a user s online activity with real time website browsing history maintaining a safe and secure environment especially for children at home Easy Setup Wizard Through its easy to use Web based user interface the DIR 619L lets you control what information is ac...

Page 7: ...storesthe router to its original factory default settings Receptor for the Power Adapter The Auto MDI MDIX WAN port is the connection for the Ethernet cable to the Cable or DSL modem LAN Ports Connect Ethernet devices such as computers switches and hubs Hardware Overview Connections ...

Page 8: ...during data transmission WLAN LED A solid light indicates that the wireless segment is ready This LED blinks during wireless data transmission Local Network LEDs A solid light indicates a connection to an Ethernet enabled computer on ports 1 4 This LED blinks during data transmission Power LED A solid light indicates a proper connection to the power supply ...

Page 9: ... to your modem Also you can only use the Ethernet port on your modem If you were using the USB connection before using the router then you must turn off your modem disconnect the USB cable and connect an Ethernet cable to the WAN port on the router and then turn the modem back on In some cases you may need to call your ISP to change connection types USB to Ethernet IfyouhaveDSLandareconnectingviaP...

Page 10: ...ices A wall that is 1 5 feet thick 5 meters at a 45 degree angle appears to be almost 3 feet 1 meter thick At a 2 degree angle it looks over 42 feet 14 meters thick Position devices so that the signal will travel straight through a wall or ceiling instead of at an angle for better reception 3 Building Materials make a difference A solid metal door or aluminum studs may have a negative effect on ra...

Page 11: ...he router 4 Plug an Ethernet cable into one of the four LAN ports on the router Plug the other end into the Ethernet port on your computer 5 Turn on or plug in your modem Wait for the modem to boot about 30 seconds 6 Plug the power adapter to the router and connect to an outlet or power strip Wait about 30 seconds for the router to boot 7 Turn on your computer 8 Verify the link lights on the route...

Page 12: ...l show you how to configure your new D Link wireless router using the web based configuration utility Web based Configuration Utility To access the configuration utility open a web browser such as Internet Explorer and enter the IP address of the router 192 168 0 1 or http dlinkrouter ...

Page 13: ...ou selected PPPoE enter your PPPoE username and password Click Next to continue Select Static if your ISP assigned you the IP address subnet mask gateway and DNS server addresses Note Make sure to remove your PPPoE software from your computer The software is no longer needed and will not work through a router If you selected PPTP enter your PPTP username and password Click Next to continue ...

Page 14: ...ou selected L2TP enter your L2TP username and password Click Next to continue If you selected Static enter your network settings supplied by your Internet provider Click Next to continue Inthepageof CURRENTNETWORKSETTING youwillseetheINTERNETstatus is connected ...

Page 15: ...k account and complete the registration form Click Register Now you can see the hint that a verification e mail has been sent out Open a new browser to login your e mail account for receiving the verification mail Once the account verification phase is complete click configure In the section mydlink account and login mydlink account Click Login ...

Page 16: ...k DIR 619L User Manual Section 3 Configuration Now the router has successfully connected to mydlink service You can download the App mydlink lite from android market or apple store to start enjoy mydink service ...

Page 17: ...uter It is not recommended that youchangethedefaultMACaddressunlessrequiredbyyourISP Enter the Primary DNS server IP address assigned by your ISP This is optional Maximum Transmission Unit you may need to change the MTU for optimal performance with your specific ISP 1492 is the default MTU IP Address Subnet Mask ISP Gateway MAC Address Clone MAC Address Primary DNS Address Secondary DNS Address MT...

Page 18: ... to the WAN s physical interface MAC address on the Broadband Router You can use the Clone MAC Address button to copy the MAC address of the Ethernet Card installed by your ISP and replace the WAN MAC address with the MAC address of the router It is not recommended that youchangethedefaultMACaddressunlessrequiredbyyourISP EntertheDNS DomainNameServer serverIPaddressassigned by your ISP Dynamic IP ...

Page 19: ...ned during inactivity To disable this feature enable Auto reconnect Maximum Transmission Unit You may need to change the MTU for optimal performance with your specific ISP 1492 is the default MTU Select either Always on Manual or Connect on demand PPPoE User Name Password Service Name IP Address DNS Addresses Maximum Idle Time MTU Connection Mode Select Internet Setup PPPoE Choose PPPoE Point to P...

Page 20: ...l Enter your PPTP account name Enter your PPTP password and then retype the password in the next box EnteramaximumidletimeduringwhichtheInternetconnection is maintained during inactivity To disable this feature enable Auto reconnect MaximumTransmissionUnit YoumayneedtochangetheMTU for optimal performance Select either Always on Manual or Connect on demand PPTP IP Address Subnet Mask Gateway DNS In...

Page 21: ...your L2TP account name Enter your L2TP password and then retype the password in the next box EnteramaximumidletimeduringwhichtheInternetconnection is maintained during inactivity To disable this feature enable Auto reconnect MaximumTransmissionUnit YoumayneedtochangetheMTU for optimal performance with your specific ISP Select either Always on Manual or Connect on demand L2TP IP Address Subnet Mask...

Page 22: ...figure thewirelesssettingsmanually clicktheManualWireless Connection Setup button The parameters for this window are described later in this section TheWireless Security section that directly follows this Configuration section provides additional explanation for how to configure theWEP WPA WPA2 andWPA WPA2 wireless security mode options Click Next to continue EnteraWirelessNetworkNameinthetextbox ...

Page 23: ...nclick Nexttocontinue This window displays a summary of your wireless security settings Please print thisoutorrecordthisinformationinasafeplaceandthenclick Savetocontinue The Router will save your new settings and reboot When it is finished after 1 2 minutes the opening Wireless Setup window is displayed ...

Page 24: ...g for an existing wireless network or to customize the wireless network The AutoChannelSelection setting can be selected to allow the DIR 619L to choose the channel with the least amount of interference Wi Fi Protected Setup Enable Wireless Channel Wireless Network Name Transmission Rate WMM Enable Enable Wireless Enable Hidden Wireless DIR 619L Use the drop down menu to select the appropriate Tra...

Page 25: ...nter this keyexactlyonallyourwirelessdevices Youmayenter up to four different keys either usingHex or ASCII Hex isrecommended lettersA Fandnumbers0 9arevalid In ASCII all numbers and letters are valid 5 Click Save Settings to save your settings If you are configuring the Router with a wireless adapter you will lose connectivity until you enable WEP on your adapter and enter the same WEP key as you...

Page 26: ...to Network Key enter a passphrase The key is an alpha numeric password between 8 and 63 characters long The password can include symbols _ and spaces Make sure you enter this key exactly the same on all other wireless clients 5 Click Save Settings to save your settings If you are configuring the router with a wireless adapter you will lose connectivity until you enable WPA WPA2 or WPA WPA2 whichev...

Page 27: ...ss once you click Apply you will need to enter the new IP address in your browser to get back into the configuration utility Enter the Subnet Mask The default subnet mask is 255 255 255 0 Enter the Domain name Optional ChecktheboxtotransfertheDNSserverinformation fromyourISPtoyourcomputers Ifunchecked your computers will use the router for a DNS server Router IP Address Default Subnet Mask Local D...

Page 28: ...ands for Dynamic Host Control Protocol The DIR 619L has a built in DHCP server The DHCP Server willautomaticallyassignanIPaddresstothecomputers on the LAN private network Be sure to set your computers to be DHCP clients by setting their TCP IP settings to Obtain an IP Address Automatically When youturnyourcomputerson theywillautomaticallyload the proper TCP IP settings provided by the DIR 619L The...

Page 29: ...your computer s time settings to copy your PC s time settings Tick the Automatically synchronize with D Link s Internet time server checkbox and then use the drop down menu to select an NTP Server NTP is shortforNetworkTimeProtocol NTPsynchronizes computer clock times in a network of computers To manually input the time enter the values in these fields for theYear Month Day Hour Minute and Second ...

Page 30: ...e sites orTurn Parental Control ON and DENY computers access to ONLY these sites Enter the keywords or URLs that you want to block or allow Any URL with the keyword in it will be blocked The schedule of time when the parental control filter will be enabled The schedule may be set to Always which will allow the particular service to always be enabled You can create your own times in the Maintenance...

Page 31: ...x to enabled the rule Enter a name for the rule Enter the IP address of the computer on your local network that you want to allow the incoming service to Enter the port or ports that you want to open If you want to open one port enter the same port in both boxes Select TCP UDP or Any Rule Name IP Address Start Port End Port Traffic Type DIR 619L ...

Page 32: ...cations makes some of these applications work with the DIR 619L Check the box to enable the rule Enter a name for the rule This is the port used to trigger the application It can be either a single port or a range of ports This is the port number on the WAN side that will be used to access the application You may define a single port or a range of ports You can use a comma to add multiple ports or...

Page 33: ...own menu and click the arrow to copy that MAC Address The schedule of time when the network filter will be enabled The schedule may be set to Always which will allow the particular service to always be enabled You can create your own times in the Maintenance Schedules section Configure MAC Filter MAC Address DHCP Client List Schedule Use MAC Media Access Control Filters to allow or deny LAN Local ...

Page 34: ...to control the access bandwidth of computer in LAN Select this function to control the access bandwidth of computer in LAN All the computers in LAN will be distributed the bandwidth equally Key in the value to setup the bandwidth manually When the option Automatic Distribute Bandwidth is unchecked you can control the access bandwidth of the specific IP address Enable Traffic Control Automatic Dist...

Page 35: ...ty of security risks so only use this option as a last resort Check this to enable SPI Check this box to enable DMZ Enter the IP address of the computer you would like to open all ports to Choose a name for the firewall rule Select to Allow or Deny transport of the data packets according to the criteria defined in the rule The Source Destination is theTCP UDP port on either the LAN or WAN side Cli...

Page 36: ...vior of the 802 11g wireless radio from the standard settings Please be aware that any changes to the factory default settings may adversely affect the behavior of your network DIR 619L CTS ClearToSend isafunctionusedtominimizecollisionsamongwirelessdevicesonawirelesslocalareanetwork LAN CTSwillmakesurethewirelessnetwork isclearbeforeawirelessclientattemptstosendwirelessdata EnablingCTSwilladdover...

Page 37: ...g may provide some extra security from hackers Tick this checkbox to allow the WAN port to be Pinged You may set the port speed of the WAN port to 10Mbps 100Mbps or 10 100Mbps Auto Some older cableorDSLmodemsmayrequireyoutosettheport speed to 10Mbps Enable UPnP Enable WAN Ping Respond WAN Port Speed Advanced Network This window allows you to change the LAN settings Please be aware that any changes...

Page 38: ...hysical Port Interface the IP packet must use to transit out of the Router The IP address of the packets that will take this route The subnet of the IP address of the packets that will take this route Specifiesthenexthoptobetakenifthisrouteisused Enable Interface Destination Subnet Mask Gateway Routing This option allows you to define fixed routes to defined destinations DIR 619L ...

Page 39: ... enables you to perform Administrator tasks from the remote Internet host The Internet IP address of the computer that has access to the Broadband Router If you input an asterisk into this field then any computer will be able to access the Router Putting an asterisk into this field would present a security risk and is not recommended The port number used to access the DIR 619L For example http x x...

Page 40: ... to transfer those settings to the Router This option will restore all configuration settings back tothesettingsthatwereineffectatthetimetherouter was shipped from the factory Any settings that have not been saved will be lost including any rules that youhavecreated Ifyouwanttosavethecurrentrouter configuration settings use the Save button above ClicktheRebootsbuttonontheleftsideofthewindow to res...

Page 41: ...indow to locate the firmware update on your hard drive Click Save Settings to complete the firmware upgrade Firmware Upgrade Browse You can upgrade the firmware of the Router here Make sure the firmware you want to use is on the local hard drive of the computer ClickonBrowsetolocatethefirmwarefiletobeusedfortheupdate PleasechecktheD Linksupportsiteforfirmware updates at http support dlink com You ...

Page 42: ... DDNS Dynamic Domain Name Service The Dynamic DNS service allows a dynamic public IP address to be associated with a static host name in any of the many domains allowing access to a specified host from various locations on the Internet This is enabled to allow remote access to a host by clicking a hyperlinked URL in the form hostname dyndns org Many ISPs assign public IP addresses using DHCP this ...

Page 43: ...d impedance mismatch This feature significantly reduces service calls and returns by allowing users to easily troubleshoot their cable connections The Ping Test is used to send Ping packets to test if a computer is on the Internet Enter the IP Address that you wish to Ping and click Ping Virtual Cable Tester VCT Info Ping Test This tool is used to verify the physical connectivity on both the LAN a...

Page 44: ... new schedule rule applies to the full 24 hour period If the new schedule rule does not apply to the full 24 hour period untick the previous checkbox and then enter a specific beginning and ending time Name Day s All Day 24 hrs Start Time End Time TheRouterallowstheusertheabilitytomanageschedulerulesforvariousfirewallandparentalcontrolfeaturesonthiswindow Once you have finished configuring the new...

Page 45: ...on requested System Firewall Security Router Status Critical Warning and Information Enter the your SNTP server name or IP address and enter your mail address before sending your system log by mail Save Log File Syslog Server Log Type Level Send by Mail The system log displays chronological event log data specified by the router user You may also save a simple text file containing the log to your ...

Page 46: ...nnect from your ISP and use DHCP Renew to connect to your ISP If your WAN connection is set up for PPPoE a Connect button and a Disconnect button will be displayed Use Disconnect to drop the PPPoE connection and use Connect to establish the PPPoE connection Displays the MAC address and the private local IP settings for the router Displays the MAC address and the public IP settings for the router D...

Page 47: ... View the first page of the log View the last page of the log View the previous page View the next page Clear the log Click this button to go directly to the Log Settings window Maintenance Log Settings ThiswindowallowsyoutoviewalogofactivitiesontheRouter Thisisespeciallyhelpfuldetectingunauthorizednetworkusage DIR 619L ...

Page 48: ... theTraffic Statistics Here you can view the amount of packets that pass through the DIR 619L on both the WAN and the LAN ports The traffic counter will reset if the device is rebooted The NAPT Active Session table displays a list of all active conversations between WAN computers and LAN computers DIR 619L DIR 619L ...

Page 49: ...r Manual Section 3 Configuration Wireless The wireless client table displays a list of current connected wireless clients This table also displays the connection time and MAC address of the connected wireless client DIR 619L ...

Page 50: ...46 D Link DIR 619L User Manual Section 3 Configuration Help Click the desired hyperlink to get more information about how to use the Router DIR 619L ...

Page 51: ...reless network so that it is protected as it is transmitted from one wireless device to another To gain access to a WEP network you must know the key The key is a string of characters that you create When using WEP you must determine the level of encryption The type of encryption determines the key length 128 bit encryption requires a longer key than 64 bit encryption Keys are defined by entering ...

Page 52: ...ic 3 Next to Authentication select either SharedKeyorOpen SharedKey isrecommendedasitprovidesgreatersecuritywhenWEPisenabled 4 Select either 64Bit or 128Bit encryption from the drop down menu next to WEP Encryption 5 Next to Default KeyType select WEPKey1and enter aWEP key that you create Make sure you enter this key exactly on all your wireless devices You may enter up to four different keys eith...

Page 53: ...uthentication protocol EAP WEP regulates access to a wireless network based on a computer s hardware specific MAC address which is relatively simple to be sniffed out and stolen EAP is built on a more secure public key encryption system to ensure that only authorized network users can access the network WPA PSK WPA2 PSK uses a passphrase or key to authenticate your wireless connection The key is a...

Page 54: ...t side 2 Next to Security Mode select Enable WPA Only Wireless Security enhanced or Enable WPA2 Only Wireless Security enhanced 3 Next to Cipher Mode select TKIP AES or Both 4 Next to PSK EAP select PSK 5 Next to Network Key enter a key passphrase The key is an alpha numeric password between 8 and 63 characters long The password can include symbols _ and spaces Make sure you enter this key exactly...

Page 55: ...reless Setup on the left side 2 Next to Security Mode select Enable WPA WPA2 Wireless Security enhanced 3 Next to Cipher Mode select TKIP AES or Both 4 Next to PSK EAP select PSK 5 Next to Network Key enter a key passphrase The key is an alpha numeric password between 8 and 63 characters long The password can include symbols _ and spaces Make sure you enter this key exactly the same on all other w...

Page 56: ...of the router 192 168 0 1 Click on Wireless Settings on the left side 2 Next to Security Mode select Enable WPA Only Wireless Security enhanced Enable WPA2 Only Wireless Security enhanced or Enable WPA WPA2 Wireless Security enhanced 3 Next to Cipher Type select TKIP AES or Auto 4 Next to PSK EAP select EAP 5 Next to RADIUS Server 1 enter the IP Address of your RADIUS server 6 Next to Port enter t...

Page 57: ...e a site survey option similar to the Windows XP utility as seen below Right click on the wireless computer icon in your system tray lower right corner next to the time Select View Available Wireless Networks If you receive the Wireless Networks Detected bubble click on the center of the bubble to access the utility or The utility will display any available wireless networks in your area Click on ...

Page 58: ...iguring your wireless adapter If you are joining an existing network you will need to know the WEP key being used 2 Highlight the wireless network SSID you would like to connect to and click Connect 1 Open the Windows XP Wireless Utility by right clicking on the wireless computer icon in your system tray lower right corner of screen Select View AvailableWireless Networks ...

Page 59: ...etwork Connection box will appear Enter the sameWEP key that is on your router and click Connect It may take 20 30 seconds to connect to the wireless network If the connection fails please verify that the WEP settings are correct The WEP key must be exactly the same as on the wireless router ...

Page 60: ...nfiguring your wireless adapter If you are joining an existing network you will need to know the WEP key being used 2 Highlight the wireless network SSID you would like to connect to and click Connect 1 Open the Windows XP Wireless Utility by right clicking on the wireless computer icon in your system tray lower right corner of screen Select View AvailableWireless Networks ...

Page 61: ...etwork Connection box will appear Enter the WPA PSK passphrase and click Connect It may take 20 30 seconds to connect to the wireless network If the connection fails please verify that the WPA PSK settings are correct The WPA PSK passphrase must be exactly the same as on the wireless router ...

Page 62: ...To enjoy the benefits of Wi Fi protection the Router must be both enabled and configured There are three basic methods to accomplish this use Windows Vista s built in support for WCN 2 0 use software provided by a third party or use the traditional Ethernet approach If you are running Windows Vista tick the Enable checkbox on the Wireless Network window Use the Current PIN that is displayed on the...

Page 63: ...method is ideal if there is no access to a GUI If you are using the Router sWi Fi Security push button option simultaneously depress the push button located on the side of the Router and the button on the client or virtual button on the client s GUI Next click Finish The Client s software will then allow a newcomer to join your secure Wi Fi protected network If you are using third party software r...

Page 64: ... the Computer Name and Joining a Workgroup Changing the Computer Name and Joining a Workgroup The following are step by step directions to change the computer name and join a workgroup 2 Click on the Advanced system settings link 1 Click on Properties ...

Page 65: ...omputer Name tab in the System Properties window and enter a description of your computer in the textbox When you are finished click the Change button 4 Go to the Computer Name Domain Changes window and click the radio button next to the Workgroup you want to join When you are finished click the OK button ...

Page 66: ...in Vista The following are step by step directions to configure the IP address in Windows Vista 2 Go to the Network and Internet window and click the appropriate Local Area Connection icon 1 Click on Properties 3 Right click the Local Area Connection icon and then select Properties from the drop down menu ...

Page 67: ...rking tab in the Local Area Connection Properties window 5 Click the Use the following IP address option in the General tab in the Local Area Connections Properties window and enter the desired IP address in the space offered Then click the Use the following DNS server addresses option on the same tab and enter the desired DNS server information ...

Page 68: ... 6 Right click the Local Area Connection icon and then select Status from the drop down menu 7 Go to the Local Area Connection Status window and click the Details button 8 Confirm your new settings on theNetworkConnectionStatuswindow When you are finished click the Done button ...

Page 69: ...llowing are step by step directions to set up a wireless connection 2 Go to the Set up a connection or network window and choose the Set up a wirelessrouteroraccesspointSetupanewwirelessnetworkforyourhome or business option Click the Next button 1 Click on Set up a connection or network in the Network and Sharing Center section ...

Page 70: ...ection Wirelessly 3 Click the Next button on the Set up a wireless router or access point window 4 The following window displays the system progress 5 This window confirms that you want to create wireless network settings that are savable to a USB flash drive ...

Page 71: ...nt wizard Click the Next button 7 Enter a passphrase on the Help make your network more secure with a passphrase window in the Set up a wireless router or access point wizard Click the Show advanced network security options link 8 Select security method on the Choose advanced network security options window in the Set up a wireless router or access point wizard Click the Next button ...

Page 72: ...he Next button 10 Select the desired file and printer sharing option on the Choose file and printer sharing options window in the Set up a wireless router or access point wizard Click the Next button 11 Once you have saved your network settings to USB use the pull down menu on the Insert the USB flash drive into this computer window in theSetupawirelessrouteroraccesspointwizardtoselectadestination...

Page 73: ...e Copying settings to the USB drive window in the Set up a wireless router or access point wizard opens to indicate the system progress 13 Once you are finished the To add a device or computer follow these instructions window in the Set up a wireless router or access point wizard opens When you are finished click the Close button ...

Page 74: ...ss Network WEP WPA PSK WPA2 PSK Connecting to a Secured Wireless Network WEP WPA PSK WPA2 PSK The following are step by step directions to set up a wireless connection 2 Click the Manage network connections link in the Network and Sharing Center window 1 Click on Properties ...

Page 75: ...a network to connect to in the Select a network to connect to window in the Connecttoanetwork wizard and then click the Connect button 5 ThefollowingConnecttoanetworkwizardwindowdisplaysthesystem progress 3 Right click the Wireless Network Connection entry and then select Connect Disconnect from the drop down menu ...

Page 76: ...henetwork and or start the new connection automatically When you are finished click the Close button 8 The successful connection is displayed at the bottom of the Windows start up menu 6 Enter the network security key or passphrase for the Router in the textbox provided in the Type the network security key or passphrase for dlink300 window in the Connect a network wizard When you are finished clic...

Page 77: ...nual Section 10 Connecting to a Secured Wireless Network WEP WPA PSK WPA2 PSK 10 TotestthenewIPaddress usethePingfeatureofthecommandprompt 9 Confirmyournewsettingsbycallingupthecommandpromptand then entering the ipconfig command ...

Page 78: ...cured Wireless Network Connecting to an Unsecured Wireless Network The following are step by step directions to set up an unsecured wireless connection 2 Go to the Network and Sharing Center window and click the Manage Network Connections link 1 Click on Properties ...

Page 79: ...ss Network Connection entry and then select Connect Disconnect from the drop down menu 4 Select a network to connect to in the Select a network to connect to windowintheConnecttoanetworkwizardandthenclicktheConnect button 5 Confirm your desire to connect anyway on the following Network Connection Status window ...

Page 80: ...dowdisplaysthesystem progress 7 The following Successfully connected to dlink300 window in the Connecttoanetworkwizardisdisplayed Choosetosavetothenetwork and or start the new connection automatically When you are finished click the Close button 8 The successful connection is displayed at the bottom of the Windows start up menu ...

Page 81: ...al Section 11 Connecting to an Unsecured Wireless Network 9 Confirm your new settings by calling up the command prompt and then entering the ipconfig command 10 To test the new IP address use the Ping feature of the command prompt ...

Page 82: ... must be on the same IP subnet to connect to the web based utility Make sure you have an updated Java enabled web browser We recommend the following Internet Explorer 6 0 or higher Netscape 8 or higher Mozilla 1 7 12 5 0 or higher Opera 8 5 or higher Safari 1 2 or higher with Java 1 3 1 or higher Camino 0 8 4 or higher Firefox 1 5 or higher Verify physical connectivity by checking for solid link l...

Page 83: ...This should open the login page for your the web management If you still cannot access the configuration unplug the power to the router for 10 seconds and plug back in Wait about 30 seconds and try accessing the configuration If you have multiple computers try connecting using a different computer 2 What can I do if I forgot my password If you forgot your password you must reset your router Unfort...

Page 84: ... increments of ten Ex 1492 1482 1472 etc Note AOL DSL users must use MTU of 1400 To find the proper MTU Size you ll have to do a special ping of the destination you re trying to go to A destination could be another computer or a URL Click on Start and then click Run Windows 95 98 and Me users type in command Windows NT 2000 and XP users type in cmd and press Enter or click OK Once the window opens...

Page 85: ...80 Once you find your MTU you can now configure your router with the proper MTU size To change the MTU rate on your router follow the steps below Open your browser enter the IP address of your router 192 168 0 1 and click OK Enter your username admin and password blank by default Click OK to enter the web configuration page for the device Click on Setup and then click Manual Configure To change th...

Page 86: ...elessLANsareusedincreasinglyinbothhomeandofficeenvironments andpublicareassuchasairports coffeeshops and universities Innovative ways to utilize WLAN technology are helping people to work and communicate more efficiently Increased mobility and the absence of cabling and other fixed infrastructure have proven to be beneficial for many users Wireless users can use the same applications they use on a...

Page 87: ...ata from one point A to point B But wireless technology has restrictions as to how you can access the network You must be within the wireless network range area to be able to connect your computer There are two different types of wireless networks Wireless Local Area Network WLAN and Wireless Personal Area Network WPAN Wireless Local Area Network WLAN In a wireless local area network a device call...

Page 88: ...ones laptops speakers and other devices that operate on batteries Who uses wireless Wireless technology has become so popular in recent years that almost everyone is using it whether it s for home office business D Link has a wireless solution for it Home Gives everyone at home broadband access Surf the web check email instant message and etc Gets rid of the cables around the house Simple and easy...

Page 89: ...eps and tips to help you through the process of setting up a wireless network Tips Here are a few things to keep in mind when you install a wireless network Centralize your router or Access Point Make sure you place the router access point in a centralized location within your network for the best performance Try to place the router access point as high as possible in the room so the signal gets d...

Page 90: ...ter Refer to product manual for detail information on how to set it up There are basically two modes of networking Infrastructure All wireless clients will connect to an access point or wireless router Ad Hoc Directly connecting to another computer for peer to peer communication using wireless network adapters on each computer such as two or more WNA 2330 wireless network Cardbus adapters An Infra...

Page 91: ...art Run In the run box type cmd and click OK At the prompt type ipconfig and press Enter This will display the IP address subnet mask and the default gateway of your adapter Iftheaddressis0 0 0 0 checkyouradapterinstallation security settings and the settings on your router Some firewall software programs may block a DHCP request on newly installed adapters If you are connecting to a wireless netw...

Page 92: ...Step 3 Highlight Internet Protocol TCP IP and click Properties Step 4 Click Use the following IP address and enter an IP address that is on the same subnet as your network or the LAN IP address on your router Example If the router s LAN IP address is 192 168 0 1 make your IP address 192 168 0 X where X is a number between 2 and 99 Make sure that the number you choose is not in use on the network S...

Page 93: ... with OFDM 802 11 n 16QAM 64QAM BPSK QPSK with OFDM VPN Pass Through Multi Sessions PPTP IPSec Device Management Web based Internet Explorer 8 or later Netscape Navigator v6 or later or other Java enabled browsers DHCP Server and Client Wireless Frequency Range 2 4GHz to 2 497GHz 802 11b 2 4GHz to 2 4835GHZ 802 11g and 802 11n Wireless Operating Range2 Indoors up to 328 ft 100 meters Outdoors up t...

Page 94: ...less Connection LAN 10 100 Dimensions L 135mm W 99 8mm H 31 5mm Weight 0 246kg Maximum wireless signal rate derived from IEEE Standard 802 11b 802 11g and 802 11n specifications Actual data throughput will vary Network conditions and environmental factors including volume of network traffic building materials and construction and network overhead lower actual data throughput rate Environmental fac...

Page 95: ... the receiver is connected Consult the dealer or an experienced radio TV technician for help This device complies with Part 15 of the FCC Rules Operation is subject to the following two conditions 1 This device may not cause harmful interference and 2 this device must accept any interference received including interference that may cause undesired operation FCC Caution Any changes or modifications...

Page 96: ... harmful interference to co channel mobile satellite systems ii The maximum antenna gain 2 dBi permitted for devices in the band 5725 5825 MHz to comply with the e i r p limits specified for point to point and non point to point operation as appropriate as stated in section A9 2 3 In addition users should also be cautioned to take note that high power radars are allocated as primary users meaning ...

Reviews: