background image

10/100 Auto Negotiation Switch User’s Guide

Introduction

4

Management Methods

The DES-3216 supports three management methods:


Local Console Management


Telnet Management


D-View/ SNMP Management

Local Console Management

Local Console Management is done through the RS-232 Console port. Managing the DES-
3216 in this mode requires a direct connection between a PC and the DES-3216.

Telnet Management

Telnet is done over the network. Once the DES-3216 is on the network, you can use Telnet to
log in and change the configuration.

D-View/ SNMP Management

The DES-3216 supports SNMP through D-View, D-Link’s proprietary SNMP application
and through other vendors’ SNMP applications. Please refer to the appropriate
documentation for instructions on installing and using D-View and other SNMP applications.

Updating Firmware

Firmware can be updated quickly and easily. See the section Software Update Menu,
Chapter 5, for instructions on updating firmware.

Summary of Contents for DES-3216

Page 1: ...DES 3216 10 100 Auto Negotiation Switch User s Guide Rev A1 December 1998 6DES3216 02 Printed In Taiwan RECYCLABLE ...

Page 2: ...er special circumstances you may request special procedure at the time of requesting an RMA number After an RMA number is issued the defective product must be packaged securely in the original or other suitable shipping package to ensure that it will not be damaged in transit and the RMA number must be prominently marked on the outside of the package The package must be mailed or otherwise shipped...

Page 3: ... Warranty Service The product s Registration card provided at the back of this manual must be sent to a D Link office To obtain an RMA number for warranty service as to a hardware product or to obtain warranty service as to a software product contact the D Link office nearest to you D Link Offices to Contact for Warranty Service To mail your Registration Card or to obtain an RMA number or warranty...

Page 4: ...ide reasonable protection against harmful interference when the equipment is operated in a commercial environment This equipment generates uses and can radiate radio frequency energy and if not installed and used in accordance with this user s guide may cause harmful interference to radio communications Operation of this equipment in a residential area is likely to cause harmful interference in wh...

Page 5: ...e sich am Geräten befinden sind zu beachten Wird das Gerät über einen längeren Zeitraum nicht benutzt sollten Sie es vom Stromnetz trennen Somit wird im Falle einer Überspannung eine Beschädigung vermieden Durch die Lüftungsöffnungen dürfen niemals Gegenstände oder Flüssigkeiten in das Gerät gelangen Dies könnte einen Brand bzw Elektrischen Schlag auslösen Öffnen Sie niemals das Gerät Das Gerät da...

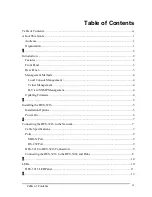
Page 6: ... Local Console Management 4 Telnet Management 4 D View SNMP Management 4 Updating Firmware 4 2 5 Installing the DES 3216 5 Installation Options 5 Power On 6 3 7 Connecting the DES 3216 to the Network 7 Cable Specifications 7 Ports 9 MDI X Port 9 RS 232 Port 9 DES 3216 to DES 3216 Connection 9 Connecting the DES 3216 to the DES 5024 and Hubs 9 4 10 LEDs 10 DES 3216 LED Panel 11 5 13 ...

Page 7: ... 19 Trunking Port Management 19 System Configuration Menu 20 System Information Menu 21 System Reset 23 Factory Reset 24 System Rate Control 26 Software Update Menu 28 User Account Management 31 User Account Change Menu 31 Create New User 31 Delete Users 33 Change Password 34 Switch Port Configuration 36 Switch Port Configuration Menu 37 Spanning Tree Configuration 39 STA Operation Levels 39 Spann...

Page 8: ...VLAN 48 Delete VLAN Menu 49 Trunking Port Management Menu 51 Create New Trunking Port 52 Delete Trunking Port 53 6 55 Troubleshooting 55 Problem Solution 55 Appendix A 57 DES 3216 Technical Specifications 57 Switch Specifications 57 Port Specifications 57 Index 61 ...

Page 9: ...configure and troubleshoot the DES 3216 is contained in the user guide Organization Chapter 1 Introduction gives a physical and functional overview of the DES 3216 The DES 3216 features LEDs and management methods are covered Chapter 2 Installing the DES 3216 covers installing and powering on the DES 3216 Chapter 3 Connecting the DES 3216 to the Network covers connecting the DES 3216 to the networ...

Page 10: ...atures Panels of the DES 3216 Management Methods Updating Firmware Features The DES 3216 has the following features All 16 ports auto negotiate 10 100 Mbps The DES 3216 can be configured and customized to your network The DES 3216 can be managed in three ways Local Console Management Telnet and SNMP Supports Cut through and Store and Forward switching Supports Full and Half Duplex for both 10 Mbps...

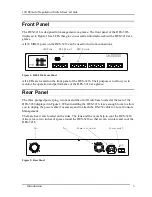
Page 11: ...w you to monitor the operation and performance of the DES 3216 at a glance Rear Panel The three pronged power plug two fans and the on off switch are located at the rear of the DES 3216 displayed in Figure 2 When installing the DES 3216 leave enough room to allow you to unplug the power cable if necessary and to attach the RS 232 cable for Local Console Management There are heat vents located on t...

Page 12: ...DES 3216 Telnet Management Telnet is done over the network Once the DES 3216 is on the network you can use Telnet to log in and change the configuration D View SNMP Management The DES 3216 supports SNMP through D View D Link s proprietary SNMP application and through other vendors SNMP applications Please refer to the appropriate documentation for instructions on installing and using D View and ot...

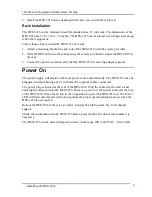
Page 13: ...mmediately Failure to register the DES 3216 may void the warranty Installation Options There are two options for installing the DES 3216 desktop shelf installation or rack installation Follow these guidelines for desktop shelf installation or rack installation The surface must support 18 lbs or 8 kg The power source must be within six feet 1 82 m Power cord and cables should never be stretched Lea...

Page 14: ... receiving adequate power Power On The power supply will adjust to the local power source automatically The DES 3216 may be plugged in without having any or with all LAN segment cables connected The power plug is located at the rear of the DES 3216 Plug the cable into the wall socket and plug the other end into the DES 3216 There is a power on off switch located at the rear of the DES 3216 Move th...

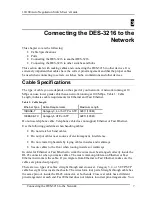
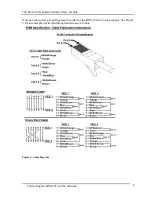
Page 15: ...or 5 UTP or STP 328 ft 100 M 100BASE TX Category 5 UTP or STP 328 ft 100 M Do not use telephone cable Telephone cable does not support Ethernet or Fast Ethernet Use the following guidelines when handling cables Do not stretch or bend cables Do not put cables near sources of electromagnetic interference Do not create trip hazards by laying cables in aisles and walkways Secure cables to the floor wh...

Page 16: ...tch User s Guide Connecting the DES 3216 to the Network 8 must use the correct pin arrangement in order for the DES 3216 to work properly See Figure 3 for an example of straight through and crossover cable Figure 3 Cable Diagram ...

Page 17: ...vice 1 Plug one end of the cable provided into the port 2 Plug the other end into the PC 3 Run HyperTerminal or a terminal emulation program using the settings given for Local Console Management at the beginning of Chapter 5 Managing the DES 3216 DES 3216 to DES 3216 Connection Connect two DES 3216s together one of the MDI X ports The DES 3216 is also compatible with the DES 5016 and DES 5024 Port...

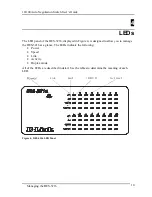
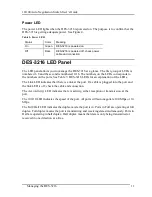
Page 18: ...e DES 3216 displayed in Figure 4 is designed to allow you to manage the DES 3216 at a glance The LEDs indicate the following Power Speed Link Activity Duplex mode All of the LEDs are described in detail Use the tables to determine the meaning of each LED Figure 4 DES 3216 LED Panel LQN FW XOO DOI ...

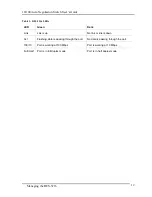
Page 19: ...s to the numbers on the ports See Table 3 DES 3216 LEDs for an explanation of the LEDs The Link LED indicates that there is a link at the port If a cable is plugged into the port and the link LED is off check the cable and connection The Act Activity LED indicates there is activity either reception or transmission at the port The 100 10 LED indicates the speed of the port All ports will auto negot...

Page 20: ...DES 3216 LEDs LED Green Dark Link Link is up No link or link is down Act Flashing data is passing through the port No data is passing through the port 100 10 Port is working at 100 Mbps Port is working at 10 Mbps Full Half Port is in full duplex mode Port is in half duplex mode ...

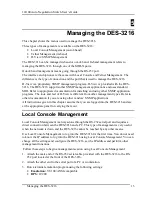
Page 21: ...nt types Refer to other documentation if you are using other vendors SNMP applications All instructions given in this chapter assume that you are logged into the DES 3216 and are at the appropriate panel for carrying them out Local Console Management Local Console Management is always done through the RS 232 serial port and requires a direct connection between the DES 3216 and a PC This type of ma...

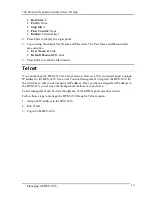
Page 22: ...enu Telnet You can manage the DES 3216 via Telnet session However first you must assign a unique IP address to the DES 3216 Use Local Console Management to log into the DES 3216 for the first time so that you can assign an IP address Once you have assigned an IP address to the DES 3216 you can use the management method of your choice Telnet management can be done through any of the MDI X ports on ...

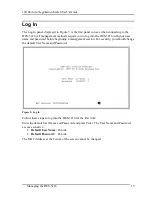
Page 23: ...16 with your user name and password before beginning a management session For security you should change the default User Name and Password Figure 5 Log In Follow these steps to log into the DES 3216 for the first time Enter the default User Name and Password and press Enter The User Name and Password are case sensitive Default User Name D Link Default Password D Link The MAC Address at the bottom...

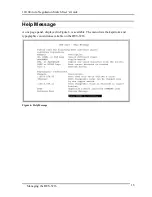
Page 24: ...ation Switch User s Guide Managing the DES 3216 16 Help Message A one page panel displayed in Figure 6 is available The menu lists the keystroke and typographic conventions available on the DES 3216 Figure 6 Help Message ...

Page 25: ...T or RIGHT keys Move cursor backward or forward Ctrl r Refresh Screen Typographic Conventions Example Description 168 8 254 20 Each read only value follows a colon Enable Each changeable value can be changed only by the toggle switch 168 8 254 1 Each changeable value is enclosed in square brackets EXIT Uppercase letters indicate a COMMAND item Blinking Text Warning Message After you are finished v...

Page 26: ...on on the system administrator User Account Management The User Account Management menu allows you to add users delete users and modify user account information Switch Port 1 8 9 16 Configuration Switch Port 1 8 Configuration and Switch Port 9 16 Configuration allow you to configure individual ports You can set the speed duplex mode enable and disable ports and make other changes Spanning Tree Con...

Page 27: ...SNMP Trap Manager Settings VLAN Port Management The VLAN Port Management menu allows you to create delete and modify VLANs quickly and easily Trunking Port Management The Trunking Port Management menu allows you to create delete and modify Trunking Ports quickly and easily Follow these steps to select a menu 1 Use the tab key or the up and down arrow keys to select an option 2 Press Enter ...

Page 28: ...dware revision MAC address LAN IP address and other information on the DES 3216 System Reset The System Reset menu allows you to reset the DES 3216 through software rather than powering off Factory Reset to Default Config Values The Factory Reset to Default Config Values menu allows you to reload factory default configurations System Rate Control The System Rate Control menu allows you to choose S...

Page 29: ...ght the menu option 2 Press Enter System Information Menu The System Information menu displayed in Figure 9 allows you to enter management and configuration information on the DES 3216 Figure 9 System Information menu Hardware Revision Specifies the hardware revision and the product generation Each revision is numbered incrementally Boot PROM Firmware Version Specifies the version of the Boot PROM...

Page 30: ...on Specifies the physical location of the DES 3216 such as a building number or street address You can enter up to 44 characters System Contact Specifies the contact information of the network administrator You can enter up to 44 characters LAN IP Address Specifies the unique IP address of your LAN You can enter up to 15 characters LAN Subnet Mask Specifies the subnet mask if you are subnetting If...

Page 31: ...he DES 3216 without powering off Figure 10 System Reset Some configurations will require you to reset the DES 3216 in order for them to take effect Screen prompts will tell you to reset the DES 3216 in order for them to take effect Follow these steps to reset the DES 3216 1 Select Yes 2 Press Enter To exit without resetting 1 Select No 2 Press Enter ...

Page 32: ...16 and restore all factory default values Using this panel erases all configurations and customization Figure 11 Factory Reset Follow these steps to restore factory default configurations 1 Select Yes 2 Press Enter You will see a confirmation panel displayed in Figure 12 Select Yes to confirm your choice Select No to return to the System Configuration menu ...

Page 33: ...o Negotiation Switch User s Guide Managing the DES 3216 25 Figure 12 Factory Reset Confirmation Follow these steps to exit the panel without restoring factory default parameters 1 Select No or Exit 2 Press Enter ...

Page 34: ... data packet has been received before it forwards the packet to a destination In Cut Through mode the DES 3216 begins sending out the packet as soon as it receives the first 128 bytes of data The first 128 bytes contain the destination of the packet Advantages of Store and Forward Store and Forward only sends out valid data packets Bad packets created by collisions on the network or damaged packet...

Page 35: ... sent as soon as the first 128 bytes are received Cut Through requires less memory since the DES 3216 only reads the address but does not store the entire message Disadvantages of Cut Through Bad packets are perpetuated taking up bandwidth The benefits diminish in high traffic networks Cut Through can not be used on networks that use both Ethernet and Fast Ethernet The network must use one or the ...

Page 36: ... software to the hard drive of the PC you will be downloading from Never attempt to load software from the floppy drive 2 Connect the DES 3216 and the PC with the software on it with the RS 232 cable provided Use the settings given at the beginning of this chapter Never attempt to load firmware through Telnet 3 Select Yes on the Software Update menu 4 You will see the panel displayed in Figure 15 ...

Page 37: ...sfer Figure 16 Send File 5 Select Browse on the panel displayed in Figure 16 The browse option shows the contents of your hard drive You must specify the path from the DES 3216 to the file the firmware is in Navigate to the file the firmware is stored in and select it Use XMODEM to transfer the file ...

Page 38: ...statistics about the transfer including the elapsed time and the time remaining Figure 17 File Transfer through Xmodem When the transfer is complete you will see the panel in Figure 18 The DES 3216 will reset itself automatically and you will have to log in again Figure 18 Message Displayed as EEPROM is Being Written ...

Page 39: ... 1 Select User Account Management on the Main menu 2 Press Enter User Account Change Menu The User Account Change menu displayed in Figure 19 allows you to add users delete users and modify user rights Figure 19 User Account Change menu Follow these steps to select a menu option 1 Select an option 2 Press Enter Create New User The Create New User panel displayed in Figure 20 allows you to add new ...

Page 40: ...assword Reenter the user s password to confirm it in this field Access Level There are two access levels available on the DES 3216 Super User and General User Super Users have administrative rights on the DES 3216 They can add and delete users change the configuration of the DES 3216 and perform all management functions General Users have read only access to the DES 3216 They can look at the panel...

Page 41: ...e DES 3216 As a safety precaution the DES 3216 will not allow the user who is currently logged in to delete themselves by accident Figure 21 Delete Users User Name Identifies the users listed on the DES 3216 Access Level Determines whether the user is a Super User with full administrative rights on the network or a General User with read only access rights Status A user s status can be active or i...

Page 42: ...llow these steps to change user Status Level 1 Select the user s Status Level 2 Toggle the space bar to select the new Status Level 3 Select Save and press Enter Follow these steps to delete users 1 Select the Access Level of the user you want to delete 2 Move the cursor to the Delete column and use the space bar to toggle the option from No to Yes 3 Press Enter 4 Select Save and press Enter Chang...

Page 43: ...ser s new password Confirm Password Reenter the new password in this field to confirm it Follow these steps to change user passwords 1 Enter the user s name in the User Name field 2 Enter the user s old password in the Old Password field 3 Enter the new password in the New Password field 4 Reenter the new password in the Confirm Password field 5 Select Save and press Enter to save your changes ...

Page 44: ...y difference between the panels is the port number that they deal with The options and settings are the same for each Select the group of ports that you want to configure and then go to the appropriate panel Follow these steps to select a panel 1 Decide which group of ports you would like to work with 2 Select the group on the Console Program panel 3 Press Enter to go to the appropriate panel ...

Page 45: ...You can disable a port but you will not be able to use a disabled port Physical Refers to the physical state of the port If you manually change the state of a port it will remain in that state until you change it It will not auto negotiate speed and duplex mode All ports can be in the following physical states Auto 100Tx Half 100Tx Full 10Tx Half 10Tx Full Ports in the Auto state automatically neg...

Page 46: ...data packets Learning means the port is learning the MAC address for data packets This setting cannot be manually changed Priority The port priority can be set from zero to 255 Zero is the highest port priority The port assigned a zero will be the root port The default setting will work in most situations Follow these steps to change the port state 1 Select the State setting of the appropriate por...

Page 47: ...h STA is very complicated and you should understand it well before changing the default settings STA Operation Levels STA operates on the bridge level and the port level On the bridge level STA calculates the Bridge Identifier for each DES 3216 then sets the Root Bridge and the Designated Bridges On the port level STA sets the Root Port and Designated Ports Spanning Tree Configuration Menu The Spa...

Page 48: ...lly with a range in seconds from 1 to 10 If the Hello Time is set for the switch and the switch is not the Root Bridge then the Hello Time will not take effect until the switch becomes the Root Bridge Forward Delay Time This is the time any port on the DES 3216 spends in the listening state while moving from the listening state to the forwarding state It can be set from 4 to 30 seconds Use the fol...

Page 49: ... the Root Bridge Avoid if the switch is used in workgroup level of a large network Hello Time 1 10 seconds No effect if not Root Bridge Never set greater than Max Age Time Max Age Time 6 40 seconds Compete for Root Bridge if BPDU is not received Avoid low number for unnecessary reset of Root Bridge Forward Delay 4 30 seconds High delays the change in state Max Age 2 x Forward Delay 1 Max Age 2 x H...

Page 50: ... DES 3216 is running For example the number and type of ports on the DES 3216 is a read only constant The number and type of ports is fixed Statistics such as the number of errors that have occurred are read only variables Read write MIBs are usually related to user customized configurations Examples of these are the DES 3216 s IP address STA parameters and port status If you use third party vendo...

Page 51: ... to help prevent unauthorized access to the DES 3216 You can name the SNMP communities anything you like You can enter up to 32 characters in each of the four fields You can create up to four SNMP Communities Access Right Enables you to set the rights that members of the SNMP Communities have Read Only access rights mean that members of the community can view the information on the DES 3216 but th...

Page 52: ... Start Signifies that the DES 3216 has been powered up Software settings are reconfigured and hardware systems are rebooted A cold start is different from a factory reset Authentication Failure Signifies that an addressee or manager user on the DES 3216 is not a valid user of the DES 3216 and may have entered an incorrect community name Link Change Event Signifies that the link of a port has chang...

Page 53: ...ES 3216 45 Follow these steps to configure the SNMP Trap Manager Setting 1 Enter the IP Address of the Trap Manager 2 Enter the name of the SNMP Community String 3 Select Status and toggle the space bar to select Valid or Invalid 4 Select Save and press Enter ...

Page 54: ...ly used on high traffic networks You should consider a VLAN on a smaller network if a department or workgroup routinely does tasks that take up a lot of bandwidth and they are not already on their own LAN segment VLANs can be used to subdivide the network The DES 3216 supports port based VLAN Port based VLAN means that the VLAN is grouped by port If a VLAN is created using three ports then those p...

Page 55: ...10 100 Auto Negotiation Switch User s Guide Managing the DES 3216 47 Figure 26 VLAN Port Management menu Follow these steps to create delete and modify VLAN 1 Select the appropriate option 2 Press Enter ...

Page 56: ...menu New VLAN Name Is the name of the VLAN you are creating All VLANs must have a unique name Port Is the number of the port The numbers on the panel match the ports on the DES 3216 Some ports are combined For example ports 1 and 3 are shown as Port 1 3 Ports that are grouped together must be part of the same VLAN TrunkGroup This field identifies the trunk group that the port has been assigned to ...

Page 57: ...ct the ports you want to include in the VLAN and toggle the space bar to change the status from Available to Selected 3 Select Save and press Enter Delete VLAN Menu The Delete VLAN menu displayed in Figure 28 is used to delete VLANs Figure 28 Delete VLAN menu VLAN Name Is the name of the VLAN Delete After you have created a VLAN this column will have the option to delete it Follow these steps to d...

Page 58: ... names of all VLANs appear in this column Follow these steps to modify VLANs 1 Select the name of the appropriate VLAN 2 Press Enter 3 You will see the VLAN Modify menu Use this panel to modify a VLAN 4 Select the ports that you want to include in the VLAN or delete from the VLAN Toggle the space bar to change the current setting Available means the port is available for inclusion in the VLAN Sele...

Page 59: ...16 51 Trunking Port Management Menu The Trunking Port Management panels are used to create delete and modify trunk ports Figure 30 Trunking Port Management menu Follow these steps to create delete and modify trunk ports 1 Select the appropriate option 2 Press Enter ...

Page 60: ...the number of the port The numbers on the panel match the ports on the DES 3216 Some ports are not available for trunking For example port 3 has a status of N A Ports that are shown as N A are not available for inclusion in any trunking groups Name This field identifies the TrunkGroup that the port has been assigned to The field is open if the port has not been assigned to a TrunkGroup Status The ...

Page 61: ...hange the status from Available to Selected 3 Select Save and press Enter Delete Trunking Port The Delete Trunking Port panel displayed in Figure 32 is used to delete Trunk Ports Figure 32 Delete Trunking Port Trunking Port Is the name of the Trunking Group Delete After you have created a Trunking Group this column will have the option to delete it Follow these steps to delete a Trunking Group 1 S...

Page 62: ... Trunked Port 2 Press Enter 3 You will see the Modify Trunking Port panel shown in Figure 33 Use this panel to modify a Trunking Group 4 Select the ports that you want to include in the Trunking Group or delete from the Trunking Group Toggle the space bar to change the current setting Available means the port is available for inclusion in the Trunking Group Selected means the port has been selecte...

Page 63: ...irst if you are having any problems connecting to a device Ethernet is more fault tolerant than Fast Ethernet If you are moving from Ethernet to Fast Ethernet make sure the cables are pinned out correctly See Chapter 3 Connecting the DES 3216 to the Network Cable Specifications for a diagram showing the proper pin arrangement for Ethernet and Fast Ethernet Port States All ports on the DES 3216 hav...

Page 64: ...eiving adequate power Log in to the DES 3216 using Local Console Management see Chapter 5 Managing the DES 3216 for instructions Power the DES 3216 off and then power it on again Use the monitor to check the error messages Return the DES 3216 to D Link for service if the problem persists Forget Password If you forget your password contact D Link Technical Support at 949 788 0805 for assistance or ...

Page 65: ...liable error free packet transfers Native SNMP management support with Ethernet MIB II RFC 1213 RMON MIB RFC 1757 and bridge MIB RFC 1493 8 192 maximum entries for MAC address Table Comprehensive LED indicators display of the system port status 512KB EEPROM flash memory for firmware upgrade RS 232 DB 9 port for Out of Band management asynchronous 8 bit data 1 stop bit no parity 19 2 K baud Rack mo...

Page 66: ...mes types Transparent IEEE 802 3 MAC layer frame size 64 1518 Protocol CSMA CD Full Duplex Data Transfer Rate Fast Ethernet 100 Mbps half duplex 200 Mbps full duplex Topology Star Network Cables 10 Base T 2 pair UTP Cat 3 100 m 4 pair UTP Cat 4 5 100 m EIA TIA 568 150 ohm STP 100 m 100 Base TX 4 pair UTP Cat 5 100 m EIA TIA 568 150 ohm STP 100 m Number of Ports 16 x 10 100 Mbps NWAY Ethernet ports...

Page 67: ...y Power Consumption 70 watts maximum DC fans 2 built in 60 x 60 mm fans Operating Temperature 0 50 degrees Celsius Storage Temperature 25 70 degrees Celsius Humidity 5 95 non condensing Dimensions 441 x 264 x 81 mm 1 5 U 19 inch rack mount width Weight 4 3 Kg EMI FCC Class A CE Mark Class A VCCI Class A Safety UL UL 1950 CSA CSA950 TUV GS EN60950 ...

Page 68: ...rmance Transmission Method Cut Through and Store and Forward RAM Buffer 1 M bytes per device Filtering Address Table 8 K entries per device Packet Filtering Forwarding Rate 148810 pps per port for 100 Mbps MAC Address Learning Automatic update Max age five minutes ...

Page 69: ... Time 40 Front Panel 3 G General User 32 H Hardware Revision 21 Hello Time 40 Help Message 16 I Install DES 3216 5 Installation 5 6 IP Address 44 L LAN Default Gateway 22 LAN IP Address 22 LAN Subnet Mask 22 Link Change 44 Local Console Management 4 13 Log In 15 M MAC Address 22 Management Methods 4 Max Age Time 40 MDI X Port 9 Modify Trunking Port 54 Modify VLAN Menu 50 N New Password 35 New Trun...

Page 70: ... 18 System Configuration Menu 20 System Contact 22 System Description 22 System Information 20 System Information Menu 21 System Location 22 System Name 22 System Rate Control 20 26 System Reset 20 23 T Telnet 4 14 TrunkGroup 48 52 Trunking Port 53 Trunking Port Management 19 51 Trunking Port Name 54 U Unpacking 5 User Account Change 31 User Account Management 18 31 User Name 32 33 35 V Virtual LA...

Reviews: