background image

29

D-Link DCS-935L User Manual

Section 3 - Configuration

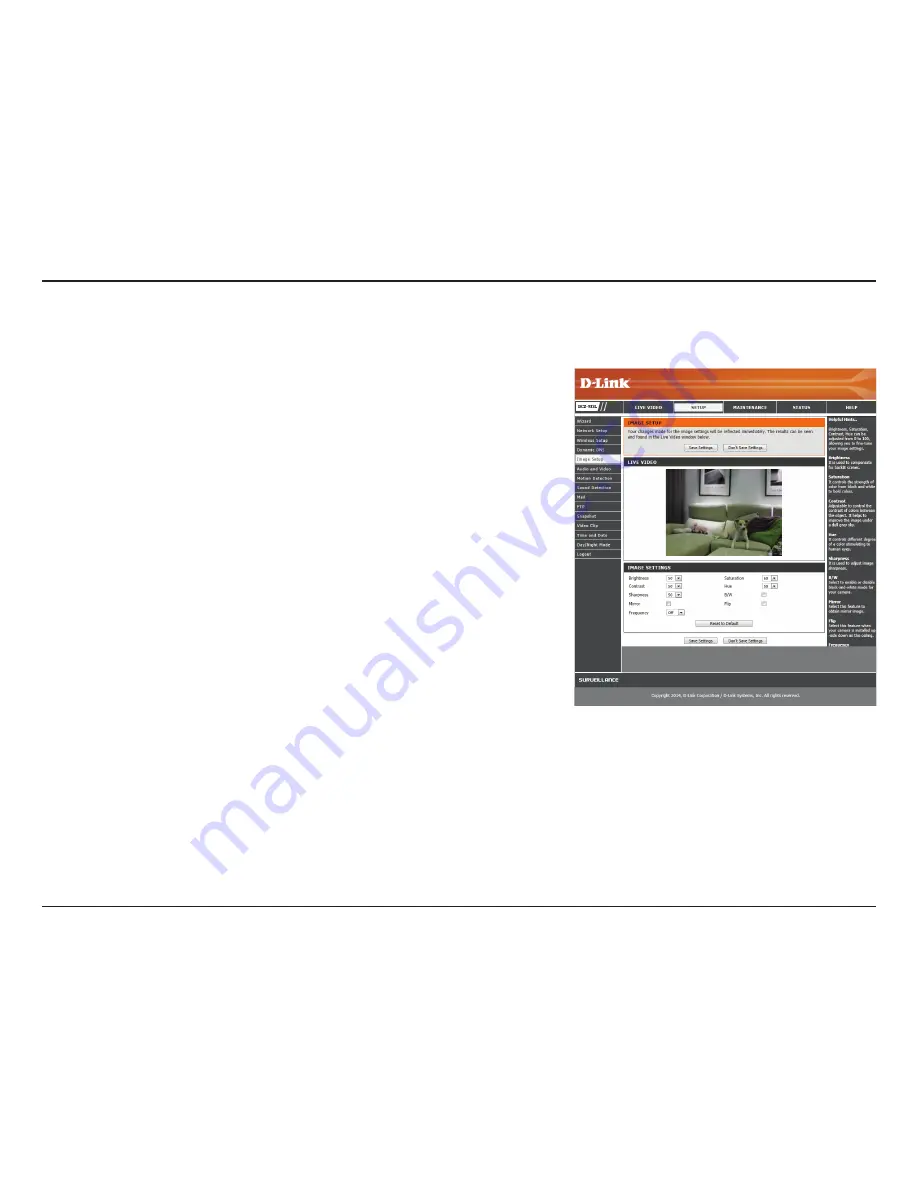
Image Setup

This section allows you to configure the image settings for your camera.

Allows you to adjust the brightness level. 

Allows you to adjust the contrast level. 

Allows you to adjust image sharpness.

Horizontally flip the video. 

Adjusts the video output. By default this is set to 

Off

, but you may override the 

setting by manually selecting either 

50Hz

 or 

60Hz

Allows you to adjust the saturation level.

Allows you to adjust the hue of the video.

Changes the images recorded on the camera to be in black and white.

Check this box to vertically flip the video. If the camera is installed upside down, 

Flip Image and Mirror should both be checked.

Click the 

Save Settings

 button to save your changes.

Brightness:

Contrast:

Sharpness:

Mirror:

Frequency: 

Saturation: 

Hue:

B/W:

Flip: 

Summary of Contents for DCS-935L

Page 1: ...Version 1 03 12 08 2014 User Manual HD Wi Fi Camera DCS 935L...

Page 2: ...DCS 935L Revision A1 with firmware version 1 00 1 02 Nov 12 2014 UPdate Screenshot 1 03 Dec 08 2014 Corrections Trademarks D Link and the D Link logo are trademarks or registered trademarks of D Link...

Page 3: ...Web Configuration Utility 18 Live Video 19 Setup 21 Wizard 21 Internet Connection Setup Wizard 22 Network 25 Wireless Setup 27 Dynamic DNS 28 Image Setup 29 Audio and Video 30 Motion Detection 31 Sou...

Page 4: ...4 D Link DCS 935L User Manual Table of Contents Wireless Modes 59 Networking Basics 60 Check your IP address 60 Statically Assign an IP Address 61 Technical Specifications 62...

Page 5: ...product Note You can power this camera with a USB battery that supplies 5 V and at least 1 5 A of power System Requirements Computer with Microsoft Windows 8 7 Vista or Mac with OS X 10 6 or higher P...

Page 6: ...agesforsecurityandsurveillance TheIRLEDprovidesaroundtheclocksurveillanceregardlessof the lighting conditions The DCS 935L can be accessed remotely and controlled from any PC Notebook over your local...

Page 7: ...u to view and connect to any available wireless networks Web Configuration Using a standard Web browser administrators can configure and manage the Network Camera directly from its own Web page via In...

Page 8: ...8 D Link DCS 935L User Manual Section 1 Product Overview Hardware Overview Front View Camera Lens Microphone IR LEDs Light Sensor...

Page 9: ...9 D Link DCS 935L User Manual Section 1 Product Overview Rear View microUSB Port for power Reset Button Direct Button WPS Button Camera Stand Power and Link LED...

Page 10: ...mydlink enabled router D Link cloud router this is the easiest way to set up your camera Refer to Zero Configuration Setup on page 12 mydlink Home Mobile App If you do not have a mydlink enabled route...

Page 11: ...degree angle appears to be almost 3 feet 1 meter thick At a 2 degree angle it looks over 42 feet 14 meters thick Position your devices so that the signal will travel straight through a wall or ceiling...

Page 12: ...the short time it takes to do this you can remotely access your camera from the website http www mydlink com to manage and monitor your DCS 935L Plug in the External Power Adapter Connect the power a...

Page 13: ...gin to your mydlink account The mydlink page will check for new devices and display a New device Found pop up notification in the bottom left corner Click the notification to continue A summary and co...

Page 14: ...g Your camera is now set up and you can skip to mydlink on page 17 to learn more about the mydlink features of this camera or to Configuration on page 18 for advanced configuration of your camera Note...

Page 15: ...ile app Search for the free mydlink Home app on the App Store or Google Play and download it to your smartphone or tablet You can also use a QR code reading app to scan the corresponding code for your...

Page 16: ...rill two holes 25mm deep 40mm apart with a 6mm drill bit where you marked Insert the screws into the holes If the wall is made out of concrete drill the holes first then insert the plastic anchors to...

Page 17: ...emotely access your camera from the www mydlink com website After signing in to your mydlink account you will see a screen similar to the following For more details on using your camera with mydlink g...

Page 18: ...ttings button Use the User name admin and the password you created while setting up the camera If you did not create a password the default password is blank After entering your password click OK Note...

Page 19: ...deo profile to view by selecting H 264 or MJPEG For information on adjusting the video profiles refer to Audio and Video on page 30 Please make sure that you have the latest version of Java installed...

Page 20: ...recording function This will recordthevideodisplayedonthescreenandsaves ittotheharddriveinthefolderspecifiedusingthe Storage folder button Storage folder button Sets the storage folder for snapshots a...

Page 21: ...d rather manually set up the camera internet connection you can refer to Network on page 25 which provides more details on the information required Internet Connection Setup Wizard Manual Internet Con...

Page 22: ...d data to destinations in a different subnet Invalid gateway settings may cause the failure of transmissions to a different subnet Primary domain name server that translates names to IP addresses Seco...

Page 23: ...n menu Enter the host name of the DDNS server Enter your username or e mail address used to connect to the DDNS Enter your password used to connect to the DDNS server You can setup how often the camer...

Page 24: ...5L User Manual Section 3 Configuration A summary of the options you selected is displayed for confirmation If you are happy with the selected configuration click Next Otherwise click Back to make the...

Page 25: ...mation from your ISP or network administrator Subnet Mask The default value is 255 255 255 0 Used to determine if the destination is part of the same subnet Default Gateway The gateway used to forward...

Page 26: ...your camera as an UPnP device in the network Enable this to allow your camera to use UPnP to configure port forwarding on your router Set the HTTP HTTPS and RTSP ports you wish to use for UPnP port f...

Page 27: ...our camera to a wireless router or access point Use Ad Hoc if you are wirelessly connecting to your PC without a wireless router or access point For security you can choose None WEP WPA PSK or WPA2 PS...

Page 28: ...nable the DDNS function Select your Dynamic DNS Server from the pull down menu Enter the host name of the DDNS server Enter your username or e mail address used to connect to the DDNS server Enter you...

Page 29: ...t By default this is set to Off but you may override the setting by manually selecting either 50Hz or 60Hz Allows you to adjust the saturation level Allows you to adjust the hue of the video Changes t...

Page 30: ...80 and 320x240 Higher settings offer better quality but will require more bandwidth to stream Select the bitrate H 264 or quality MJPEG for the video stream Higher bitrates and quality will require mo...

Page 31: ...n small changes will cause motion to be detected Low sensitivities may be useful when monitoring an area that has flickering lights or a window to the outside in view High sensitivities may be useful...

Page 32: ...etermine whether sound was detected or not If this option is selected the trigger by option under Video Clip or Snapshot should also be selected Enable Sound Detection Detection Level Select this box...

Page 33: ...hentication enter your password If your SMTP server requires SSL TLS or STARTTLS select it here For example if you want to use Gmail with SSL TLS for e mail notifications you can follow the setup proc...

Page 34: ...ecting to Enter the port of the FTP server that you will be connecting to Enter the user name of your FTP server account Enter the password of your FTP server account Enter the destination path folder...

Page 35: ...et Check this box to enable the Snapshot function Select whether to record when triggered by Motion or Sound according to a Schedule or Always record Select whether to take a single snapshot or to tak...

Page 36: ...Clip Target Check this box to enable the Video Clip function Select whether to record when triggered by Motion or Sound according to a Schedule or Always record Here you can specify how much video to...

Page 37: ...g time you can enable it here Select Set DST Manually if you want to manually set the offset and the period of time that the Daylight Saving correction should be used Network Time Protocol will synchr...

Page 38: ...uminators to allow for clear black and white video in dark areas with little to no light Auto Manual Always Day Mode Always Night Mode Day Mode Schedule This mode will automatically switch between Day...

Page 39: ...era to be noticeable Select Enable to allow access to the current camera snapshot via the web address indicated Select Enable to allow the current time to be added to the camera video and select a col...

Page 40: ...configuration to your local PC To load a previously saved configuration click the Browse button select your saved configuration file then click the Restore Configuration From File button Click the Res...

Page 41: ...u may go to the D Link Support Page to check for the latest firmware versions available To upgrade your firmware please download and save the latest firmware version from the D Link Support Page to yo...

Page 42: ...42 D Link DCS 935L User Manual Section 3 Configuration Status Device Info This section displays information about your camera and its current network and wireless status...

Page 43: ...43 D Link DCS 935L User Manual Section 3 Configuration System Log The system log records network events that have occurred...

Page 44: ...44 D Link DCS 935L User Manual Section 3 Configuration Event Log The event log records camera events that have occurred...

Page 45: ...rotected as it is transmitted from one wireless device to another To gain access to a WEP network you must know the key The key is a string of characters that you create When using WEP you must determ...

Page 46: ...ion Standard instead of TKIP User authentication which is generally missing in WEP through the extensible authentication protocol EAP WEP regulates access to a wireless network based on a computer s h...

Page 47: ...ork camera using your Internet Explorer web browser 3 Access the router with your web browser 4 Open virtual server ports to enable remote image viewing Note These are manual steps however if you deci...

Page 48: ...log in to your account Select your camera click on the Settings tab then click on the Advanced Settings button Use the User name admin and the password you created while setting up the camera If you d...

Page 49: ...op of the screen Scroll to the bottom of the Network Setup page to display the ports used by HTTP and Streaming audio and video If necessary these ports can be changed if they are already in use by ot...

Page 50: ...IP Address Dynamic means that your router s WAN IP address can change from time to time depending on your ISP A dynamic WAN IP Address identifies your router on the public network and allows it to acc...

Page 51: ...f numbered ports The ports normally used by the DCS 935L are blocked from access over the Internet Therefore these ports need to be made accessible over the Internet This is accomplished using the Vir...

Page 52: ...ccordingly If your ISP does not pass traffic on port 80 you will need to change the port the camera uses from 80 to something else such as 800 Not all routers are the same so refer to your user manual...

Page 53: ...your settings back to the factory defaults To reset your camera please use an unfolded paperclip to press and hold the RESET button for at least 10 seconds while your camera is plugged in 3 Why does...

Page 54: ...tely as prolonged exposure to bright lights will damage the CMOS sensor 7 The camera is producing noisy images How can I solve the problem The video images might be noisy if the Network Camera is used...

Page 55: ...ar computer network that transmits and receives data with radio signals instead of wires Wireless LANs are used increasingly in both home and office environments and public areas such as airports coff...

Page 56: ...a from one point A to point B But wireless technology has restrictions as to how you can access the network You must be within the wireless network range area to be able to connect your computer There...

Page 57: ...s a wireless solution for it Home Gives everyone at home broadband access Surf the Web check email instant message and etc Gets rid of the cables around the house Simple and easy to use Small Office a...

Page 58: ...of setting up a wireless network Tips Here are a few things to keep in mind when you install a wireless network Centralize your router or Access Point Make sure you place the router access point in a...

Page 59: ...peer communication using wireless network adapters on each computer such as two or more DCS 935L wireless network Cardbus adapters An Infrastructure network contains an Access Point or wireless route...

Page 60: ...art Run In the run box type cmd and click OK At the prompt type ipconfig and press Enter This will display the IP address subnet mask and the default gateway of your adapter If the address is 0 0 0 0...

Page 61: ...and select Properties Step 3 Highlight Internet Protocol TCP IP and click Properties Step 4 Click Use the following IP address and enter an IP address that is on the same subnet as your network or the...

Page 62: ...Server PPPoE UPnP Port Forwarding Bonjour UPnP RTP RTSP RTCP HTTP for configuration WIRELESS CONNECTIVITY 802 11b g n ac Wireless with WEP WPA WPA2 security WIRELESS TRANSMIT POWER 802 11b 16 dBm 802...

Page 63: ...ce AES Auto Electronic Shutter POWER Input 100 240 V AC 50 60 Hz Output 5 V DC 1 2 A External AC to DC switching power adapter DIMENSIONS 66 8 x 84 5 x 124 85 mm 2 63 x 3 33 x 4 92 in WEIGHT 160 grams...

Reviews: