background image

23

D-Link DCS-6410 User Manual

Section 3 - Configuration

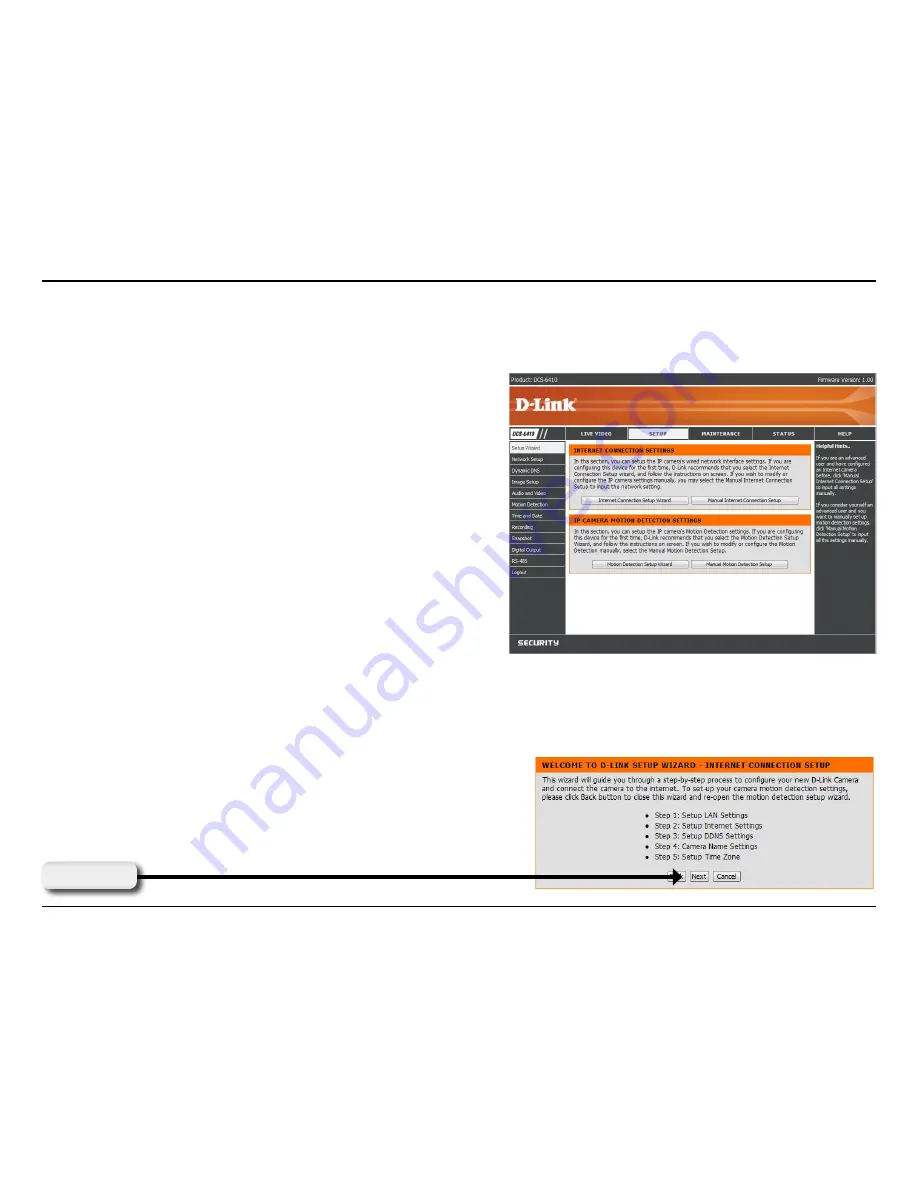
Setup

Wizard

To quickly configure your Network Camera, click 

Internet 

Connection  Setup  Wizard 

or  click 

Manual  Internet 

Connection  Setup 

to  manually  configure  your  Network 

Camera.

To  quickly  configure  your  Network  Camera’s  motion 

detection settings, click 

Motion Detection Setup Wizard 

and go to page 27. If you want to enter your settings without 

running the wizard, click 

Manual Motion Detection Setup


and skip to page 30.

Internet Connection Setup Wizard

This wizard will guide you through a step-by-step process to configure your new D-Link Camera and connect the 

camera to the Internet. Click 

Next

 to continue.

Click 

Next

Summary of Contents for DCS-6410

Page 1: ......

Page 2: ... 23 Wizard 23 Network Setup 30 Dynamic DNS 32 Image Setup 33 Audio and Video 34 Motion Detection 35 Time and Date 36 Recording 37 Snapshot 38 Digital Output 39 RS 485 40 Maintenance 41 Device Management 41 Backup and Restore 42 Firmware Upgrade 43 Status 44 Device Info 44 Log 45 Help 46 D ViewCam Installation 47 Add a Camera 50 Troubleshooting 55 Networking Basics 58 Check your IP address 58 Stati...

Page 3: ...warranty for this product If any of the above items are missing please contact your reseller System Requirements Windows XP or Windows Vista At least 256MB of memory 512MB recommended An available Ethernet connection Internet Explorer 6 x or higher Internet Web Browser VGA card resolution 800x600 or above CPU 1 7GHz or above processor 2 8GHz plus processor with 512MB memory and a 32MB video card i...

Page 4: ...video in rooms with minimal lighting With the Built In IR LED Lens you can customize your surveillance application to enable low light or night vision video streaming The DCS 6410 gives you the ability to monitor video and audio in your home office using an Internet browser anywhere in the world Simple installation procedures along with the built in Web based interface offers easy integration to y...

Page 5: ...olled by the administrator Powerful Surveillance and Remote Monitoring Utility An administrator is assigned with a pre defined user ID and password can modify the Network Camera settings from a remote site via Intranet or Internet Administrators are allowed to monitor the video image record the video image to a hard drive and take snapshots Broad Range of Applications With today s high speed Inter...

Page 6: ...rk port supports the NWay protocol allowing the Network Camera to automatically detect or negotiate the transmission speed of the network Reset Button Reset will be initiated when the reset button is pressed once and held until the Power LED flashes through its cycle twice DC Power Connector The DC power input connector is located on the DCS 6410 Network Camera s back panel and is labeled 12V DC w...

Page 7: ...ovides an Audio Out Connector to be used for 2 way audio Speakers not included may be connected to the camera to provide audio for 2 way communication DI DO The DCS 6410 provides a general I O terminal block The I O connectors provide the physical interface to send and receive digital signals to and from a variety of external devices Video Out The DCS 6410 provides an Analog RCA Video port output ...

Page 8: ...tion When Mounting to a Ceiling Find a suitable place to install the camera using the alignment stencil Place the camera at the desired operating location and insert the screws through the two holes located at the base of the camera Use a screwdriver to tighten and secure ...

Page 9: ...ect the network camera to a switch via an Ethernet cable Connect the supplied power cable from the camera to a power outlet Connection with a PoE Switch If using a PoE switch connect the network camera to the switch via an Ethernet cable which will provide both power and data transmission over a single cable ...

Page 10: ...ll be shown in Windows XP Similar steps and screens will also be shown for other Windows operating systems If the CD Autorun function does not automatically start on your computer click Windows Start Run In the Run command box type D DCS6410 exe where D represents the drive letter of your CD ROM If it does start proceed to the next screen Software Installation Click Setup Wizard ...

Page 11: ...11 D Link DCS 6410 User Manual Section 2 Installation Click Next to continue Click Yes to accept the License Agreement Click Next Click Yes ...

Page 12: ...12 D Link DCS 6410 User Manual Section 2 Installation To start the installation click Next Note The installation may take several minutes to complete Click Next ...

Page 13: ...13 D Link DCS 6410 User Manual Section 2 Installation Click Finish to complete the installation Click Finish ...

Page 14: ...DCS 6410 User Manual Section 2 Installation Click ffdshow Now click on ffdshow from the autorun screen This will install the proper codecs that will allow you to playback video taken by the DCS 6410 Click I Agree ...

Page 15: ...15 D Link DCS 6410 User Manual Section 2 Installation Click Next Click Install ...

Page 16: ... configure its properties From your computer click on Start Programs ffdshow Configuration At the ffdshow properties window scroll to the bottom and click Miscellaneous Be sure Autodetect is checked and Error resilience and Error concealment are set to none Click OK and close the window Click OK ...

Page 17: ...figuration Configuration This section will show you how to configure your new D Link Network Camera using the Setup Wizard Setup Wizard Configuration Click on the icon that has been created in your Windows Start menu Click D Link Setup Wizard SE ...

Page 18: ...t The Setup Wizard will appear and show the MAC address of your DCS 6410 and an IP Address which may or may not be correct depending on what you have your DCS 6410 connected to If you have a DHCP server on your network there will be a valid IP Address displayed here Click the Wizard button to continue Note A DHCP server is a device that supplies the IP address ...

Page 19: ...k DCS 6410 User Manual Section 3 Configuration Select static IP to use the same IP address at each boot up Click Next Select DHCP if you want to obtain a new IP address every time the camera boots up Click Next ...

Page 20: ...ess the web configuration page The Setup Wizard will automatically open your web browser with the IP address of your DCS 6410 For example the IP address is http 192 198 0 20 Note Your DCS 6410 may have a different IP Address Click Restart Click Restart to save your settings and reboot the Network Camera ...

Page 21: ...d enter the IP address of your Network Camera http 192 168 0 20 Note 192 168 0 20 is only an example Your address may differ Enter Admin for the username and leave the password blank by default Note To change your password please refer to page 41 This section will show you how to configure your new D Link Network Camera using the Web based Configuration Utility Click OK ...

Page 22: ... of the live video image using your mouse Right click to zoom out and left click to zoom in on the image Digital Input Indicator MotionTrigger Indicator Recording Indicator This indicator will light up when there is an available digital input signal When a trigger event occurs this will light up Note The video motion feature of your camera must be enabled When a recording is in progress this indic...

Page 23: ...quickly configure your Network Camera s motion detection settings click Motion Detection Setup Wizard and go to page 27 If you want to enter your settings without running the wizard click Manual Motion Detection Setup and skip to page 30 Internet Connection Setup Wizard This wizard will guide you through a step by step process to configure your new D Link Camera and connect the camera to the Inter...

Page 24: ...o page 25 Select Static IP if your Internet Service Provider has provided you with connection settings or you want to set a static address within your home network Enter the accurate information for your static IP setting Click Next to continue Click Next If you are using PPPoE select Enable and enter your user name and password Click Next to continue ...

Page 25: ...tion Click Next If you have a Dynamic DNS account and would like your camera to update its IP address automatically Select Enable and enter your host information Click Next to continue Click Next Enter a name for your camera and click Next to continue ...

Page 26: ...re that all events will be triggered captured and scheduled at the right time Click Next to continue Click Apply You will see a summary of your camera s settings Please note down all this information as you will need it for accessing your camera within the network Click Apply to activate your settings ...

Page 27: ...to configure your new D Link Camera motion detection functions Click Next to continue Click Next This section will allow you to enable or disable motion detection as well as control the camera s sensitivity or its ability to detect movement You can select the Drawing Mode to draw or erase the motion area in the window of live video Click Next ...

Page 28: ...on Click Next This step allows you to specify how you will receive the events notification of your camera either via using email or FTP You will need to enter all the relevant information for your email account or FTP settings Then click Next to continue ...

Page 29: ...29 D Link DCS 6410 User Manual Section 3 Configuration Click Apply You have completed the Motion Detection Wizard Click Apply to activate your settings ...

Page 30: ...ng your camera in the future The fixed IP address The default value is 255 255 255 0 Used to determine if the destination is in the same subnet The gateway used to forward frames to destinations in a different subnet Invalid gateway settings may cause the failure of transmissions to a different subnet Primary domain name server that translates names to IP addresses Secondary domain name server to ...

Page 31: ... network is using PPPoE service The unique name of your account You may obtain this information from your ISP The password of your account You may obtain this information from your ISP The default value is 80 The port number that you use for RTSP streaming to mobile devices such as mobile phones or PDAs The default port number is 554 ...

Page 32: ...s manually Enter the host name of the DDNS server Enter your user name or e mail used to connect to the DDNS Enter your password used to connect to the DDNS server Indicate the connection status automatically determined by the system Dynamic DNS DDNS Dynamic Domain Name Server will hold a DNS host name and synchronize the public IP address of the modem when it has been modified The user name and p...

Page 33: ...cklit scenes This setting controls the strength of color from black and white to bold colors Allows for the measurement of color intensity or strength This setting controls the color tone Image Setup In this section you may configure the image settings for your camera A preview of the image will be shown in the window of Live Video ...

Page 34: ...presents the maximum refresh rate when a picture is updated on the screen every second This provides a better quality of video Bits Per Second BPS will affect the bit rate of the video recorded by the camera A higher bit rate will increase the video quality Is the URL name used to connect to the camera when viewing from a mobile device or PDA Audio and Video You may configure 4 video profiles with...

Page 35: ...erence between two sequential images that would indicate motion Select this option to draw out the motion detection area by dragging your mouse in the window indicated by the red colored box Use this option to erase your motion detection area by dragging your mouse in the window Motion Detection Enabling Video Motion will allow your camera to use the motion detection feature You may also draw out ...

Page 36: ...ly Select this option so that you may configure the Daylight Saving date and time manually Sets the amount of time to be added or removed when Daylight Saving is enabled Enable this feature to obtain time configuration automatically from the NTP server Network Time Protocol NTP synchronizes the DCS 6410 with an Internet time server Choose the one that is closest to your location This option allows...

Page 37: ... menu When the recording storage area is full you may choose to stop recording or recycle the recording files so that your camera can record the video continuously Select to record continuously Allows Recording when Motion Recording Digital Input 1 or Digital Input 2 is triggered A preset amount of time before motion recording is triggered A preset amount of time after motion recording is triggere...

Page 38: ...a FTP The host name of your FTP server Thedirectoryorpathwheretheimageswillbeuploadedto for example pub images The prefix that will be added to the filename of each file The port of the FTP server The default port is 25 Some FTP servers allow clients to use passive mode when connecting to an FTP which uses random ports for transfers Snapshot Enable the Snapshot feature so that your camera can take...

Page 39: ... D O to send a signal when there is a triggered event You can choose from one or up to three events such as Motion Detection D I Signal 1 and D I Signal 2 for the sources of the triggered events Digital Output You may enable the Digital Output DO feature and configure the source of event for your camera ...

Page 40: ...of communication for a single packet The more bits used for stop bits the greater the lenience in synchronizing the different clocks but the slower the data transmission rate By default the value is 1 Choices of No Even and Odd It is a simple form of error checking used in serial communication and you may use no parity For even and odd parity the serial port sets the parity bit the last bit after ...

Page 41: ...displayed here You may delete any accounts included in the list Create a unique name for your camera to access the camera in your web browser For example DCS 6410 By default Select this option to enable the On Screen Display feature for your camera Enter the label name Select this option to enable the time stamp display in the video screen You may modify the name and administrator s password of yo...

Page 42: ...to your computer Locate a pre saved configuration file by clicking Browse and then restore the pre defined settings to your camera by clicking Load Configuration You may reset your camera and restore the factory settings to your camera by clicking Restore Factory Defaults This will restart your camera Backup and Restore In this section you may backup restore and reset the settings as well as reboo...

Page 43: ...ading the new firmware to your camera Firmware Upgrade Your current firmware version and date will be displayed on your screen You may go to the D Link Support Page to check for the latest firmware version available To upgrade the firmware on your DCS 6410 please download and save the latest firmware version from the D Link Support Page to your local hard drive Locate the file on your local hard d...

Page 44: ...44 D Link DCS 6410 User Manual Section 3 Configuration Status Device Info This page displays all the details about your device and network connection ...

Page 45: ...45 D Link DCS 6410 User Manual Section 3 Configuration Log This page displays the log information of your camera You may also download the information by clicking Download ...

Page 46: ...46 D Link DCS 6410 User Manual Section 3 Configuration Help ...

Page 47: ... may now use the software to configure all the advanced settings for your cameras D ViewCam is a comprehensive management tool for IP surveillance Insert the CD ROM into the CD ROM drive A menu screen will appear as shown below Click D ViewCam D ViewCam provides English Traditional Chinese and Simplified Chinese language versions Select a language version and click OK to continue Click OK ...

Page 48: ...DCS 6410 User Manual Section 4 D ViewCam Installation Click Next to continue Click Browse if you would like to choose a specific folder for the installation otherwise click Next to continue Click Next Click Next ...

Page 49: ...er Manual Section 4 D ViewCam Installation Click Next to start the installation Note The D ViewCam installation process may take several minutes to complete Click Next Click Finish to complete the installation Click Finish ...

Page 50: ... Programs D Link D Link D ViewCam Enter Admin as the default user name and leave the password blank Click to log into the system and access the Add Camera Wizard Note Please refer to the D ViewCam user manual to change your password This section will show you how to start and add a camera to the D ViewCam system ...

Page 51: ...r Manual Section 4 D ViewCam Installation Welcome to the Add Camera Wizard Use this wizard to add your cameras to the D ViewCam system Note Use the left or right arrow to navigate the wizard Click Next to continue Click Next ...

Page 52: ...inue If you choose Auto Discovery the system will search for all available cameras that are located on the same LAN with same subnet The system will place all the cameras under the default map called My Map Click Next to continue If you choose Add Manually enter the IP address or domain name http port model name camera ID and password Click the button to auto detect the camera s model name then th...

Page 53: ...monitoring but ONLY recording when motion is detected Office Hours Only Continuously monitoring during office hours 08 00 AM to 06 00 PM and ONLY recording when motion is detected Non Office Hours Only Continuously monitoring during non office hours 06 00 PM to 08 00 AM and ONLY recording when motion is detected Note Excluding 24 7 Continuous Recording other schedule recording types can ONLY do re...

Page 54: ...s or select No if you have no additional camera s to be added Click Next to continue The Add Camera wizard is now complete Click Close to access the D ViewCam s main screen Your D ViewCam Installation is Complete Note Please refer to the D ViewCam user manual for information about using D ViewCam ...

Page 55: ...s 10 Please keep in mind the overall performance of the transmission speed will slow down when many users are logged on 3 What algorithm is used to compress the digital image The Network Camera utilizes MPEG 4 simple profile image compression technology to provide high quality images 4 Can I capture still images from the Network Camera Yes you are able to capture still images with the snapshot fun...

Page 56: ...nfigured on the router or firewall To correct the problem you need to determine if the DCS 6410 is behind a router or firewall and if the router or firewall is properly configured for the ports the DCS 6410 is using Other possible problems might be due to the network cable Try replacing your network cable Test the network interface of the product by connecting a local computer to the unit utilizin...

Page 57: ...256 colors Using 16 or 256 colors on your computer will produce dithering artifacts in the image making the image appear to be of poor quality The configuration on the Network Camera image display is incorrect Through the Advanced Image Setting section of the Web management you need to adjust the image related parameters such as brightness contrast hue and power line frequency for fluorescent ligh...

Page 58: ... Run In the run box type cmd and click OK At the prompt type ipconfig and press Enter This will display the IP address subnet mask and the default gateway of your adapter If the address is 0 0 0 0 check your adapter installation security settings and the settings on your router Some firewall software programs may block a DHCP request on newly installed adapters If you are connecting to a wireless ...

Page 59: ...Step 3 Highlight Internet Protocol TCP IP and click Properties Step 4 Click Use the following IP address and enter an IP address that is on the same subnet as your network or the LAN IP address on your router Example If the camera s LAN IP address is 192 168 0 1 make your IP address 192 168 0 X where X is a number between 2 and 99 Make sure that the number you choose is not in use on the network S...

Page 60: ...lays Configurable motion detection windows VIDEO ELECTRONIC SHUTTER NTSC 1 60 1 100 000 sec PAL 1 50 1 110 000 sec 3A CONTROL AGC AWB AES VIDEO BIT RATE 20K to 2M MIC Input Impedance 4 4k Ohm AUDIO VIDEO OUT Yes RESET BUTTON Reset to factory default I O CONNECTOR 2 Inputs Photo relay Active High Dropout 0 VDC 1 Output photo relay Close circuit current AC 70mA or DC 100mA 40Ohm Open circuit voltage...

Page 61: ...ameras Viewing of up to 32 cameras on one screen Supports all management functions provided in web interface Scheduled motion triggered or manual recording options REMOTE MANAGEMENT Configuration accessible via web browser Take snapshots video clips and save to local hard drive via web browser or NAS SURVEILLANCE Motion detection weekly schedule Upload snapshots via email Upload snapshots via FTP ...

Page 62: ...rdware Revision located on the label on the bottom of the Network Camera e g rev A1 Serial Number s n number located on the label on the bottom of the Network Camera You can find software updates and user documentation on the D Link website as well as frequently asked questions and answers to technical issues For customers within the United States Phone Support 877 354 6555 Internet Support http s...

Page 63: ...er this Limited Warranty will be at D Link s option to repair or replace the defective Hardware during the Warranty Period at no charge to the original owner or to refund the actual purchase price paid Any repair or replacement will be rendered by D Link at an Authorized D Link Service Office The replacement hardware need not be new or have an identical make model or part D Link may at its option ...

Page 64: ...see for the non conforming Software will be refunded by D Link provided that the non conforming Software and all copies thereof is first returned to D Link The license granted respecting any Software for which a refund is given automatically terminates Non Applicability of Warranty The Limited Warranty provided hereunder for Hardware and Software portions of D Link s products will not be applied t...

Page 65: ... return shipping charges for any product that is not packaged and shipped in accordance with the foregoing requirements or that is determined by D Link not to be defective or non conforming What Is Not Covered The Limited Warranty provided herein by D Link does not cover Products that in D Link s judgment have been subjected to abuse accident alteration modification tampering negligence misuse fau...

Page 66: ...E REMEDY FOR A BREACH OF THE FOREGOING LIMITED WARRANTY IS REPAIR REPLACEMENT OR REFUND OF THE DEFECTIVE OR NONCONFORMING PRODUCT THE MAXIMUM LIABILITY OF D LINK UNDER THIS WARRANTY IS LIMITED TO THE PURCHASE PRICE OF THE PRODUCT COVERED BY THE WARRANTY THE FOREGOING EXPRESS WRITTEN WARRANTIES AND REMEDIES ARE EXCLUSIVE AND ARE IN LIEU OF ANY OTHER WARRANTIES OR REMEDIES EXPRESS IMPLIED OR STATUTO...

Page 67: ...r Connect the equipment into an outlet on a circuit different from that to which the receiver is connected Consult the dealer or an experienced radio TV technician for help FCC Caution Any changes or modifications not expressly approved by the party responsible for compliance could void the user s authority to operate this equipment This device complies with Part 15 of the FCC Rules Operation is s...

Page 68: ...e and 2 this device must accept any interference received including interference that may cause undesired operation IMPORTANT NOTE Radiation Exposure Statement This equipment complies with IC radiation exposure limits set forth for an uncontrolled environment This equipment should be installed and operated with minimum distance 20cm between the radiator and your body This device has been designed ...

Page 69: ... DCS 6410 User Manual Appendix E Registration Version 1 1 August 25 2009 Product registration is entirely voluntary and failure to complete or return this form will not diminish your warranty rights Registration ...

Reviews: