background image

6

D-Link DCM-301 User Manual

Section 1 - Product Overview

Back Panel Connectors

7

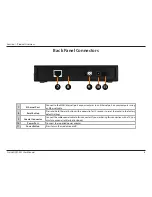
Ethernet Port

Connect to the WAN (Internet) port on your router or to an Ethernet port on your computer using 

an Ethernet cable.

8

Reset Button

Press and hold the reset button with a paper clip for 10 seconds to reset the router to the factory 

default settings.

9

Coaxial Connector

Connect the cable coaxial cable to this connector. If you are sharing this connection with a TV, you 

must use a coaxial splitter (not included).

10

Power Port

Connect the supplied power adapter.

11

Power Button

Press to turn the modem on or off.

7

8

9

10 11

Summary of Contents for DCM-301

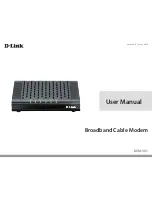
Page 1: ...User Manual Version 5 0 May 6 2014 DCM 301 Broadband Cable Modem ...

Page 2: ...iew 5 Front Panel LEDs 5 Back Panel Connectors 6 Before You Begin 7 Local Cable Network Service 7 Prepare Your Workspace 7 Installation 8 Connecting the Cable Modem with Router 9 Connecting the Cable Modem without Router 10 Troubleshooting 11 Technical Specifications 12 Contacting Technical Support 14 Warranty 15 Registration 20 Table of Contents ...

Page 3: ... Verify that you have these items before beginning the installation A cable line splitter not included if you plan to have the cable modem and a television connected to the same wall cable outlet An active two way cable line Subscription to a cable Internet service provider ISP Package Contents If any of the above items are missing please contact your reseller ...

Page 4: ...cable modem is its easy installation because DHCP and TFTP clients can obtain automatic access to the IP address and configuration from their network servers via the modem SNMPagentspermitremoteconfigurationandmonitoringfromamanagementstationequippedwithanSNMPserver Note For Internet Access a subscription to a cable provider is required Full featured compact economical cable modem with Ethernet po...

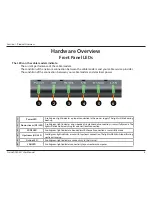
Page 5: ...the power supply The light will blink during boot up 2 Downstream DS LED A solid green light indicates a non bonded single channel connection is successfully made The light will blink while searching for a downstream connection 3 W DS LED A solid green light indicates a bonded multi channel connection is successfully made 4 Upstream US LED Asolidgreenlightindicatesasuccessfulupstreamconnection The...

Page 6: ...le 8 Reset Button Press and hold the reset button with a paper clip for 10 seconds to reset the router to the factory default settings 9 Coaxial Connector Connect the cable coaxial cable to this connector If you are sharing this connection with aTV you must use a coaxial splitter not included 10 Power Port Connect the supplied power adapter 11 Power Button Press to turn the modem on or off 7 8 9 1...

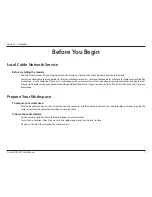
Page 7: ...n a level surface Do not restrict the airflow around the cable modem Before installing the modem Find the Serial Number RF and Ethernet address located on a sticker on the cable modem and write them down ContactyourlocalcableserviceoperatorforInternet cablenetworkaccess Yourlocalcableoperatorwillcheckforcableaccessavailability in your area install a cable line if necessary provide you with an acce...

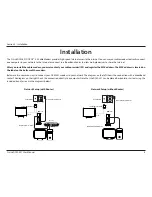
Page 8: ...of the modem Below are two common ways to connect your DCM 301 modem to your network The diagram on the left shows the connection with a broadband router The diagram on the right shows the connection directly to a computer Note that the DCM 301 can be placed horizontal or vertical using the included stand as seen in the diagrams below Power Adapter Included Your Network Setup Cable Outlet Splitter...

Page 9: ...modem s power adapter into a wall outlet or surge protector and into the cable modem s power port Step 5 Plug one end of the Ethernet cable into the cable modem s Ethernet port and the other end of the cable into theWAN or Internet port on your router Step 6 In most cases you will have to call your cable company Internet Provider and register the MAC address of the D Link modem The MAC address is ...

Page 10: ...le modem s power adapter into a wall outlet or surge protector and into the cable modem s power port Step 5 Plug one end of the Ethernet cable into the cable modem s Ethernet port and the other end of the cable into the Ethernet adapter of your computer Step 6 In most cases you will have to call your cable company Internet Provider and register the MAC address of the D Link modem The MAC address i...

Page 11: ... the modem 2 Cannot connect to the Internet YoumustcontactyourInternetproviderandregistertheMACaddressofthemodem locatedonthebottomofthemodem If you skip this step you will not be able to connect Verify all cables are connected properly If the LEDs on the modem are indicating that you are connected to the Internet verified by your Internet provider and you are connected to a router you may have to...

Page 12: ...nding Frequency Range 5 to 42MHz edge to edge Bandwidth 0 2 0 4 0 8 1 6 3 2MHzTDMA 200 400 800 1600 3200 and 6400 kHz S CDMA 1600 3200 and 6400 kHz TDMA 8to 54dBmV 32QAM 64QAM 8to 55dBmV 8QAM 16QAM 8 to 58 dBmV QPSK S CDMA 8 to 53 dBmV all modulations Output level of CM can be automatically controlled by CMTS through power ranging function Step 1dB OutputReturnLoss 6dB 5 42MHz and 91 857MHz Max Nu...

Page 13: ...V3 MIB MIB II MCNS MIB Environment Operating temperature 32 F 0 C to 104 F 40 C Operating humidity 10 to 90 Non condensing Storage temperature 4 F 20 C to 140 F 60 C LEDs Power DS W DS US Online LAN Dimensions without AC Adapter 159 mm x 133 mm x 32 5 mm Approximately Weight 220g 10g Approximately ...

Page 14: ...one Before you contact technical support please have the following ready Model number of the product e g DCM 301 Hardware Revision located on the label on the bottom of the modem e g rev E1 Serial Number s n number located on the label on the bottom of the modem You can find software updates and user documentation on the D Link website as well as frequently asked questions and answers to technical...

Page 15: ...er this Limited Warranty will be at D Link s option to repair or replace the defective Hardware during the Warranty Period at no charge to the original owner or to refund the actual purchase price paid Any repair or replacement will be rendered by D Link at an Authorized D Link Service Office The replacement hardware need not be new or have an identical make model or part D Link may at its option ...

Page 16: ...see for the non conforming Software will be refunded by D Link provided that the non conforming Software and all copies thereof is first returned to D Link The license granted respecting any Software for which a refund is given automatically terminates Non Applicability of Warranty The Limited Warranty provided hereunder for Hardware and Software portions of D Link s products will not be applied t...

Page 17: ...ng What Is Not Covered The Limited Warranty provided herein by D Link does not cover Productsthat inD Link sjudgment havebeensubjectedtoabuse accident alteration modification tampering negligence misuse faultyinstallation lack of reasonable care repair or service in any way that is not contemplated in the documentation for the product or if the model or serial number has been altered tampered with...

Page 18: ...EXPRESS WRITTEN WARRANTIES AND REMEDIES ARE EXCLUSIVE AND ARE IN LIEU OF ANY OTHER WARRANTIES OR REMEDIES EXPRESS IMPLIED OR STATUTORY Governing Law This Limited Warranty shall be governed by the laws of the State of California Some states do not allow exclusion or limitation of incidental or consequential damages or limitations on how long an implied warranty lasts so the foregoing limitations an...

Page 19: ...rantee that interference will not occur in a particular installation If this equipment does cause harmful interference to radio or television reception which can be determined by turning the equipment off and on the user is encouraged to try to correct the interference by one or more of the following measures Reorient or relocate the receiving antenna Increase the separation between the equipment ...

Page 20: ...x D Registration Version 5 0 May 6 2014 Product registration is entirely voluntary and failure to complete or return this form will not diminish your warranty rights Registration Register your product online at http registration dlink com ...

Reviews: