background image

Remove

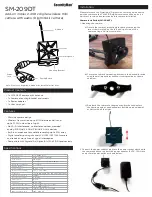
1. Have Z-Wave

TM

 Controller entered exclusion mode.

2. Pressing tamper key three times within 1.5 seconds

to enter the exclusion mode.

Node ID has been excluded.

Reset

Notice: Use this procedure only in the event 

that the primary controller is lost or 

otherwise inoperable.

1. Pressing tamper key four times within 1.5 seconds 

and do not release the tamper key in the 4

th


pressed, and the LED will light ON.

2. After 3 seconds the LED will turn OFF, after that 

within 2 seconds, release the tamper key. If 

successful, the LED will light ON one second. 

Otherwise, the LED will flash once.

3. IDs are excluded and all settings will reset to 

factory default.

Association

1. Have Z-Wave

TM

 Controller entered association 

mode.

2. Pressing tamper key three times within 1.5 seconds

to enter the association mode.

Note: The device support 2 groups. The group 1 is for 

receiving the report message, like triggered event, 

temperature, illumination etc. The group 2 is for light 

control, the device will send the “Basic Set” command 

to this group. And each group support 8 nodes 

maximum.

Failed or success in add/remove the node ID can be viewed 

from Z-Wave

TM

 Controller.

Notice 1:

 Always RESET a Z-Wave

TM

 device before trying to add it to a

Z-Wave

TM

 network 

Notice 2:

 When the device into NWI mode, the sensor functionality 

will useless. The NWI mode will timeout after 30 seconds. You can 

press the tamper key 3 times to abort the NWI mode.

Z-Wave

TM

 Notification

After the device adding to the network, it will wake-up once per day in

default. When it wake-up it will broadcast the “Wake Up Notification”

message   to   the   network,   and   wake-up   10   seconds   for   receive   the

setting commands.

The wake-up interval minimum setting is 30 minutes, and maximum

setting is 120 hours. And the interval step is 30 minutes.

If the user want to wake-up the device immediately, please remove the

front cover, and press the tamper key once. The device will wake-up 10

seconds.

Z-Wave

TM

 Message Report

When the PIR motion triggered , the device will report the trigger event

and also report the battery status, temperature and illumination level.

In default the device will using Notification Report to represent the

trigger event, it can be changed to Sensor Binary Report by setting the

configuration NO. 7 Bit4 to 1.

* Motion Report:

When the PIR motion detected, the device will unsolicited to send the

report to the nodes in the group 1.

Notification Report (V4)
Notification Type: Home Security (0x07)

Event: Motion Detection, Unknown Location (0x08)
Sensor Binary Report (V2)
Sensor Type: Motion (0x0C)

Sensor Value: 0xFF

2

All manuals and user guides at all-guides.com

Summary of Contents for DCH-122

Page 1: ...ow Concurrent multi channel support reduces external interference Better RF range improve about 10 meters in indoor Support 100 Kbps transmit speed speed up communication Add to Remove from Z WaveTM Network There are two tamper keys in the device one is in the back side another is in the front side Both of them can add remove reset or association from Z WaveTM network In the first time add the dev...

Page 2: ... to add it to a Z WaveTM network Notice 2 When the device into NWI mode the sensor functionality will useless The NWI mode will timeout after 30 seconds You can press the tamper key 3 times to abort the NWI mode Z WaveTM Notification After the device adding to the network it will wake up once per day in default When it wake up it will broadcast the Wake Up Notification message to the network and w...

Page 3: ...lue is 30 if setting to 1 that means the minimum auto report interval will be one minute And please notice if setting this value to zero that means disable all of the timing report except the low battery detection Power Up Procedure Battery Power Check When the device power up the device will detect the power level of the battery immediately If the power level is too low the LED will continue flas...

Page 4: ...delay a while to turn OFF the lighting equipment The delay time is setting by the configuration NO 9 The PIR motion re detected interval in the Test Mode fixed to 6 seconds In the Normal Mode it according to the setting of the configuration NO 8 Notice When the tamper key of the back side is released the device always in the Test Mode no matter the DIP switch setting Battery Installation When the ...

Page 5: ...ing The right way for A tape installation is stick it to the position below tamper key The thicker tape won t let the tamper key pressed so the sensor will enter the test mode You may test if installed position is good or not by this way After finish the test and decide to fix then you can remove tape A and mounting the sensor by using tape B The tamper key will pressed and let the sensor enter no...

Page 6: ...ns turn off illumination detected function And always turn on the light Notice In none test mode only the value in 1 to 99 will enable the illumination detected function and update the illumination value NO Name Def Vali d A B C Description 5 Operation Mode 0 All Operation mode Using bit to control Caution The value is unsigned byte the range is from 0x00 0xFF 0 Bit0 Reserve 0 Bit1 1 means test mo...

Page 7: ...f Vali d A B C Description received the trigger signal too frequently Also can save the battery energy Notice If this value bigger than the configuration setting NO 9 There is a period after the light turned off and the PIR not start detecting 9 Turn Off Light Time 4 0 127 After turn on the lighting setting the delay time to turn off the lighting when the PIR motion is not detected 8 seconds per t...

Page 8: ... use only Specifications subject to change without notice due to continuing product improvement FCC ID KA2CHZ122A1 IC ID 4216A CHZ122A1 Disposal This marking indicates that this product should not be disposed with other household wastes throughout the EU To prevent possible harm to the environment or human health from uncontrolled waste disposal recycle it responsibly to promote the sustainable re...

Page 9: ...his device may not cause harmful interference and 2 This device must accept any interference received including interference that may cause undesired operation FCC Caution Any changes or modifications not expressly approved by the party responsible for compliance could void the user s authority to operate this equipment This transmitter must not be co located or operating in conjunction with any o...

Reviews: