background image

3

A.

Power on the DSA-3100.

B.

Connect an Ethernet cable from the 

Public LAN

 port to a switch or wireless

access point on your public network. The Public LAN LED will illuminate to indicate
a proper connection. If the Public LAN LED doesn’t light up, please check the
connections.

C.

Connect an Ethernet cable from the 

Private LAN

 port to an Ethernet port on your

private network’s switch. If properly connected, the Private LAN LED will illuminate.

(Note: For configuration purposes a computer can be connected directly to this
port using a standard Ethernet cable)

D.

Attach an Ethernet cable to the 

WAN port

 on the back panel of the DSA-3100.

Connect the other end to a router or directly to a broadband modem. The WAN
LED light will illuminate to indicate proper connection.

Connecting The DSA-3100 To Your Network
(continued)

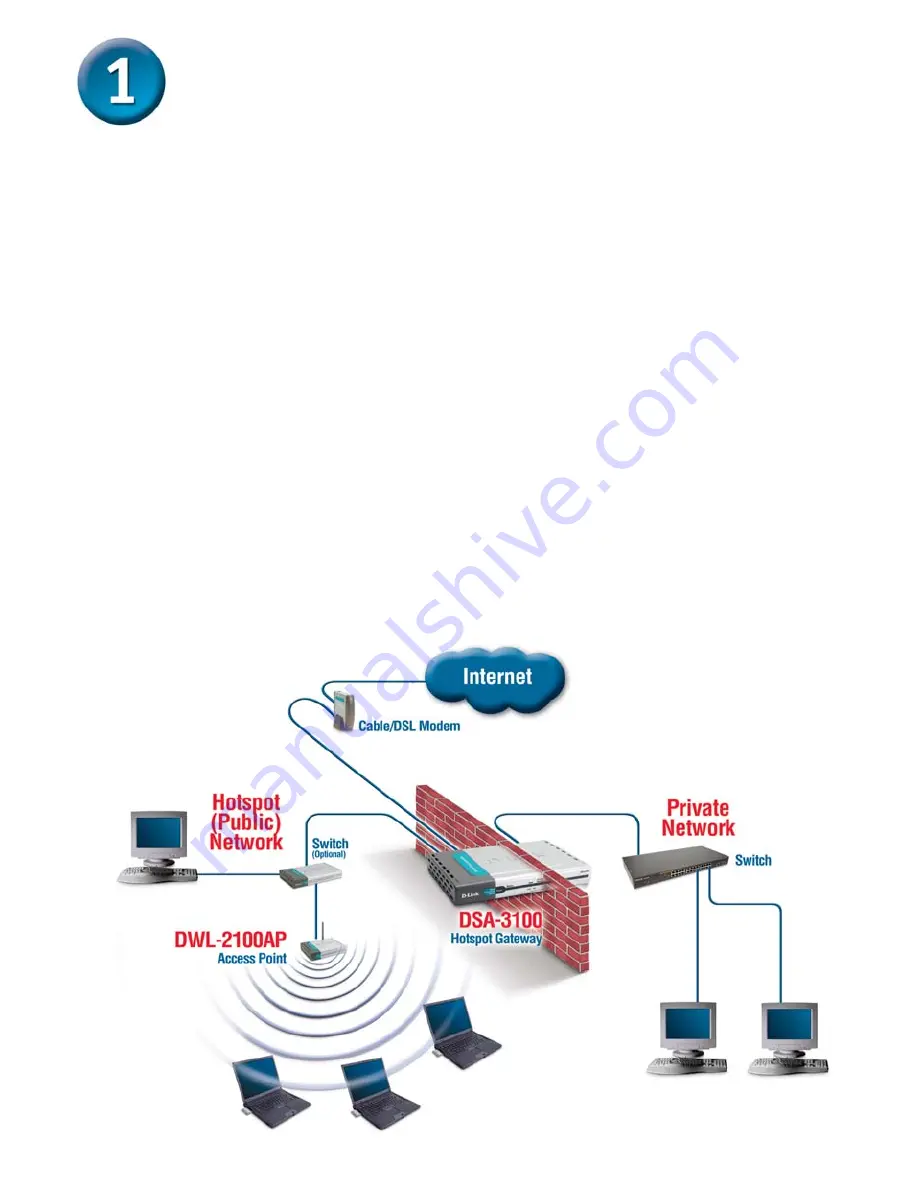
When you have completed the steps in this 

Quick Installation Guide,

 your connected

network should look similar to this:

Summary of Contents for Airspot DSA-3100

Page 1: ... and void its warranty If any of the above items are missing please contact your reseller DSA 3100 2006 D Link Systems Inc All rights reserved Trademarks or registered trademarks are the property of their respective holders Software and specifications subject to change without notice DSA 3100 03062006 Console Cable RS 232 These are the items included with your DSA 3100 purchase 1x Ethernet CAT5 UT...

Page 2: ... private network CONSOLE Connects to your computer s COM port using the provided Console Cable Port also connects to optional DSA 3100P Ticket Printer POWER LED A solid light indicates a proper connection to the power supply NETWORK LEDs A solid light on the port indicates a good connection The LEDs blink during data transmission Power Receptor Connection for the PowerAdapter Public LAN Port Conne...

Page 3: ... network s switch If properly connected the Private LAN LED will illuminate Note For configuration purposes a computer can be connected directly to this port using a standard Ethernet cable D Attach an Ethernet cable to the WAN port on the back panel of the DSA 3100 Connect the other end to a router or directly to a broadband modem The WAN LED light will illuminate to indicate proper connection Co...

Page 4: ...e DSA 3100 to conform to a network then input that IPAddress instead of the default IPAddress To obtain a new IP address from the DSA 3100 you may need to restart your computer or release and renew your IP address Make sure that the network adapter in your computer is configured properly Instructions for configuring the network adapter to obtain an IP address automatically from the DSA 3100 can be...

Page 5: ...gged in the home screen will appear You have the option to establish a new password for the admin account Click Run Wizard Select the appropriate time zone for your location Click Next Enter a new admin password and retype it for verification Click Next ...

Page 6: ...NS Server IP IP address of the DomainName Server Click Next Select the type of Internet connection that you have Select an Option Click Next Configure the Public LAN Port IP Address The IP address used for the DSA 3100 on the Public LAN Subnet Mask The Subnet Mask of the DSA 3100 on the Public LAN DHCP Server Enabled Disabled With DHCP Server enabled IP addresses are provided automatically to clie...

Page 7: ... Enter a User Name and Password information as necessary User Accounts can be restricted to specific MAC addresses if desired Click Add after entering each User Account Repeat this step for each user Click Next Specify a range of IP addresses to assign the DHCP clients The range is entered in the format Start IP End IP i e 192 168 0 101 192 168 0 200 Enter the Domain Name and Primary DNS Server se...

Page 8: ...8 Click Restart Setup Wizard Complete Click Restart to complete your configuration Using The Setup Wizard continued ...

Page 9: ...ically from the DSA 3100 Airspot Public Private Gateway Microsoft Windows XP Go to Start right click on My Network Places select Properties Right click on the Network Connection of the Ethernet adapter connecting to the DSA 3100 and select Properties Appendix IP Configuration Click OK Click Internet Protocol TCP IP Click Properties Select Obtain an IP address automatically ...

Page 10: ...address information the Subnet Mask the DSA 3100 IP address and the Ethernet adapter address will appear Click on Network Click on Apply Now Select Using DHCP in the Configure pull down menu Select Built in Ethernet in the show pull down menu Appendix IP Configuration continued ...

Page 11: ...11 Notes ...

Page 12: ...technical support through our website or by phone Tech Support for customers within the United States D Link Technical Support over the Telephone 877 453 5465 6am 6pm PST Mon Fri D Link Technical Support over the Internet http support dlink com email support dlink com Tech Support for customers within Canada D Link Technical Support over the Telephone 800 361 5265 Monday to Friday 8 30am to 9 00pm...

Reviews: