background image

Networking Basics 


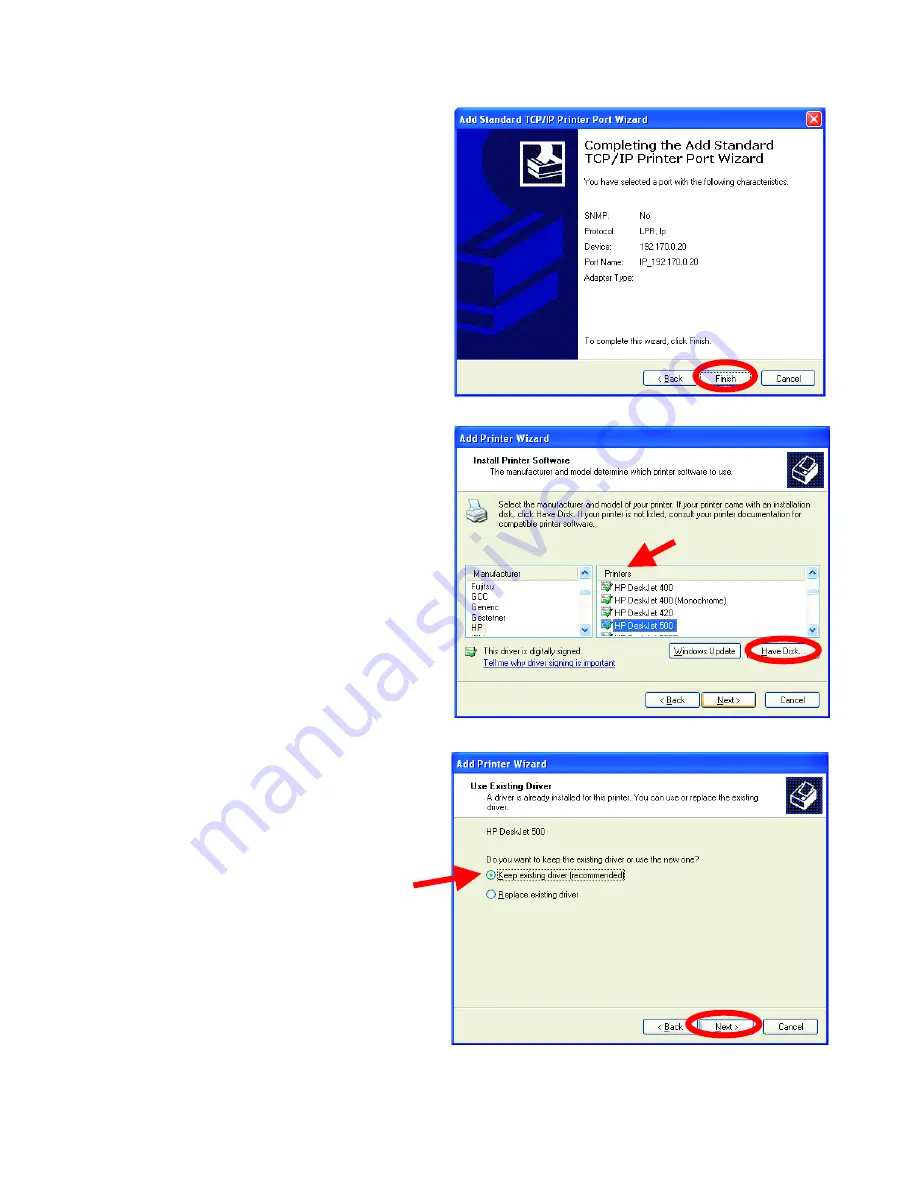
Sharing an LPR printer


• 

This screen will show 
you information 
about your printer. 


• 

Click

 Finish 

• 

Select the

 printer

you 

are adding from the 
list of 

Printers

.  


• 

Insert the printer 
driver disk that came 
with your printer.  


• 

Click 

Have Disk


If the printer driver is already 
installed,  
 

• 

Select 

Keep existing 

driver 


• 

Click

 Next 

Summary of Contents for AirPlus DWL-800AP+

Page 1: ...D Link AirPlus DWL 800AP Enhanced 2 4 GHz Wireless Range Extender Manual Building Networks for People ...

Page 2: ... 2 Introduction 4 3 Wireless Basics 8 4 Getting Started 11 5 Using the Configuration Menu 13 6 Troubleshooting 18 7 Networking Basics 24 8 Technical Specifications 53 9 Contacting Technical Support 55 10 Warranty and Registration 56 ...

Page 3: ...nt voltage rating than the one included with the DWL 800AP will cause damage and void the warranty for this product If any of the above items are missing please contact your reseller System Requirements For Configuration Computer with Windows Macintosh or Linux based operating system with an installed Ethernet adapter Internet Explorer 6 0 or later or Netscape Navigator version 6 0 or above with J...

Page 4: ... DI 614 Wireless Router After completing the steps outlined in the Quick Installation Guide included in your package you will have the ability to share information and resources such as files and printers and enjoy the freedom that wireless networking brings The DWL 800AP is compatible with most popular operating systems including Macintosh Linux and Windows and can be integrated into a large netw...

Page 5: ...tory Default Settings for the DWL 800AP Wireless Mode Repeater SSID default Channel 6 Transmission rates Auto Encryption No Administrator password Blank no password needed IP Address mode Static IP Address 192 168 0 30 IP Subnet 255 255 255 0 username admin all lower case Ethernet Reset Button Power Receptor Category 5 is the most reliable grade of twisted pair cable It Is available as either Stra...

Page 6: ...b standard and interoperable with all existing 802 11b compliant devices Stronger Network Security with 256 bit WEP Encryption Supports 64 128 256 bit WEP encryption for higher level of security for your data and wireless communication than encryption found in existing 802 11b products Setup Wizard for easy configuration Web based interface for Managing and Configuring Easy to use interface indepe...

Page 7: ... has 2 LEDs as shown below Power a steady Green light indicates a proper connection to a power source Wireless Link Act a steady Yellow light indicates a good wireless connection A blinking light indicates that the DWL 800AP is receiving transmitting from to the wireless network ...

Page 8: ...network Wireless adapter cards used on laptop and desktop systems support the same protocols as Ethernet adapter cards Under many circumstances it may be desirable for mobile network devices to link to a conventional Ethernet LAN in order to use servers printers or an Internet connection supplied through the wired LAN A Wireless Access Point AP is a device used to provide this link People use WLAN...

Page 9: ...eless Access Points Standards Based Technology The IEEE standard based technology assures that this product is interoperable with existing compatible 2 4GHz wireless technology This means you will be able to transfer large files quickly or even watch a movie in MPEG format over your network without noticeable delays The technology works by using multiple frequencies in the 2 4GHz range at speeds u...

Page 10: ...and computers A wall that is 1 5 feet thick 5 meters at a 45 degree angle appears to be almost 3 feet 1 meter thick At a 2 degree angle it looks over 42 feet 14 meters thick Position the range extender Access Points and adapters so that the signal will travel straight through a wall or ceiling instead of at an angle for better reception 3 Building Materials can impede the wireless signal A solid m...

Page 11: ...h a DHCP capable gateway router there is no need to manually assign an IP address The default setting for the DWL 800AP is Repeater mode Please note If you have a DHCP capable router such as the DI 604 there is no need to assign an IP Address If you need to assign IP Addresses to the computers on the network please remember that the IP Address for each computer must be in the same IP Address range...

Page 12: ...router Connect the router to the D Link AirPlus DWL 800AP Refer to the Quick Installation Guide for setting up the Access Point If you are connecting a desktop computer in your network you can install the D Link AirPlus DWL 520 wireless PCI adapter into an available PCI slot See the Quick Installation Guide included with the DWL 520 Install the drivers for the wireless cardbus adapter D Link AirPl...

Page 13: ...e changed the IP Address of the DWL 800AP to conform to a network other than one with D Link devices at their default setting then input that IP Address in the web browser instead of the default IP Address shown Open the web browser Type in the IP Address of the Access Point Type admin in the User Name field Leave the Password blank Click OK The Home window will appear Please refer to the Quick In...

Page 14: ...ur wireless network AP Name You may choose to rename your DWL 800AP especially if you have more than one Access Point on your network This window displays the default settings of the DWL 800AP The default IP Address is 192 168 0 30 If you select Dynamic IP Address you will obtain a dynamic IP Address from a DHCP server on your network The Subnet Mask is 255 255 255 0 Input the IP Address of the Ga...

Page 15: ...ame WEP selection either Enable or Disable and they must share the same WEP key The WEP key is generated from ASCII or Hexadecimal entries that are either 64 128 or 256 bit in length When enabling encryption select the Key Type ASCII or Hexadecimal and then input the appropriate digits or letters You can create up to 4 keys Select the key you wish to use Transmission Rate Select the transmission r...

Page 16: ...be saved as a file onto the local hard drive by clicking Save The saved file can be loaded back on the DWL 800AP by clicking Browse When you have selected the settings file click Load Click Restore to return to Factory Default Settings Firmware Upgrade Upgrade the firmware for the DWL 800AP Find upgrades to the firmware on the D Link website at http support dlink com After you have downloaded a fi...

Page 17: ...Menu Help The Help window displays information about each window in the Configuration menu When you change the settings in the Configuration menu you will need to restart the DWL 800AP for the changes to take effect ...

Page 18: ...e item 3 Check that the drivers for the network adapters are installed properly in this Troubleshooting section to check that the drivers are loaded properly Check that the IP Address is in the same range and subnet as the DWL 800AP Please see Checking the IP Address in Windows XP in the Networking Basics section of this manual Note The IP Address of the DWL 800AP is 192 168 0 30 All the computers...

Page 19: ...ess adapter double click on the Local Area Connection icon in the taskbar select the Support tab and the IP Address will be displayed Please refer to Checking the IP Address in the Networking Basics section of this manual If it is necessary to assign a Static IP Address to the wireless adapter please refer to the appropriate section in Networking Basics If you are entering a DNS Server address you...

Page 20: ...ed properly You may be using different network adapters than those illustrated here but this procedure will remain the same regardless of the type of network adapters you are using Go to Start Right click on My Computer Click Properties Select the Hardware Tab Click Device Manager ...

Page 21: ...e using a different wireless network adapter but your trouble shooting procedure will be similar to this example Select Properties to check that the drivers are installed properly Look under Device Status to check that the device is working properly Click OK D Link AirPlus DWL 650 Wireless Cardbus Adapter D Link AirPlus DWL 650 Wireless Cardbus Adapter D Link AirPlus DWL 650 Wireless Cardbus Adapt...

Page 22: ...ystems ceiling fans and lights your wireless connection will degrade dramatically or drop altogether Try changing the Channel on your Router Access Point and Wireless adapter to a different channel to avoid interference Keep your product away at least 3 6 feet from electrical devices that generate RF noise like microwaves Monitors electric motors etc 6 Why can t I get a wireless connection If you ...

Page 23: ...rPlus products network together out of the box at the factory default settings To hard reset the D Link AirPlus DWL 800AP to Factory Default Settings please do the following Locate the Reset button on the back of the DWL 800AP Use a paper clip to press the Reset button Hold for about 5 seconds and then release After the DWL 800AP reboots this may take a few minutes it will be reset to the factory ...

Page 24: ... or work using Microsoft Windows XP Note Please refer to websites such as http www homenethelp com and http www microsoft com windows2000 for information about networking computers using Windows 2000 ME or 98 Go to Start Control Panel Network Connections Select Set up a home or small office network When this screen appears Click Next ...

Page 25: ...ow all the instructions in this window Click Next In the following window select the best description of your computer If your computer connects to the internet through a gateway router select the second option as shown Click Next ...

Page 26: ...26 Networking Basics Enter a Computer description and a Computer name optional Click Next Enter a Workgroup name All computers on your network should have the same Workgroup name Click Next ...

Page 27: ...ing Basics Please wait while the Network Setup Wizard applies the changes When the changes are complete click Next Please wait while the Network Setup Wizard configures the computer This may take a few minutes ...

Page 28: ...hat fits your needs In this example Create a Network Setup Disk has been selected You will run this disk on each of the computers on your network Click Next Insert a disk into the Floppy Disk Drive in this case drive A Format the disk if you wish and click Next ...

Page 29: ...copies the files Please read the information under Here s how in the screen below After you complete the Network Setup Wizard you will use the Network Setup Disk to run the Network Setup Wizard once on each of the computers on your network To continue click Next ...

Page 30: ...ttings will take effect when you restart the computer Click Yes to restart the computer You have completed configuring this computer Next you will need to run the Network Setup Disk on all the other computers on your network After running the Network Setup Disk on all your computers your new wireless network will be ready to use ...

Page 31: ...dows XP Click Start in the lower left corner of the screen Right click on My Computer Select Properties and click Select the Computer Name Tab in the System Properties window You may enter a Computer description if you wish this field is optional To rename the computer and join a domain Click Change ...

Page 32: ...see Getting Started in this manual for a definition of IP Address To check on the IP Address of the adapter please do the following In this window enter the Computer name Select Workgroup and enter the name of the Workgroup All computers on your network must have the same Workgroup name Click OK Right click on the Local Area Connection icon in the task bar Click on Status ...

Page 33: ...puters on the network using DHCP Dynamic Host Configuration Protocol technology If you are using a DHCP capable Gateway Router you will not need to assign Static IP Addresses If you are not using a DHCP capable Gateway Router or you need to assign a Static IP Address please follow these instructions Go to Start Double click on Control Panel This window will appear Click the Support Tab Click Close...

Page 34: ...34 Networking Basics Assigning a Static IP Address Double click on Network Connections Right click on Local Area Connections Double click Properties ...

Page 35: ... For example if one computer has an IP Address of 192 168 0 2 the other computers should have IP Addresses that are sequential like 192 168 0 3 and 192 168 0 4 The subnet mask must be the same for all the computers on the network IP Address e g 192 168 0 2 Subnet Mask 255 255 255 0 Default Gateway Enter the LAN IP address of the wireless router D Link wireless routers have a LAN IP address of 192 ...

Page 36: ...to the Apple Menu and select System Preferences Click on Network Select Built in Ethernet in the Show pull down menu Select Manually in the Configure pull down menu Input the Static IP Address the Subnet Mask and the Router IP Address in the appropriate fields Click Apply Now ...

Page 37: ... Go to the Apple Menu and select System Preferences Click on Network Select Built in Ethernet in the Show pull down menu Select Using DHCP in the Configure pull down menu Click Apply Now The IP Address Subnet mask and the Router s IP Address will appear in a few seconds ...

Page 38: ...cess Point A good wireless connection will show four replies from the wireless router or access point as shown Checking the Wireless Connection by Pinging For Windows Me and 98 Go to Start Run type command A window similar to Fig 9 26 will appear Type ping xxx xxx xxx xxx where xxx is the IP address of the Wireless Router or Access Point A good wireless connection will show four replies from the w...

Page 39: ...dd a local printer a printer connected directly to one computer share an LPR printer a printer connected to a print server or share a network printer a printer connected to your network through a Gateway Router use the Add Printer Wizard Please follow the directions below First make sure that you have run the Network Setup Wizard on all of the computers on your network We will show you 3 ways to u...

Page 40: ...uter A printer that is not shared on the network and is connected directly to one computer is called a local printer If you do not need to share your printer on a network follow these directions to add the printer to one computer Go to Start Printers and Faxes Click on Add a printer ...

Page 41: ...o this computer Deselect Automatically detect and install my Plug and Play printer if it has been selected Click Next Select Use the following port From the pull down menu select the correct port for your printer Most computers use the LPT1 port as shown in the illustration Click Next ...

Page 42: ...xt If the correct driver is not displayed insert the CD or floppy disk that came with your printer and click Have Disk At this screen you can change the name of the printer optional Click Next Select Yes to print a test page A successful printing will confirm that you have chosen the correct driver Click Next ...

Page 43: ...Networking Basics Adding a local printer Click Finish Click OK This screen gives you information about your printer When the test page has printed ...

Page 44: ...rk you can run the Add Printer Wizard on all the computers on your network Please follow these directions to use the Add Printer Wizard to share a printer on your network Go to Start Printers and Faxes A successful installation will display the printer icon as shown at right You have successfully added a local printer Go to Start Printers and Faxes ...

Page 45: ...Networking Basics Sharing a network printer Click on Add a Printer Click Next Select Network Printer Click Next ...

Page 46: ...46 Networking Basics Sharing a network printer Select Browse for a printer Click Next Select the printer you would like to share Click Next Click Finish ...

Page 47: ...r installation You have completed adding the printer To share this printer on your network Remember the printer name Run the Add Printer Wizard on all the computers on your network Make sure you have already run the Network Setup Wizard on all the network computers After you run the Add Printer Wizard on all the computers in the network you can share the printer ...

Page 48: ...Server such as the DP 101P Please make sure that you have run the Network Setup Wizard on all the computers on your network To share an LPR printer please follow these directions Go to Start Printers and Faxes Click on Add a Printer The screen to the right will display Click Next Select Local printer Click Next ...

Page 49: ...LPR printer Select Create a new port From the pull down menu select Standard TCP IP Port as shown Click Next Please read the instructions on this screen Click Next Enter the Printer IP Address and the Port Name as shown Click Next ...

Page 50: ...an LPR printer In this screen select Custom Click Settings Enter the Port Name and the Printer Name or IP Address Select LPR Enter a Queue Name if your Print Server Gateway has more than one port you will need a Queue name Click OK ...

Page 51: ...you information about your printer Click Finish Select the printer you are adding from the list of Printers Insert the printer driver disk that came with your printer Click Have Disk If the printer driver is already installed Select Keep existing driver Click Next ...

Page 52: ...e other computers on your network Click Next Select Yes to print a test page Click Next This screen will display information about your printer Click Finish to complete the addition of the printer Please run the Add Printer Wizard on all the computers on your network in order to share the printer Note You must run the Network Setup Wizard on all the computers on your network before you run the Add...

Page 53: ...E 802 11 IEEE 802 11b IEEE 802 3 IEEE 802 3u Port Auto MDIX 10 100 Mbps Fast Ethernet Frequency Range 2 4 2 4835 GHz Data Rates with Automatic Fallback 22 Mbps 11 Mbps 5 5 Mbps 2 Mbps 1 Mbps Encryption 64 128 256 bit WEP Diagnostic LEDs Power Green WLAN Yellow External Antenna Type Detachable with reverse SMA connector Operating Range Indoors up to 328 feet 100 meters Outdoors up to 1 312 feet 400...

Page 54: ...trum DSSS CCK Complementary Code Keying 11 chip Barker sequence Modulation Techniques PBCC 22Mbps 8 5db PBCC 11Mbps 4 5db CCK 11 Mbps 8 5db PBCC 5 5 Mbps 1 5db CCK 5 5Mbps 5 5db Barker 2 Mbps 3db Barker 1Mbps 0db Power Input External Power Supply DC 5V 2 5A Transmitter Output Power 15dBm 32mW 2dB Over driving levels Tolerates up to 17dBm at the antenna Device Management Web Based Internet Explorer...

Page 55: ...he United States for the duration of the warranty period on this product U S customers can contact D Link technical support through our web site or by phone D Link Technical Support over the Telephone 877 453 5465 24 hours a day seven days a week D Link Technical Support over the Internet http support dlink com When contacting technical support please provide the following information Serial numbe...

Page 56: ...hich the purchase price is refunded shall become the property of D Link upon replacement or refund Limited Software Warranty D Link warrants that the software portion of the product Software will substantially conform to D Link s then current functional specifications for the Software as set forth in the applicable documentation from the date of original retail purchase of the Software for a perio...

Page 57: ...ence misuse faulty installation lack of reasonable care repair or service in any way that is not contemplated in the documentation for the product or if the model or serial number has been altered tampered with defaced or removed Initial installation installation and removal of the product for repair and shipping costs Operational adjustments covered in the operating manual for the product and nor...

Page 58: ...ction against harmful interference in a residential installation This equipment generates uses and can radiate radio frequency energy and if not installed and used in accordance with the instructions may cause harmful interference to radio communication However there is no guarantee that interference will not occur in a particular installation If this equipment does cause harmful interference to r...

Reviews: