background image

AX-AERO48 (AX-AERO38)

1

2

3

4

5

6

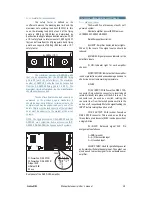
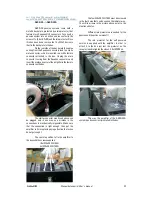
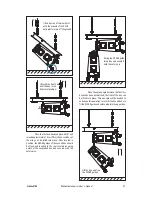
Quick release pin must be
inserted thru the slot of G2A48.

3 y 4

AERO-38

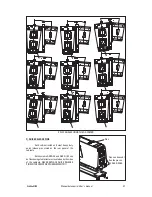
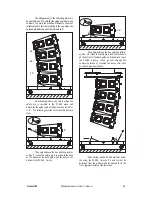
Once the boxes have been joined, the front

dolly panels can be removed. The next boxes should
be attached “one by one” using the methods
described. Finally, the array should be hoisted to the
correct height and secured with slings to avoid
swinging. This method is more time consuming than
assembling an array by the “all at once” procedure,
but is appropriate for situations due to a lack of space
in which to array the system. During the process, the
safety pins should be checked making sure they are
secured correctly. Once the complete array has been
lifted into place, additional slings should be attached
to secure the array and avoid swinging.

AERO-182 systems can be flown one by one

as described previously!!.

4.4 ASSEMBLING AN ARRAY USING
THE PL-38 PLATFORM

The PL-38 platform can be used to easily

transport AERO-38 units to the assembling area. To
use this method of assembling and hoisting the array,
there must be enough space to permit linking all the
boxes from the front of the the rigging hardware.

The first step will be to attach the AX-

AERO48 or AX-AERO38 grid and the 2 hoists. Once
this has been accomplished, the grid structure can be
placed in a vertical position by lifting the rear hoist and
lowering the front hoist so that the rear of the grid is on
top and the front of the grid at the bottom, ready to
receive the first box.

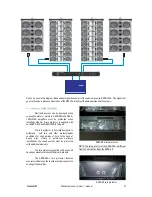
Rigging points

The next step is to attach the first unit to the

grid by introducing the G1A48 and G2A48 guides in
the receiving points of the grid structure and assuring
them with the (6) safety pins. The safety pins should
be inserted in the slot of the G2A48. It is very
important to make sure that the pins have been
inserted and locked correctly.

58

Aero-38

Manual del usuario/

User´s manual

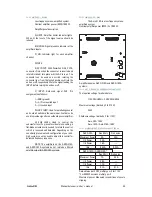
Lift the box and introduce the
G1A48 guides securing them
with the safety pins.

Summary of Contents for AERO-38 series

Page 1: ...Manual del Usuario User s Guide AERO 38 series...

Page 2: ...lamente por personal cualificado No cuelgue la caja delasasas Noreemplacepasadoresdeseguridadportornillos Precauciones de seguridad Safety Precautions The exclamation point inside an equilateral trian...

Page 3: ...AERO 218 enclosures are rectangular The Aero 38 and AERO 182 systems incorporate captive rigging hardware which is compatible with one another and designed to provide a fast simple and safe rigging by...

Page 4: ...important to avoid injury and absolutely no risks should be taken in this respect It is highly recommended that you implement an inspection and maintenance program on flying elements including reports...

Page 5: ...han the other one and it is recommended to be used to fly a maximum of 8 cabinetsAERO 38Aor6AERO 48 Weight Dimensions 147x62x10 cm Al x An x P 60Kg 132 lbs 57 8x24 4x4 in For example if 12 units AERO...

Page 6: ...rigging grid The AX COMBO includes front and rear steel guides which permit variation of the angle between it and the last AERO 38 cabinet in the cluster Anglesvaryfrom0 0 to9 6 AX COMBO G2A48 G1A48...

Page 7: ...ins stored on the rear panel of the cabinets Both systems AERO 38 and AERO 182 can be flown using steel structures located on boths sides of the cabinets NEVER REPLACE QUICK RELEASE PINSWITHSCREWSOROT...

Page 8: ...00Kg 10 1 3 1 AERO 38A 3 SELF POWERED SYSTEMS The Aero 38A is a three way class D self powered system Nominal amplifier power RMS per way LF 1000W MF 500W HF 500W Amplifierpaneldescription A A B C E F...

Page 9: ...and configuration of your mid high system you may need to adjust this control for balancedfrequencyresponse INPUT SUB LEVEL NOTE The amplifiers on the AERO 218A and AERO 182A systems do not inlclude a...

Page 10: ...elow the shutdown voltage for the unit it will stop playing When acceptable levels are regained the unit will switch backonautomatically 3 9 ECUALIZATION The AERO 38A can be used full range Full range...

Page 11: ...plied with eachAERO 38AandAERO 182A 218Aunit The rain protector is specially designed to withstand soft rain and other meteorological conditions for short periods of time In the case of heavy rains st...

Page 12: ...ors and insertthemaleconnectoroftheamplifierinthefemale connectoronthebox The four M4x30 DIN 7985 must be screwed in the four holes that can be seen on the radiator area The white arrows in the pictur...

Page 13: ...he black wire and a smaller 4 8mm female terminal to the red wire Connecting the terminals to the correct male terminals on the amplifier circuit boardamplifie thepolaritywillbecorrect faston faston f...

Page 14: ...e attached to the black wire and the small terminal should be attached to the redwire faston faston 6 3mm wide 4 8mm wide In the case of the AERO 218A the same processappliestothesecondamplifierintheb...

Page 15: ...e using an incorrect un balanced to balanced cable 2 The mixer and the powered speaker are not plugged into the same mains outlet 3 The audio signal cable is too long or too close to an AC cable 1 Rea...

Page 16: ...ay has been attached to the AX AERO48 or AX AERO38 the assembly should be lifted by way of the rear hoist until the wheels of the PL 38 dolly platform lift off the ground From this point on the front...

Page 17: ...place and secure it with the safety pin Once the splay angle between the first two boxes has been determined the front of the box can be lifted into place Three people will be needed to undertake this...

Page 18: ...LATFORM The PL 38 platform can be used to easily transport AERO 38 units to the assembling area To use this method of assembling and hoisting the array there must be enough space to permit linking all...

Page 19: ...eflown thesafetypinsshouldbeintheslotof theG2A48guide As the array assembly is lifted 6 7 the PL 38platformsshouldberemoved Once the complete array has been lifted into place additional slings should...

Page 20: ...Manual del usuario User s manual 60 Aero 38...

Page 21: ...kedontheplatform The PL 48S platform has two types of moving pieces One of them is fixed PL 48S_2 and can only be swung around the other is free PL 48S_1 and is joined to the platform by way of a safe...

Page 22: ...48S_2 piece by removing the safety pins 1 Next swing the pieces and introduce them 2 into the rear rigging hardware of thelowestbox securingthemwiththesafetypin 3 1 2 6 4 5 3 7 G2A48 Quick release pin...

Page 23: ...is stacked safely on the PL 48S platform To move the stack slightly raise the upper group of boxes and rollawaythelowergroup When the G1A48 pieces have been freed they should be turned 11 and stored 1...

Page 24: ...X AERO48grid The last step consists of lowering the remaining array so that the safety pins can be inserted 18 into the holes of the PL 48S_1 pieces and the platform B Stacked units MAX 4 units Beside...

Page 25: ...the platform will be 0 when the safety pin is inserted in the hole on the bottom of the back guide and the hole on the bottomofthePL 48S_2piece The angle between the box and the platform willbe 1 6 wh...

Page 26: ...Then the safety pins can be inserted 7 in the holes As has been said before the splay angle between the platform and the box is given by theholeusedinthePL 48S_2piece The hole chosen in this example...

Page 27: ...till the holes fit together and finally insert the safety pins again Lower the cluster till the platform is resting onthefloor 67 Aero 38 Manual del usuario User s manual 8 G2A48 Stack Fly G2A48 9 1...

Page 28: ...sert the safety pins into the holes 18 that determine the angle previously selected for stacking Repeat the same procedure with box number 1 lower the cluster 19 free the rear guides G2A48 20 21 andse...

Page 29: ...tached from boxnumber1 In order to set up the angle between boxes 1 and 2 you must pull up 23 from the grid until the hole in the G2A48 piece fits with the hole that determines thestackingangle Thenin...

Page 30: ...attach the box on top to the grid front guides G1A48 and rear guides G2A48 must be swung 2 and inserted into the AX AERO48 grid receiving points Once this has been done detach the 6 safety pins from...

Page 31: ...the PL 48S_2 piece to the box After raising the cluster a bit the safety pins which connect the PL 48S_1 piece to the box can be released 8 also PL 48S_1 piece should now be reattached again to the p...

Page 32: ...s 9 of the first box on the platform can now be swung and left in the upright position ready to be inserted into the front rigginghardwareofthenextbox Lower the cluster until the G1A48 front guides fi...

Page 33: ...nserting thesafetypinsinthecorrecthole From here on the process is similar to the previously described Detach the safety pins from their receptacles on the sides of the boxes swing 12 the G2A48 rear g...

Page 34: ...cies limiterssettings etc are to LINK 2 x 750 1200 W 4ohm 2 x 750 1200 W 4ohm 2 x 750 1200 W 4ohm 2 x 750W 4ohm 4HF 3MF 2LF2 1LF1 4HF 3MF 2LF2 1LF1 80Hz 1LF1 CH A CH B RECOMMENDED AMPLIFIERS 1LF1 DSP...

Page 35: ...ates have been disposed on the top and bottom sides of the box Both plates can be removed clearing the access to the driverfrombothsides First remove the screws from the aluminium plates The following...

Page 36: ...ems each way can be easily identifiedbythewirecolour 3 1 1 3 4 4 2 2 ct Internal conne ions in the AERO 38 system In order to access the speakers in the AERO 182 and AERO 218Sub subwoofer units first...

Page 37: ...Steel Stacking Dolly Model Frequency Range 10 dB Horizontal Coverage 6dB Vertical Coverage RMS Average Power Handling On Axis Sensitivity 1 W 1 m Rated Maximum Peak SPL at 1 m Transducers Replacement...

Page 38: ...T PowerCon NAC 3 FCA AC OUTPUT Powercon NAC 3 DFCB 115V 50 Hz 60 Hz 230V 50 Hz 60 Hz 101 x 68 x 82 5 cm 39 8 x 26 8 x 32 5 in 98 kg 215 6 lb Aero 218 Sub 28 Hz 85 Hz 1400 W 103 dB SPL 140 dB LF 2 x 18...

Page 39: ...0 775 GdB In this example we are going to feed the highs of AERO 38 with one amplifier channel Total impedance of 2 ND 10 high frequency drivers as wired in the AERO 38 is 8 Ohms The maximum rms power...

Page 40: ...LOW CUT HIGH CUT EQ 1FREQ EQ 1LEVEL EQ 1BW 0 dB 125 Hz 6 dB 0 4 oct Normal 50 Hz LR 24 159 Hz LR 24 60 Hz 3 dB 0 3 oct 2 dB Normal 159 Hz LR 24 757 Hz LR 24 450 Hz 6 dB 0 4 oct 9 dB Normal 12 5 kHz 1...

Page 41: ...PERATING PARAMETERS GAIN EQ 2FREQ EQ 2LEVEL EQ 2BW EQ 3FREQ EQ 3LEVEL EQ 3BW POLARITY LOW CUT HIGH CUT EQ 1FREQ EQ 1LEVEL EQ 1BW 0 dB 125 Hz 6 dB 0 4 oct Normal 50 Hz LR 24 159 Hz LR 24 60 Hz 3 dB 0 3...

Page 42: ...RATION 2 16 x 38a 4 x 182a aero aero power LINK LINK LINK LINK INPUT POWER 4 x ero 38A a aero 38A LINK INPUT POWER POWER 2 x ero 182A a aero 182A aero 38A self powered system aero 38A self powered sys...

Page 43: ...o aero 115V max 3 units in parallel 230V max 6 units in parallel AC CONNECTIONS WARNING power LINK LINK LINK LINK INPUT POWER 4 x ero 38A a aero 38A power LINK LINK LINK LINK INPUT POWER 2 x ero 218A...

Page 44: ...th signal conductors in the same way At the device s input the two signals get summed with opposite sign so that noise is cancelled out while the programme signal doubles in level Most professional au...

Page 45: ...4 96 134 0860 Fax Intl 34 96 134 0607 D A S AUDIO of AMERICA Inc Sunset Palmetto Park 6816 NW 77th Court Miami FL 33166 U S A TOLL FREE 1 888DAS4USA Tel 305 436 0521 D A S AUDIO DEUTSCHLAND GmbH Frank...

Reviews: