8
6. OPERATION CONTROLS AND FUNCTIONS
6.1 Front Panel
POWER
A
B
IN 1
IN 2
IN 3
IN 4
MATRIX
1
2
3
4
MULTI VIEW
WINDOW SOURCE SELECT
W1
W2
W3
W4
1
2
3
4
1 2
3 4
2
1
1 2
1
2
3
4
MENU
LOCK
ENTER
PRESET
+
-
EL-42PIP
1
2
5
3
4
6
7
8 10
11
9
1
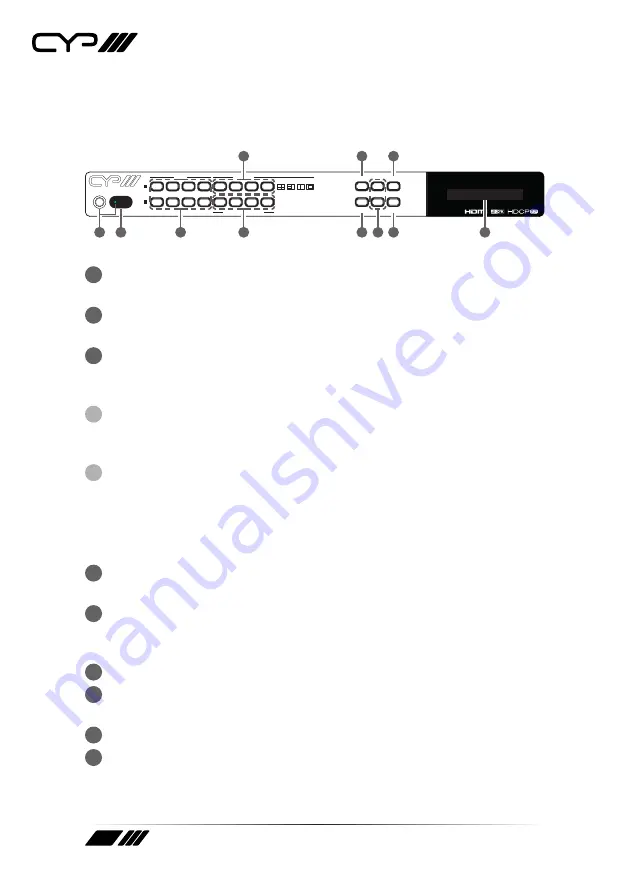
POWER:
Press this button to power the unit on (green LED) or place it
into stand-by mode (red LED).
2
IR WINDOW:
Accepts IR signals from the included IR remote for
control of this unit only.
3
MATRIX A/B IN1~IN4:
These input selection buttons behave
differently depending on the current input and output resolutions in
use.
A
All inputs and outputs are below 4K:
Press any of these buttons to
seamlessly switch to the selected input (IN1~IN4)for display on the
associated output (A or B).
B
Any input or output is 4K:
Press any of these buttons to seamlessly
switch to the selected input (IN1~IN4) for display on both outputs
simultaneously.
Note: Audio for both outputs will follow the most recently selected input
(from A or B) in both modes.
4
MULTIVIEW:
Press any of these buttons to switch immediately to the
corresponding Multiview output mode.
5
WINDOW SOURCE SELECT:
Press these buttons to sequentially
switch through the available inputs for each window in Multiview
output modes.
6
MENU:
Press to enter the LCD menu, or to back out from menu Items.
7
ENTER:
Press to confirm a selection within the LCD menu or to go
deeper into a menu item.
8
+ & −:
Press to move up and down or adjust selections within menus.
9
LOCK:
Press to lock all button functions on the front panel. Press the
button again to release the lock function. The LCD will display a “Lock”
message when the function is active.


