background image

8

6. OPERATION CONTROLS AND FUNCTIONS

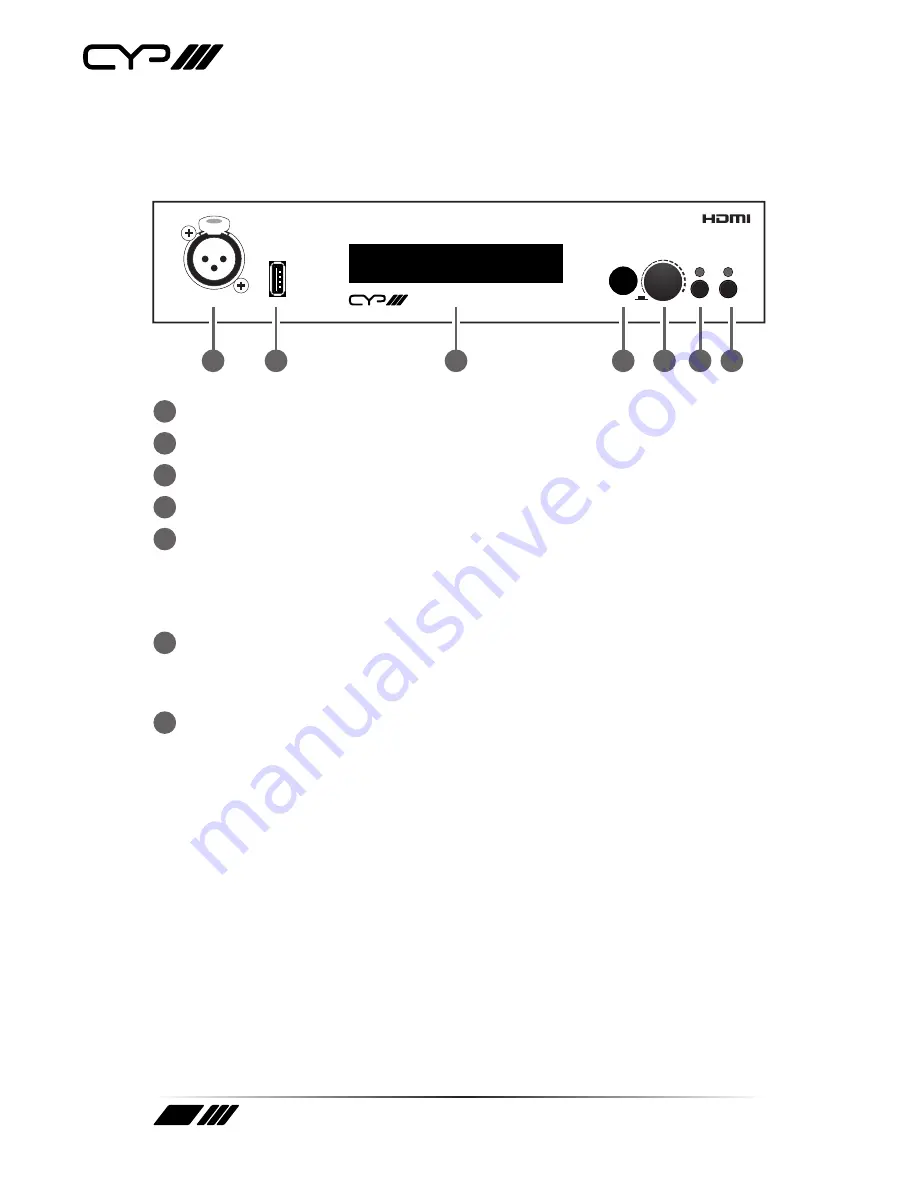
6.1 Front Panel

PUSH

EXIT POWER

UPDATE

Integrated Zone Amplifier 

CONTROL

MIC

Coaxial In  -20.0 dB

 44.1K  ->   44.1K

1

2

3

4

5

6

7

1


MIC: 

Connect to a microphone or a mono balanced source.

2


UPDATE: 

Manufacturer use only. 

3


OLED: 

Display current  source selection and volume setting.

4


IR WINDOW: 

Accepts the IR signal from the supplied remote control.

5


CONTROL: 

Control and direct volume adjustment. Turn the wheel to 

directly adjust the volume level when not in the menu or press it to 

enter into the menu. Turn the wheel to navigate the menu and press it 

again to enter or confirm the selection. 

6


EXIT: 

Press this button to exit the menu. When not in the menu press 

this button to mute the output, the LED will illuminate in red. Press it 

again to unmute.

7


POWER: 

Press this button to turn on the device, the LED will 

illuminate in blue to indicate that it is powered. Press it again to switch 

to standby mode, the LED will turn red to indicate that it is in standby.

Summary of Contents for AU-A300

Page 1: ...AU A300 Integrated 2 Channel Zone Amplifier OPERATION MANUAL ...

Page 2: ......

Page 3: ...rves the right to make improvements to this document and or product at any time and without notice COPYRIGHT NOTICE No part of this document may be reproduced transmitted transcribed stored in a retrieval system or any of its part translated into any language or computer file in any form or by any means electronic mechanical magnetic optical chemical manual or otherwise without express written per...

Page 4: ...pty slots in the unit as you may damage parts inside the unit Do not attach the power supply cabling to building surfaces Use only the supplied power supply unit PSU Do not use the PSU if it is damaged Do not allow anything to rest on the power cabling or allow any weight to be placed upon it or any person walk on it To protect the unit from overheating do not block any vents or openings in the un...

Page 5: ...ctions 8 6 1 Front Panel 8 6 2 Rear Panel 9 6 3 Remote Control 10 6 4 OLED Menu 11 6 5 RS 232 Protocols 12 6 6 RS 232 and Telnet Commands 12 6 7 Telnet Control 14 6 8 Web GUI Control 16 7 Connection Diagram 17 8 Specifications 18 8 1 Technical Specification 18 8 2 Audio Specification 19 8 3 Amplifier Specification 19 9 Acronyms 20 ...

Page 6: ... a dedicated source within an AV system 2 APPLICATIONS Matrix Zone Audio Routing and Amplification Corporate events Educational Presentation Stereo Ceiling Speaker Systems Analogue to Digital and Digital to Analogue Conversion HDMI Audio Embedding and de embedding 3 PACKAGE CONTENTS 1 Integrated Zone Amplifier 1 IR Receiver 1 Remote Control CR 126 1 24V 3 75A DC Power Adaptor and Power Cable Opera...

Page 7: ...ntrol via remote control RS 232 or IP Web GUI or Telnet Simultaneous audio outputs Dedicated Microphone input for commercial applications Supports Digital to Analogue DAC and Analogue to Digital ADC conversion Compact design for remote application Supports a wide range of resolutions from 480i to 1080p and VGA to WUXGA RB Supports HDMI audio loopthrough and video bypass output Note Does not suppor...

Page 8: ...l and direct volume adjustment Turn the wheel to directly adjust the volume level when not in the menu or press it to enter into the menu Turn the wheel to navigate the menu and press it again to enter or confirm the selection 6 EXIT Press this button to exit the menu When not in the menu press this button to mute the output the LED will illuminate in red Press it again to unmute 7 POWER Press thi...

Page 9: ... Laptop or control system with D sub 9 pin cable for RS 232 control 6 LINE IN Connect to an audio source with 3 5mm mini jack cable for stereo audio signal input 7 OPT and COAX IN Connect to source equipment such as a Set top box or games console with an optical or coaxial digital output 8 OPT and COAX OUT Digital audio output Connect to additional amplifiers or active speakers 9 RCA IN Connect to...

Page 10: ...ut volume up or down 4 INPUT Press these hot keys to switch the required input source directly 5 MENU Press this button to enter the OLED MENU then press the up or down buttons to select the required option and press it again to confirm the selection 6 EXIT Press this button to go back one step or exit from the menu CR 126 MUTE POWER VOL MENU EXIT HDMI 1 HDMI 2 OPTICAL COAXIAL LINE LR INPUT 1 3 4 ...

Page 11: ...n Coaxial In Line In RCA L R In HDMI Setting Video HDMI 1 HDMI 2 Audio HDMI 1 Ext Audio Display Set Timeout 5s Timeout 10s Timeout 15s Mic Setting Off Normal Phantom Line Mode Volume Line Out Setting Fix Level Default IP Configuration IP SN GN Reset To Default OK Note Only the corresponding video for the currently selected HDMI audio input will be output from the HDMI output ...

Page 12: ...6 6 RS 232 and Telnet Commands COMMAND DESCRIPTION HELP Display list of commands H Alias for HELP Alias for HELP PWR S 0 1 Power control S Status 0 Off 1 On SOURCE S 0 5 Source in selection S Status 0 HDMI 1 1 HDMI 2 2 Opt 3 Coax 4 Line in 5 RCA in VOL S 0 80 Output volume setting 0 80db S Show Vol 0 5db 2db 0 5db 2db or 0 80db MUTE S 0 1 Output volume mute control S Status 0 Unmute 1 Mute MICVOL ...

Page 13: ...AC Print the MAC address to the screen SHOWTPORT Print the Telnet communication port to the screen SHOWHPORT Print the HTTP communication port to the screen SIPADD Set the IP address SNETMASK Set the Net Mask address SGATEWAY Set the Gateway address SHTTPPORT Set the HTTP communication port 1 62235 80 STELNETPPORT Set the Telnet communication port 1 62235 23 Note RS 232 commands will be not execut...

Page 14: ...are connected to the same active network To access the Telnet control in Windows 7 click on the Start menu and type cmd in the Search field then press enter Under Windows XP go to the Start menu and click on Run type cmd with then press enter In the Mac OS X Finder select Go Applications Utilities Terminal from the taskbar See below for reference ...

Page 15: ...onfig option in the settings menu This will bring us into the device which we wish to control Type H to list the available commands Type IPCONFIG to show all IP configurations To reset the IP type RESETIP Note All the commands will be not executed unless followed by a carriage return Commands are not case sensitive If the IP is changed then the IP Address required for Telnet access will also chang...

Page 16: ... On a PC Laptop that is connected to the same active network as the Integrated Zone Amplifier open a web browser and type device s IP address into the web address entry bar The browser will display the device s control page ...

Page 17: ...KER RCA IN DC 24V IR IN OUT IN R L R L 7m 3m 3m 60 m m 3m IR Extender Modem Router HDTV Power Supply Speakers Active Speakers Amplifier DVD Player Blu ray Player Set top Box Smartphone or Tablet PC or RS 232 Control System CD Player Analog Stereo Output RS 232 Analog Stereo Input Analog Stereo Input Digital Optical and Coaxial Inputs Digital Optical Output Digital Coaxial Output Speaker Level Outp...

Page 18: ...tput Level 2 Vrms 0 2 HDMI Cable Distance Up to 15m 1080p 12 bit IR Frequency 38kHz ESD Protection Human body model 8kV air gap discharge 4kV contact discharge Power Supply 24V 3 75A DC US EU standards CE FCC UL certified Dimensions 215mm W 172 5mm D 46mm H Weight 1060g Chassis Material Aluminum Silkscreen Color Black Operating Temperature Operating from 0 C 40 C Storage Temperature 20 C 60 C 4 F ...

Page 19: ...evel T H D N Freq Response SNR HDMI 1 2 OPTICAL COAX 0dBFS 1kHz HDMI 0dB 1dB 0 01 1dBFS 80dB OPTICAL COAX L R 2 0Vrms 10 0 1 1dBFS 70dB Analog L R Phone Jack 2 0Vrms 1kHz HDMI 0dB 1dB 0 01 1dBFS 80dB OPTICAL COAX L R 2 0Vrms 10 0 1 1dBFS 80dB 8 3 Amplifier Specification ...

Page 20: ...20 9 ACRONYMS ACRONYM COMPLETE TERM CAT5e Category 5 Cable CAT6 Category 6 Cable COAX Coaxial HDMI High Definition Multimedia Interface OLED Organic Light Emitting Diode OPT Optical ...

Page 21: ......

Page 22: ......

Page 23: ......

Page 24: ...CYP UK Ltd Unit 7 Shepperton Business Park Govett Avenue Shepperton Middlesex TW17 8BA Tel 44 0 20 3137 9180 Fax 44 0 20 3137 6279 Email sales cypeurope com www cypeurope com v1 04 ...

Reviews: