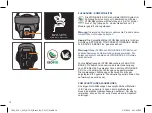


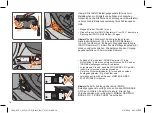


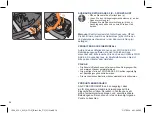


• Now lower the foot end of the ATON infant carrier until the
second locking bar (z) engages with the locking hooks (o),
audible with a CLICK.
• Ensure that the indicator button (x) on the unlock key (j) is
clearly visible. Pull on the carrying handle (a) to verify a proper
installation.
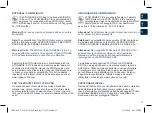
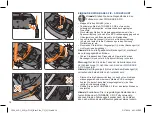
REMOVING OF THE ATON
• Push the indicator button (x) to release the unlock key (j).
• Simultaneously press the unlock key (j) and tilt the infant carrier
slightly forward until the locking bar (z) disengages from the
locking hooks (o) on the food end side.
• Now ATON can be lifted out of the base.
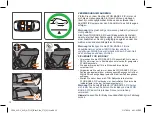
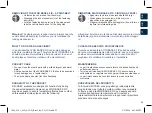
REMOVING OF THE ATON BASE 2-FIX – ISOFIX
• Perform all installation steps in reverse order.
• Release the ISOFIX connectors (C) by simultaneously
pulling and slinging back the release buttons (E).
• Pull ATON BASE 2-FIX out of the ISOFIX guides (f).
• Rotate the ISOFIX connectors (C) by 180° to bring them
to their original position.
• Abbassare ora il lato piedi del seggiolino dove è posta la
seconda barra di fissaggio (z) che deve collegarsi agli appositi
ganci di bloccaggio (o) con un sonoro „click“.
• Assicuratevi che l‘indicatore di corretto ancoraggio (x) sulla
maniglia di sblocco (j) sia ben visibile. Verificare la corretta
installazione sollevando il manico di trasporto (a).
TOGLIERE IL SEGGIOLINO ATON
• Premere il pulsante indicatore di corretto ancoraggio (x) per
sbloccare la chiave di rilascio (j).
• Premere la chiave di rilascio (j) e contemporaneamente inclinare
leggermente in avanti il seggiolino fino a staccare la barra (z)
dagli agganci (o) dal lato piedi.
• Ora è possibile sollevare agevolmente l‘ATON dalla sua base.
RIMOZIONE DI ATON BASE 2-FIX - ISOFIX
• Eseguire tutti i passaggi dell‘installazione nell‘ordine
inverso.
• Sbloccare il connettore ISOFIX (C) da entrambi i
lati, premendo i pulsanti di rilascio (E) e tirandoli
contemporaneamente indietro.
•
Sfilare ATON BASE 2-FIX dalle guide ISOFIX (f).
• Ruotare i connettori ISOFIX (C) di 180° per riportarli alla
posizione originaria.
23
DE
UK
IT
C100_823-1_01D_ATON_Base2-fix_UG_SG1.indd 23
5/17/2018 4:31:04 PM
Summary of Contents for ATON BASE 2-FIX
Page 2: ...C100_823 1_01D_ATON_Base2 fix_UG_SG1 indd 2 5 17 2018 4 31 00 PM ...
Page 5: ...3 4 5 10 11 9 3 C100_823 1_01D_ATON_Base2 fix_UG_SG1 indd 3 5 17 2018 4 31 01 PM ...
Page 7: ...5 10 11 3 9 4 5 C100_823 1_01D_ATON_Base2 fix_UG_SG1 indd 5 5 17 2018 4 31 01 PM ...
Page 8: ...C100_823 1_01D_ATON_Base2 fix_UG_SG1 indd 6 5 17 2018 4 31 01 PM ...
Page 34: ...32 C100_823 1_01D_ATON_Base2 fix_UG_SG1 indd 32 5 17 2018 4 31 05 PM ...
Page 60: ...58 C100_823 1_01D_ATON_Base2 fix_UG_SG1 indd 58 5 17 2018 4 31 09 PM ...
Page 86: ...84 C100_823 1_01D_ATON_Base2 fix_UG_SG1 indd 84 5 17 2018 4 31 13 PM ...


