background image

User Manual version 4.11

STH 15B 

Series

6-68

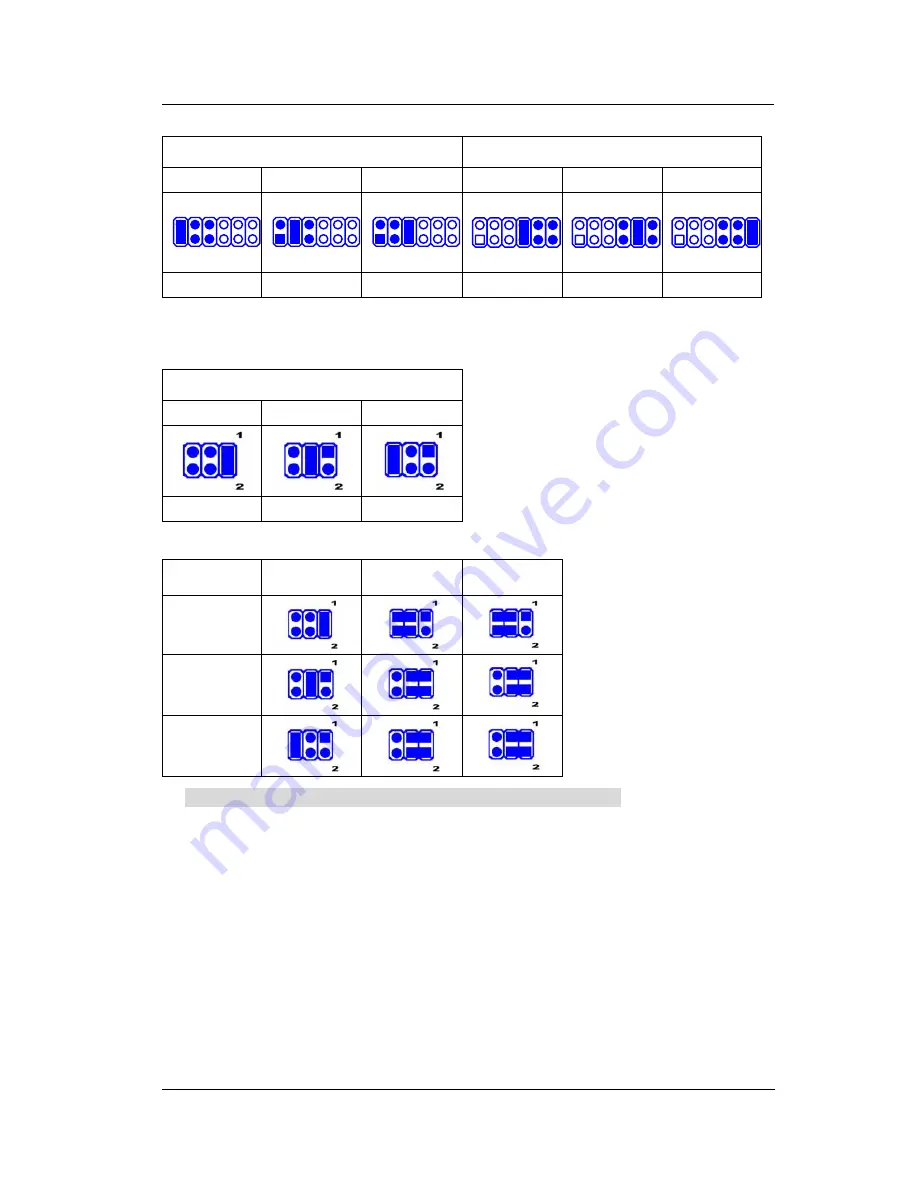
6.7.2.JP1 COM1/COM2 Pin9 Power selection 

COM 1

COM 2

Normal 12V  5V  Normal 12V  5V 

1

5

2

6

1

5

2

6

1

5

2

6

7

8

12

11

7

8

12

11

7

8

12

11

1-2 3-4 5-6 7-8 9-10 

11-12 

6.7.3.JP2 COM3 Pin9 Power selection 

COM 3

Normal 12V  5V 

1-2 3-4 5-6 

6.7.4.JP3 & JP4-1/2 COM2 RS-232/422/482 selection 

 JP3 

JP4-1 

JP4-2 

RS-232

RS-485

RS-422

      Note : RS-422/485 pin assignment see Connectors and pin define. 

Summary of Contents for STH 15B Series

Page 1: ...nual may be reproduced without permission STH 15B Series 15 LCD Panel PC with Intel or Celeron Processor and Optional Touchscreen CyberResearch Inc www cyberresearch com 25 Business Park Dr Branford C...

Page 2: ......

Page 3: ...mentioned herein are used for identification purposes only and may be trademarks and or registered trademarks of their respective companies NOTICE CyberResearch Inc does not authorize any CyberResear...

Page 4: ...Intentionally Blank...

Page 5: ...ood condition STH 15B series main system x 1 Accessories Power adapter AC power core x 1 Mounting kit optional x 1 set Stand kit x 1 set Utilities drivers and user manual CD x 1 Make sure that all of...

Page 6: ...e extension cord does not exceed the cord s ampere rating 5 Do not expose the power cord extension cord and power outlet to moisture 6 Install the computer on a reliable surface to prevent damage caus...

Page 7: ...e with use However hours of use will vary depending on the application environment 12 If the computer is equipped with a touch panel avoid using sharp objects to operate the touch panel Scratches on t...

Page 8: ...BIOS Setup 2 14 2 2 3 Operating System and Driver Installation 2 15 3 VERSATILE STANDING MOUNTING OPTIONS 3 16 3 1 UPRIGHT DESKTOP STANDING 3 20 3 2 30 TO 47O DESKTOP STANDING 3 21 3 3 OTHER STAND OPT...

Page 9: ...6 49 General Information 6 49 6 2 BOARD PLACEMENT DIMENSION 6 50 6 3 MAIN BOARD JUMPERS JUMPER SETTING 6 51 6 3 1 CMOS Clear Setting JRTC1 6 52 6 3 2 PWR 34 pin power connector 6 52 6 3 3 IDE1 1st ch...

Page 10: ...7 72 7 3 1 Main Menu 7 72 7 4 AWARD BIOS SETUP 7 72 7 4 1 AWARD BIOS Setup Main Menu 7 72 7 5 AWARD BIOS SETUP MAIN MENU 7 74 7 5 1 Standard CMOS Features 7 76 7 5 2 Advanced BIOS Features 7 79 7 5 3...

Page 11: ...1 3 Installation 9 99 9 1 4 Installing MonitorMouse for Windows system 9 101 9 1 5 Getting More Information 9 105 9 2 5 WIRE TOUCH SCREEN DRIVER INSTALLATION 9 105 9 2 1 For Windows 95 98 Me NT4 2000...

Page 12: ......

Page 13: ...5B series 1 1 1 INTRODUCTION This chapter provides background information and detailed specification on the STH 15B series Sections in this chapter include General Information Whats covered in this Ma...

Page 14: ...rd features include super I Os XGA 15 TFT flat panel touch screen Ethernet and multimedia functions The full PC functionality coupled with its multi I Os stand ready to accommodate a wide range of PC...

Page 15: ...C s various standing and mounting options by graphical illustrations Chapter 4 provides the procedures to connect external devices to the I O interface Chapter 5 helps you to recognize the STH 15B sys...

Page 16: ...lor TFT 1024 768 Viewing angle 100 Luminance cd m2 200 or above Simultaneous mode yes CPU Socket 478 Intel Pentium 4 Process MicroPGA FSB533 FSB 400 Maximum speed up to 3 06GHz FSB 533 System BIOS Awa...

Page 17: ...1 x S video RCA Optional 1 x Compact flash port Optional Ethernet LAN1 100 10 Base T Ethernet by SiS962 chipset LAN2 100 10 Base T Ethernet by PHY RTL8201BL chipset Watchdog Timer 64 level time inter...

Page 18: ...controller 15 capacitive type with RS 232 controller 15 surface acoustic wave type SAW Power Adapter 120W input range 100 240VAC 50 60Hz Output 20V 6 0A Speakers Speakers 2 CD ROM or DVD ROM Slim typ...

Page 19: ...e Pantone cool gray 3C Black Pantone 3x2X Dimension chassis only unit mm STH 15B 416 359 120 5 Mounting Panel mount with mounting kits Wall mount with swing arm standard VESA mounting holes 100 100 mm...

Page 20: ...ser Manual version 4 11 STH 15B Series 1 8 1 4 Dimensions 1 4 1 STH 15B The STH 15B s chassis size is shown below This does not include the dimension of the stand Dimension unit mm STH 15B chassis siz...

Page 21: ...User Manual version 4 11 STH 15B Series 2 9 2 USING THE SYSTEM Identifying the STH 15B system System setup for the first time use...

Page 22: ...B Series 2 1 1 Front View When the STH 15B Series is put upright on the desktop with the provided pedestal its front view appears as below The illustrations of the STH 15B Series may differ slightly F...

Page 23: ...2 11 2 1 2 Side Views The left side of the panel PC appears as below 2 1 3 Side door for two PCI ISA expansion outlet Floppy disk drive CD ROM Big pedestal Small base versatile stand A Versatile stand...

Page 24: ...ss B TV out S terminal Optional SiS302 C TV out RCA Jack Optional SiS302 D Ethernet 1 E Ethernet 2 F 2 channel DIO G VGA port H PS 2 Mouse I PS 2 Keyboard J Compact Flash slot K COM 1 L COM 2 M COM 3...

Page 25: ...tion Procedures 1 Connect the female end of the adapter power cord to the AC inlet located at the rear side of the panel PC 2 Connect the 3 pin male end of the power cord to an electrical outlet 3 Con...

Page 26: ...ased The BIOS setup program is stored in ROM which can be accessed by pressing DEL key on the keyboard immediately when the system is powered on In order to retain the specified setup information when...

Page 27: ...all your preferred ones there are several ways to load OS and software into the system 1 Via the CD ROM 2 Via Ethernet You can boot up the system via Ethernet boot Rom and download system OS or softwa...

Page 28: ...designed for universal standing and mounting to fit into various environmental applications This chapter highlights the steps of different mounting options with graphical illustrations Sections inclu...

Page 29: ...TH 15B Series 3 17 The STH 15B system comes with a versatile stand composing of one big pedestal and a small base The following diagrams show the major parts that make up the STH 3047 stand FIGURE 3 1...

Page 30: ...User Manual version 4 11 STH 15B Series 3 18 FIGURE 3 2 BIG PEDESTAL ASSEMBLY...

Page 31: ...User Manual version 4 11 STH 15B Series 3 19 FIGURE 3 3 STH 15B SMALL BASE ASSEMBLY...

Page 32: ...ts size all in one in its design along with its industrial grade reliability the STH 15B system standing upright is the best replacement for a desktop computer When the STH 15B is to stand upright onl...

Page 33: ...e pedestal assembled with the small base enables the STH 15B system to endure the long time operation in any public sectors By swiveling the two knobs on the small base and pulling the base up and dow...

Page 34: ...s stand is used when the STH 15B system is to stand upright while the touch screen is frequently used The big pedestal assembled with a special small prop enables the STH 15B to stand from 60 to 90o b...

Page 35: ...sets of VESA holes 75 75mm and 100 100mm on the rear side of the chassis System integrators can design their special wall mount brackets per the two sets of VESA holes or obtain market available swing...

Page 36: ...plication the 4 mounting holes on the upper side and the bottom side of the rear cover need to be cut through first Then use the 4 optional mounting brackets or design your own mounting brackets to mo...

Page 37: ...User Manual version 4 11 STH 15B Series 4 25 4 I O CONNECTION This chapter describes the STH 15B system I O ports and how to use the I O interface to connect to external devices...

Page 38: ...be used to connect to a wide array of printers ZIP drive parallel scanner and any other parallel devices The printer interface on the STH 15B Series is a 25 pin female D SUB connector To connect any p...

Page 39: ...COM port is with 5V 12V power capabilities on pin 9 providing easy accommodation to a broad range of serial devices The COM port 5V 12 power is selected via jumper setting on the IO TR board The IO TR...

Page 40: ...onnectors and pin define If a touch screen module is installed for factory default setting its controller will occupy COM3 COM1 to COM4 are all D SUB 9 pin connectors To connect to any serial device f...

Page 41: ...ss you may need to run the CMOS setup to change the hardware device setup If the COM2 is to be set to RS 485 for long distance transmission the related onboard jumpers have to be set correctly first R...

Page 42: ...uctions below 1 Turn of the STH 15B system and the Ethernet hubs 2 Plug in one end of cable of a 100 10 Base T hub to the system s RJ 45 phone jack The pin assignment of the RJ 45 is listed as follow...

Page 43: ...the RGB interface There is some application software that is to be executed in 800 600 resolution When the software is running under STH 15B 150 only part of the screen will show on the LCD display I...

Page 44: ...it You will need a shape screwdriver to adjust it for display brightness control 4 8 DIO Digital Input Output The STH 15B provides 2 channel DIO that can be used for the system s simple automation con...

Page 45: ...er the TV or the LCD can be used as the display at a given time they can not display images simultaneously Due to chipset limitation when the TV monitor is used as the display the graphic mode is view...

Page 46: ...audio driver has to be installed first before using any audio device 4 11 2 0 USB Ports The STH 15B Series also provides four 2 0 USB ports to connect to external USB devices A simple plug in of the...

Page 47: ...erviews the installation of the STH 15B s internal components and devices Sections include The exploded diagram Touch screen LCD assembly Power module assembly Installing the CPU Installing the SDRAM...

Page 48: ...DD and power supply are already housed in a plastic rear cover The system s performance depends on the installed CPU and the capacity of the system memory and hard disk drive In some circumstances you...

Page 49: ...ser Manual version 4 11 STH 15B Series 5 37 5 1 Recognizing the System Major Parts The following diagram shows the system major parts that make up the STH 15B Series FIGURE 5 1 STH 15B EXPLODED DIAGRA...

Page 50: ...li SAW touch screen PLEASE NOTE THAT WHEN DIFFERENT TOUCH MODULE IS INSTALLED DIFFERENT TOUCH SCREEN METAL BRACKETS ARE NEEDED YOU CAN NOT REPLACE ONE TYPE OF TOUCH PANEL WITH THE OTHER WITHOUT CHANGI...

Page 51: ...User Manual version 4 11 STH 15B Series 5 39 FIGURE 5 5 LCD MODULE TO FRONT BEZEL FIGURE 5 6 LCD MODULE TO MAIN SYSTEM...

Page 52: ...emove the CPU first by pulling the lever out a little and raising it then lifting out the existing CPU from the socket 2 To insert the CPU into the socket the notch on the corner of the CPU the corner...

Page 53: ...until they separate from the two vertical posts 3 Holding the memory module with the notch on the upper right corner then insert the memory module into the DIMM socket at 90q angle 4 Push the two eje...

Page 54: ...ew the 3 5 HDD module is located at the left bottom side of the system compartment Detach the existing 3 5 HDD module from the system chassis by removing the screw located at the left side of the chas...

Page 55: ...DD CD ROM cover at the right side of the chassis first Remove the two screws used to fix the module to the chassis Then the FDD CD ROM module will slide out of the chassis from the FDD CD ROM opening...

Page 56: ...unit to the system compartment from the CD ROM FDD opening Fix it to the system chassis with two screws 8 Cut out the plastic slips on the FDD CD ROM plastic cover to make openings for the insertion a...

Page 57: ...e the two screws used to fix the module to the chassis Then the FDD CD ROM module will slide out of the chassis from the FDD CD ROM opening 5 Refer to figure 5 12 If a floppy drive is to be installed...

Page 58: ...OM board Make sure the other end of the cable is connector the motherboard primary IDE connector 12 Make sure the 26 pin FDD flat cable 16 pin FDD cable 4 pin audio cable and 5V power cable is properl...

Page 59: ...m L W 1 Detach and remove the rear cover Remove the system metal cover located at the upper side of the chassis 2 Invert the system compartment to make the upper side of the chassis to be lower side 3...

Page 60: ...on 4 11 STH 15B Series 6 48 6 SYSTEM CONTROL BOARD The system controller used in the STH 15B system is a Pentium 4 multimedia embedded little board PC 761 This chapter provides detail introduction of...

Page 61: ...print all in one PC system for integration into any space constricted embedded applications Highly integrated it is perfect for running Intel Pentium 4 533 400MHz and Tualatin CPU Onboard features inc...

Page 62: ...User Manual version 4 11 STH 15B Series 6 50 6 2 Board Placement Dimension The mainboard dimensions and layout are shown below...

Page 63: ...st channel 3 5 IDE connector IDE2 2nd channel 3 5 IDE connector LINKA LINK A board connector LINKB LINK B board connector LINKC LINK C board connector Slot PCI PSD RISER PCI board connector Slot AMR P...

Page 64: ...urning on the power supply set the jumper back to RTC enable 1 2 Clear CMOS 2 3 RTC enable Default 6 3 2 PWR 34 pin power connector Pin No Signal Pin No Signal 1 PSON 2 PWOK 3 VCC3 4 VCC3 5 VCC3 6 VCC...

Page 65: ...6 Data 09 A 7 Data 05 A 8 Data 10 A 9 Data 04 A 10 Data 11 A 11 Data 03 A 12 Data 12 A 13 Data 02 A 14 Data 13 A 15 Data 01 A 16 Data 14 A 17 Data 00 A 18 Data 15 A 19 GND 20 NC 21 IDEDRQ A 22 GND 23...

Page 66: ...7 Data 05 B 8 Data 10 B 9 Data 04 B 10 Data 11 B 11 Data 03 B 12 Data 12 B 13 Data 02 B 14 Data 13 B 15 Data 01 B 16 Data 14 B 17 Data 00 B 18 Data 15 B 19 GND 20 NC 21 IDEDRQ B 22 GND 23 IOW B 24 GN...

Page 67: ...TVDACG 3 TVDACB 4 GND 6 3 6 JLINC Power connector Pin No Signal 1 VCC5 2 GND 3 GND 4 12V 6 3 7 CN1 Inverter connect Pin No Signal 1 BKADJ 2 GND 3 Backlight on off 4 12V 6 3 8 CN2 Power connector Pin N...

Page 68: ...3 HDD LED 4 LAN LED 5 ACPI LED 6 GND 7 SPK LO 8 SPK RO 9 SPK LN 10 SPK RN 11 GND 12 GND 13 IRRX 14 IRTX 6 3 10 USB1 USB connector Pin No Signal Pin No Signal 1 GND 2 GND 3 GND 4 GND 5 Data_4 6 Data_3...

Page 69: ...08 A 5 Data 06 A 6 Data 09 A 7 Data 05 A 8 Data 10 A 9 Data 04 A 10 Data 11 A 11 Data 03 A 12 Data 12 A 13 Data 02 A 14 Data 13 A 15 Data 01 A 16 Data 14 A 17 Data 00 A 18 Data 15 A 19 GND 20 NC 21 ID...

Page 70: ...or over and with 1280 x 1024 resolution LVDS LCD panel have to add SiS302LV board and select resolution in BIOS selection Pin No Signal Pin No Signal Pin No Signal Pin No Signal 1 5V 2 5V 27 R2 28 R3...

Page 71: ...escription CN1 Add grounding power FDD FDD connector Touch Touch screen connector Link to LINK B board enable rear COM 3 function PCI1 2 PCI slot 6 4 1 FDD FDD connector Pin No Signal Pin No Signal 1...

Page 72: ...11 STH 15B Series 6 60 6 4 2 TOUCH TOUCH connector Pin No Signal Pin No Signal 1 DCDC 2 DSRC 3 SINC 4 RTSC 5 SOUTC 6 CTSC 7 DTRC 8 RIC 9 GND 10 NC 6 4 3 CN1 Grounding connector PIN No Signal 1 12V 2 G...

Page 73: ...B42 SERR A42 GND B12 GND A12 GND B43 3 3V A43 PAR B13 GND A13 GND B44 C BE 1 A44 AD15 B14 NC A14 VCC3 Dual B45 AD14 A45 3 3V B15 GND A15 PCIRST B46 GND A46 AD13 B16 PCICLK A16 5V B47 AD12 A47 AD11 B17...

Page 74: ...5B Series 6 62 PCI Routing address PCI1 Define System INT A INT D INT B INT A INT C INT B INT D INT C GNT GNT 2 REQ REQ 2 IDSEL AD29 PCI2 Define System INT A INT C INT B INT D INT C INT A INT D INT B...

Page 75: ...User Manual version 4 11 STH 15B Series 6 63 6 5 LINK A board Jumpers On LINK A board without any Jumper The connector definition please back to chapter 4...

Page 76: ...Description Touch Touch screen connector Link to LINK B board enable rear COM 3 function IDE1 Link to System board LCF1 connector for enable rear side compact flash function PCI1 2 PCI slot J4 CD Audi...

Page 77: ...2 GND 3 Data 07 A 4 Data 08 A 5 Data 06 A 6 Data 09 A 7 Data 05 A 8 Data 10 A 9 Data 04 A 10 Data 11 A 11 Data 03 A 12 Data 12 A 13 Data 02 A 14 Data 13 A 15 Data 01 A 16 Data 14 A 17 Data 00 A 18 Da...

Page 78: ...6 D07 31 D15 32 CS1 7 CS0 8 FGND 33 FGND 34 IORD 9 FGND 10 FGND 35 IOWR 36 5V 11 FGND 12 FGND 37 INTRQ 38 5V 13 5V 14 FGND 39 5VF 40 NC 15 FGND 16 FGND 41 RESET 42 IORDY 17 FGND 18 A02 43 NC 44 DACK 1...

Page 79: ...on of each jumper setting Description CN2 Add grounding power JP1 COM1 COM 2 Pin 9 5V 12V Power selection JP2 COM3 Pin 9 5V 12V Power selection JP3 RS 232 422 482 selection JP4 1 RS 232 422 482 select...

Page 80: ...V Normal 12V 5V 1 5 2 6 1 5 2 6 1 5 2 6 7 8 12 11 7 8 12 11 7 8 12 11 1 2 3 4 5 6 7 8 9 10 11 12 6 7 3 JP2 COM3 Pin9 Power selection COM 3 Normal 12V 5V 1 2 3 4 5 6 6 7 4 JP3 JP4 1 2 COM2 RS 232 422 4...

Page 81: ...User Manual version 4 11 STH 15B Series 7 69 7 AWARD BIOS SETUP The chapter describes how to set up BIOS configuration...

Page 82: ...rased The BIOS setup program is stored in ROM which can be accessed by pressing DEL key on the keyboard immediately when the system is powered on In order to retain the specified setup information whe...

Page 83: ...eturn to Main Menu PgUp key Increase the numeric value or make changes PgDn key Decrease the numeric value or make changes F1 key General help only for Status Page Setup Menu and Option Page Setup Men...

Page 84: ...ll help window that describes the appropriate keys to use and the possible selections for the highlighted item To exit the Help Window press ESC 7 4 AWARD BIOS Setup 7 4 1 AWARD BIOS Setup Main Menu P...

Page 85: ...urations of PCI PnP ISA resources PC HEALTH STATUS This setup page auto detects the temperature voltage and fan speed FREQUENCY VOLTAGE CONTROL This setup page includes the CPU SDRAM PCI frequency set...

Page 86: ...7 74 7 5 AWARD BIOS Setup Main Menu Power on the computer and press DEL immediately to run the AWARD BIOS setup The setup main menu will appear on the screen Use the arrow keys to move among the item...

Page 87: ...urations of PCI PnP ISA resources PC HEALTH STATUS This setup page auto detects the temperature voltage and fan speed FREQUENCY VOLTAGE CONTROL This setup page includes the CPU SDRAM PCI frequency set...

Page 88: ...system BIOS will automatically detect the memory size therefore no setting is needed DATE The date format is day month date year day The day from Sun to Sat determined by the BIOS and is display only...

Page 89: ...ive table The hard disk will not work properly if you enter improper information for this category If you select User Type related information will be asked to enter to the following items Enter the i...

Page 90: ...88M byte VIDEO The category selects the default video device Options EGA VGA CGA40 CGA80 Mono HALT ON The category determines whether the computer will stop if an error is detected during power up NO...

Page 91: ...11 STH 15B Series 7 79 7 5 2 Advanced BIOS Features If the ADVANCED BIOS FEATURES option is selected from the main menu the screen below will appear The following sample screen consists of the defaul...

Page 92: ...STH 15B Series 7 80 7 5 3 Advanced Chipset Features If the ADVAMCED CHIPSET FEATURES option is selected from the main menu the screen below will appear The following sample screen consists of the def...

Page 93: ...Series 7 81 7 5 4 Integrated Peripherals If the INTEGRATED PERIPHERALS option is selected from the main menu the screen below will appear The following sample screen consists of the default values fo...

Page 94: ...User Manual version 4 11 STH 15B Series 7 82 SIS OnChip PCI Device LCD Panel ID Selection...

Page 95: ...User Manual version 4 11 STH 1B Series 7 83 Onboard SuperIO Device...

Page 96: ...5B Series 7 84 7 5 5 Power Management Setup If the POWER MANAGEMENT SETUP option is selected from the main menu the screen below will appear The following sample screen consists of the default values...

Page 97: ...If the PNP PCI CONFIGURATION option is selected from the main menu the screen below will appear The following sample screen consists of the default values for STH 15B 7 5 7 PC Health Status The PC HE...

Page 98: ...User Manual version 4 11 STH 15B Series 7 86 CPU Warning Temperature Shutdown Temperature...

Page 99: ...tage Control This setup page is for the CPU SDRAM and PCI frequency setting 7 5 9 Load Fail Safe Defaults The default values of the LOAD FAIL SAFE DEFAULTS indicates the most appropriate value of the...

Page 100: ...1 STH 15B Series 7 88 7 5 10 Load Optimized Defaults The default values of the LOAD OPTIMIZED DEFAULTS indicates the most appropriate value of the system parameters that the system would be in best pe...

Page 101: ...ord Press Enter If the CMOS is working properly or the USER PASSWORD option is selected to change the default password then the current password the ROM password or the use defined password stored in...

Page 102: ...memory When the system is turned on every time the CPU will check the CMOS to compare the CMOS data to see whether it matches the system These data are very important for the system operation 7 5 13...

Page 103: ...User Manual version 4 11 STH 15B Series 8 91 8 SOFTWARE DRIVERS INSTALLATION The chapter introduces the STH 15B onboard VGA Ethernet Audio and the respective drivers and installation...

Page 104: ...ecent releases of operating systems always include setup programs that load automatically and guide you through the installation Notice All of USB 2 0 drivers are included in Windows XP service pack 1...

Page 105: ...lexibly utilize the frame buffer size up to 64MB In addition to providing standard interface for analog monitor the STH 15B also provides an interface for digital flat panels The STH 15B XGA drivers a...

Page 106: ...USB 2 0 Setup The STH 15B USB 2 0 drivers are contained on the software CD SiS651 962 audio drivers for Windows 98 98SE Windows ME Windows 2000 Notice If OS is Windows XP please down load XP service p...

Page 107: ...User Manual version 4 11 STH 15B Series 8 95...

Page 108: ...keyboard less operation the STH 15B Series provides an optional touch screen The STH 15B system can use either ELO resistive type touch screen or ELO Intelli touch This chapter details the procedures...

Page 109: ...DOS 2 0 or later version The Windows drivers will run on any system with Windows 3 1 or later versions The DOS demonstration program requires a VGA color display The touch screen calibration program...

Page 110: ...driver for Microsoft Windows This program allows all Windows programs to be used with a touch screen Your mouse may be used in conjunction with the touch screen DOS mouse driven programs run from Win...

Page 111: ...g the connections please contact the Manufacturer s Customer Service department STEP 3 RUNNING THE INSTALL PROGRAM The DOS and Windows Driver Disk contains an installation program which will automatic...

Page 112: ...ries uses onboard COM3 to drive this controller IRQ is selected by BIOS setting IRQ10 is the factory default setting for COM3 The software to be installed and disk space requirements will be displayed...

Page 113: ...ler you are using and how it is connected Control type serial SmartSet 2xx0 COM port COM3 8 Complete the Setup program 9 Restart your system 10 Click the Start button then click Settings and then clic...

Page 114: ...ouch screen Control Panel do not match the actual controller configuration Use Safe Mode to start Windows 95 and change the resource settings to match the controller configuration then restart Windows...

Page 115: ...ow the following steps to install the null cursor file 1 Open the Control Panel and select Mouse 2 Select the Pointers tab 3 Highlight the Normal Select cursor then select Browse 4 Type null cur in th...

Page 116: ...he following keys from the registry HKEY_CURRENT_USER Control Panel desktop DoubleClickHeight HKEY_CURRENT_USER Control Panel desktop DoubleClickWidth Delete the following registry key folders and the...

Page 117: ...Touch screen Driver Installation 9 2 1 For Windows 95 98 Me NT4 2000 XP TouchKit is software which contains drivers of the touch panel controllers for the specified communication connectors RS232 PS...

Page 118: ...OR CHANGE TO WIN98 WINME WINNT WINXP2000 WINXP RESPECTIVELY 3 DOUBLE CLICK THE SETUP EXE THEN WINDOWS STARTS TO RUN THE INSTALLATION PROGRAM 4 JUST CLICK NEXT BUTTON TO CONTINUE INSTALLATION 5 OUR TO...

Page 119: ...1 STH 15B Series 9 107 6 SELECT APPROPRIATE FOLDER WHERE SET UP WILL INSTALL FILES PRESS ON THE NEXT BUTTON TO CONTINUE 7 THEN TYPE IN YOUR PROGRAM FOLDER S NAME PRESS ON NEXT TO CONTINUE THERE WILL B...

Page 120: ...11 STH 15B Series 9 108 8 WINDOWS IS COPYING FILES TO DISK AND THE SETUP IS COMPLETE CLICK FINISH TO TERMINATE 9 WINDOWS WILL REQUEST YOU TO RE BOOT YOUR COMPUTER PRESS YES OR NO TO RE BOOT AND THE IN...

Page 121: ...User Manual version 4 11 STH 15B Series 9 109 10 PRESS ADD TO ADDING THE TOUCH SCREEN AT COM 2 11 STEPUP RE BOOT AND THE INSTALLATION IS FINISHED SETUP IS COMPLETE...

Page 122: ...Timer If you want to use the watchdog timer you must write a program which writes I O port address 444 Hex at timer setting intervals The first time your program writes the port it sets and enables t...

Page 123: ...EM Refresh the Watchdog timer 25 GOSUB 600 30 X OUTP H444 Timer REM Refresh the Watchdog timer 35 GOSUB 800 X INP H441 REM Disable Watchdog timer 45 END 500 REM Subroutine takes shorter than setting l...

Page 124: ...level interface easy to programming the external control board For example POS machine s cash drawer Game machine s Coin insert detection The following is the Digital I O instruction Digital in IOR 4...

Page 125: ...o take measurements of the signals you are trying to measure as well as the signals on the board module or power supply 4 Isolate problem areas that are not working as you expected 5 Have the source c...

Page 126: ...Intentionally Blank STH 15B Series User Manual version 4 11...

Page 127: ...equipment purchased and in lieu of all other warranties expressed implied or statutory including but not limited to any implied warranty of merchant ability or fitness and all other obligations or lia...

Page 128: ...Intentionally Blank STH 15B Series User Manual version 4 11...

Page 129: ......

Page 130: ...CyberResearch Inc 25 Business Park Drive Branford CT 06405 USA P 203 483 8815 F 203 483 9024 www cyberresearch com...

Reviews: